A new feature in the content server version 16.2 is the usage of smartGUI in workflows. This gives a standard workflow user a great new experience in using this workflow.
Lets see, how:
Setup
But first, you have to setup an few things.
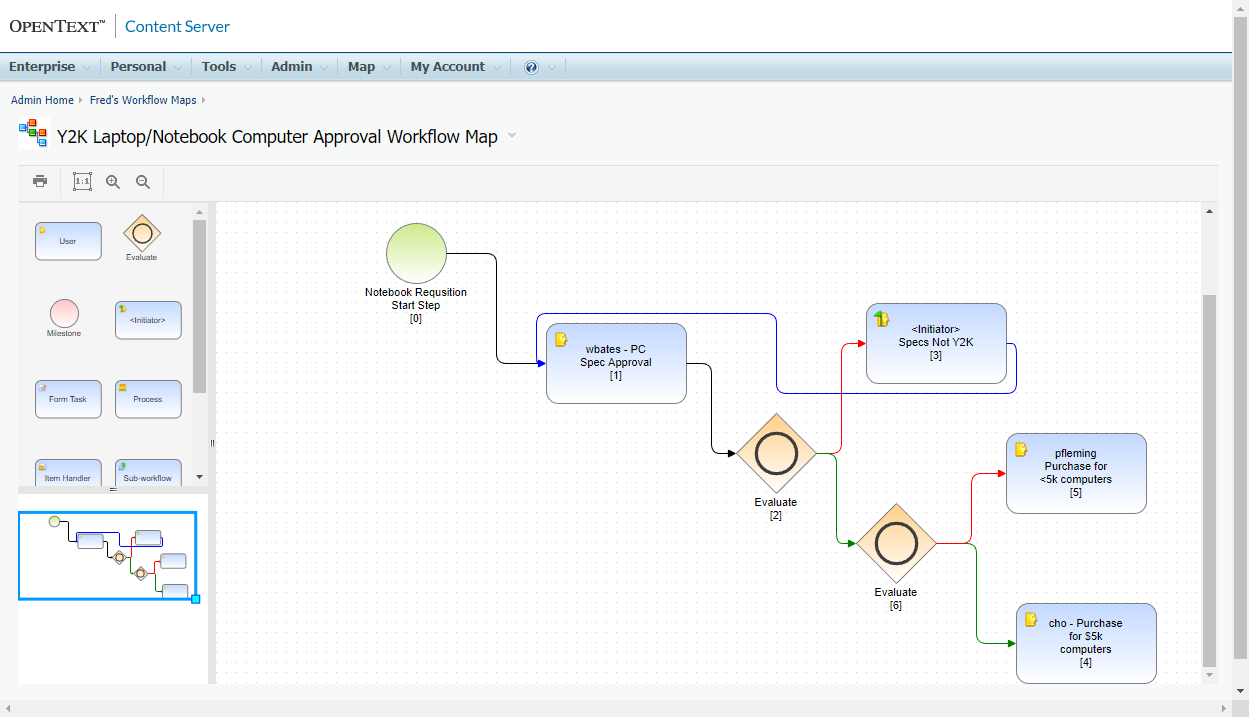
This is our workflow map which we use in this example:
Example Workflow Map: Computer Approval
In the Classic UI edit the workflow map.
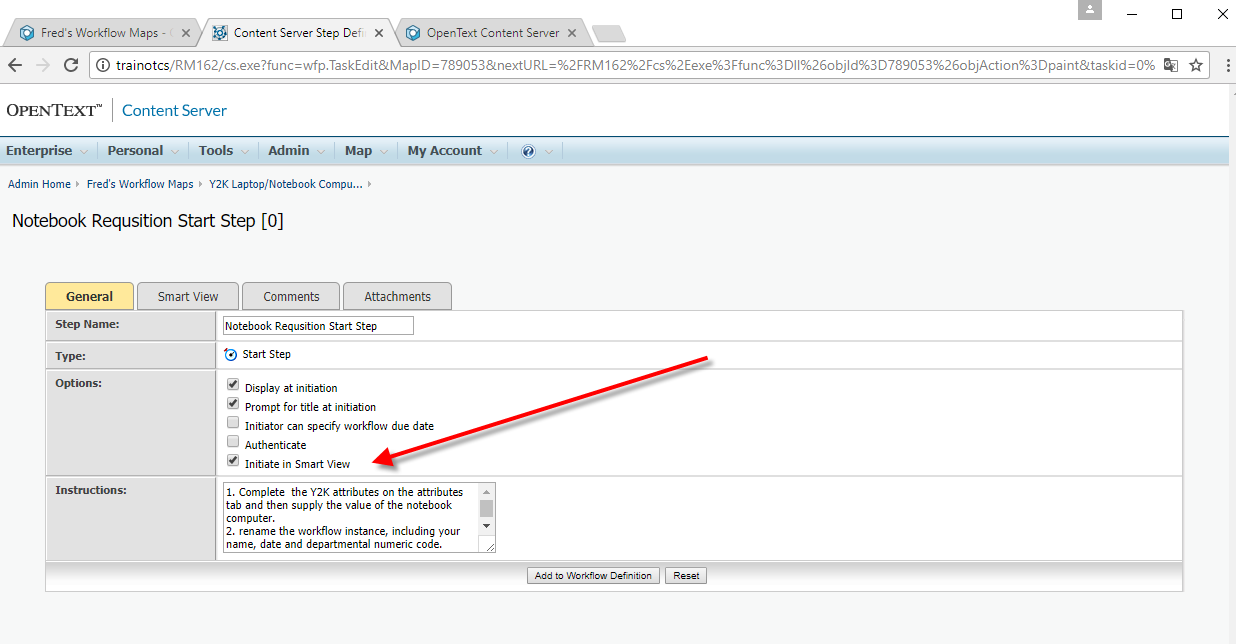
Goto to the Initiator. Mark „Initiate in Smart View“ . Add to Workflow Definition and save the map
Initiator
(optional)
goto the Tab „Smart View“ and add a form. Forms can be added to all steps, if they are enabled for display in Smart View.
This is an example of the last step on „How to enable a step for SmartUI“:
Enable a Step in smartGUI
Save the map and exit.
Now its time to see our workflow in the smartGUI.
Usage
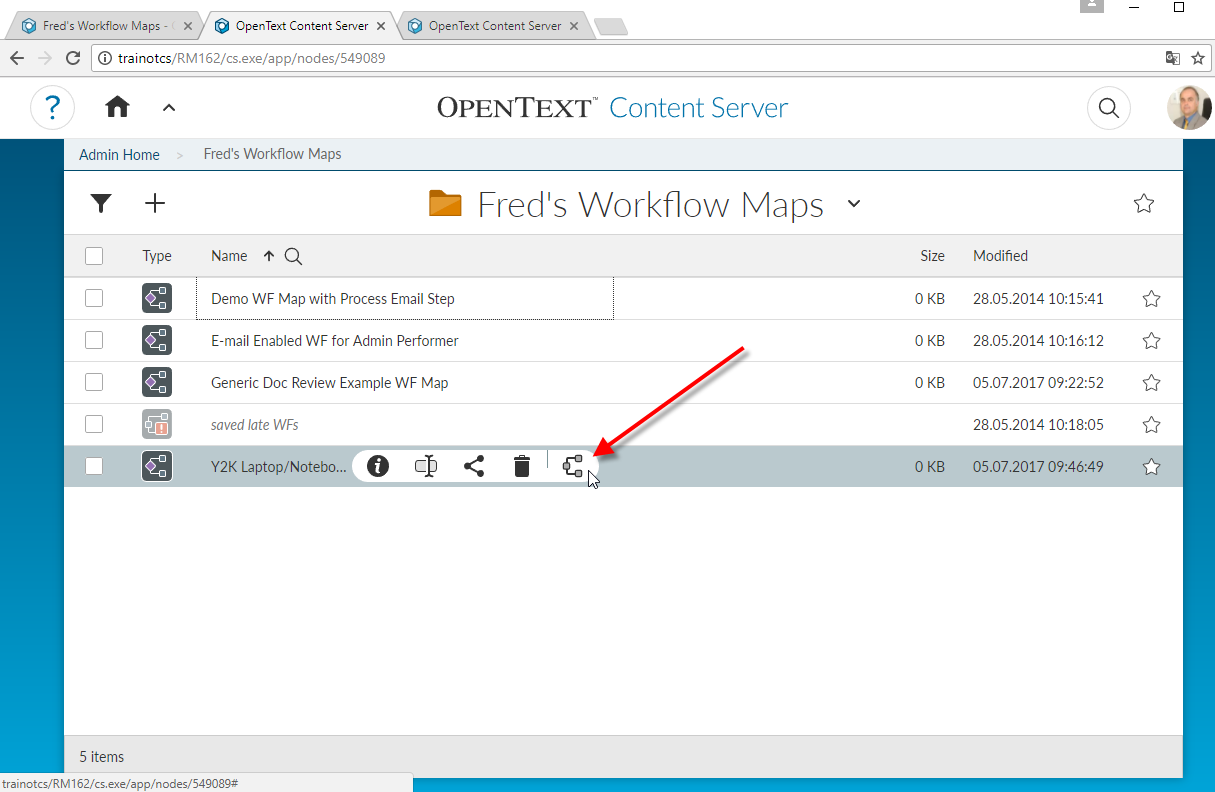
Switch to the smartGUI and instantiate the workflow from the map.
Instantiate a Workflow
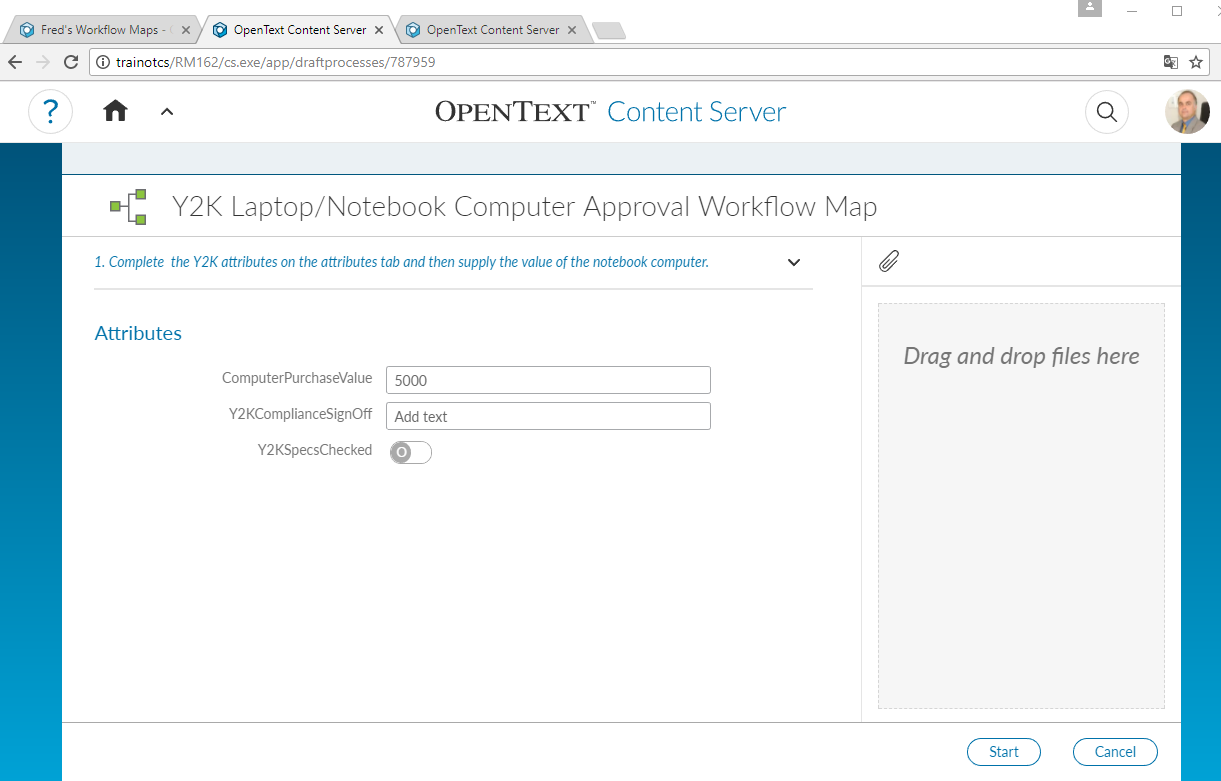
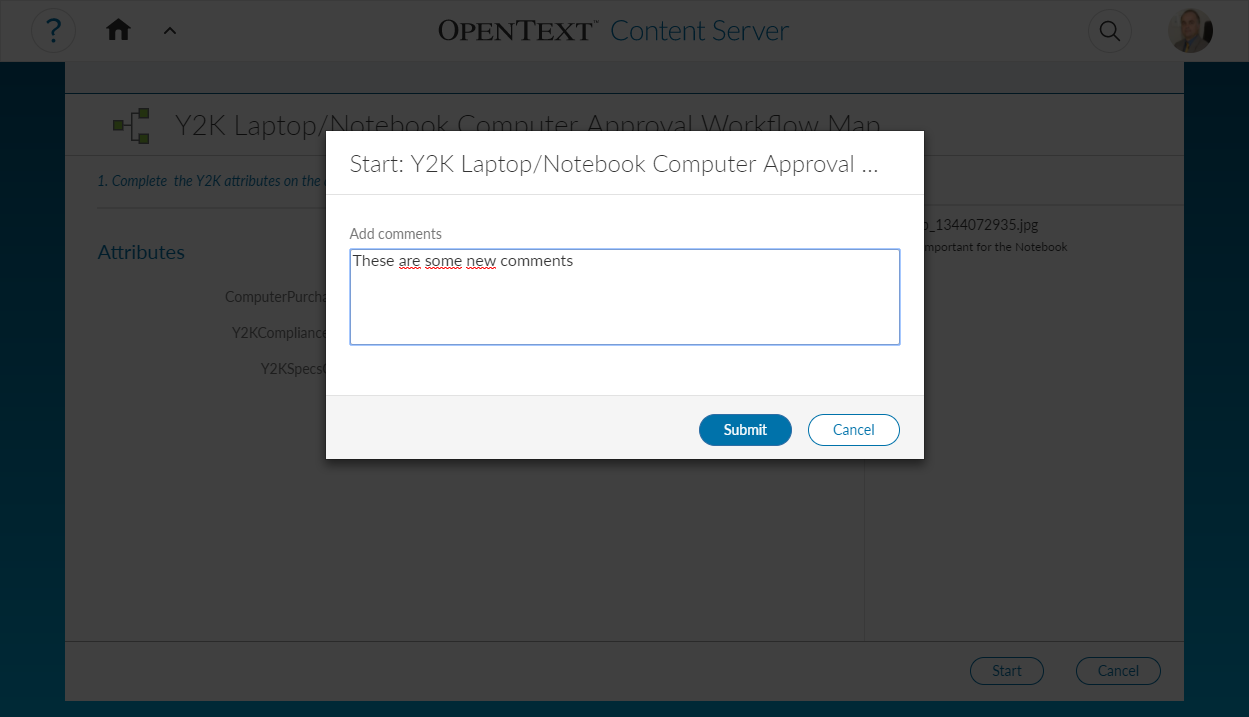
Then the Workflow Widget appears. At this stage, you can set all attributes as usual, you can add files at to the workflow by dragging and dropping these to the right side of the widget
Workflow Widget
Add some comments
Comments on the Workflow
Click submit and login with the userid of the first step assignee.
An open workflow in a landing page
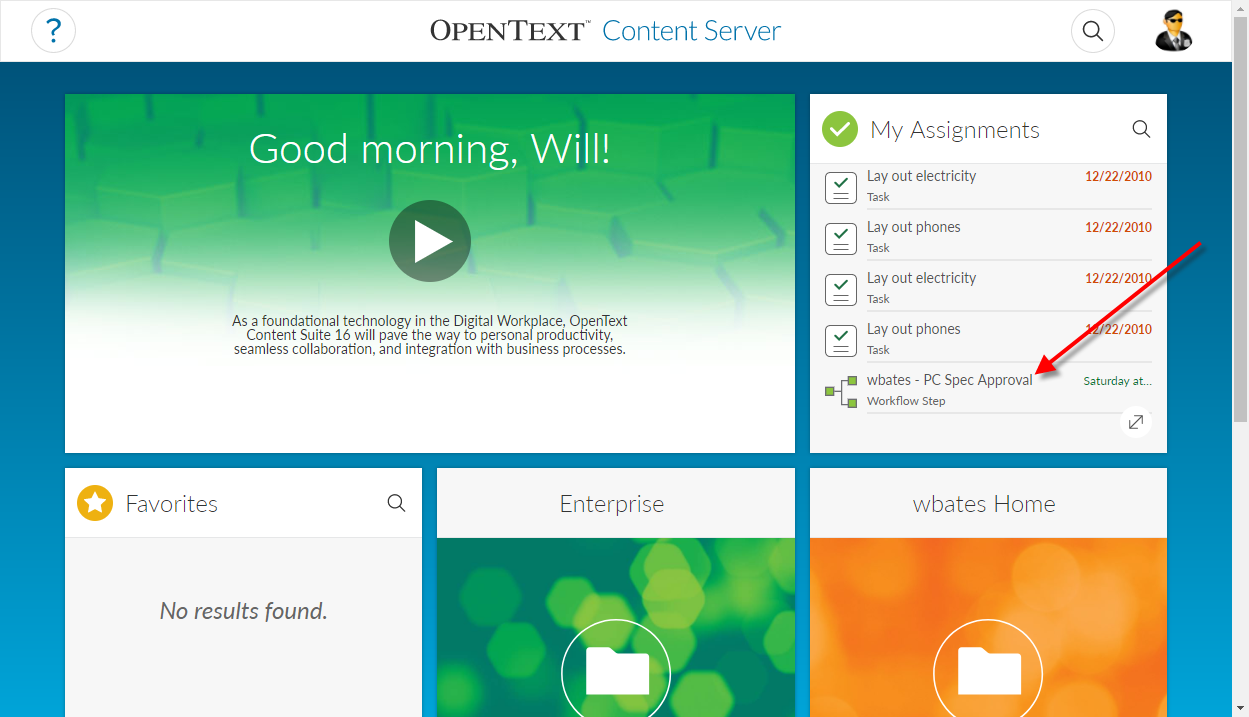
Here, you see your open workflow step in the “My Assignments” widget. Clicking on the entry opens the Approval widget
Approval in the workflow
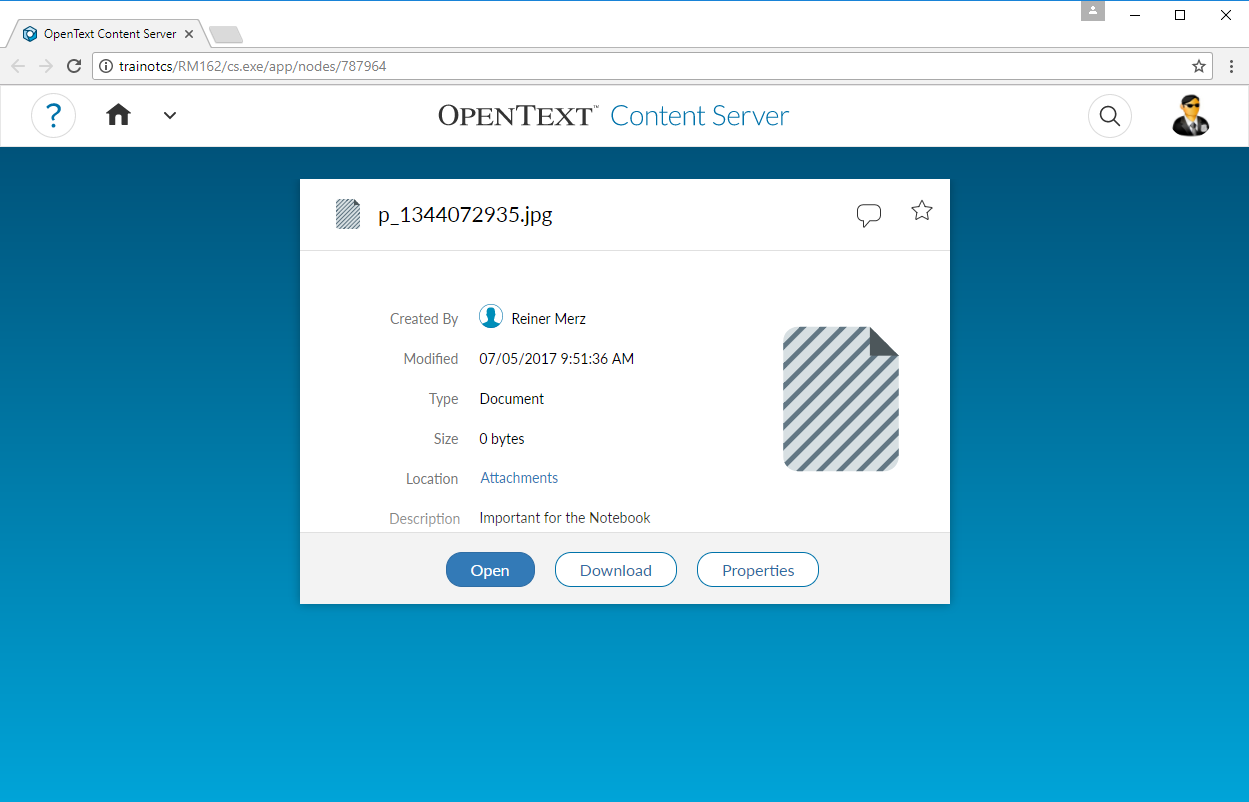
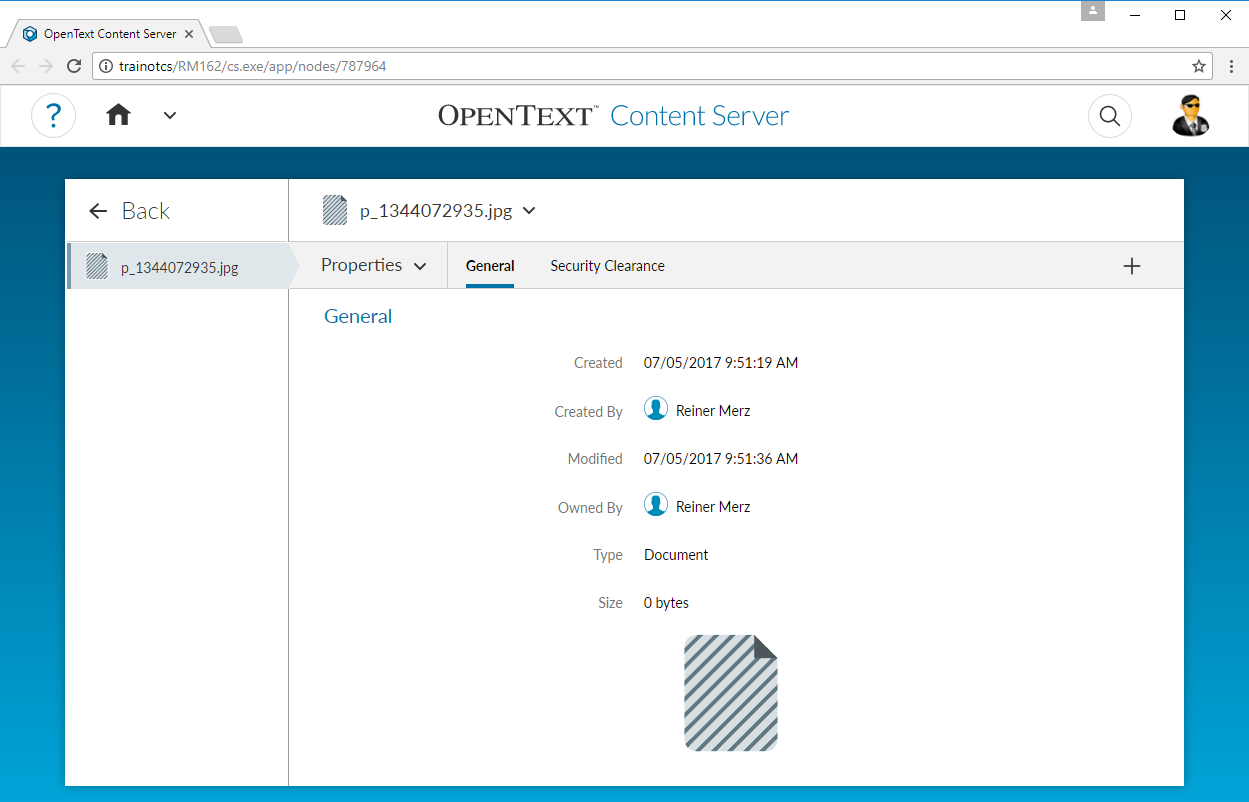
By clicking on the attachment at the right side, the attachment can be opened, downloaded or the properties can be checked.
Attachment
The properties look like
Attachment Properties Window
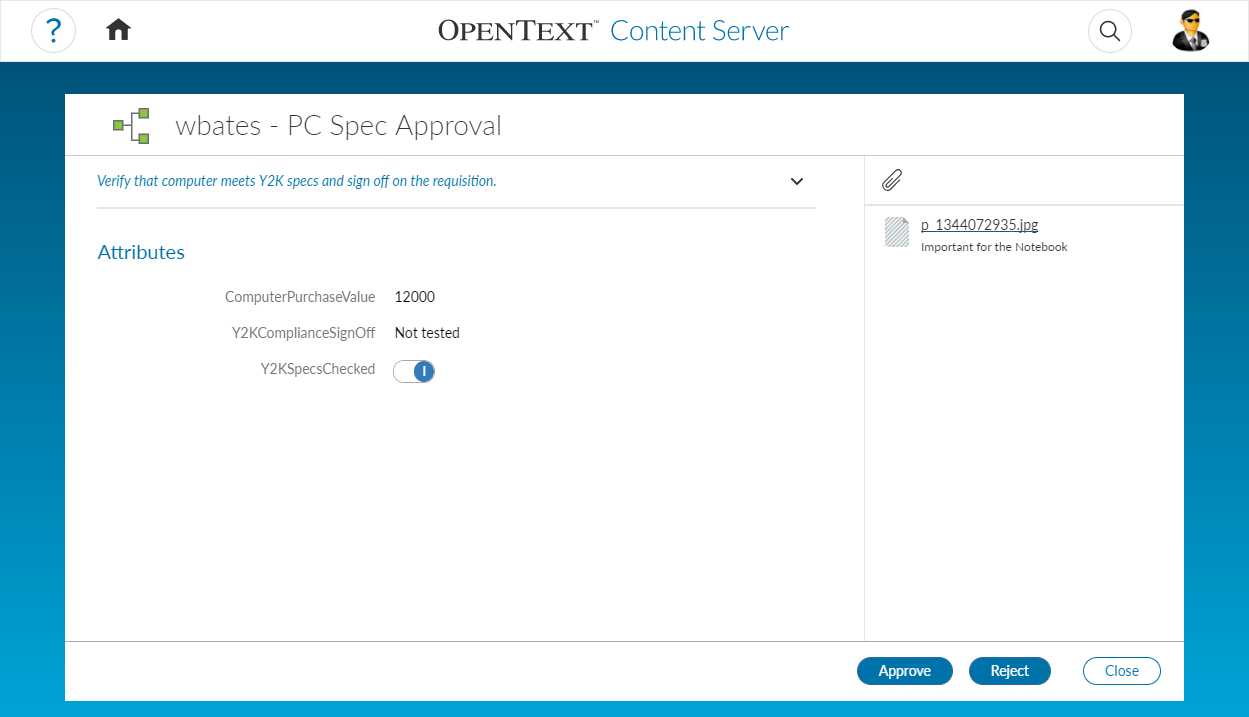
Now after the examination, you can click on “Approve” and add a comment.
Then the Workflow Step is approved. The entry in MyAssignments is removed. The workflow is on the next step.
From time to time, you need a test email server on a VM or on a test environment to configure the Content Server elink capabilities. Or maybe a Exchange is too powerful for you?
Then Mercury as an email server and Pegasus as email client may be a good choice for you. You can download this at http://www.pmail.com/ .
But having a mail server up and running is only half of the price. You still have to configure elink and the mail server.
elink is a Content Server mechanism, which allows you to store documents via email or post replies to to discussions or send documents also via email.
Setting up elink is simple.
You have to imagine, that elink has to have a mailbox on the mail server, which is used to retrieve messages to the content server. This means, a mail to this mailbox is processed by the content server. The mail server must be configured that all mails from a domain will be stored in this mailbox.
for example the message
<123BeDessfdj>@elink.net must be stored in the elink mailbox to be processed by the content server.
First, lets configure the Mercury Server. First, we need to setup a Content Server used. Lets call it elink.
User Administration on Mercury
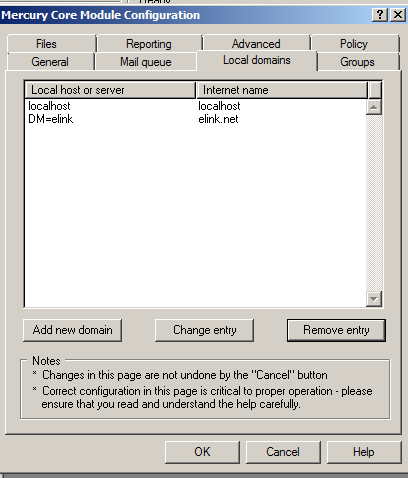
Second, we need to setup the Domain for this mailbox. If we enter the DM=user with the username just defined and an Internet Name (here elink.net) for our mails to the content server, we define that all mails from the Domain elink.net will be stored in the elink mailbox.
Domain Administration on Mercury
Next, we need to configure elink. This must be done on the Content Server admin pages.
Configuration of elink on the admin pages
Virtual Hostname is the name of the Domain, from which we want to store all messages in the elink mailbox.
Username/Password is the name of out mailbox user (elink) and its password. You can test the connection by pressing the “Test Connection” button.
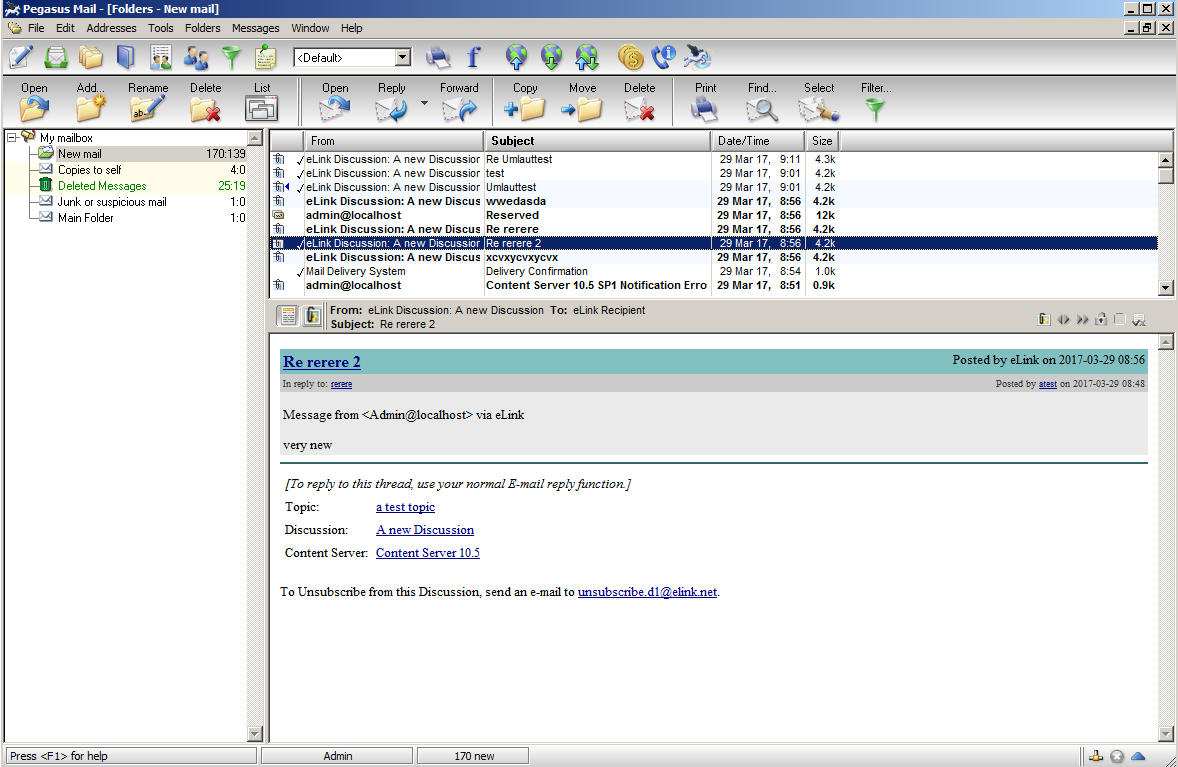
If everything runs, you’ll see mails like these in the Pegasus mail client.
If everything runs, Content Server can be used though Pegasus
One of the nicest things in the content server area is, you can set Access Control Lists not only for the owner or the default group of a node, and you can add or revoke rights to the node for virtually all users and groups defined in the content server.
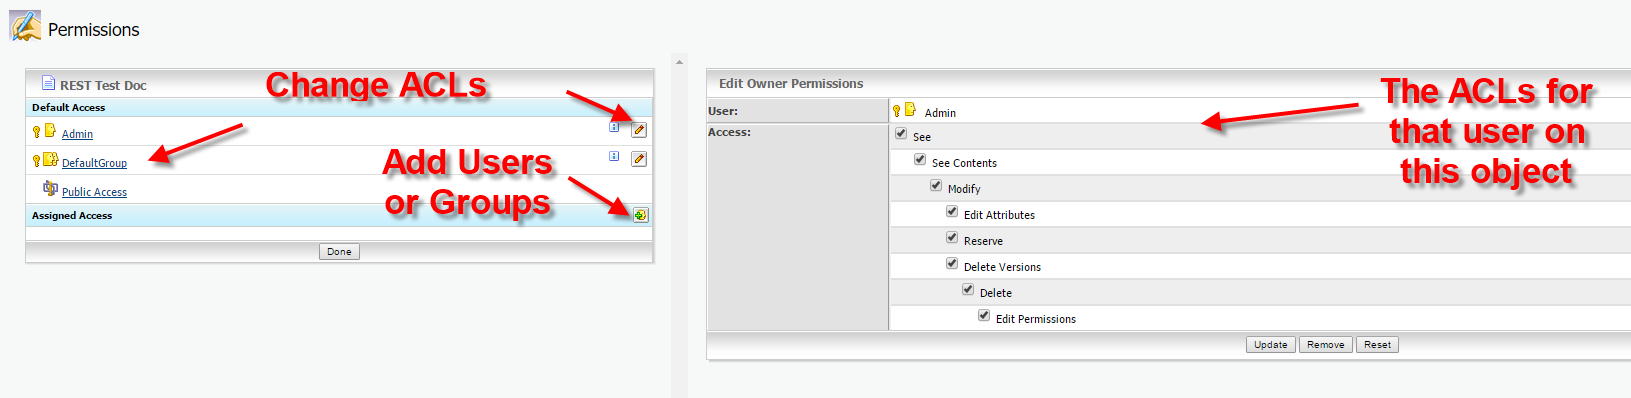
Here, we want do discuss how to do this using Content Server Web services. First, let’s see how ACLs are organized. A simple object would display something like this:
The ACLs for this object
On the left hand side, you see the default access, there is always one Owner, one default group and a public group.
If you want to assign further access, you can select a user or a group by clicking on the bottom at the lower left hand side. This will select a user or a group. (Btw: It’s recommended to use groups instead of users)
On the right hand side, there are the ACLs for the selected user/group on the object. Here, we used the Administrator, therefore all rights are switched on.
Ok, how to use this on a c# client?
First, the ACLs for a given user are called NodePermissions. Use them like this. Let’s say, this is utils.setNodeRights(….)
/// <summary>
 /// Creates a Noderight Structure and returns it
 /// </summary>
 /// <param name="rights">"all" or see (see,seecontents)</param>
 /// <param name="id">the member ID for this node rights</param>
 /// <param name="type">Owner, Ownergroup, Public or ACL </param>
 /// <returns></returns>
 public DocumentManagement.NodeRight setNodeRights(string rights, long id, string type )
 {
 DocumentManagement.NodePermissions newPerm = new DocumentManagement.NodePermissions();

newPerm.SeeContentsPermission = true;
 newPerm.SeePermission = true;
 if (rights.Equals("all"))
 {
 newPerm.AddItemsPermission = true;
 newPerm.DeletePermission = true;
 newPerm.DeleteVersionsPermission = true;
 newPerm.EditAttributesPermission = true;
 newPerm.EditPermissionsPermission = true;
 newPerm.ModifyPermission = true;
 newPerm.ReservePermission = true;
 }
 DocumentManagement.NodeRight newRight = new DocumentManagement.NodeRight();
 newRight.Permissions = newPerm;
 newRight.RightID = id;
 newRight.Type =type;
 return newRight;

}
The Nodepermissions is simply a container with the single access rights set to true or false.
When the definition is finished, the NodePermissions must be encapsulated in a structure called NodeRight. This contains the ACLs defined and the user/group for the ACL. Use the id as long integer, this is the unique identifier of a user/group in the content server. You can use MemberServices to get this number, if you know the login-name.
Then, the system wants to know, which kind this user/group is. Use ACL, if these are additional users/groups, or use something like Owner, Ownergroup or Public, if the ACLs should belong to the predefined entities.
How to use this?
First, login to the Webservices.
Second. Get the node, onto which you want to set ACLs.
Forth. Set the ACLs for the standard entities (if needed). Define a NodeRight for every entity (user/group) you want to set. Define these 2 right groups.
 // setup standard permissions for base ACL group
 DocumentManagement.NodeRight newRightstandardGroup = utils.setNodeRights("see", standardGoupID, "ACL");
 DocumentManagement.NodeRight newRightsmanagerGroup = utils.setNodeRights("all", managergroupID, "ACL");
The nodesrights on a node can contain something or be null. First, lets check, if the thing is null.
 if (nodesrights == null)
 {
 Console.WriteLine("Nodesrights not found- no external Users/groups assigned");
 Console.WriteLine("Setting a group with rights see/seecontent");

 DocumentManagement.NodeRight[] allrights = new DocumentManagement.NodeRight[2];
 allrights[0] = newRightstandardGroup;
 allrights[1] = newRightsmanagerGroup;
 nodeRights.ACLRights = allrights;
 docclient.SetNodeRights(ref otauth, pargs.nodenumber, nodeRights);
 authClient.Close();
 Console.WriteLine("All Rights and Groups set --- Finish");
 return;
 }
In this case we simply define a NodeRight array with two entries containing our new RightstandardGroup and our newRightmanagerGroup.
Let’s store them into our newly created array.
Let’s store this array in our nodeRights under ACLRights. This will change our copy of our structure which we downloaded before.
Next is simply a SetNodeRights with the nodenumber and the updated nodeRights array to write our changes back to the server.
If there are already entries, you should set them like this:
// Just display the first Entry of the first assigned Users/groups
 DocumentManagement.NodeRight right = nodesrights[0];
 DocumentManagement.NodePermissions nperms = right.Permissions;
 // check, if we do habe the groups already set

int newLen = nodesrights.Length;

 // copy rights into new longer Array
 DocumentManagement.NodeRight[] allrights = new DocumentManagement.NodeRight[newLen+2];
 for ( int i = 0; i < newLen;i++ )
 {
 allrights[i] = nodesrights[i];
 }
 allrights[newLen] = newRightsmanagerGroup;
 allrights[newLen + 1] = newRightstandardGroup;
 nodeRights.ACLRights = null;
 nodeRights.ACLRights = allrights;
 docclient.SetNodeRights(ref otauth, pargs.nodenumber, nodeRights);
 Console.WriteLine("All Rights and Groups set --- Finish");
 authClient.Close();
In this case, our nodesrights come from the nodeRights.ACLRights, because there are alredy entries.
Now, let’s do the same thing like we did on a new structure. But, we don’t want to delete existing entries, lets simply add our new RightstandardGroup and our newRightmanagerGroup to the ACLRights array.
One thing, if finished, first set the nodesRights.ACLRight to null and then fill it with the new extended ACL array.
Then do a SetNodeRights with the nodenumber and the updated nodeRights array to write our changes back to the server.
Finished. Quite easy, isn’t it?
BTW: There is no equivalent to do this on the REST api at the time of this post.
If you are thinking on using Content Server Webservices (CWS´) you may wonder how to activate this on a standard Content Server Installation. Normally, right out of the box, CWS is not active or installed, although you got the license to use it in your basic license.
As Administrator, you have to do a couple of things to activate CWS.
Decide which architecture you will use.
CWS can be used inside of the Microsoft Internet Information Server or inside a Java Application Server like Tomcat. Both ways to activate will be described here.
Locate the CWS Software
Look in your install directory of the content server. There, you will find a directory named “webservices”.
Webservices Basedirectory
Here, there are three entries:
dotnet contains all CWS service definitions for use inside the Microsoft IIS
java contains all webapps for use inside the Tomcat application server
java6 contains the same thing as in 2. but for use with java 6.
Installing CWS inside the Microsoft Internet Information Server IIS
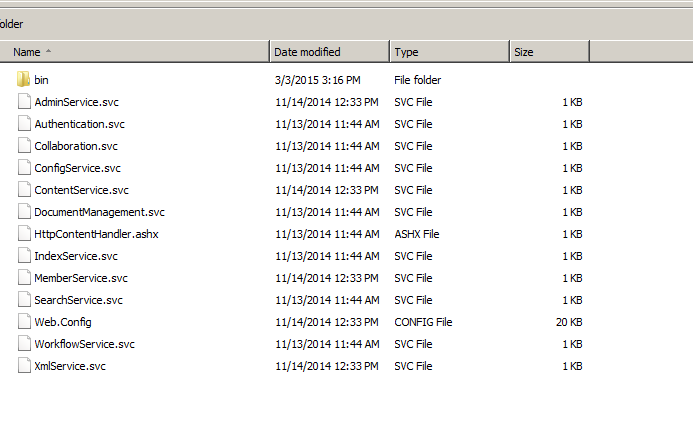
First, let’s examine how to install CWS inside IIS. Switch to the dotnet subdirectory, then to cws (do not use les-services, this is an old version supporting legacy clients)
All svc files for installation
Locate the .svc files you wish to install and use in CWS.
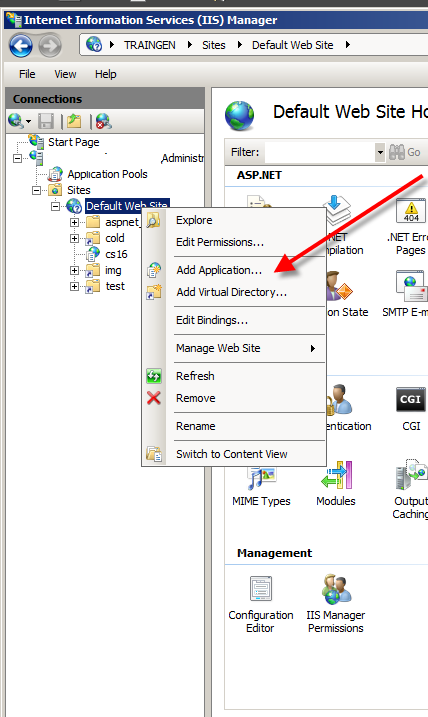
Open the IIS Manager. Create a new Application at the default web site
Create a new ApplicationApp pointing to CWS
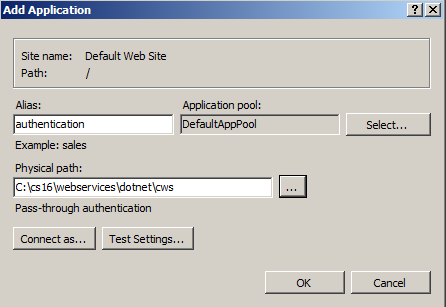
Enter the path to the dotnet\cws directory , enter for example CWS as alias.
Remark: IIS must be configured to
execute .NET 2.0 apps
allow “Read” and “Script” rights to the new app
execute WCF (can be ensured for example by “%SystemRoot%\Microsoft.NET\Framework\v3.0\Windows Communication Foundation\ServiceModelReg.exe -i” (check, if something changed, if you are using newer versions)
allow “Read” and “Execute” rights for the ID of the Application pool on $OTHOME/webservices/dotnet
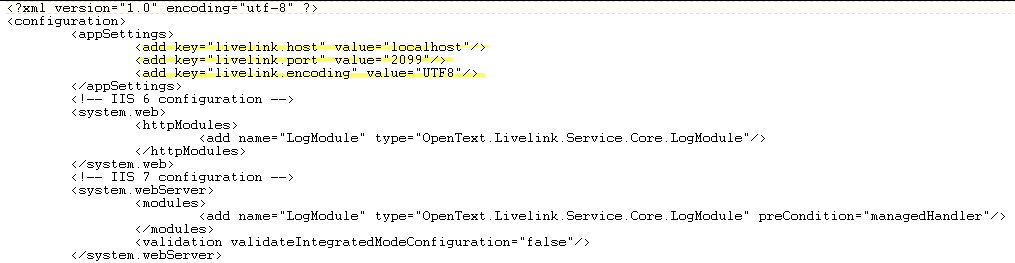
And (don’t forget), ensure that your webservides will use the same port as your content server uses. If you use a nonstandard port (not 2099) you need to change the port in the file $OTHOME\webservices\dotnet\cws\web.conf
If you use the standard port, there is nothing for you to do.
Installing CWS in Tomcat
Alternatively, you can use Tomcat as a base for CWS.
In this case, go to the java6 base directory in the webservices dir.
The war files
In this dir, you’ll find the war (web application archive) files, which you need to deploy.
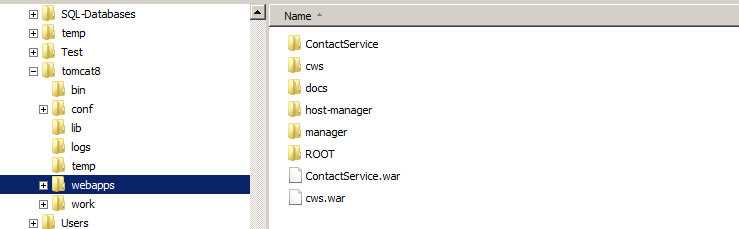
Deploy the cws.war file either to the TOMCAT\webapps directory or use the Tomcat service manager to deploy this file.
The tomcat webapps dir
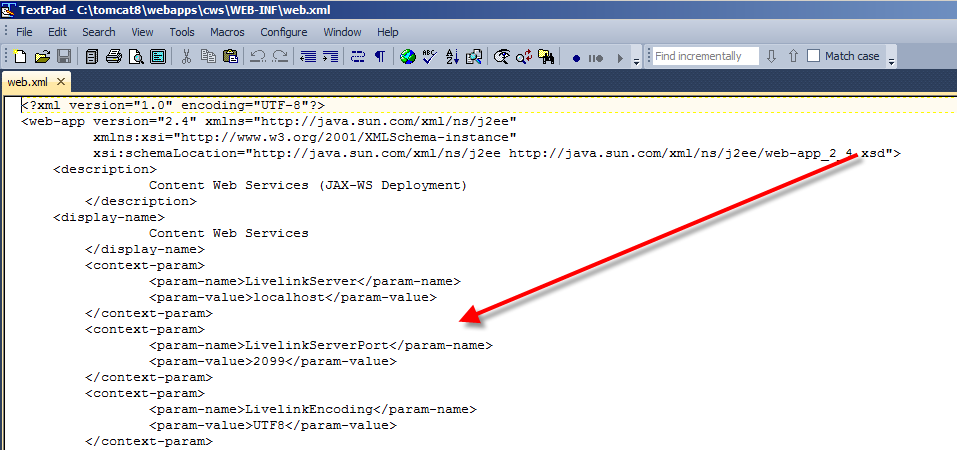
Don’t forget, if you changed your port number of your content server from 2099 to something else, change also the value in the web.xml of the unpacked cws web app.
The port in the web.xml file
If you don’t use the same port numbers, the whole system will listen to different ports and will do nothing.
Test your installation
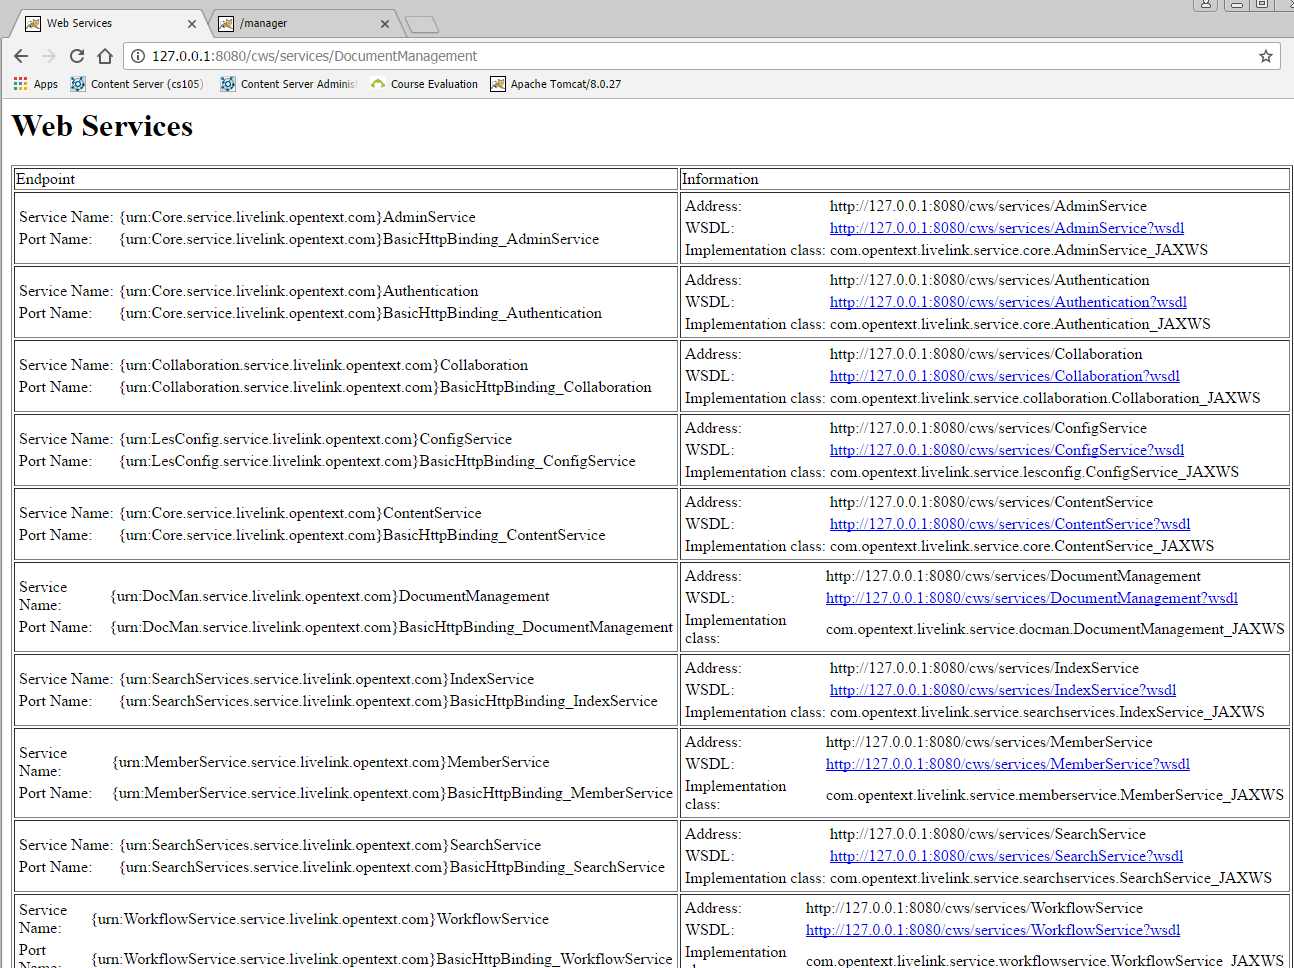
Your installation is correct, if a browser, pointing to
http://127.0.0.1:8080/cws/services/DocumentManagement (Tomcat) or
Did you ever wonder, how to create new widgets or forms for the new SmartUI of the content server? The new SmartUI is responsive and can be used on mobile devices.
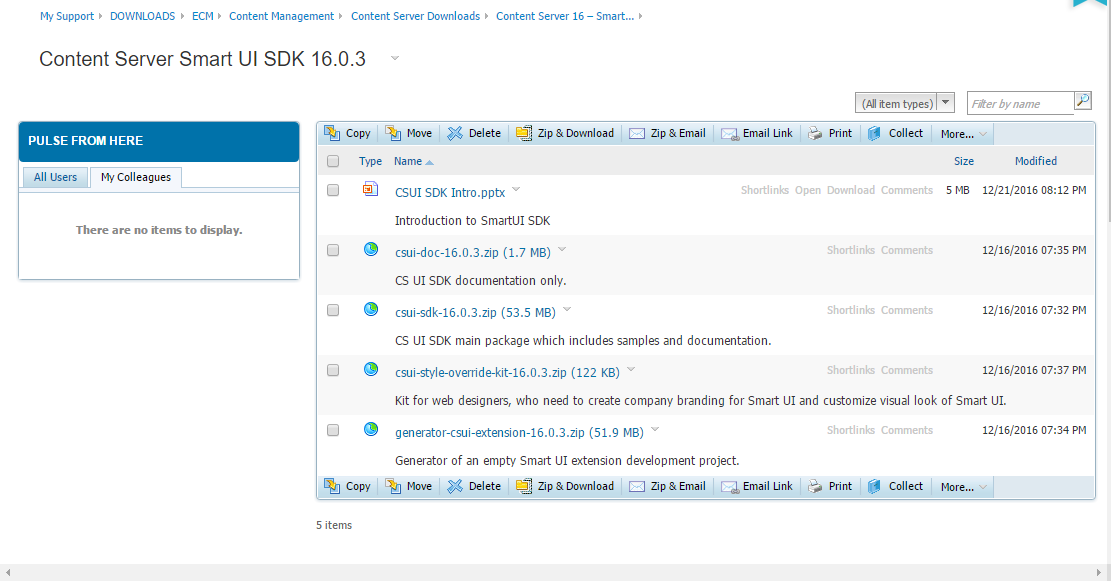
If you want to add new widgets or modify things, there is a new SDK on the knowledge center, which can be found here:
This are the components:
CSUI SDK Intro.pptx
this is a powerpoint presentation on the SDK.
csui-doc-16.0.3.zip (1.7MB)
this is the documentation as stand alone.
csui-sdk-16.0.3.zip (53.5 MB)
this is the sdk itself. It contains a copy of the documentation.
csui-style-override-kit-16.0.3.zip (122 kb)
this is a kit to provide branded css files, which will be used instead of the original ones.
generator-csui-extension-16.0.3.zip(51.9 MB)
this is a generator, which will be used to setup an empty development project.
The basic requirement is the installation of node.js at your CSIDE machine. You should be familiar with the REST API and Grunt to use the SDK.
The workflow is
Generate an empty project on the harddisc
Install all prerequisites in node.js (npm, grunt-cli)
Modify the example according to your needs
Import the module in out-module of your project into CSIDE
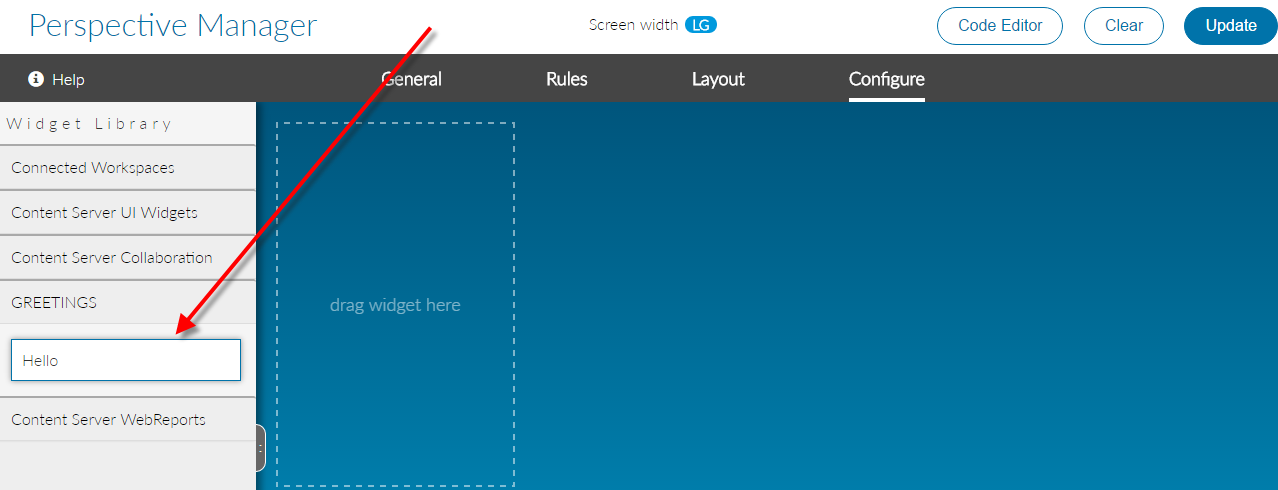
Copy the widgets etc into your support folder
Create the module in CSIDE and install it
The installed new Widget
Then you should see the example widget under the name of your module in the perspective manager.
Watch for upcoming posts on this exciting new Content Server technology.
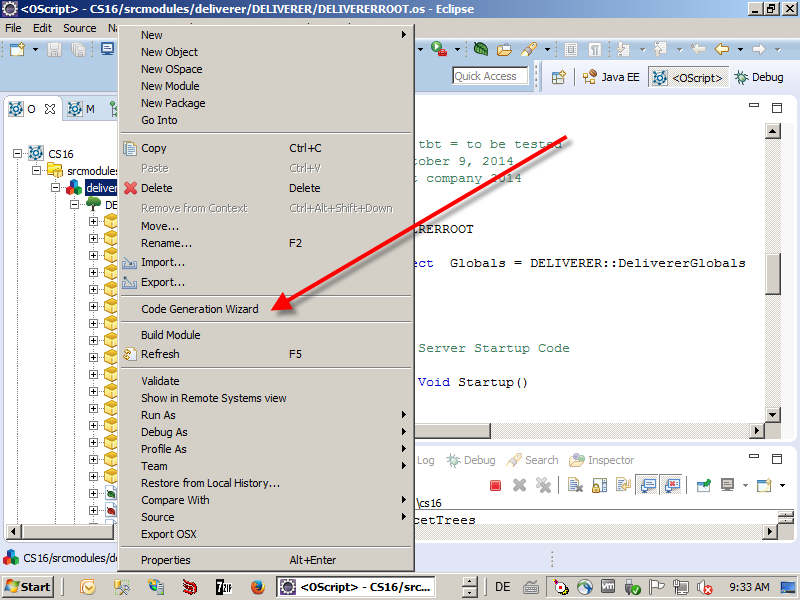
In the newer versions of CSIDE, you’ll find a code generation wizard, which writes code snipets for standard tasks automatically.
You can call this Code Generation wizard by clicking on the right mouse button.
Call of the Code Generation Wizard
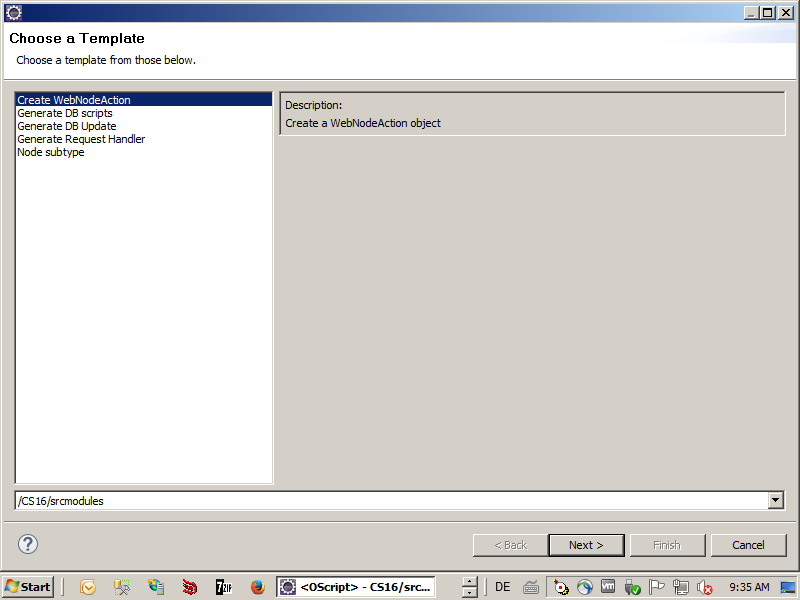
Next, the Code Generation Wizard gives you a list of all templates, which can be used for the code generation. The amount of templates can vary from CSIDE version to CSIDE version.
List of all Templates to be used for the code generation
When you click on a template, you’ll get further info’s on the template. The amount of info’s can vary from template to template.
Infos on the template
Here in this post, we are using the “Create WebNodeAction” Command. Refer to future posts on examples of the other templates.
A WebNodeAction is a command, which is executed against a node by issuing a WebNodeCommand (in Contenxt/Node or other menus). For example, the “Open” command in a node menu is a WebNodeCommand, which issues the action for opening the node content.
After selecting “Create WebNodeAction”, we must provide two additional definitions.
Additional Infos to provide
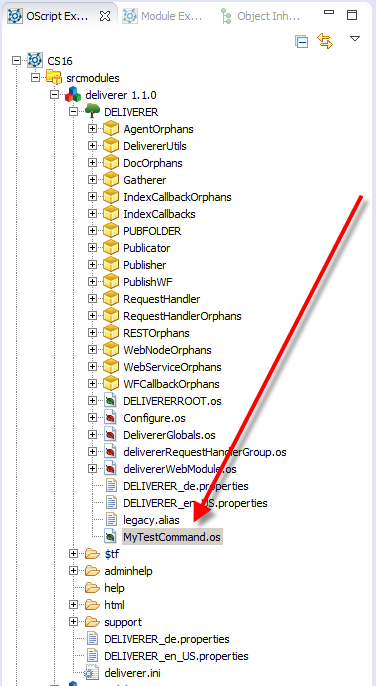
First, we must select the package to put this command in. We simply select DELIVERER (the name of our module), but in practical situations, you should select a proper package.
And the name of the command has to be provided. After clicking “Finish”, a file with the name “MyTestCommand.os” will appear in the first level of our OSPACE.
The Command is generated as .os file
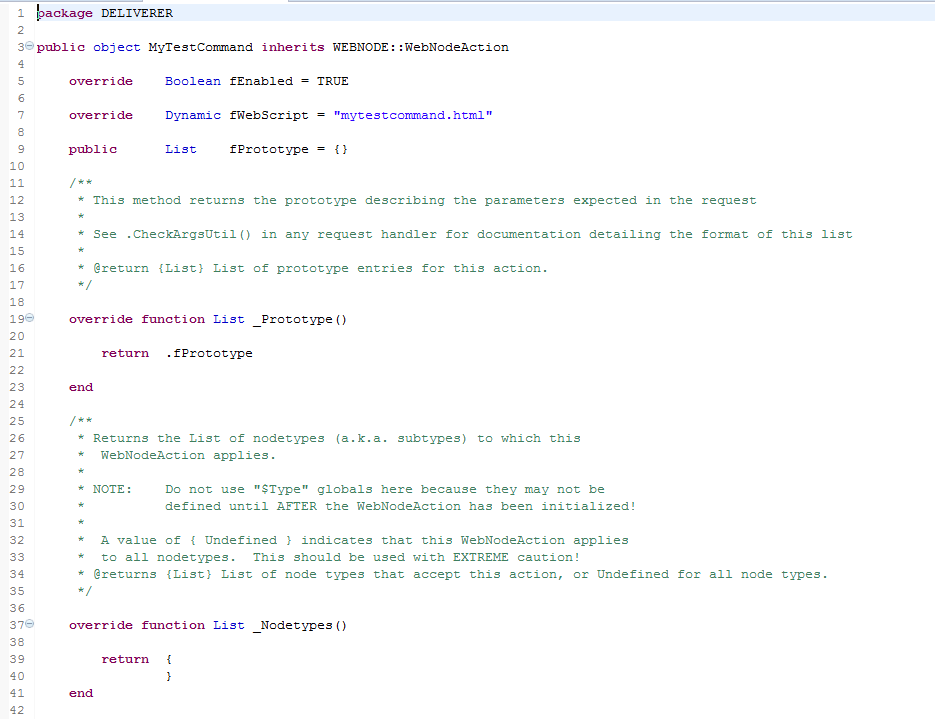
When you open the newly created file, you’ll see a complete command definition.
Command Definition Part 1
The fEnabled is set to true. The fWebScript has the default name of “mytestcommand.html” and there is an empty list of fPrototype.
Change the name of the fWebScript to the name you want. Add the Webingo parts of the commands output in this fWebScript.
If you use special parameters in the request, setup the proper fPrototype list.
The _Nodetypes() returns an undefined List, which should be changed immediately to reflect the node subtypes for which the command should be valid.
Command Definition Part 2
There is even a _SubclassExecute stub generated automatically. Add the action code to be executed in this _SubclassExecute stub.
Optional: Connect this WebNodeAction with a WebNodeCommand in a context or node menu or somewhere in the GUI to make it accessible for the end-user.
In December 2016, we discussed how to call Java code from OScript . Now, we’ll discuss the other way round, how to call OScript from Java. This can be quite useful, if you want to use your business logic implemented in java against the content server.
The Java code must be put in the ojlib directory (see the previous post on this topic).
As always, if you want to deploy your java code within a module, do this
Build your code into jar files.
Add the jar files in OTHOME/ojlib/ or OTHOME/module/yourmodule_yourversions/ojlib/ directory (and their subdirectories) to be recognized by Content Serverk JVM’s application classloader.
The base thing is, you call OScript built-in functions through the OScriptObject.runScript method from a java coding.
will display the unique integer for the current thread ID at the console (or in the logs, if you do not use CSIDE)
You can call all OScript functions and scripts. This example will list all nodes in the enterprise workspace
     // List nodes in the Enterprise workspace.
            result = (Map<String,Object>) OScriptObject.runScript( "$LLIAPI.NodeUtil.ListNodes",
				prgCtx,
				"(ParentID=:A1)",
				args );
prgCtx is the standard rogram Context, args is the ArrayList containing the arguments and A1 points to the first entry in the args array to be used as ParentID.
The next example can be used to get the current user from java coding, extract its userID and then derives the user name from ths user id. A standard logger is used to log the output, replace this with the logger of your preference.
    public static String getUserName( OScriptObject prgCtx )
    throws Exception
    {
        String retval = " user not found";

        try
        {
            // get the user session object
            OScriptObject uSession = (OScriptObject) prgCtx.invokeScript( "USession" );
            // get the userID from the User Session
            Integer userID = (Integer) uSession.getFeature( "fUserId" );
            // display it
            logger.log( Level.INFO, "UserID is " + userID );

            retval = "The current login User: " + userID;

            // Get the Users name from the User ID
            Map<String,Object> status = (Map<String,Object>)
			OScriptObject.runScript( "$LLIAPI.UsersPkg.NameGetByID", uSession, 1000 );

            logger.log( Level.INFO, String.valueOf( status ) );
            logger.log( Level.INFO, (String) status.get( "Name" ) );
        }
        catch( Exception e )
        {
            logger.log( Level.SEVERE, "Caught Exception", e );
            throw e;
        }

        return retval;
    }
In the next posting on this topic, we’ll discuss the Mappings from JAVA to OScript and vice versa.
From time to time, you may want to execute a livereport from an OScript function and get the results for further processing. This can be done quite easy.
First, you should have the node id of the report to execute.
In this scriptlet, the node id of this livereport to execute is nodeid
Second, you should setup a list with all input parameters. For each input parameter, create an assoc with inputType, label, prompt, textvalue and value of the parameter.
Add this assoc to the list of input parameters.
Store this list in the pExtendedData field of report node.
Sometimes it would be nice to use existing Java coding from a module instead of recoding this in OScript.
There is a facility in the content server which does exactly this bridging from OScript to Java, the so called JavaObject class. You’ll find the exact documentation in the “OScript API/Build-In Package Index”
In this first post of the series we’ll discuss the basic calls from OScript.
First, you need some Java Code, compiled and in the form of a jar. Put this jar either in OTHOME/ojlib or (much better) in a ojlib directory in your module structure. After installing the module, the jar(s) are copied automatically to the OTHOME/ojlib. Then, the jvm classloader will find your jar(s).
From OScript it is possible to access static classes and instances.
The return values are either Error or Dynamic if the call is successful.
An example
function void javaTest()

   JavaObject myObject

   myObject = JavaObject.new("my.own.package.class")

   Dynamic res = myObject.InvokeMethod("myMethod",{"aa","bb})

   if (isError(res))

     echo ("Init failed")

     return

   end

   Dynamic res1 = myObject.GetField("myResult")

   if (IsError(res))

     echo("Calculation failed")

     return

   end

   echo("The result is "+res1)

end
In the next post we’ll discuss how to get the JNI exceptions and the error stack from the jvm.