SmartUI expandable Tiles at Work

Wondered, how expandable Tiles work in smartUI?

The base Widget is a simple Tile:
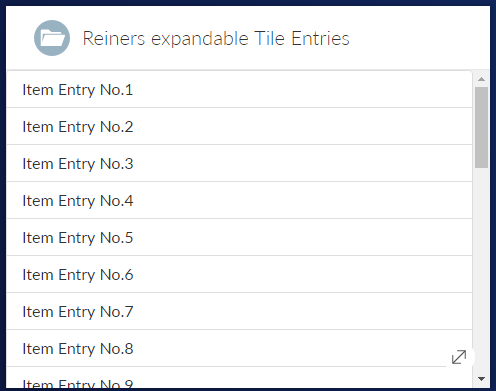
Reiners Expandable Tile Entries
Expandable Tile Entries

Pressing the Expand Button (lower right) shows a different view with more details as a list:
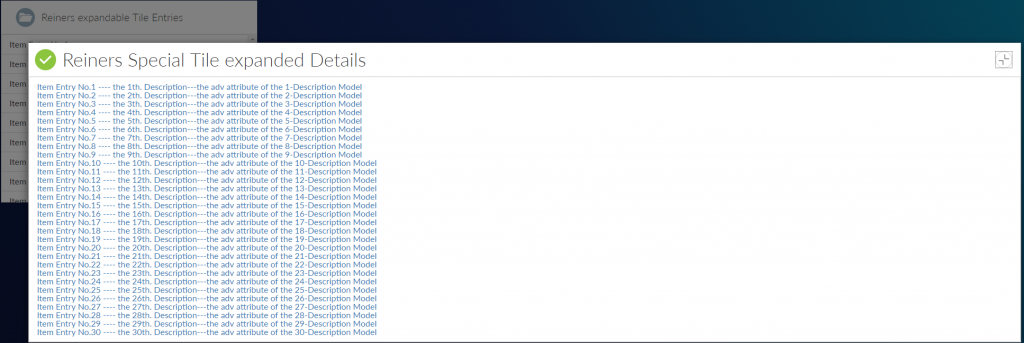
Expanded Tile Entries

Implementation:

For simplicity sake, all require.js setups are omitted. The complete javascript would run on a simple html page without connecting to Server.

First, we need a collection and a model. The model does have 3 attributes, name, desc, adv. 30 Models are filled automatically in the collection.

     var  ItemModel = Backbone.Model.extend({
              defaults: {
                  id: null,
                  name: 'Unnamed',
                  desc: 'Unnamed',
                  adv: 'Unnamed'
              }
          }),

      ItemCollection = Backbone.Collection.extend({
              model: ItemModel,
              initialize: function (models, options) {
                  this._items = _.times(30, function (index) {
                          ++index;
                          return {
                              id: index,
                              name: 'Item Entry No.' + index,
                              desc: 'the ' + index + 'th. Description',
                              adv: 'the adv attribute of the ' + index + '-Description Model'
                          };
                      });
                  this.makeFetchable(options)
                  .makeClientSideBrowsable(options);
              },
              sync: function (method, collection, options) {
                  if (method !== 'read') {
                      throw new Error('Only fetching the collection is supported.');
                  }
                  console.log('Getting', collection._items.length, 'items');
                  var deferred = $.Deferred();
                  setTimeout(function () {
                      var response = _.clone(collection._items);
                      if (!options) {
                          options = {};
                      }
                      if (options.success) {
                          options.success(response, options);
                      }
                      collection.trigger('sync', collection, response, options);
                      deferred.resolve(response);
                  }, 250);
                  return deferred.promise();
              }
          }),

Second, we need two views, a base view and an expanded view.

The base view with its template is:

      ListItemView = Marionette.ItemView.extend({
              className: 'binf-list-group-item',
              template: Handlebars.compile($('#list-item-template').html())
          }),
 
script id="list-item-template" type="text/x-handlebars-template"
  {{name}} 
/script

<> around the script tags are omitted

The extended view with its template is

ListFieldItemView = Marionette.ItemView.extend({

                  className: 'binf-list-group-item',

                  template: Handlebars.compile($('#list-item-template1').html()),

                  initialize: function () {

                      this.listenTo(this.collection, 'sync', this.render);

                      this.collection.fetch();

                  },

                  serializeData: function () {

                      if (!this.model && !this.collection) {

                          return {};

                      }
                   var args = [this.model || this.collection];
                  if (arguments.length) {
                      args.push.apply(args, arguments);
                  }

                  if (this.model) {
                      return this.serializeModel.apply(this, args);
                  } else {
                      return {
                          items: this.serializeCollection.apply(this, args)
                      };
                  }
              },
          }), 
script id="list-item-template1" type="text/x-handlebars-template"
   {{#each items}}
      p class="items"a href=#{{name}}  ----     {{desc}}---{{adv}}/a/p
  {{/each}}
/script

<> brackets around the html and script tags are omitted

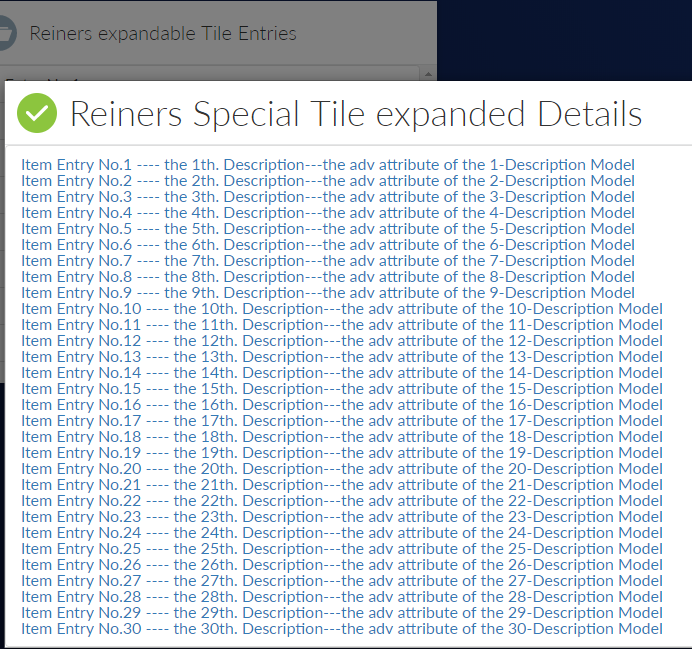
The serialize function is used to make the collection renderable with handlebars.js. This and item-template1 will render to this expanded view:
We also need one base view, referencing our two views, one as contentview and one as expandedView. We add the Behavior Expanding with the options with our collection set. And of course, with several title and icon options set.

     ListTileView = TileView.extend({
              icon: 'header-openfolder',
              title: 'Reiners expandable Tile Entries',
              contentView: ListView,
              contentViewOptions: function () {
                  return {
                      collection: this.items
                  };
              },
              childEvents: {
                  'click .items': 'onClickItem'
              },
              onClickItem: function (target) {
                  this.trigger('click:item');
                  this.triggerMethod('execute:defaultAction', target.model);
                  alert("Clicked on item '" + target.model.attributes.name + "'");
              },
              behaviors: {

                  Expanding: {
                      behaviorClass: ExpandingBehavior,
                      expandedView: ListFieldItemView,
                      expandedViewOptions: function () {
                          return {
                              collection: this.contentView.collection
                          };
                      },
                      titleBarIcon: 'title-assignments',
                      dialogTitle: 'Reiners Special Tile expanded Details',
                      expandIconTitle: 'Reiners Expand Button',
                      dialogTitleIconRight: "icon-tileCollapse"
                  }
              },
              constructor: function (options) {
                  ListTileView.__super__.constructor.apply(this, arguments);
                  this.items = new ItemCollection(undefined, {
                          top: 30
                      });
                     // options.items = this.items;
              },
              onShow: function () {
                  this.items.fetch();
              }
          });

Initialize it and show it at the el #tile. Then you are done

      var
      // Create instances of the views to show on the page
      tileView = new ListTileView(),

      // Create helpers to show the views on the page

      tileRegion = new Marionette.Region({
              el: "#tile"
          });

      tileRegion.show(tileView);

Easy, isn’t it?

The complete html file containing the javascript demo code can be downloaded here

The smartUI Page Context

•The simplest context in smartUI is the Page Context, which can include and fetch models and collections, but does not provide any other functionality. If you use it with widgets, which expect changes based on their context-changing models, you will have to handle these changes yourself.

You can use the page context like this

 
 require(['csui/lib/jquery', '../page.context', 'csui/utils/contexts/factories/connector',
       'csui/utils/contexts/factories/user', './page.context.mock'
     ], function ($, PageContext, ConnectorFactory, UserModelFactory, PageContextMock) {
       var contentElement = $('body'),
           context = new PageContext(),
           connector = context.getObject(ConnectorFactory),
           currentUser = context.getModel(UserModelFactory);
       $('<p>')
           .text('Connected to the server ' + connector.connection.url)
           .appendTo(contentElement);
 
       PageContextMock.enable();
       context.fetch()
           .done(function () {
             $('<p>')
                 .text('Current user is ' + currentUser.get('name'))
                 .appendTo(contentElement);
           });
     }); 

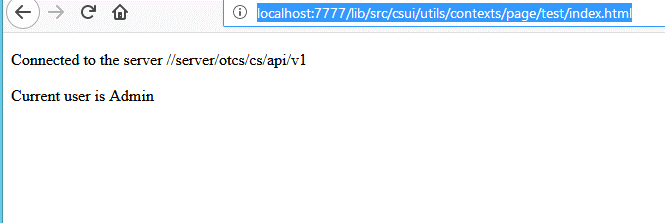
This results in

How to use Zip&Download in smartUI

This is a control in smartUI. Basic infos are:

This control uses the command:

–lib\src\csui\utils\commands\zipanddownload.js

Requires:

“module”, “require”, “csui/lib/underscore”, “csui/lib/jquery”, “i18n!csui/utils/commands/nls/localized.strings”, “csui/utils/command.error”,   “csui/utils/commandhelper”, “csui/models/command”, ” csui/utils/url ”   

Triggered, when more than 1 file is selected. Action.ID = “zipanddownload« 

Uses ‘csui/controls/globalmessage/globalmessage’,         “csui/models/zipanddownload/zipanddownload.preflight”,         “csui/models/zipanddownload/zipanddownload.stages”,         “csui/dialogs/modal.alert/modal.alert”  in local require.

Uses REST Calls. To use the command, these REST calls must exist on the Content Server side.

  • Post api/v2/zipanddownload with body={” id_list”:[oids zu compress],”type” : “zipanddownload ” 
    • Returns in results/data/jobs/id the oid of the archive to download
  • Post api/v2/zipanddownload/oid to download the compressed archive

Simply put the command in a place where your menu options are. Typically in a toolbar config like

/* Example where to put the command
define([
'module',
"csui/controls/toolbar/toolitem.model",
'csui/controls/toolbar/toolitems.factory',
'i18n!conws/utils/commands/nls/commands.lang'
], function (module, ToolItemModel, ToolItemsFactory, lang) {
var toolbarItems = {
    otherToolbar: new ToolItemsFactory({

        first: [{
                signature: "AddParticipant",
                name: lang.CommandNameAddParticipant,
                icon: "binf-glyphicon binf-glyphicon-plus"
            },
            {
                signature: "YourCommand",
                name: "YourCommandname",
                icon: "Your Binf-Glyphicon"
            },
            {
                signature: "PrintParticipants",
                name: lang.CommandNamePrintParticipants,
                icon: "binf-glyphicon binf-glyphicon-print"
            }, {
                signature: "ExportParticipants",
                name: lang.CommandNameExportParticipants,
                icon: "binf-glyphicon binf-glyphicon-download"
            }, {
                signature: "ShowRoles",
                name: lang.CommandNameShowRoles
            }, {
                signature: "RemoveParticipant",
                name: lang.CommandNameRemoveParticipant
            }

        ],
        second: [
        ],
        third: [
        ]
    }, {
        maxItemsShown: 99,
        dropDownIcon: "icon icon-toolbar-more"
    })

};

return toolbarItems;

});

The new smartUI Zip&Download control

Zip&Download has arrived in smartUI. Finally.

The new download and zip command

Open up a nodelist and you’ll see the new Download command.

How to use it?

  • First select a couple of files to download
  • Click on Download
  • Then the ZIP archive is build
Building the ZIP Archive
  • When finished, you can change the default name
ZIP file build
ZIP file build

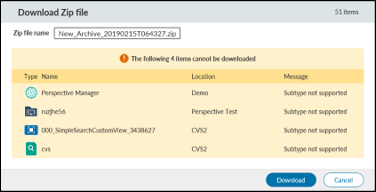
Then you get the summary of all files contained in this ZIP Archive

Filelist for all files i n the ZIP archive

Click on Download and this archive will be downloaded to your machine.

New Permissions Explorer in smartUI

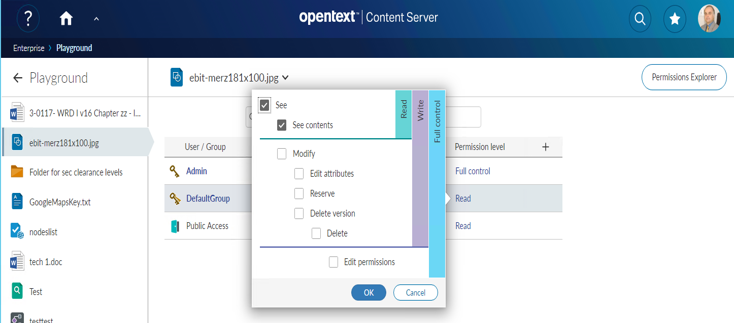
Have you seen the new permissions explorer in smartUI? Open up the permissions on an object and you’ll see the new selection.

Permission Selection
The Permissions Explorer

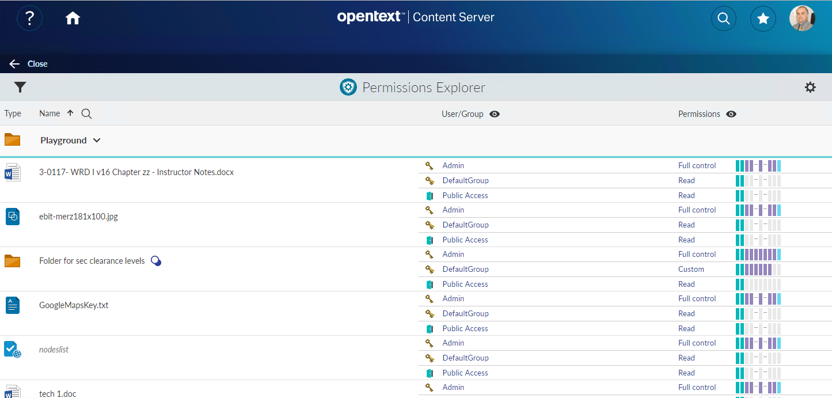
The permissions explorer is opened with a click on the “Permissions Explorer” Button on the upper right.

Inside the Permissions Explorer

This will give you the option to edit all permissions of the objects in this folder at once.

Improved smartUI Webreport Usability

The usability of Webreports in smartUI has been improved. Now, you can, after starting a Webreport, edit the parameters of that report and receive feedbacks from the running Webreport. This makes a lot of fun!

Lets see, how this is done.

First a table.report widget can be used to list all data.

Click on a Webreport to start it

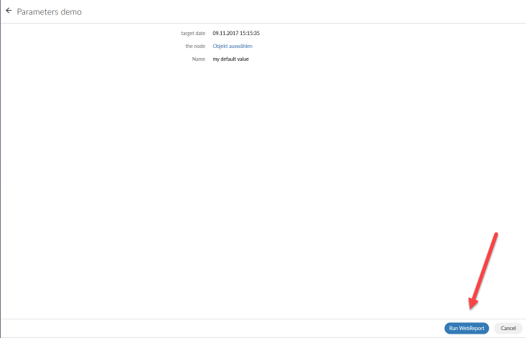
Then a Parameter Window opens. The Webreport can be startet by pressing the button “Run Webreport”

Webreport Parameters can be edited

A feedback can be given from the Webreport like this

Running webreports can give Feedbacks to SmartUI

The table.report shows a Smart UI table based on the output of WebReports data. The WebReport used by this widget must be based on either the widget_table_report_process_data_in_webreport or widget_table_report_process_data_in_datasource default reportviews which use the INSERTJSON @TABLEREPORT directive.

   // Create the data managing context
      var context = new PageContext(),
      sampleTableReportView = new TableReportView({
          context: context,
          data: {
            id: 24024,
            sortBy: "SubType",
            SortOrder: "ASC",
            columnsWithSearch: "SubType",
            titleBarIcon: 'mime_audio',
            title: 'Sample WebReports Table',
            header: true,
            swrLaunchCell: {
                id: 12345,
                iconClass: 'my-icon-class',
                hoverText: 'Some hover text for my icon.'
            },
 parameters: [
                {
                    name: 'myparm1',
                    value: 'val1'
                },
                {
                    name: 'myparm2',
                    value: 'val2'
                }
            ]
          }
      }),
      // Create helpers to show the views on the page
      region = new Marionette.Region({
        el: "#content"
      });

      // Show the views on the page
      region.show(sampleTableReportView);

      // Fetch the WebReport output from the server to populate the tile with
      context.fetch();

The parameter window can be implemented like this (the xxxxxx is the node number for the webreport)

  var promptView,
        promptModel,
        contentRegion = new Marionette.Region({el: "#content"}),
        pageContext = new PageContext(),
        currentNode = pageContext.getModel(NodeModelFactory, {attributes: {id: xxxxxx}}),
        runWRModel = pageContext.getModel(PromptModelFactory, {
            attributes: {
                node: currentNode
            }
        }),
        runWRController = new RunWRController();
pageContext.fetch()
            .done(function () {

                // We've got the page context, now get the runWRModel to see if there are parameters:
                runWRController.getRunWRPreModel({
                    node: currentNode,
                    context: pageContext
                }).done( function(){

                    // Build the prompt view and show it:
                    promptView = new PromptView({
                        context: pageContext,
                        model: currentNode,
                        promptModel: runWRController.runWRPreModel,
                        showBackIcon: false
                    });

                    contentRegion.show(promptView);
                });
            })

A feedback is implemented by the status.screen control.

  require(['csui/lib/underscore', 'csui/lib/marionette', 'csui/utils/contexts/page/page.context',  'csui/utils/contexts/factories/connector',
  'csui/controls/globalmessage/globalmessage',
  'webreports/controls/status.screen/status.screen.view',
  'webreports/models/run.webreport.pre/run.webreport.pre.model',
  'webreports/models/run.webreport/run.webreport.model',
  './status.screen.mock.js'
  ], function (_, Marionette, PageContext, ConnectorFactory, GlobalMessage, StatusScreenView, WebReportRunModelPre, WebReportRunModel, WRMock) {

  var statusView,
  context = new PageContext(),
  connector = context.getObject(ConnectorFactory),
  region = new Marionette.Region({el: "#webreport-status-screen-demo"}),
  attributes = { id: xxxxxx },
  options = { connector: connector },
  WRRunPreModel = new WebReportRunModelPre(attributes, options),
  WRRunModel = new WebReportRunModel(attributes, options);
  WRMock.enable(); // Mockup for local tests
WRRunPreModel
  .fetch()
  .done( function(){

WRRunModel
  .fetch()
  .done( function(){
statusView = new StatusScreenView({
  destinationModel: WRRunPreModel.destinationModel,
  executeModel: WRRunModel});
  region.show(statusView);
  })
  })

});

Working with WebReports and SmartUI now makes a lot of fun!

New RulesMatchingMixin in smartUI

Have you seen the new Rules matching Mixin in the smartUI? Its a great mixin, allowing you to implement a colloection of rule models which are supposed one model, which rules match the input object. This is a quite powerful functionality

The following example implements the selection collection

  • Container = true
  • Subtype = 144, 749
  • and is type = 144 is one of the mimetypes listed
  • and is type = 144 or mimetype startswith “image/” of equals “pdf/x-pdf”
  • and is type = 144 and mimetype = “text/plain”

If run, then the action of the appripriate node is returned. Only on the base of a rules Model!!

Can be implemented like this

  var NodeActionSelectingModel = Backbone.Model.extend({
  idAttribute: 'signature',
  defaults: {
    sequence: 100,
    signature: null
  },
  constructor: function NodeActionSelectingModel(attributes, options) {
    Backbone.Model.prototype.constructor.apply(this, arguments);
    this.makeRulesMatching(options);
  },
  enabled: function (node) {
    return this.matchRules(node, this.attributes);
  }
});

RulesMatchingMixin.mixin(NodeActionSelectingModel.prototype);
var NodeActionSelectingCollection = Backbone.Collection.extend({
  model: NodeActionSelectingModel,
  comparator: 'sequence',
  constructor: function NodeActionSelectingCollection(models, options) {
    Backbone.Collection.prototype.constructor.apply(this, arguments);
  },
  findByNode: function (node) {
    return this.find(function (model) {
      return model.enabled(node);
    });
  }
});
var nodeActions = new NodeActionSelectingCollection([
  {
    equals: {
      container: true
    },
    signature: 'Browse'
  },
  {
    equals: {
      type: [144, 749]
    },
    signature: 'Open'
  },
  {
    and: [
      equals: {
        type: 144
      },
containsNoCase: {
        mime_type: [
          "application/msword",
          "application/vnd.ms-word",
          "application/vnd.msword",
          "application/vnd.openxmlformats-officedocument.wordprocessingml.document",
          "application/vnd.wordprocessing-openxml",
          "application/vnd.ces-quickword",
          "application/vnd.ms-word.document.macroEnabled.12",
          "application/vnd.ms-word.document.12",
          "application/mspowerpoint",
          "application/vnd.ms-powerpoint",
          "application/vnd.openxmlformats-officedocument.presentationml.presentation",
          "application/vnd.ces-quickpoint",
          "application/vnd.presentation-openxml",
          "application/vnd.presentation-openxmlm",
          "application/vnd.ms-powerpoint.presentation.macroEnabled.12",
          "application/msexcel",
          "application/vnd.ms-excel",
          "application/vnd.openxmlformats-officedocument.spreadsheetml.sheet",
          "application/vnd.ces-quicksheet",
          "application/vnd.spreadsheet-openxml",
          "application/vnd.ms-excel.sheet.macroEnabled.12",
        ]
      }
    },
    signature: 'Edit',
    sequence: 50
  },
{
    and: {
      equals: {
        type: 144
      },
      or: {
        startsWithNoCase: {
          mime_type: 'image/'
        },
        equalsNoCase: {
          mime_type: ['application/pdf', 'application/x-pdf']
        }       }     },
    signature: 'Convert',
    sequence: 50
  },
  {
    and: [
      {
        equals: {
          type: 144
        }
      },
      {
        equalsNoCase: {
          mime_type: 'text/plain'
        }      }    ],
    signature: 'Read',
    sequence: 50
  },
  {
    signature: 'Properties',
    sequence: 200
  }
]);
var node = new NodeModel(...),
    action = nodeActions.findByNode(node);

Using handlebars to setup a select box in CSUI

Look at the standard problem:

Your handlebars template contains a Selectbox to display a the status of a task:

<select name="status" id="Status" class="binf-selectpicker" data-style="binf-btn-warning">

<select name="status" id="Status" class="binf-selectpicker" data-style="binf-btn-warning">

{{#select status}}

<option value="0" selected="">Pending</option> 

<option value="1">In Process</option> <option value="2">Issue</option>

<option value="3">On Hold</option> 

<option value="-1">Completed</option> 

<option value="-2">Cancelled </option>

{{/select}} 

</select>

And the values you receive from the REST Calls are between -2 and 3.

How can you transfer this in a “selected” clause in the html select box?


Easy.

Ass a select helper in your main marionette view:

 Handlebars.registerHelper('select', 
function (selected, options) { 
Handlebars.registerHelper('select', function (selected, options) 
{ return options.fn(this).replace( new RegExp(' value=\"' + selected + '\"'),
 '$& selected="selected"'); });

This handlebars helper named “select” will examine the coding tagged betweern a {{select}} and a {{/select}} in your handlebars template and insert at the option clause which is selected a ‘selected=”” ‘ clause. Then the Selectbox is ready to use.


Simply add a

status: this.model.get('status'),

to be returned in your template helper and the

{{#select status}}

...

{{/select}}


will trigger your select box helper to check for the v ariable status and to add a selected at the proper place.

Thats the magic behind the handlebars select helpers.

Upload a File to Content Server using REST and Javascript

This is an example how to upload a file using JavaScript and REST.

This example uploads the file c:\test.txt with the name of “MyFile123” under the folder with the node id 485336. This snipped relies on a previous login. The subtype of the file to be uploaded is “document” (144). The authorization token is saved under the variable name of “otcsticket”.

This example does not consider any categories (mantadory or not). We’ll discuss this in a later post.

6 Steps:

  1. Declare all variables needed. This is done by defining the array bodyData. At least there must be the subtpe, the parent_id, the name and the local file name.
  2. Fire an AJAX request to the URL, where your content server is, Use “api/v1/nodes” as REST command.
  3. Put the authorization ticket in the header field
  4. Put the bodyData in the data field
  5. Set the Mime Type to “application/x-www-form-urlencoded”
  6. If the request is done, process the “success” or the “failure” clauses

Put some nice HTML around it, add the authorization code and then you are done.

(At least for this example. Normally, you should provide some name check for the node name)

function upload() {
  var bodyData = {
        type: 144,
        parent_id: 485336,
        name: "Myfile123",
        file: "c:\\test.txt"
        }
      formData = new FormData();
  formData.append( "body", JSON.stringify( bodyData ) );

  formData.append( "file", "c:\\test.txt" );
  return $.ajax( {
    type: "POST",
    url: "http://[yourserver/yourcs/cs.exe/api/v1/nodes",
    data: bodyData,
    headers: { otcsticket: otcsticket },
    beforeSend: function( xhr ) {    
    xhr.overrideMimeType( "application/x-www-form-urlencoded" )
    }
  } ).then( function ( response ) {
    alert("Success")
  }, function ( jqxhr ) {
    alert("failure")
  } );
}


Authentication (1/3) How to authenticate against the Content Server in REST/Javascript

This is the first post on a series about authentication against the content server. The first post explains the authentication from a html page with Javascript and JQuery using REST

The REST API can be used to perfom things on the Content Server from nearly every thinkable language. Here is the example how to do a login from Javascript.

Replace [yourserver] with the DNS name of your Content Server, replace [yourCSInstance] with your CS instance and the cgi.

A valid URL would be for example

http://AllmyServer.mydomain.com/cs16/cs.exe/api/v1/auth

for the Authentication request.

<script>
  var otcsticket = "";
  /*
  * This function needs to be run first to authenticate the user against Content Server.
  */
  function authenticate() {
  // Set up the ajax request
  $.ajax({
  // Authenticate is a POST
  type: "POST",
  url: "http://[yourserver]/[yourCSInstance]/api/v1/auth",
  data: { username: [username], password: [password] },
  beforeSend: function( xhr ) {
  // Set the correct MimeType for the request.
  xhr.overrideMimeType( "application/x-www-form-urlencoded" )
  }
  }).done( function( data ) {

var val = JSON.parse( data );
  alert( "setting otcsticket to: " + val[ "ticket" ] );
  // Store the ticket for later use.
  otcsticket = val[ "ticket" ];

});
  }
 </script>

To authenticate, a $.ajax call is used. The REST call to do this is “/api/v1/auth”. The data must contain a valid username and a valid password for this user.

If the call is finished, then the JSON array (in the response) must be parsed for the key “ticket”. The value is the authentication token which should be stored somewhere for further use. Normally, the name otcsticket is used for this.

The token should be send as a header in any request, like in this example:

$.ajax( {
  type: "POST",
  url: "[yourURL]/api/v1/nodes",
  data: bodyData,
  headers: { otcsticket: otcsticket },
  beforeSend: function( xhr ) {
  // Set the correct MimeType for the request.
  xhr.overrideMimeType( "application/x-www-form-urlencoded" )
  }
  } ).then( function ( response ) {
  alert("Success")
  }, function ( jqxhr ) {
  alert("failure")
  } );

(This is a call to upload a file, for the complete example on uploading files with REST see the posts in January 2017)