Have you seen the new Rules matching Mixin in the smartUI? Its a great mixin, allowing you to implement a colloection of rule models which are supposed one model, which rules match the input object. This is a quite powerful functionality
The following example implements the selection collection
Container = true
Subtype = 144, 749
and is type = 144 is one of the mimetypes listed
and is type = 144 or mimetype startswith “image/” of equals “pdf/x-pdf”
and is type = 144 and mimetype = “text/plain”
If run, then the action of the appripriate node is returned. Only on the base of a rules Model!!
And the values you receive from the REST Calls are between -2 and 3.
How can you transfer this in a “selected” clause in the html select box?
Easy.
Ass a select helper in your main marionette view:
 Handlebars.registerHelper('select',
function (selected, options) {
Handlebars.registerHelper('select', function (selected, options)
{ return options.fn(this).replace( new RegExp(' value=\"' + selected + '\"'),
 '$& selected="selected"'); });
This handlebars helper named “select” will examine the coding tagged betweern a {{select}} and a {{/select}} in your handlebars template and insert at the option clause which is selected a ‘selected=”” ‘ clause. Then the Selectbox is ready to use.
Simply add a
status: this.model.get('status'),
to be returned in your template helper and the
{{#select status}}

...

{{/select}}
will trigger your select box helper to check for the v ariable status and to add a selected at the proper place.
Thats the magic behind the handlebars select helpers.
Beeing Content Server Trainer, I was asked to provide a training “How to program a Widget for the new Content Server GUI” to several customers. This is about the content of such a training and the reason why such a training is technically really advanced.
CSUI SDK introduces a shift in paradigma, the server is no longer providing the GUI, all is done by a Javascript Application at the client side.
Basic Training (newest version 1.005 from Feb/2018)
The basic training is very compact and lasts 5 days.
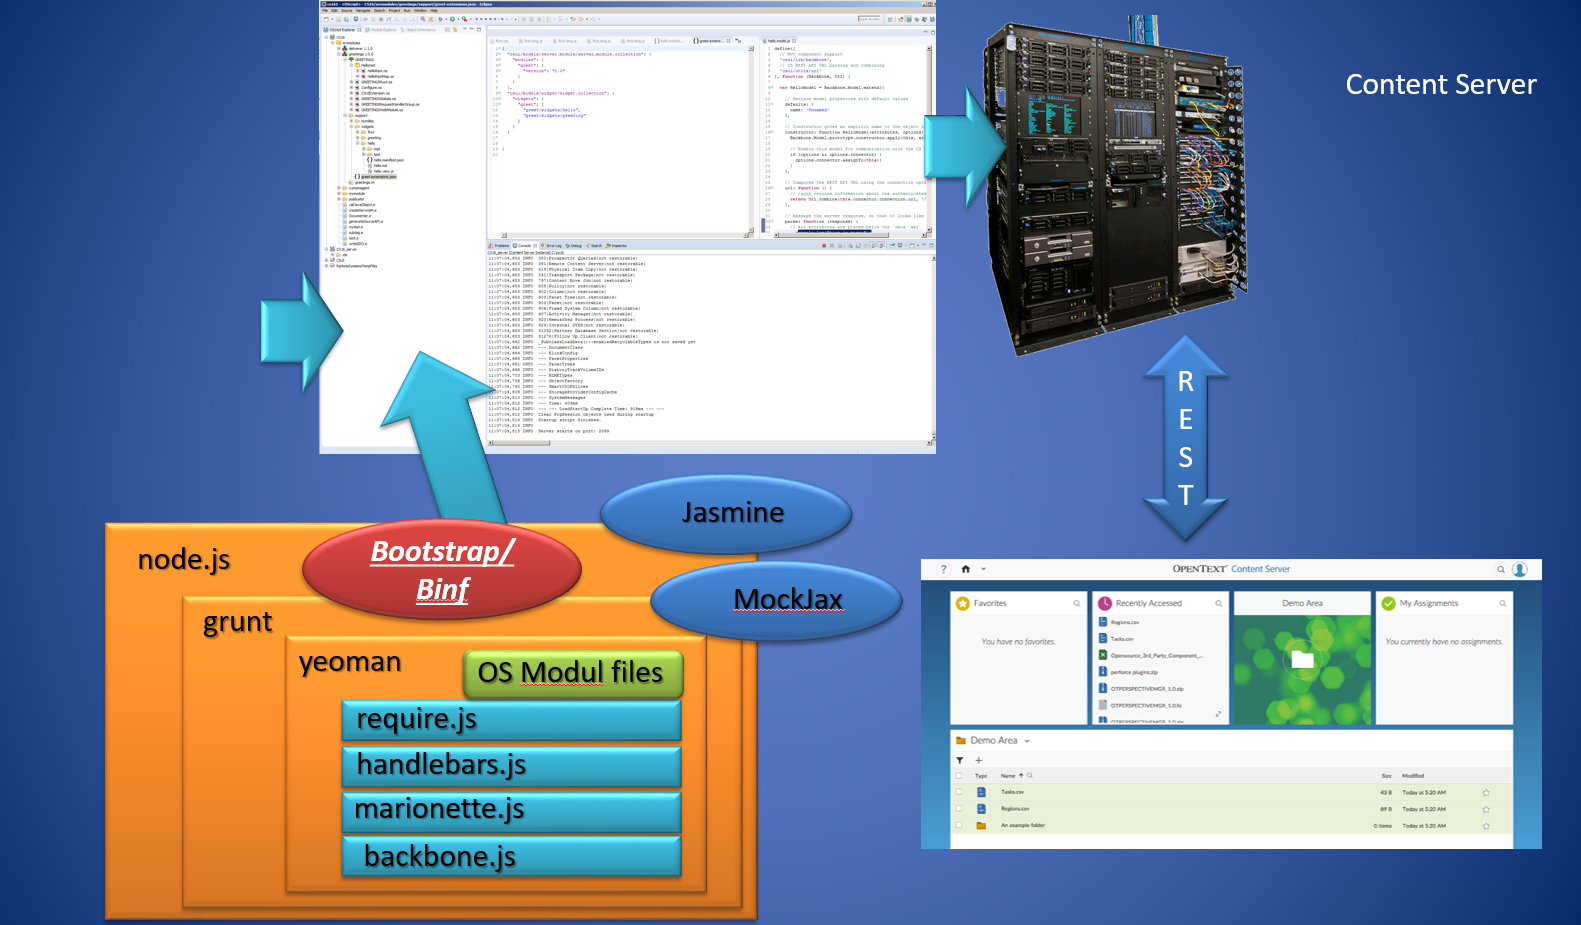
First, lets take a look on the components:
As a prerequisite, a firm knowledge of CSIDE, How to build a module, the Node Structure and whats to do with Content server Nodes is necessary.
At the end of the training, you’ll have a working knowledge of:
Content Server Perspectives. What are they and how you can use them to provide a user specific interface.
Content Server REST. This is the only possibility for the client to communicate with the server, so its mandantory to know the REST interface from the application point of vue. And, as REST can be very slow due to unneccesary data, its also mandantory to know, how to add REST services to the Content Server to get the data you want in the fastest way.
Javascript. There are Javascript Patterns, which are used heavily in the SDK. If “Javascript Object Inheritance”, “Currying/Schoenfinkelizing”, “Decorators” etc are weird words for you, this chapter is the right chapter for you.
Next is the infrastructural world of the sdk.
The CSUI Components
There are several components, which must be understood prior to build a Widget.
node.js is the base Javascript system for our development
grunt.js is a Javascript task runner, which we use to build, test and debug our widget
yeoman is a scaffolding system, which will be used by a Opentext extension to initialize the development folder. It also creates the skeleton of a Content Server module, which is used as a “Carrier” for our Widget(s)
backbone.js is the base framework to be used
marionette.js is an extension to backbone.js, making Views easier.
handlebars.js is the html templating framework used in the sdk
require.js is the javascript module loader to be used
bootstrap.js/binf.js is originally the public domain CSS/JS framework from Twitter for the appearance of the Widget. Binf is the Opentext variant, allowing to override CSS without negative effects
Next is the SDK itself. Due to time restrictions, in the base training are only the base functions, the advanced training covers the other aspects. It contains
Installing the SDK
Building the Demo Widget
CSS Style Overrides binf
General Overview of the SDK
Content of the SDK
Routing (Preview of the Advanced Training)
New Commands
Custom Columns
Metadata
Define a new NodeType
Create a Widget
Base Widgets
Controls
Models
Mockup and Test Data. How to setup mockup REST data. How to build test facilities in the SDK
Anatomy of the Hello Widget. A walktrough through this widget
Anatomy of the MyAssignment Widget
Add another Widget to the Content Server. Change the Hello Widget and add additional fields
Build a Custom Widget to be used as Client with a custom REST service. Here, a custom widget is build, which uses an extended version of the custom REST service from Part 2.
If time allows: Some Tips and Tricks from a “Work-in-Progress” Widget
Advanced Training (Version 1.005 Feb/2018)
OK, thats the basic training. There are a lot of additional things inside the SDK, but to understand these, there must be a couple of weeks with practical experience in between. The advanced part has beed remodelled to include a couple of interesting things. The advanced part contains:
Chapter 1 Extended SDK Parts
Additional Widgets
NodesListReportView
TilereportView
FilteredCountChartView
Carousel Widget View
Userwidget eSocial
ActivityFeedWidgetView
ActivityFeedContent
ChatWidget
Datepicker
switch
Workflow (new in Content Server 16.2)
Workflow Components
Workflow in smartUI
Starting Workflows
URL Routes
Workitem Actions
Workitem Extension
Writing Workflow Extensions
New REST API Support (16.2) for Workflows
Widgets not part of the SDK
Mobile Scanning
xECM: Header Widget with Business Object Infos
xECM: Snapshot of current document Attachments
xECM: Dossier View Widget
Engineering Doc Management: Search
xECM: Office365 Groups
Chapter 2 Extended SDK Features
Build Language Packs for Internationalization
Commands
Implementation and Inheritance from “CommandModel”
Best Practices
Using Commands
Custom URL Router. Routing, adding custom Routers. Using Routers as Navigation.
Behaviours. What are Behaviours?
DefaultActionBehaviour
BlockingBehaviour
ExpandingBehaviour
InfiniteScrollingBehaviour
PerfectScrollingBehaviour
PageLeavingBehaviour
Mixins. What are Mixins? All available Mixins.
Browsable Support for Collections. Using the “Browsable” support for Model-Collections.
Chapter 3 Additional Things to consider
Tips and Tricks (Work in Progress- List can change)
Add a OTDS Ticket already in the browser to the connection object
Re-using a OTDS Ticket as LLCookie
Checking the paths in the test/index.html
Using Helpers for supporting a select box with Handlebars
Adding non CSUI supported JQuery functions in a view
Handlebars advanced. A deeper look into Handlebars
LESS advanced. A deepter look into LESS, the CSS language used in Bootstrap
Accessibility in Bootstrap. What can be done to add support for screenreades etc to Bootstrap/Binf? Whats to avoid? Which tools are available
Best Practices in Development
As you can see, there is a lot of stuff. The basic training last 5 days, the advanced training 2. But on the other side, you’ll get happy users with your new Widgets.
And that’s all what counts.
References
Javascript
“JavaScript Application Design “as a general introduction (covering Grunt) https://www.manning.com/books/javascript-application-design
One of the nicest things in the content server area is, you can set Access Control Lists not only for the owner or the default group of a node, and you can add or revoke rights to the node for virtually all users and groups defined in the content server.
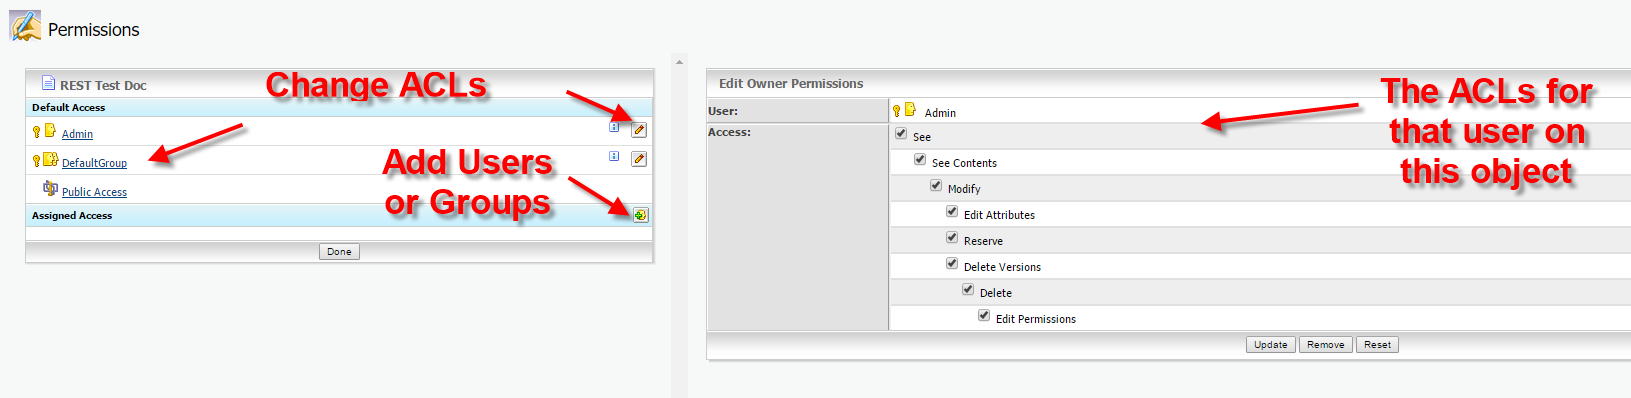
Here, we want do discuss how to do this using Content Server Web services. First, let’s see how ACLs are organized. A simple object would display something like this:
The ACLs for this object
On the left hand side, you see the default access, there is always one Owner, one default group and a public group.
If you want to assign further access, you can select a user or a group by clicking on the bottom at the lower left hand side. This will select a user or a group. (Btw: It’s recommended to use groups instead of users)
On the right hand side, there are the ACLs for the selected user/group on the object. Here, we used the Administrator, therefore all rights are switched on.
Ok, how to use this on a c# client?
First, the ACLs for a given user are called NodePermissions. Use them like this. Let’s say, this is utils.setNodeRights(….)
/// <summary>
 /// Creates a Noderight Structure and returns it
 /// </summary>
 /// <param name="rights">"all" or see (see,seecontents)</param>
 /// <param name="id">the member ID for this node rights</param>
 /// <param name="type">Owner, Ownergroup, Public or ACL </param>
 /// <returns></returns>
 public DocumentManagement.NodeRight setNodeRights(string rights, long id, string type )
 {
 DocumentManagement.NodePermissions newPerm = new DocumentManagement.NodePermissions();

newPerm.SeeContentsPermission = true;
 newPerm.SeePermission = true;
 if (rights.Equals("all"))
 {
 newPerm.AddItemsPermission = true;
 newPerm.DeletePermission = true;
 newPerm.DeleteVersionsPermission = true;
 newPerm.EditAttributesPermission = true;
 newPerm.EditPermissionsPermission = true;
 newPerm.ModifyPermission = true;
 newPerm.ReservePermission = true;
 }
 DocumentManagement.NodeRight newRight = new DocumentManagement.NodeRight();
 newRight.Permissions = newPerm;
 newRight.RightID = id;
 newRight.Type =type;
 return newRight;

}
The Nodepermissions is simply a container with the single access rights set to true or false.
When the definition is finished, the NodePermissions must be encapsulated in a structure called NodeRight. This contains the ACLs defined and the user/group for the ACL. Use the id as long integer, this is the unique identifier of a user/group in the content server. You can use MemberServices to get this number, if you know the login-name.
Then, the system wants to know, which kind this user/group is. Use ACL, if these are additional users/groups, or use something like Owner, Ownergroup or Public, if the ACLs should belong to the predefined entities.
How to use this?
First, login to the Webservices.
Second. Get the node, onto which you want to set ACLs.
Forth. Set the ACLs for the standard entities (if needed). Define a NodeRight for every entity (user/group) you want to set. Define these 2 right groups.
 // setup standard permissions for base ACL group
 DocumentManagement.NodeRight newRightstandardGroup = utils.setNodeRights("see", standardGoupID, "ACL");
 DocumentManagement.NodeRight newRightsmanagerGroup = utils.setNodeRights("all", managergroupID, "ACL");
The nodesrights on a node can contain something or be null. First, lets check, if the thing is null.
 if (nodesrights == null)
 {
 Console.WriteLine("Nodesrights not found- no external Users/groups assigned");
 Console.WriteLine("Setting a group with rights see/seecontent");

 DocumentManagement.NodeRight[] allrights = new DocumentManagement.NodeRight[2];
 allrights[0] = newRightstandardGroup;
 allrights[1] = newRightsmanagerGroup;
 nodeRights.ACLRights = allrights;
 docclient.SetNodeRights(ref otauth, pargs.nodenumber, nodeRights);
 authClient.Close();
 Console.WriteLine("All Rights and Groups set --- Finish");
 return;
 }
In this case we simply define a NodeRight array with two entries containing our new RightstandardGroup and our newRightmanagerGroup.
Let’s store them into our newly created array.
Let’s store this array in our nodeRights under ACLRights. This will change our copy of our structure which we downloaded before.
Next is simply a SetNodeRights with the nodenumber and the updated nodeRights array to write our changes back to the server.
If there are already entries, you should set them like this:
// Just display the first Entry of the first assigned Users/groups
 DocumentManagement.NodeRight right = nodesrights[0];
 DocumentManagement.NodePermissions nperms = right.Permissions;
 // check, if we do habe the groups already set

int newLen = nodesrights.Length;

 // copy rights into new longer Array
 DocumentManagement.NodeRight[] allrights = new DocumentManagement.NodeRight[newLen+2];
 for ( int i = 0; i < newLen;i++ )
 {
 allrights[i] = nodesrights[i];
 }
 allrights[newLen] = newRightsmanagerGroup;
 allrights[newLen + 1] = newRightstandardGroup;
 nodeRights.ACLRights = null;
 nodeRights.ACLRights = allrights;
 docclient.SetNodeRights(ref otauth, pargs.nodenumber, nodeRights);
 Console.WriteLine("All Rights and Groups set --- Finish");
 authClient.Close();
In this case, our nodesrights come from the nodeRights.ACLRights, because there are alredy entries.
Now, let’s do the same thing like we did on a new structure. But, we don’t want to delete existing entries, lets simply add our new RightstandardGroup and our newRightmanagerGroup to the ACLRights array.
One thing, if finished, first set the nodesRights.ACLRight to null and then fill it with the new extended ACL array.
Then do a SetNodeRights with the nodenumber and the updated nodeRights array to write our changes back to the server.
Finished. Quite easy, isn’t it?
BTW: There is no equivalent to do this on the REST api at the time of this post.
In December 2016, we discussed how to call Java code from OScript . Now, we’ll discuss the other way round, how to call OScript from Java. This can be quite useful, if you want to use your business logic implemented in java against the content server.
The Java code must be put in the ojlib directory (see the previous post on this topic).
As always, if you want to deploy your java code within a module, do this
Build your code into jar files.
Add the jar files in OTHOME/ojlib/ or OTHOME/module/yourmodule_yourversions/ojlib/ directory (and their subdirectories) to be recognized by Content Serverk JVM’s application classloader.
The base thing is, you call OScript built-in functions through the OScriptObject.runScript method from a java coding.
will display the unique integer for the current thread ID at the console (or in the logs, if you do not use CSIDE)
You can call all OScript functions and scripts. This example will list all nodes in the enterprise workspace
     // List nodes in the Enterprise workspace.
            result = (Map<String,Object>) OScriptObject.runScript( "$LLIAPI.NodeUtil.ListNodes",
				prgCtx,
				"(ParentID=:A1)",
				args );
prgCtx is the standard rogram Context, args is the ArrayList containing the arguments and A1 points to the first entry in the args array to be used as ParentID.
The next example can be used to get the current user from java coding, extract its userID and then derives the user name from ths user id. A standard logger is used to log the output, replace this with the logger of your preference.
    public static String getUserName( OScriptObject prgCtx )
    throws Exception
    {
        String retval = " user not found";

        try
        {
            // get the user session object
            OScriptObject uSession = (OScriptObject) prgCtx.invokeScript( "USession" );
            // get the userID from the User Session
            Integer userID = (Integer) uSession.getFeature( "fUserId" );
            // display it
            logger.log( Level.INFO, "UserID is " + userID );

            retval = "The current login User: " + userID;

            // Get the Users name from the User ID
            Map<String,Object> status = (Map<String,Object>)
			OScriptObject.runScript( "$LLIAPI.UsersPkg.NameGetByID", uSession, 1000 );

            logger.log( Level.INFO, String.valueOf( status ) );
            logger.log( Level.INFO, (String) status.get( "Name" ) );
        }
        catch( Exception e )
        {
            logger.log( Level.SEVERE, "Caught Exception", e );
            throw e;
        }

        return retval;
    }
In the next posting on this topic, we’ll discuss the Mappings from JAVA to OScript and vice versa.
Sometimes it would be nice to use existing Java coding from a module instead of recoding this in OScript.
There is a facility in the content server which does exactly this bridging from OScript to Java, the so called JavaObject class. You’ll find the exact documentation in the “OScript API/Build-In Package Index”
In this first post of the series we’ll discuss the basic calls from OScript.
First, you need some Java Code, compiled and in the form of a jar. Put this jar either in OTHOME/ojlib or (much better) in a ojlib directory in your module structure. After installing the module, the jar(s) are copied automatically to the OTHOME/ojlib. Then, the jvm classloader will find your jar(s).
From OScript it is possible to access static classes and instances.
The return values are either Error or Dynamic if the call is successful.
An example
function void javaTest()

   JavaObject myObject

   myObject = JavaObject.new("my.own.package.class")

   Dynamic res = myObject.InvokeMethod("myMethod",{"aa","bb})

   if (isError(res))

     echo ("Init failed")

     return

   end

   Dynamic res1 = myObject.GetField("myResult")

   if (IsError(res))

     echo("Calculation failed")

     return

   end

   echo("The result is "+res1)

end
In the next post we’ll discuss how to get the JNI exceptions and the error stack from the jvm.
This is an example how to upload a file using JavaScript and REST.
This example uploads the file c:\test.txt with the name of “MyFile123” under the folder with the node id 485336. This snipped relies on a previous login. The subtype of the file to be uploaded is “document” (144). The authorization token is saved under the variable name of “otcsticket”.
This example does not consider any categories (mantadory or not). We’ll discuss this in a later post.
6 Steps:
Declare all variables needed. This is done by defining the array bodyData. At least there must be the subtpe, the parent_id, the name and the local file name.
Fire an AJAX request to the URL, where your content server is, Use “api/v1/nodes” as REST command.
Put the authorization ticket in the header field
Put the bodyData in the data field
Set the Mime Type to “application/x-www-form-urlencoded”
If the request is done, process the “success” or the “failure” clauses
Put some nice HTML around it, add the authorization code and then you are done.
(At least for this example. Normally, you should provide some name check for the node name)
To authenticate with a JAVA client against a Content Server, you should first create all client proxys. This example can be used against a Servlet Container, like Tomcat. Here, it is assumed, that it runs on port 8080.
The creation of the proxys must be done manually by typing
wsimport -keep http://yourserver:8080/cws/services/Authentication?wsdl[add all services you want to use]jar cvfM webservices.jar com/opentext/*
Add the webservices.jar file in the build path of your Java application.
This is the second post on a series about authentication against the content server. This post explains the authentication from a c# application using Webservices.
Normally, the Webservices are used from a Java application container like Tomcat. To use this snippet, a Service Reference exist inside Visual Studio with the URL
Here, the userid and the password is send to the Authentication service. If all is correct, the authentication token is send back.
This token can be used like in the following snippet. Here, the Node 485227 is requested.
DocumentManagement.DocumentManagementClient docclient = new DocumentManagement.DocumentManagementClient(); DocumentManagement.OTAuthentication otauth = new DocumentManagement.OTAuthentication(); otauth.AuthenticationToken = authToken;
// Get the Node 485227 DocumentManagement.Node node = docclient.GetNode(ref otauth, 485227);
Like the Authentification Service, the DocumentManagement Service must be declared as a Service Reference in Visual Studio. When a Tomcat is used, then the declaration looks like
This is the first post on a series about authentication against the content server. The first post explains the authentication from a html page with Javascript and JQuery using REST
The REST API can be used to perfom things on the Content Server from nearly every thinkable language. Here is the example how to do a login from Javascript.
Replace [yourserver] with the DNS name of your Content Server, replace [yourCSInstance] with your CS instance and the cgi.
<script> var otcsticket = ""; /* * This function needs to be run first to authenticate the user against Content Server. */ function authenticate() { // Set up the ajax request $.ajax({ // Authenticate is a POST type: "POST", url: "http://[yourserver]/[yourCSInstance]/api/v1/auth", data: { username: [username], password: [password] }, beforeSend: function( xhr ) { // Set the correct MimeType for the request. xhr.overrideMimeType( "application/x-www-form-urlencoded" ) } }).done( function( data ) {var val = JSON.parse( data ); alert( "setting otcsticket to: " + val[ "ticket" ] ); // Store the ticket for later use. otcsticket = val[ "ticket" ];}); }</script>
To authenticate, a $.ajax call is used. The REST call to do this is “/api/v1/auth”. The data must contain a valid username and a valid password for this user.
If the call is finished, then the JSON array (in the response) must be parsed for the key “ticket”. The value is the authentication token which should be stored somewhere for further use. Normally, the name otcsticket is used for this.
The token should be send as a header in any request, like in this example:
$.ajax( {
  type: "POST",
  url: "[yourURL]/api/v1/nodes",
  data: bodyData,
  headers: { otcsticket: otcsticket },
  beforeSend: function( xhr ) {
  // Set the correct MimeType for the request.
  xhr.overrideMimeType( "application/x-www-form-urlencoded" )
  }
  } ).then( function ( response ) {
  alert("Success")
  }, function ( jqxhr ) {
  alert("failure")
  } );
(This is a call to upload a file, for the complete example on uploading files with REST see the posts in January 2017)