Remove Commands from Nodestable etc in the smartUI SDK

Command is Gone

From time to time you’ll need to remove commands from the widgets, like the nodeslist widget.

The magic spice is setting up a blacklist on the masks.js files during the initial phase:

csui.require.config({
  config: {
    'csui/widgets/search.results/toolbaritems.masks': {
      'mycustomer': {
        'otherToolbar': { blacklist: ['Properties', 'permissions'] },
        'inlineToolbar': { blacklist: ['Properties', 'permissions'] }
      }
    }
  }
})

There are several possibilities to do that.

1, The approved way

The approved way is to configure smartUI before its initialized from OScript.

This can be done by overriding the GetDynamicConfiguration in your base smartUI module (the one with the csuiextension orphan) like:

override function Assoc GetDynamicConfiguration(Object prgCtx, Record request)
  
    List blacklist = { "Copy", "Move" }
    return assoc{
      "csui/widgets/nodestable/toolbaritems.masks": assoc{
        "basecsui": assoc{
          "tableHeaderToolbar": assoc{ "blacklist": blacklist },
          "inlineToolbar": assoc{ "blacklist": blacklist },
        }
      },
      "csui/widgets/nodestable/headermenuitems.masks": assoc{ 
        "basecsui": assoc{ "blacklist": blacklist }     }    }
  end
end

Here in this example, the toolbaritem.masks and the headermenuitem.masks are set up with our magic spice (a blacklist containing all the signatures of the commands not desired). This will remove the “Copy” and “Move” commands from the list of commands permanently. And permanently means, this will survice a Page Reload.

2. The ugly way (but also surviving a Page Reload)

The ugly way is a way is the standard OpenText Way of overriding app.html and configuring the blacklists by yourself. Lets take a look at the app.html (found at ../core/module/csui/html).

Here is an example on a windows server:

Where to find app.html
app.html - the head

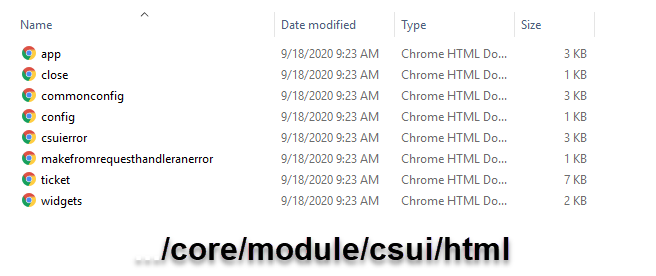
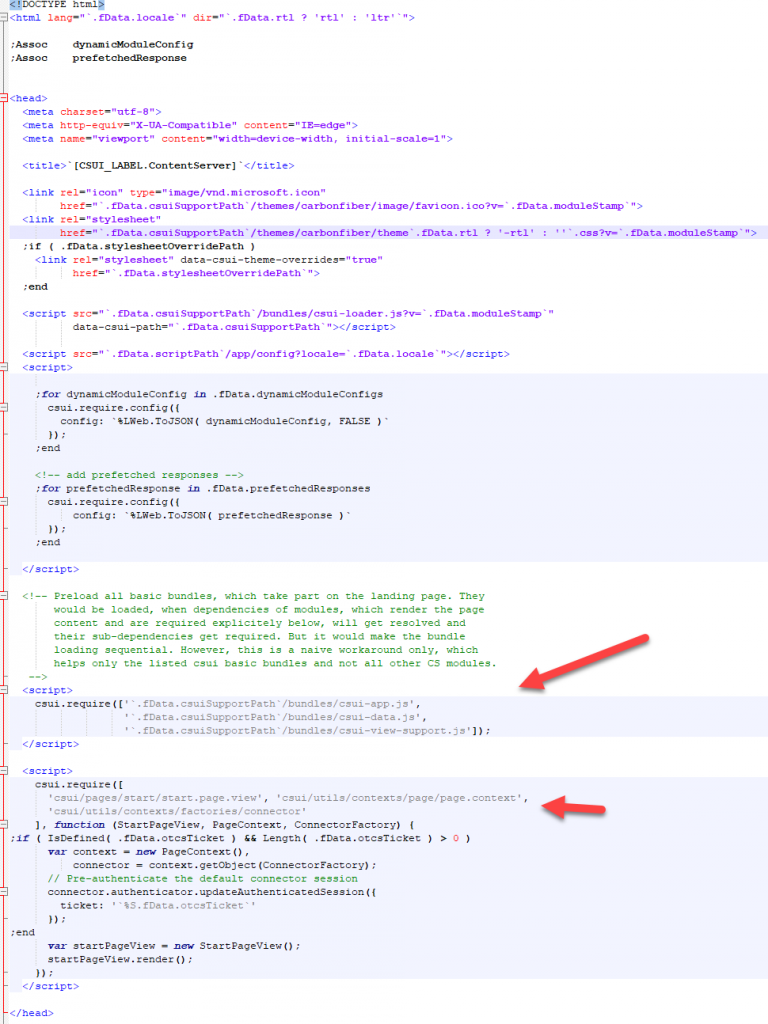
In the upper part you can see the csui.require calls. At the top you’ll notice a csui.require.config call, where you can put our magic spice (see above).

The disadvantage is, when you override app.html (directly or by using htmlmap) then you’ll have to check, if any future OpenText patches will override the app.html also.

BUT: If you override app.html, you can take advantage of this for example by implementing a permanent footer, which is always drawn at the bottom. You cannot do that with pure smartUI tools.

Here is an example of a permanent footer in the body part of the app.html.

Multiple usages of app.html - the body

3. The force way

There is also a brutal way to remove commands without that configuration of app.html. This requires

  • a widget or a command to do the removal
  • a couple of js lines

But on the other hand, this is the way which allows easy recovery of the command by doing a simple refresh of the page.

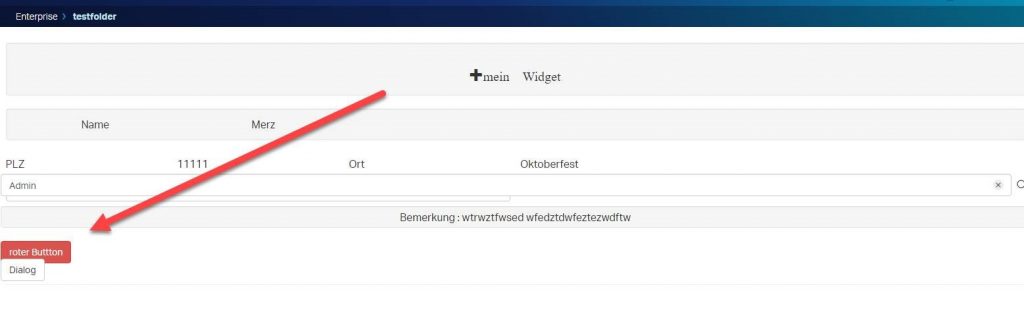
Here is a demo case (a wild version of the hello widget from my training installation). This is a widget with some demos and a new inserted button to delete a command.

a very chaotic demo

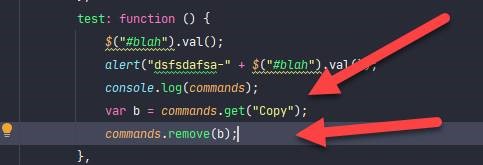
Behind the button are some js lines of code, which will remove the Copy-Command. Actually, the lines var b=commands.get(“Copy”); and commands.remove(b); do the job.

You will have to require /csui/utils/commands unter commands to use this two lines.

Two lines to decide the fate of the copy command.
Two Javascript Lines will decide the fate of the copy command

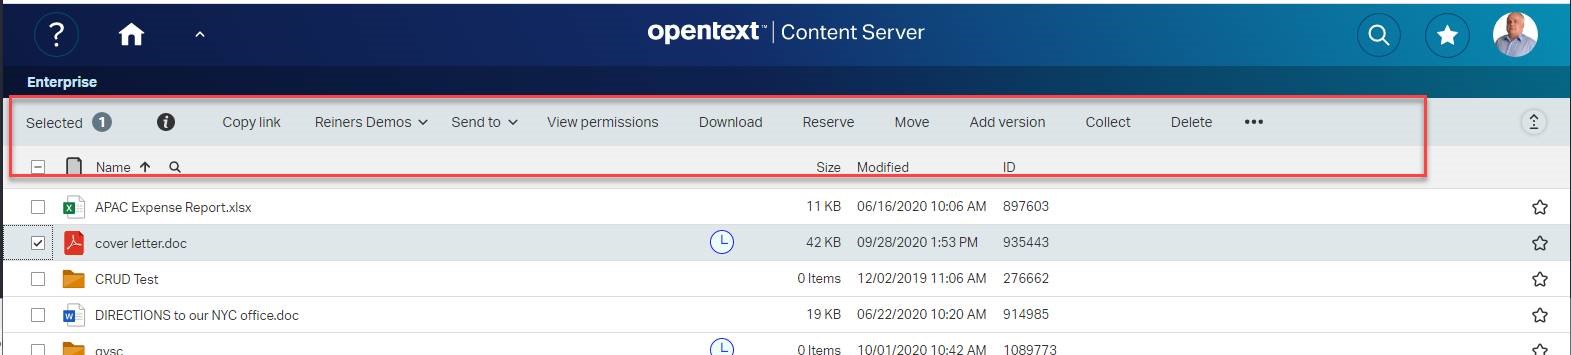
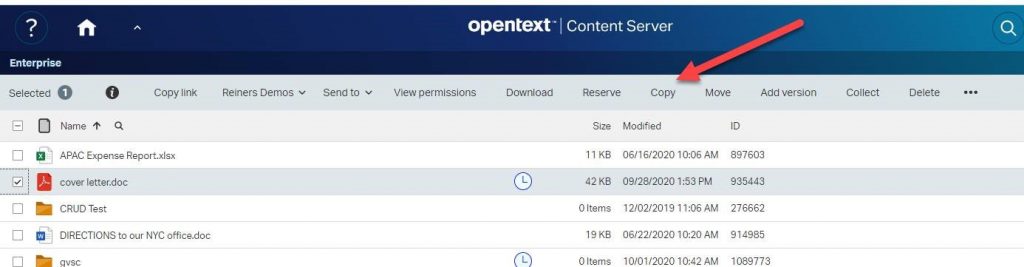
Lets see the initial command set. The Copy Command is here as usual.

Copy command lives

After the red button is pressed in the then the Copy Command is gone:

Copy Command is gone

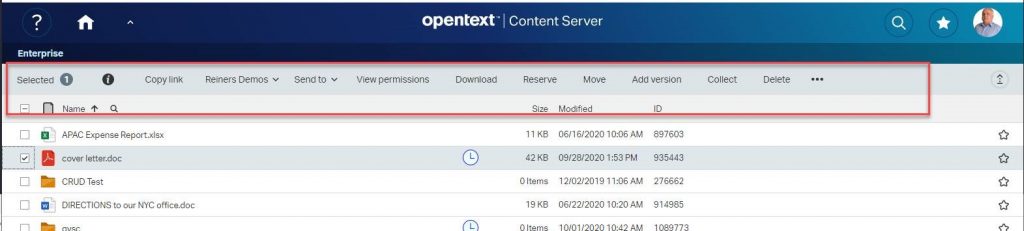
We simply deleted the Copy command from the list of commands. This means, a simple Refresh will restore it.

Have much fun on playing around with commands!

smartUI in practice: SMART TOOLS(3) – Renditions

smart tools

In SMART TOOLS renditions are also build in the properties manager of smartUI. Renditions can be displayed by selecting renditions on the pull down menu, just like Multilingual Metatata in my last post.

The main menu

Rendition Main Panel

Next, the main panel of renditions is displayed. The renditions of the newest version or the latest 5 versions will be displayed.. A Rendition can be downloaded, deleted, replaced or (if configured) with “View as Webpage” be seen.

Rendition Commands

If there are a lot of versions, a starting version can be selected. Then this version and the last 5 versions with all renditions will be displayed.

Ascending or descending sorts on versions can be done by clicking on Versions.

Interesting is the “View as Wewbpage” function. This is a build in function in the Content Server, so it can also be used to see the contents of any renditions in the classic UI and in a separate window.

view as webpage display

A rendition can also be downloadeed by clicking on the down.arrow icon. This will normally download the file as setup by the users browser. If the rendition is a PDF and print.js (a standard extension in browsers) is activated, the the pdf can also be displayed directly.

A list of renditions can also be printed. This is a nice addition to help you to get an overview.

Rendition list

Direct Access Renditions

For a direct access to renditions, I also added a cell renderer to be displayed, if the newest version of the document has a rendition.

This is a little svg icon displayed directly in the list of documents.

Cell Renderer

The little icon can be clicked and then a list of renditions belopnging to this document is displayed.

Direct Access Rendition

From this panel, a rendition can be selected and downloaded. If the user has proper permissions, he can also delete the rendition selected. Also a printed list (see above) can be made at this point.

Sorting in ascending/descending versions can be done by clicking on the Arrow in the “Vers” columnn.

Because this direct access requires a lot of calls to the server, this feature can be switched off at the Admin Pages of smartUI.

Add Rendition Command

Additionally, there is also one command required, the “Add Rendition” command. The “Make Rendition” command is not implemented, because this requires local admin rights, something which should be rare.

This command can be issued at any document directly from the list of documents

Addrendition command

Commands are usually displayed in two locations, the Headertoolbar (above) and the Toolbar (below)

Command in Toolbar

Adding a rendition means, selecting one of system defined rendition types and a file beeing intended as the rendition. If the selected rendition type does not exist on that document, then the file is uploaded and used as a rendition.

Add Renditions - Panel

Next week, we dive more in the direct access of renditions and the Pros and Cons of that technique.

Missed something in the Posts? Here are the parts already posted:

smart UI in practice: SMART TOOLS(2) – Multilingual Metadata

smart UI in practice: SMART TOOLS(1) – the beginning

Building a Content Server Request Handler for AJAX Client Requests

In the standard request handler usage scenarios, there is always a complete URL, which is send to the server. Then the server processes that and returns the result page to the client.

With a little change, these standard request handlers in a module can be modified to be used from clients asynchronously by the usage of AJAX.

Client Part

The easiest approach is to use AJAX with JQUERY (which is delivered by the content server). If the base page was built from another request handler, it can include weblingo constructs. These are OSCRIPT parts, delimited by `-Delimiters. Like JSP, the final renderer evaluates everything between two delimiters and replaces that with the result of the evaluation.

So a AJAX JQUERY command with intermixed OSCRIPT parts can look like that:

This is a simple AJAX call, calling the request handler on the server as usual. But there is a parameter called func, which contains the actual request handler address and one parameter nodeid, which is the data parameter.

Request Handler
AJAX Part

Server Part

A sample request handler looks like this listing below. There is a prototype declared, this prototype must exist in the request.

Server Request Handler

The rest of the data is encapsulated in the JSON array. This array can be parsed into an assoc with the call to

$WebLL.JSONUtils.ParseJSON(request.configData)

and processed in the standard way.

Any responses should be handled in the standard way with an assoc.

String tst = $WebLL.JSONUtils.ToJSON(response)
  Web.Write(ctxOut, $WebLL.JSONUtils.GetJSONHeader(.fExtraHeaders))
  Web.Write(ctxOut, tst);
  .fHTMLFile = Undefined

This assoc is changed with a call to the ToJSON to a normal string.

Here, we do not have a output html file, so we have to use a Web.Write to write the output directly to the port. Do not forget to include the JSONHeaders.

The fHTMLFile stores normally the weblingo output file and has to be set to undefined in this case.

package DELIVERER::PUBLICATOR::AJAXHANDLER

public object UpdateAjax inherits DELIVERER::RequestHandlerOrphans::LLRequestHandler

override Boolean fEnabled = TRUE
  override String fFuncPrefix = 'deliverer'
  override Dynamic fHTMLFile
  override List fPrototype = { { 'configdata', -1, 'The config data changed at the client', FALSE } }
  /*
  * This is the Request handler to handle the Ajax Update Request(s)
  * Based on the original Request handlers, this handler receives an AJAX Request from the NodeAction Browse Page
  * and sends the Response back to the Browse Page (PUBLICATOR.html)
  *
  * @param {Dynamic} ctxIn
  * @param {Dynamic} ctxOut
  * @param {Record} request
  *
  * @return {Dynamic} Undefined
  */
  override function Dynamic Execute( \
  Dynamic ctxIn, \
  Dynamic ctxOut, \
  Record request )

Object prgCtx = .PrgSession()
  Assoc response = Assoc.CreateAssoc()
  Assoc cDat = $WebLL.JSONUtils.ParseJSON(request.configData)
  integer nodeid = cDat.id
  DAPINode node = DAPI.GetNodeByID(prgCtx.DapiSess(),nodeid)
  Assoc.Delete(cDat,"id") // remove the NodeID
  string remark = cDat.remark
  Assoc.Delete(cDat,"remark");
  node.pComment=remark
  // save configdata in pExtendedData
  // do not forget to include other assocs, if needed from the pExtendedData
  Assoc a = node.pExtendedData;
  //TODO Add Things
  a.configdata=cDat
  node.pExtendedData = a

DAPI.UpdateNode(node) // store it

// Send response
  response.ok="OK"
  response.msg="Fine"
  String tst = $WebLL.JSONUtils.ToJSON(response)
  Web.Write(ctxOut, $WebLL.JSONUtils.GetJSONHeader(.fExtraHeaders))
  Web.Write(ctxOut, tst);
  .fHTMLFile = Undefined

return Undefined
  end

end