3-5 days,
depending on the skills of the attendees.
Here, an EVENT Management system in the Content Server is built from the scratch. Events can be anything, from a Music Concert to Keysessions or anything else. To manage Events, all necessary Notes, Documents, Feedbacks can be stored in the Content Server.
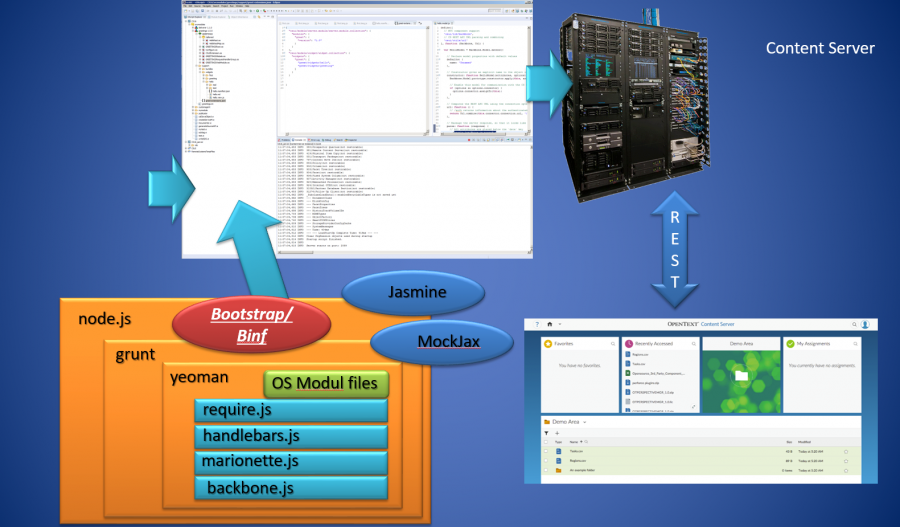
Each event is mapped to a Business Workspace and has several folders to hold all documentation and feedback. Events can be related to other events. Each Event is containing Documents according to the template and has a Team of Coworkers. We also implement a Dashboard to see all Events in smartUI. If an Event is clicked in the Dashboard then the corresponding Connected WorkSpace Business Object is opened. Both parts, the Dashboard and the Business Workspace correspond via REST Service, which is also to be implemented during this workshop.
Uses the Content Server 16.2.10, the smartUI SDK and the D3 library, which is part of the smartUi SDK.
New: We are offering custom widget development. Interested? Send an e-mail to merz at ebit-company.de stating the purpose of the widget and requesting aqoute
1 day. Here,
some practical parts of the SDK usage are discussed. First, we discuss, what’s
to do, if somebody wants to use the Barcode Command (Enterprise Scan) as a
widget in smartUI. We discuss what’s to investigate using CSIDE and implement
the widget. Then the appropriate REST Services are implemented on the Content
Server side. Then we add an email functionality to the TEAM widget by
implementing this as a view and interconnecting this with the original widget
using a command.
Practical Experience in the SDK or the Base Workshop is required.
New: We are offering custom widget development. Interested? Send an e-mail to merz at ebit-company.de stating the purpose of the widget and requesting aqoute
open.webreport.js (action to show
the Parameters form)
binf-Datepicker
Using
the build in datepicker
binf-switch
Using
the binf-switch to turn checkboxes and radio buttons into switches
Workflow
Workflow
Components
Workflow
in smartUI including Workflow Status (new in 16.2.4)
Starting
Workflows
URL
Routes
Workitem
Model
Workitem
Actions
Workitem
Extension
Writing
Workflow Extensions
REST
API Support for Workflows
Connected
Workspaces
Configurationvolume
Header
xECM:
Office365 Groups
Extended
ECM
xECM:
Header Widget with Business Object Infos
xECM:
Snapshot of current document Attachments
xECM:
Dossier View Widget
Event
Action Center
Widgets
not part of the SDK
Mobile
Scanning
Discussion
Widget
Engineering
Doc Management: Search
MyShares
“Extended SDK Features” 0.75 days
Content:
Build
Language Packs for Internationalization
How
to build an English language template
How
to build the language pack
Commands
Implementation
and Inheritance from “CommandModel”
Best
Practices
Attributes,
Methods
Using
Commands
Custom
URL Router.
Routing,
adding custom Routers.
Using
Routers as Navigation.
Perspective
Routers
Authenticators
and Regions
Authenticators
Non-Attaching
Region
Non-Emptying
Region
Script
Executing Region
Behaviors.
What are Behaviors?
DefaultActionBehavior
ExpandingBehavior
InfiniteScrollingBehavior
PerfectScrollingBehavior
Search
Behavior
CollectionErrorBehavior
CollectionStateBehavior
ItemErrorBehavior
ItemStateBehavior
Mixins.
What
are Mixins?
Discussion
of the main mixins
LayoutViewEventsPropagationMixin
ViewEventsPropagationMixin
AutoFetchableMixin
NodeAutoFetchableMixin
ConnectableMixin
NodeConnectableMixin
FetchableMixin
ResourceMixin
NodeResourceMixin
UploadableMixin
CommandableMixin
ExpandableMixin
AdditionalResourcesV2Mixin
V2CommandableMixin
ExpandableV2Mixin
FieldsV2Mixin
RulesMatchingMixin
SyncableFromMultipleSourcesMixin
Browsable
Support for Collections.
Using
the “Browsable” support for Model-Collections.
Widget
Options for the Perspective Manager
Wire
up your widget options that they can be configured at the Perspective Manager
Level
“Additional things to consider” 0.75 days
Tips and Tricks
Add a OTDS Ticket already in the browser to the connection object
Re-using a OTDS Ticket as LLCookie
Checking the paths in the test/index.html
Adding non CSUI supported jQuery functions in a view
Add additional jQuery Libraries
Adding Controls to a widget
CKEDITOR 4
Intro
JQuery Non-SDK example
Usage in the SDK
Handlebars advanced
Handlebars QuickStart
Expressions
Helpers
Helpers with html output
Helpers with Hash Object
The Helper fn property
The helper inverse property
Partials
Helpers in the SDK
188 Handlebar Helpers
LESS advanced
LESS installation
Using LESS variables
Using Mixins in LESS
Parametric Mixins
Guarded Mixins
D3
What is D3
Basic Elements
Zooming and Panning
D3 in the smartUI SDK
Moment
What is Moment?
Performing Time Calculations
Alpaca
What is Alpaca?
Content Server Support for Alpaca
Alpaca Tutorial
“One or two more things” 0.5 days optional
Accessibility in Bootstrap. Screen reader support and what’s to change in the SDK to support screen readers for visual impaired users.
What is Accessibility
Kinds of Disabilities
Accessibility and the law
WAI-ARIA
ASSETS.CMS.GOV
PayPal Bootstrap Accessibility Plugin
Web Experience Toolkit WET
Other resources
Best Practices in smartUI development
Pre-Development Steps
Preparation Steps
Development Steps
Integration Steps
Documentation Steps
Development Infrastructure for security aware Organizations
Recommendations what’s to do if the reloading of npm modules during the creation of a widget is not wanted
1 Day optional Discussion
of actual problems
Discussion
of actual problems
Here actual problems from the widget development are discussed. This part has to be discussed and defined in advance.
New: We are offering custom widget development. Interested? Send an e-mail to merz at ebit-company.de stating the purpose of the widget and requesting aqoute
The new smart GUI. How smartUI works. Setting up landing pages with the new GUI. Using Perspectives and build them with the Perspective Manager. Use Webreports to build custom widgets. The new perspective element and the difference 20.2 to previous versions.
Using
widgets on another portal w/o content server.
Exercises:
Build a custom perspective
Build a custom widget based on a web report
Content:
Chapter 2.1: The different UI Possibilities
Examples: Connected Workspaces
Examples: xECM
Examples: Documentum D2 Smart View
The Big Picture. See the GUI components in the Content Server Environment
Functional Components of the smartUI SDK
Chapter 2.2: smartUI Overview
Chapter 2.3: Diving deeper in the smartUI
Role-Based Content Server Pages
User Interface
Chapter 2.4: Perspectives Overview
Scenario: Creating a new Perspective
Chapter 2.6: The Perspective Manager
General Information
Rules for Role-Based Perspectives
Layout Behavior
Configure Widgets
Chapter 2.6: The Toolbox. An overview of the visual components in the SDK. The usage will be discussed later in the SDK
Day 2 (9:00-17:00)
Chapter 3 REST
REST. What
is REST? Overview of REST Services
Chapter 3.1 REST.
Consuming REST Services with Postman.
Using REST Services.
Authenticate
a User
Test
a REST Operation in Postman
Filtering
and Expanding Data in the request
REST
API Clients
Tips
and Tricks.
Exercises:
Use
POSTMAN to get used to REST, Authenticate in REST
Try
several REST commands and get an overview over the various options
Build
a REST based html page, which queries a node
Chapter 3.2 Extending REST
Services.
How to
build a new REST Service in OSCRIPT.
Exercises:
Build
a custom REST Service in a new Content Server Module. Later in Chapter 10, this
REST Service will be modified and be the server-side base of our first widget
Content:
Handling Requests with REST API
RESTful object
Create a module for REST extension
REST API module in Content Server 20.x
Resources, actions and prototypes
Adding parameters to the prototype
Test a new REST resource
Tips and Tricks for REST Services with smartUI
Table Query inside a REST Service
Getting nodes with complex categories
Handling complex Categories
Chapter 4 A very short
intro to JavaScript Patterns.
That’s what
any developer of the SDK sees inside the SDK. A short tour through the
JavaScript patterns required to understand the SDK and the underlying
frameworks. This is based on Stefanov “JavaScript Patterns” O’Reilly,
ISBN 978-0-596-80675-0, which is very recommended. Some new Aspects of ECMA6, Promises,
Deferrals are also discussed
Content:
Introduction
and References
ECMAScript
Versions
Chapter
4.1 The Patterns
Promises
JQuery
Deferred
XMLHttpRequest
Immediate
Functions
Immediate
Object Initialization
Function
Properties—A Memorization Pattern
Configuration
Objects
Function
Application (also with smartUI examples)
Schönfinkelizing or currying a function
Mix-In
Inheritance copy all properties to a child
Borrowing
Methods
Chapter
4.2: Object Creation Patterns
Chapter
4.3: Sugar methods
Chapter
4.4: Object Design Patterns
Singleton
Object
Decorators (used quite often in the smartUI SDK)
Chapter
4.5: DOM and Browser Patterns
Web Workers (only in recent browsers) long running
scripts
Day 3 (9.00-17:00)
SDK
Infrastructure Intro
Chapter 5 SDK
Infrastructure Intro
Introduction to Infrastructure
needed for the SDK. All components and frameworks will be introduced. Introduction
to Backbone with a Tutorial, Marionette as the extension of Backbone is also
covered by a tutorial.
Exercises:
Backbone
Tutorial. Building a browser-based TODO List
Marionette
Tutorial. Extending the TODO List with Marionette
Content:
Chapter
5.1: Bootstrap
A
CSS and JS framework as the base of smartUI
Chapter
5.2: Node.JS
Chapter
5.3: Require.js
Overview
How
to use require.js.
Chapter
5.4: Backbone.js
Views
Events
Models
Collections
Routers
Models and Views
Collections
View Rendering
Routing with URLs
A
simple Backbone Tutorial
Chapter
5.5: Marionette.js
Marionette
Views – Layouts
Marionette
Views – Regions
Tutorial:
A simple Backbone-Marionette App
Recommended
Tools
Backbone Debugger
Marionette Inspector
Python
based client for mozilla-marionette
Chapter
5.6: Handlebars.js (Overview, more in depth in the advanced training)
A
html template framework
Handlebars
SDK usage
Chapter
5.7: Yeoman
Chapter
5.8 Grunt.js
Tasks
Configuration
Starting
grunt
Some
examples of GRUNT tasks
CSUI
sdk custom grunt tasks
Chapter 5.9
Additional Libraries. Here the libraries are quickly discussed. For a more in-depth
discussion, please refer to the Advanced Workshop.
Short
Overview of D3, the interactive SVG Graphics package inside the SDK
D3 GANTT Chart example
Short
Overview of Alpaca, the forms package inside der SDK
Alpaca Example
Alpaca Support in the Content Server
Chapter
5.10 Additional Infrastructure
Python
CORS
– Cross Origin Resource Sharing Chrome Plugin
Inkscape/wingrep/fiddler
SVG
viewer
Markdown
Day 4 (9:00-17:00)
Chapter 6 smartUI Intro
BASIC
What is the
SDK, Prerequisites, documentation? Download and install the SDK. Examine the structure. Style Overrides, an
overview. We look at all framework homepages to find examples and
documentation. Using fiddler to examine underlying functionality. What’s
possible with the SDK. Discussion of how to add new node types, new commands.
Discussion of the controls and the widgets in the SDK (basic level).
6.7 Routing Preview (see adv. Training for a more detailed discussion)
6.8 New Command
6.9 Custom Column
6.10 Metadata
6.11 Define a new Nodetype
6.12 Create a Widget
6.13 Base Widgets. Detailed info’s on base widgets.
Favorites
Recently Accessed
MyAssignments
Shortcut (depreciated in 16.2.10)
Shortcuts
Metadata
NodesTable
Thumbnail
DocumentOverview
Search Results
node.state
Permissions and Permission Explorer
Html.editor
Navigation Header
6.14 Controls and Contexts
Controls
Node Picker
Modal Alert
File Open
Perspectives: Grid, Single, Left-Center-Right, Tabbed, Tabbed-Flow
Tile
ListView
ListItem
Signin
UserPicker
Breadcrumps
Checkbox
Dialog
Disclosure
Error
Form – with alpaca.js
Globalmessage
Grid
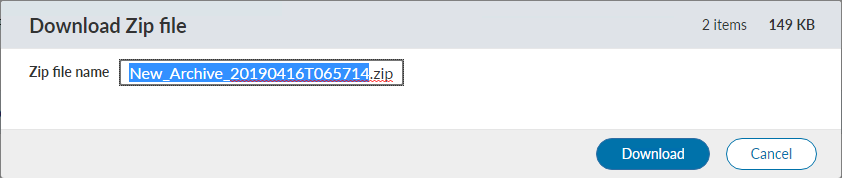
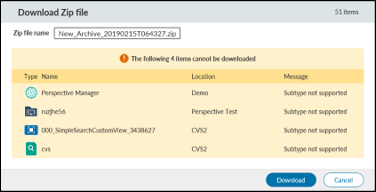
Zip&Download
Visual Count Control
Integration Folder Browser
Integration Target Picker
Contexts
Detached objects
Permanent objects
Temporary objects
Page Context
Browsing Context
Perspective Context
Portal Context
6.15 Models and Factories
NodeModel
Other Models
Factories
Fetchable Factory
Configurable Factory
Day 5 (9:00-16:00)
Rest of Chapter 6: SDK
The remaining parts of yesterdays SDK intoduction
Chapter 7 Mockup Data and Testing
MockJax is
used to mock up data (no need for a Content Server during development of a
widget) and the Jasmine Framework is used to for the testing of the widgets or
other JavaScript modules
Content:
Mocking
Up Data
MockJax
Setup
and Usage
Jasmine Usage
Chapter 8 The anatomy of
the example widget Hello.
A detailed
voyage in the source of the widget. (Explanation of all js files, the test
folder, css and language settings)
The Chapters 9-11 are exercises. Chapter 12 is a
Real-Life Demo/Exercise. Depending on the time left, these parts can be cut
down.
Chapter 9 The
anatomy of the myAssignment Widget.
A detailed
voyage in the source of the widget. (Explanation of all js files, the test
folder, css and language settings)
Chapter 10 Add another Widget to the one already loaded.
Recap the
complete workflow how to implement a widget from Unit7. Add the Greeting Widget
(another simple Widget from the samples) to the Greetings Widget.
Exercises:
Add
the Greeting Widget to the Content Server
Test
using the Perspective Manager
Modify
the widget (by doing several things as implementing a control from the library)
Chapter 11: Build a custom
Widget (optional)
Our First Widget.
Use the
Hello Widget, modify it to call the REST Service we build in Unit 3.2. Modify
this REST Service to provide a better JSON Structure.
Exercises:
Modify
the Hello-Widget. Add a model for our REST Service. Add a handlebar template to
output our greetings from the server. Add some css effects
Content:
Subdirectory
Structure
Some
Changes to our REST Service
Files
to create
Add
mockup support, once the answer is clear defined
Test
with index.html
Start
„npm start “the local server in the dev folder
Chapter 12: Strategies to “widgedize” an
existing legacy gui module and to add things to an existing module (optional)
The strange word “to widgedize”
stands for “Build a widget for a legacy module not already supporting widgets”.
The Strategies on amending a Module by adding a widget and on adding additional
functionality inside an existing widget are discussed. In the complete practical
workshop, these widgets are implemented also on the Server side, whereas here
no server implementations are made.
Content:
Moving from a legacy gui module to a smartUI module
Examine a legacy module and rebuild a smartUI widget
(here only on the client side)
As an example, the barcode module
Add a functionality in an existing widget
Add an email functionality in the Connected
Workspaces Team Widget.
Usable from inside the Widget
Handouts and Class
Material
A share
accessible for all attendees as source of this handouts is required.
Material for Chapter 12 including the client side js apps
Training conditions
The training is remote using Microsoft Teams in these Corona times.
The training materials are in english, the trtaining lanbguage is english or german, depending on the geographical location.
The customer needs to setup a stand alone training VM with a Content Server and Database. A copy of these machine must be provided as the Trainer Machine to us, on which the training is held.
New: We are offering custom widget development. Interested? Send an e-mail to merz at ebit-company.de stating the purpose of the widget and requesting aqoute
This is a 4-5
days’ Workshop covering the additional Parts of the SDK, the xECM, Webreports,
Workflow etc. Modules. Here, some of the more advanced concepts are discussed,
like how to make Widgets configurable in the Perspective Manager.
Also, there are overviews of D3 (Graphic Package) and Alpaca (Forms Package) inside the SDK. The complete Training is configurable.
There are a few additional libraries in smartUI, which are distributed in any content server installation. Therefore its not necessary, to instatt the libraries, just use them. We discuss several libraries also in the smartUI base and advanced trainings.
These are
alpacca.js A library to develop and use JSON based forms. Supported by Content Server RESTS calls
ally.js simplify certain accessibility features, functions and behaviors.
bililite.js Cross-Browser Text Ranges and Selection
ckeditor.js Configurable javascript RTF Editor
d3.js Data driven documents. A highly interactive library to draw interactive SVG graphics. Used to visualize data. The OpenText distribution contains
d3-selection
d3-array
d3-scale
d3-shape
d3-axis
d3-collection
d3-transition
d3-interpolate
d3-format
hammer.js Gestures in Webapps
less.js dynamic stylesheet language
moment.js Date Arithmetic in JS. Very useful with d3.
numeral.js Formatting and manipulating numbers
text.js AMD/Loader Plugin for loading text resources
<> brackets around the html and script tags are omitted
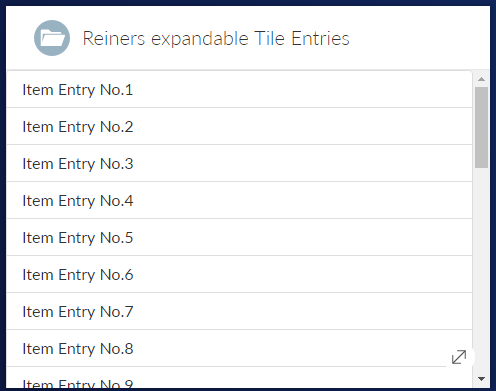
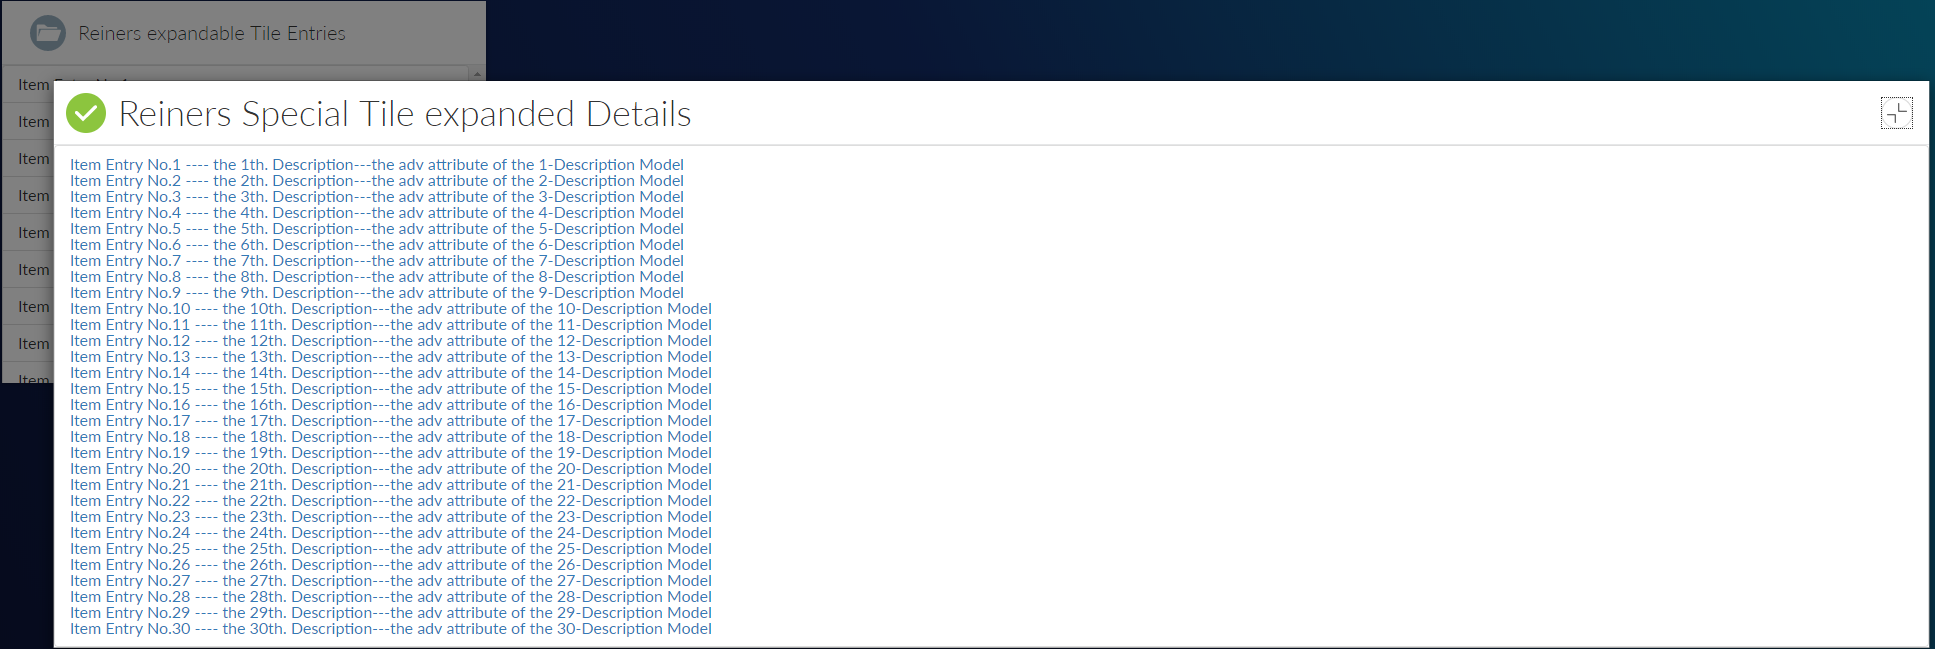
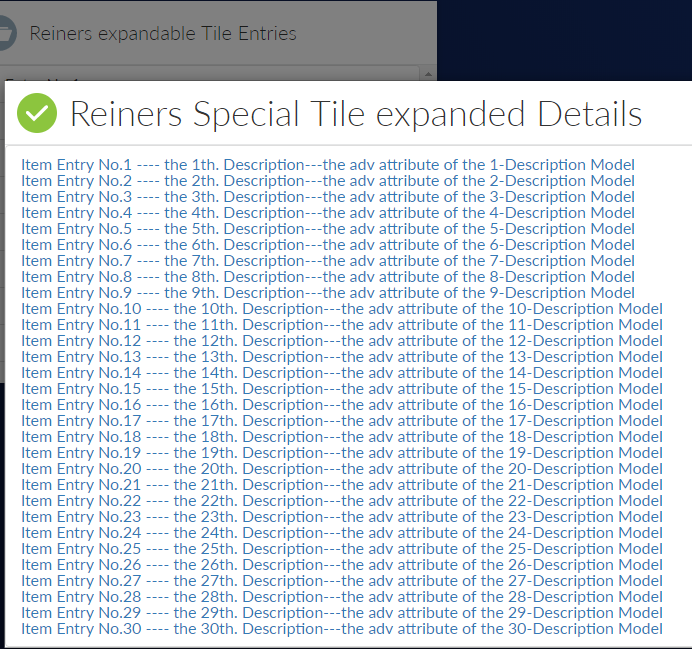
The serialize function is used to make the collection renderable with handlebars.js. This and item-template1 will render to this expanded view:
We also need one base view, referencing our two views, one as contentview and one as expandedView. We add the Behavior Expanding with the options with our collection set. And of course, with several title and icon options set.
Initialize it and show it at the el #tile. Then you are done
      var
      // Create instances of the views to show on the page
      tileView = new ListTileView(),

      // Create helpers to show the views on the page

      tileRegion = new Marionette.Region({
              el: "#tile"
          });

      tileRegion.show(tileView);
Easy, isn’t it?
The complete html file containing the javascript demo code can be downloaded here
•The simplest context in smartUI is the Page Context, which can include and fetch models and collections, but does not provide any other functionality. If you use it with widgets, which expect changes based on their context-changing models, you will have to handle these changes yourself.
You can use the page context like this
 require(['csui/lib/jquery', '../page.context', 'csui/utils/contexts/factories/connector',
       'csui/utils/contexts/factories/user', './page.context.mock'
     ], function ($, PageContext, ConnectorFactory, UserModelFactory, PageContextMock) {
       var contentElement = $('body'),
           context = new PageContext(),
           connector = context.getObject(ConnectorFactory),
           currentUser = context.getModel(UserModelFactory);
       $('<p>')
           .text('Connected to the server ' + connector.connection.url)
           .appendTo(contentElement);

       PageContextMock.enable();
       context.fetch()
           .done(function () {
             $('<p>')
                 .text('Current user is ' + currentUser.get('name'))
                 .appendTo(contentElement);
           });
     });
Triggered, when more than 1 file is selected. Action.ID = “zipanddownload«
Uses ‘csui/controls/globalmessage/globalmessage’, “csui/models/zipanddownload/zipanddownload.preflight”, “csui/models/zipanddownload/zipanddownload.stages”, “csui/dialogs/modal.alert/modal.alert” in local require.
Uses REST Calls. To use the command, these REST calls must exist on the Content Server side.
Post api/v2/zipanddownload with body={” id_list”:[oids zu compress],”type” : “zipanddownload ”
Returns in results/data/jobs/id the oid of the archive to download
Post api/v2/zipanddownload/oid to download the compressed archive
Simply put the command in a place where your menu options are. Typically in a toolbar config like