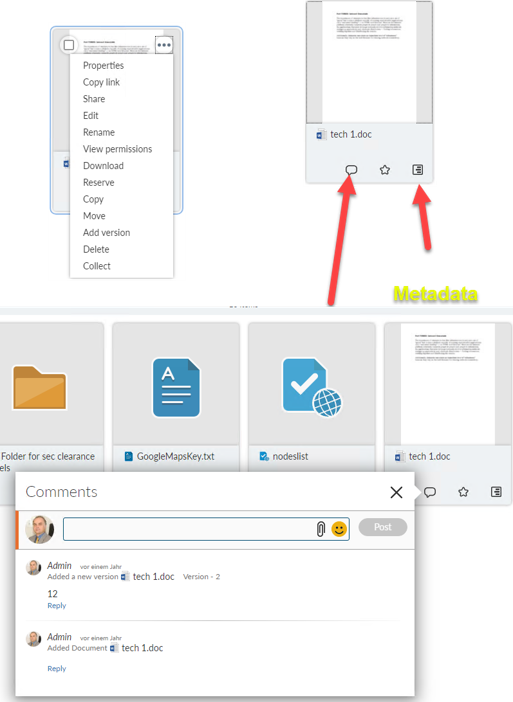
Have you seen the new smartUI thumbnail mode? You can switch the normal nodelist to the thumbnail mode quite easy by clicking on the list/images icon in the upper right. Another click switches the display back to the list mode.
Thumbnail mode displays all list entries in a more intuitive way
And, thumbnail mode does have also commands available
The tumbnails do have also some commands available
The actual Content Server release 16.2.8 brought a lot of improvements to the smartUI SDK, for example the xECM and the connected Workspaces Widgets are nowadays part of the SDK.
Also a lot of of people were interested in smartUI, not only Developers.
So we introduced an updated 5 days training to reflect the changes of 16.2.8 and a 2 days training to provide an overview of the SDK. Naturally, a 5 days training gives more information and also more exercises than a 2 days training, but this 2 days training can provide a good overview for Team Leaders and technical Managers.
For those with little time, there is also a 1 day training giving you a more compact overview for technical Managers and technical Evangelists. The one day training is not recommended for Developers. This training was held at the Enterprise World in Vienna 2019.
Whats new in the trainings?
New in the basic training
The Chapter 6 (SDK Intro) (5 days training Basic)
6.1 Introduction
6.2 Installing the SDK. Different Installations in 16.2.4 and 16.2.8. (NEW)
6.7 Routing Preview (see adv. Training for a more detailed discussion)
6.8 New Command
6.9 Custom Column
6.10 Metadata
6.11 Define a new Nodetype
6.12 Create a Widget
6.13 Base Widgets. Detailed info’s on base widgets.
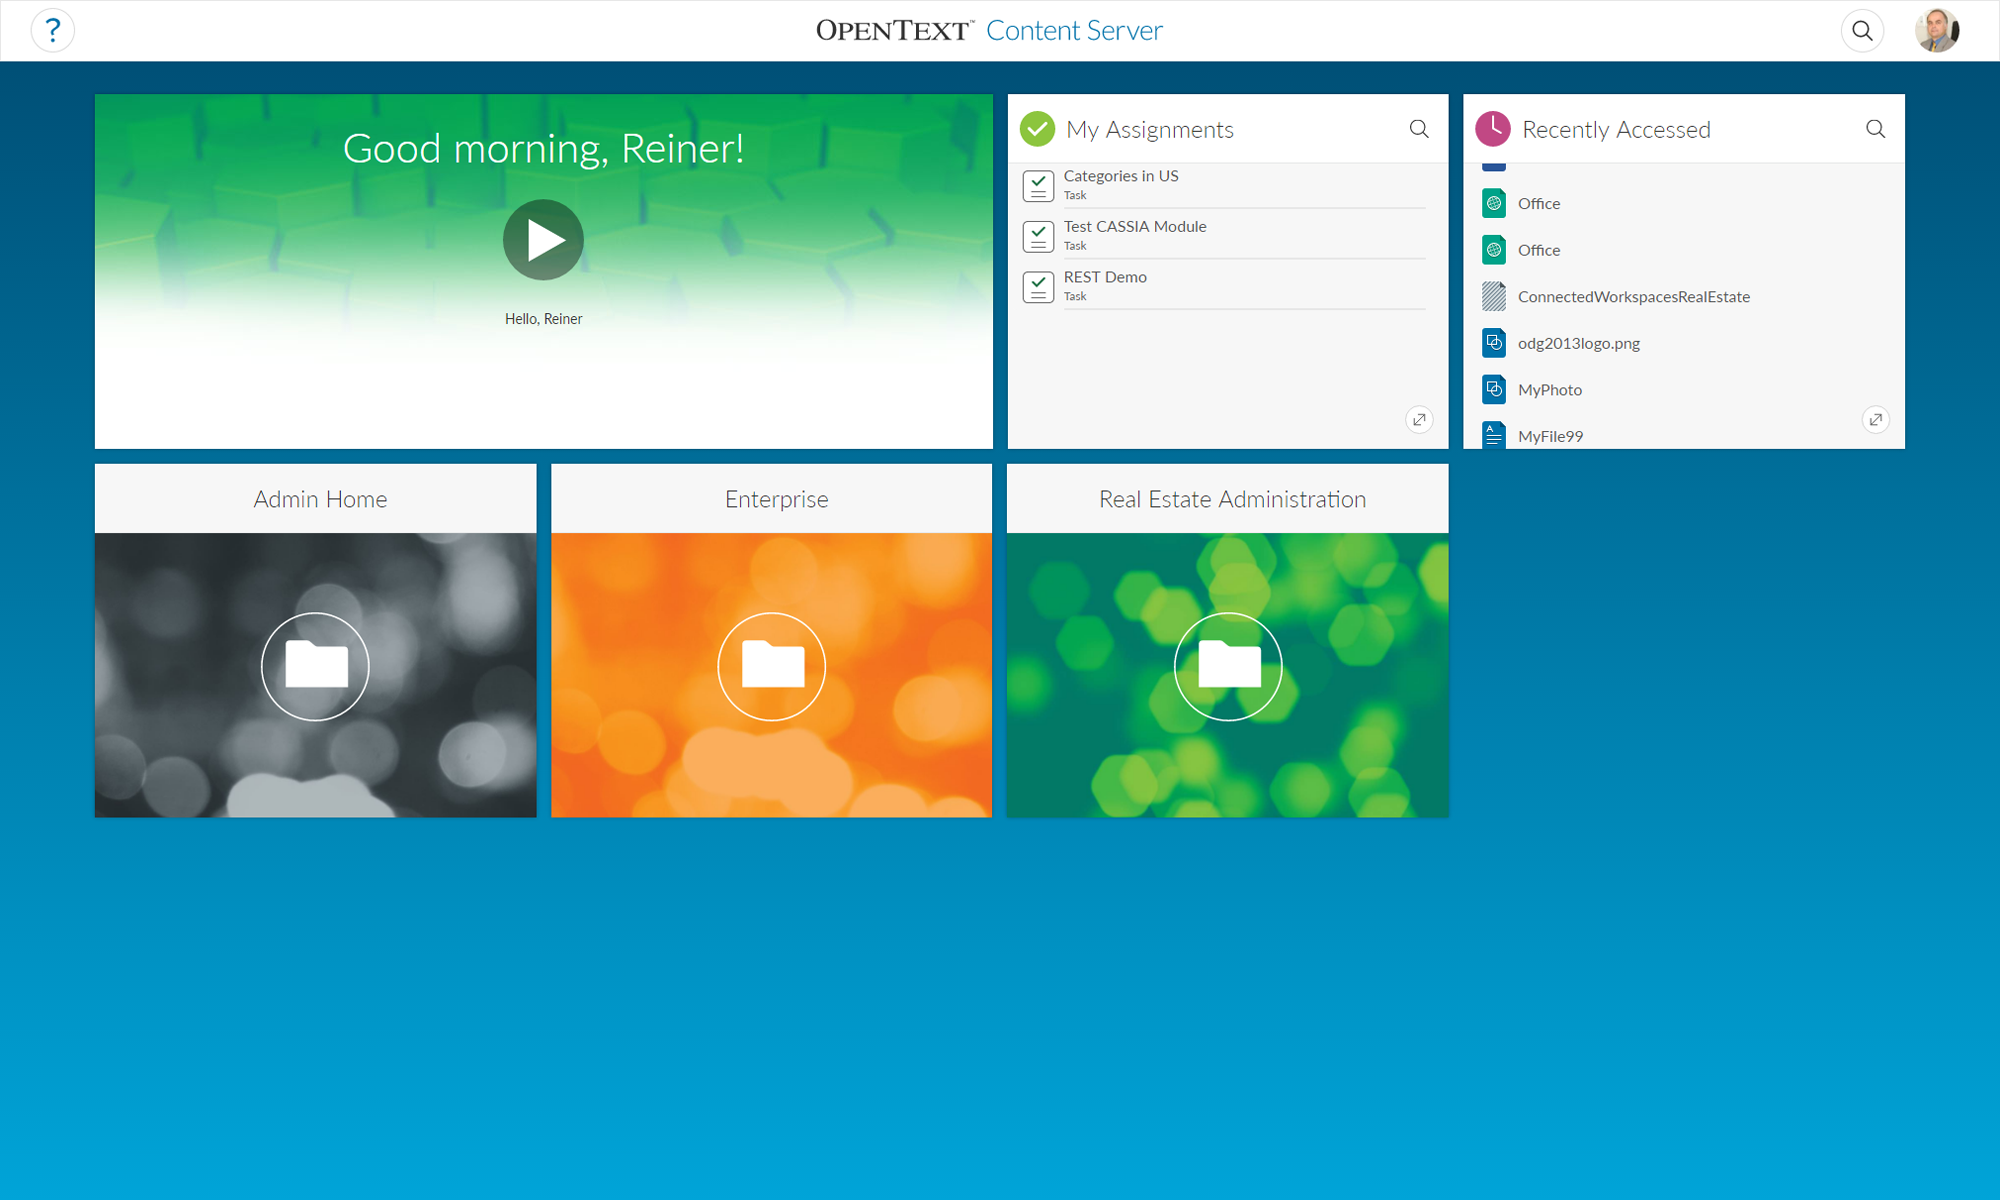
Favorites
Recently Accessed
MyAssignments
Shortcut
Shortcuts
Metadata
NodesTable
DocumentOverview
Search Results (NEW)
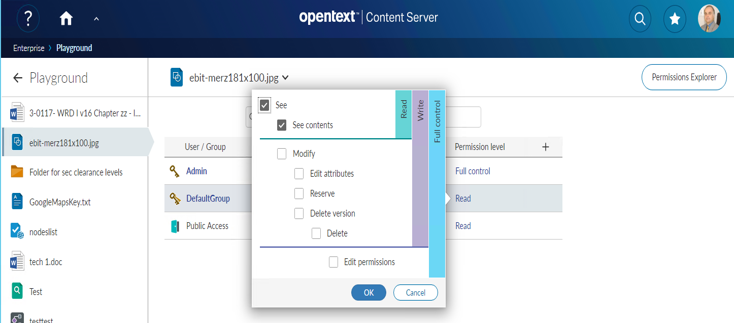
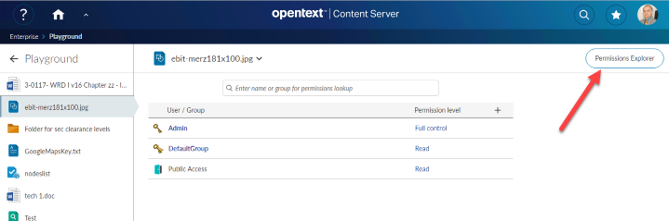
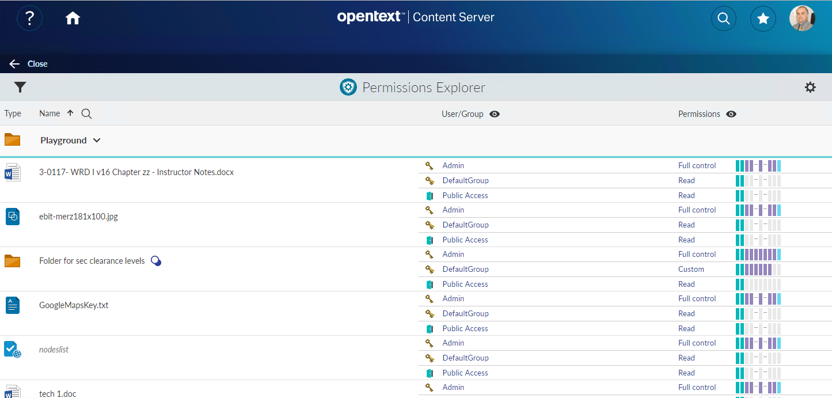
Permissions (NEW)
Html.editor (NEW)
Navigation Header (NEW)
6.14 Controls and Contexts
Controls
Node Picker
Modal Alert
File Open
Perspectives: Grid, Single, Left-Center-Right, Tabbed, Tabbed-Flow
Tile
ListView
ListItem
Signin
UserPicker
Breadcrumps
Checkbox
Dialog
Disclosure (NEW)
Error (NEW)
Form (NEW)
Globalmessage (NEW)
Grid (NEW)
Zip&Download (NEW)
Integration Folder Browser
Integration Target Picker
Contexts
Detached objects
Permanent objects
Temporary objects
Page Context
Browsing Context
Perspective Context
Portal Context
6.15 Models and Factories
NodeModel
Other Models
Factories
Fetchable Factory
Configurable Factory
A new Chapter 12 discusses the strategys needed to “widgedize” an existing legacy g module and to add things to an existing widget
The strange word “to widgedize”
stands for “Build a widget for a legacy module not already supporting widgets”.
The Strategies on amending a Module by adding a widget and on adding additional
functionality inside an existing widget are discussed.
Content:
Moving from a legacy gui module to a smartUI module
Examine a legacy module and rebuild a smartUI widget (here only on the client side)
As an example, the barcode widget
Add a functionality in an existing widget
Add an email functionality in the Connected Workspaces Team Widget.
Usable from inside the Widget
As an example the new team widget with email Support
New in the advanced training
The advanced training will eventually grow more and more to cover the new widgets and controls coming in future releases.
Chapter 1: Extended SDK Parts
Additional Widgets
Webreports
NodesListReportView
TilereportView
FilteredCountChartView
Carousel Widget View
parameter.prompt.form (NEW)
table.report (NEW)
status.screen (NEW)
open.webreport.js (action to show the Parameters form) (NEW)
binf-Datepicker
Using the build in datepicker
binf-switch
Using the binf-switch to turn checkboxes and radio buttons into switches
Workflow
Workflow Components
Workflow in smartUI including Workflow Status (new in 16.2.4)
Starting Workflows
URL Routes
Workitem Model
Workitem Actions
Workitem Extension
Writing Workflow Extensions
REST API Support for Workflows
Connected Workspaces
Configurationvolume (NEW)
Header (NEW)
Extended ECM
xECM: Office365 Groups (NEW)
xECM: Header Widget with Business Object Infos (NEW)
xECM: Snapshot of current document Attachments (NEW)
xECM: Dossier View Widget (NEW)
Event Action Center (NEW)
Widgets not part of the SDK
Mobile Scanning
Discussion Widget
Engineering Doc Management: Search
MyShares
The chapter 3 has also been amended
Tips and Tricks (Work in Progress- List can change)
Add a OTDS Ticket already in the browser to the connection object
Re-using a OTDS Ticket as LLCookie
Checking the paths in the test/index.html
Adding non CSUI supported jQuery functions in a view
Add additional jQuery Libraries
Adding Controls to a widget (NEW)
CKEDITOR 4 (NEW)
Intro (NEW)
JQuery Non SDK example (NEW)
Usage in the SDK (NEW)
Handlebars advanced
Handlebars QuickStart
Expressions
Helpers
Helpers with html output
Helpers with Hash Object
The Helper fn property
The helper inverse property
Partials
Helpers in the SDK
188 Handlebar Helpers
LESS advanced
LESS installation
Using LESS variables
Using Mixins in LESS
Parametric Mixins
Guarded Mixins
Accessibility in Bootstrap. Screen reader support and what’s to change in the SDK to support screen readers for visual impaired users.
What is Accessibility
Kinds of Disabilities
Accessibility and the law
WAI-ARIA
ASSETS.CMS.GOV
PayPal Bootstrap Accessibility Plugin
Web Experience Toolkit WET
Other resources
Best Practices in smartUI development
Pre-Development Steps
Preparation Steps
Development Steps
Integration Steps
Documentation Steps
Development Infrastructure for security aware Organizations (NEW)
Recommendations what’s to do if the reloading of npm modules during the creation of a widget is not wanted (NEW)
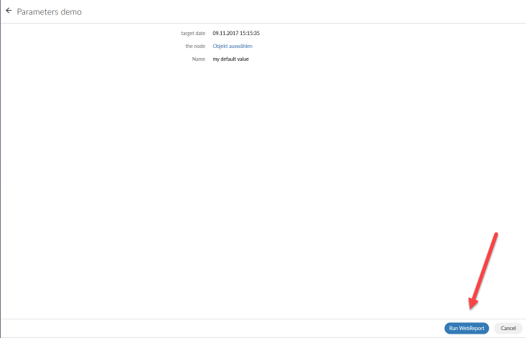
The usability of Webreports in smartUI has been improved. Now, you can, after starting a Webreport, edit the parameters of that report and receive feedbacks from the running Webreport. This makes a lot of fun!
Lets see, how this is done.
First a table.report widget can be used to list all data.
Click on a Webreport to start it
Then a Parameter Window opens. The Webreport can be startet by pressing the button “Run Webreport”
Webreport Parameters can be edited
A feedback can be given from the Webreport like this
Running webreports can give Feedbacks to SmartUI
The table.report shows a Smart UI table based on the output of WebReports data. The WebReport used by this widget must be based on either the widget_table_report_process_data_in_webreport or widget_table_report_process_data_in_datasource default reportviews which use the INSERTJSON @TABLEREPORT directive.
   // Create the data managing context
       var context = new PageContext(),
        sampleTableReportView = new TableReportView({
           context: context,
           data: {
             id: 24024,
             sortBy: "SubType",
             SortOrder: "ASC",
             columnsWithSearch: "SubType",
             titleBarIcon: 'mime_audio',
             title: 'Sample WebReports Table',
             header: true,
             swrLaunchCell: {
                 id: 12345,
                 iconClass: 'my-icon-class',
                 hoverText: 'Some hover text for my icon.'
             },
  parameters: [
                 {
                     name: 'myparm1',
                     value: 'val1'
                 },
                 {
                     name: 'myparm2',
                     value: 'val2'
                 }
             ]
           }
       }),
       // Create helpers to show the views on the page
       region = new Marionette.Region({
         el: "#content"
       });

       // Show the views on the page
       region.show(sampleTableReportView);

       // Fetch the WebReport output from the server to populate the tile with
       context.fetch();
The parameter window can be implemented like this (the xxxxxx is the node number for the webreport)
  var promptView,
         promptModel,
         contentRegion = new Marionette.Region({el: "#content"}),
         pageContext = new PageContext(),
         currentNode = pageContext.getModel(NodeModelFactory, {attributes: {id: xxxxxx}}),
         runWRModel = pageContext.getModel(PromptModelFactory, {
             attributes: {
                 node: currentNode
             }
         }),
         runWRController = new RunWRController();
         pageContext.fetch()
             .done(function () {

                 // We've got the page context, now get the runWRModel to see if there are parameters:
                 runWRController.getRunWRPreModel({
                     node: currentNode,
                     context: pageContext
                 }).done( function(){

                     // Build the prompt view and show it:
                     promptView = new PromptView({
                         context: pageContext,
                         model: currentNode,
                         promptModel: runWRController.runWRPreModel,
                         showBackIcon: false
                     });

                     contentRegion.show(promptView);
                 });
             })
A feedback is implemented by the status.screen control.
Have you seen the new Rules matching Mixin in the smartUI? Its a great mixin, allowing you to implement a colloection of rule models which are supposed one model, which rules match the input object. This is a quite powerful functionality
The following example implements the selection collection
Container = true
Subtype = 144, 749
and is type = 144 is one of the mimetypes listed
and is type = 144 or mimetype startswith “image/” of equals “pdf/x-pdf”
and is type = 144 and mimetype = “text/plain”
If run, then the action of the appripriate node is returned. Only on the base of a rules Model!!
Inside the webreport html widget there used to be the opportunity to use plain html for menu or other purposes. Since 16.2.4 there is a new widget in town, a plain html widget without the need of an webreport license.
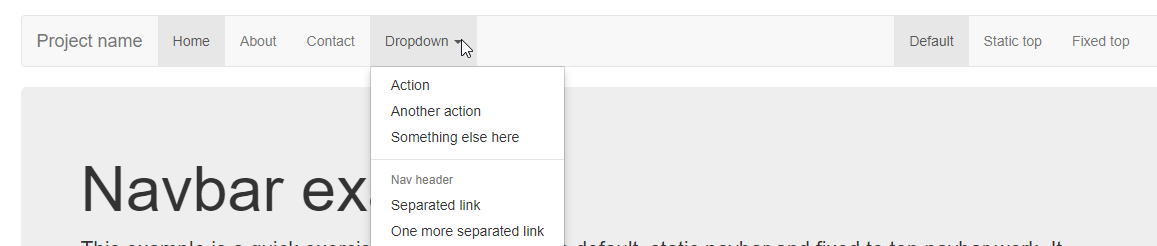
In both cases, you have to think of the new namespace (“binf”) on using bootstrap.
Take a bootstrap menu for example.
This is an example of a plain bootstrap menu
The plain bootstrap code wont work, because OpenText added the prefix “binf” to introduce a special namespace.
Change the plain code by adding these “binf” prefixes:
And the values you receive from the REST Calls are between -2 and 3.
How can you transfer this in a “selected” clause in the html select box?
Easy.
Ass a select helper in your main marionette view:
 Handlebars.registerHelper('select',
function (selected, options) {
Handlebars.registerHelper('select', function (selected, options)
{ return options.fn(this).replace( new RegExp(' value=\"' + selected + '\"'),
 '$& selected="selected"'); });
This handlebars helper named “select” will examine the coding tagged betweern a {{select}} and a {{/select}} in your handlebars template and insert at the option clause which is selected a ‘selected=”” ‘ clause. Then the Selectbox is ready to use.
Simply add a
status: this.model.get('status'),
to be returned in your template helper and the
{{#select status}}

...

{{/select}}
will trigger your select box helper to check for the v ariable status and to add a selected at the proper place.
Thats the magic behind the handlebars select helpers.
Beeing Content Server Trainer, I was asked to provide a training “How to program a Widget for the new Content Server GUI” to several customers. This is about the content of such a training and the reason why such a training is technically really advanced.
CSUI SDK introduces a shift in paradigma, the server is no longer providing the GUI, all is done by a Javascript Application at the client side.
Basic Training (newest version 1.005 from Feb/2018)
The basic training is very compact and lasts 5 days.
First, lets take a look on the components:
As a prerequisite, a firm knowledge of CSIDE, How to build a module, the Node Structure and whats to do with Content server Nodes is necessary.
At the end of the training, you’ll have a working knowledge of:
Content Server Perspectives. What are they and how you can use them to provide a user specific interface.
Content Server REST. This is the only possibility for the client to communicate with the server, so its mandantory to know the REST interface from the application point of vue. And, as REST can be very slow due to unneccesary data, its also mandantory to know, how to add REST services to the Content Server to get the data you want in the fastest way.
Javascript. There are Javascript Patterns, which are used heavily in the SDK. If “Javascript Object Inheritance”, “Currying/Schoenfinkelizing”, “Decorators” etc are weird words for you, this chapter is the right chapter for you.
Next is the infrastructural world of the sdk.
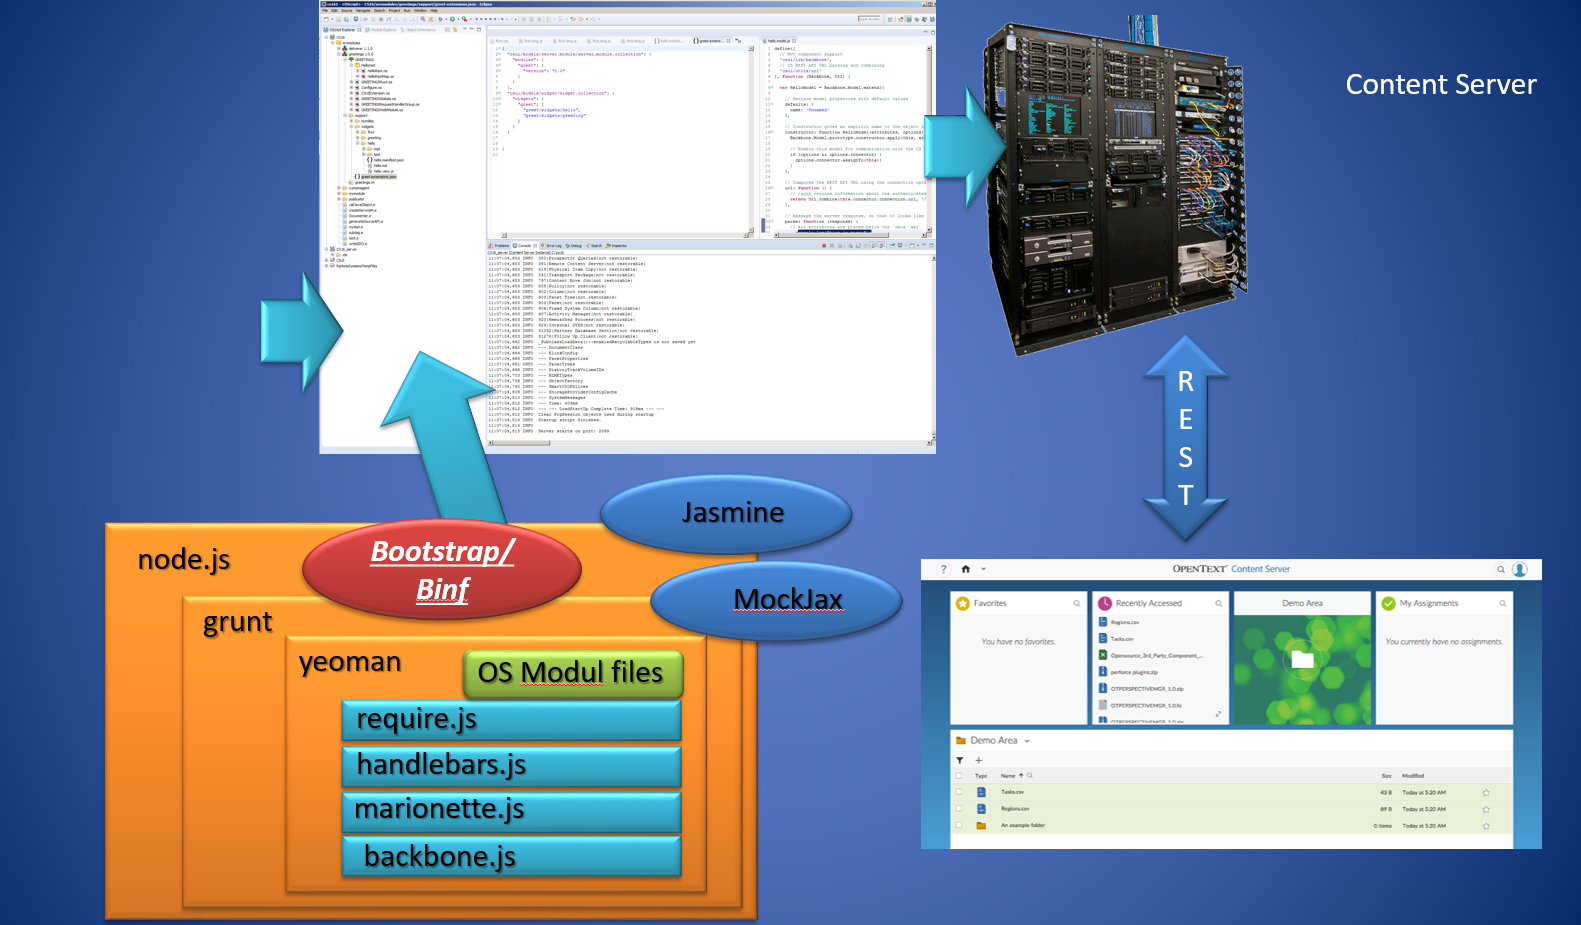
The CSUI Components
There are several components, which must be understood prior to build a Widget.
node.js is the base Javascript system for our development
grunt.js is a Javascript task runner, which we use to build, test and debug our widget
yeoman is a scaffolding system, which will be used by a Opentext extension to initialize the development folder. It also creates the skeleton of a Content Server module, which is used as a “Carrier” for our Widget(s)
backbone.js is the base framework to be used
marionette.js is an extension to backbone.js, making Views easier.
handlebars.js is the html templating framework used in the sdk
require.js is the javascript module loader to be used
bootstrap.js/binf.js is originally the public domain CSS/JS framework from Twitter for the appearance of the Widget. Binf is the Opentext variant, allowing to override CSS without negative effects
Next is the SDK itself. Due to time restrictions, in the base training are only the base functions, the advanced training covers the other aspects. It contains
Installing the SDK
Building the Demo Widget
CSS Style Overrides binf
General Overview of the SDK
Content of the SDK
Routing (Preview of the Advanced Training)
New Commands
Custom Columns
Metadata
Define a new NodeType
Create a Widget
Base Widgets
Controls
Models
Mockup and Test Data. How to setup mockup REST data. How to build test facilities in the SDK
Anatomy of the Hello Widget. A walktrough through this widget
Anatomy of the MyAssignment Widget
Add another Widget to the Content Server. Change the Hello Widget and add additional fields
Build a Custom Widget to be used as Client with a custom REST service. Here, a custom widget is build, which uses an extended version of the custom REST service from Part 2.
If time allows: Some Tips and Tricks from a “Work-in-Progress” Widget
Advanced Training (Version 1.005 Feb/2018)
OK, thats the basic training. There are a lot of additional things inside the SDK, but to understand these, there must be a couple of weeks with practical experience in between. The advanced part has beed remodelled to include a couple of interesting things. The advanced part contains:
Chapter 1 Extended SDK Parts
Additional Widgets
NodesListReportView
TilereportView
FilteredCountChartView
Carousel Widget View
Userwidget eSocial
ActivityFeedWidgetView
ActivityFeedContent
ChatWidget
Datepicker
switch
Workflow (new in Content Server 16.2)
Workflow Components
Workflow in smartUI
Starting Workflows
URL Routes
Workitem Actions
Workitem Extension
Writing Workflow Extensions
New REST API Support (16.2) for Workflows
Widgets not part of the SDK
Mobile Scanning
xECM: Header Widget with Business Object Infos
xECM: Snapshot of current document Attachments
xECM: Dossier View Widget
Engineering Doc Management: Search
xECM: Office365 Groups
Chapter 2 Extended SDK Features
Build Language Packs for Internationalization
Commands
Implementation and Inheritance from “CommandModel”
Best Practices
Using Commands
Custom URL Router. Routing, adding custom Routers. Using Routers as Navigation.
Behaviours. What are Behaviours?
DefaultActionBehaviour
BlockingBehaviour
ExpandingBehaviour
InfiniteScrollingBehaviour
PerfectScrollingBehaviour
PageLeavingBehaviour
Mixins. What are Mixins? All available Mixins.
Browsable Support for Collections. Using the “Browsable” support for Model-Collections.
Chapter 3 Additional Things to consider
Tips and Tricks (Work in Progress- List can change)
Add a OTDS Ticket already in the browser to the connection object
Re-using a OTDS Ticket as LLCookie
Checking the paths in the test/index.html
Using Helpers for supporting a select box with Handlebars
Adding non CSUI supported JQuery functions in a view
Handlebars advanced. A deeper look into Handlebars
LESS advanced. A deepter look into LESS, the CSS language used in Bootstrap
Accessibility in Bootstrap. What can be done to add support for screenreades etc to Bootstrap/Binf? Whats to avoid? Which tools are available
Best Practices in Development
As you can see, there is a lot of stuff. The basic training last 5 days, the advanced training 2. But on the other side, you’ll get happy users with your new Widgets.
And that’s all what counts.
References
Javascript
“JavaScript Application Design “as a general introduction (covering Grunt) https://www.manning.com/books/javascript-application-design
Did you ever wonder, how to create new widgets or forms for the new SmartUI of the content server? The new SmartUI is responsive and can be used on mobile devices.
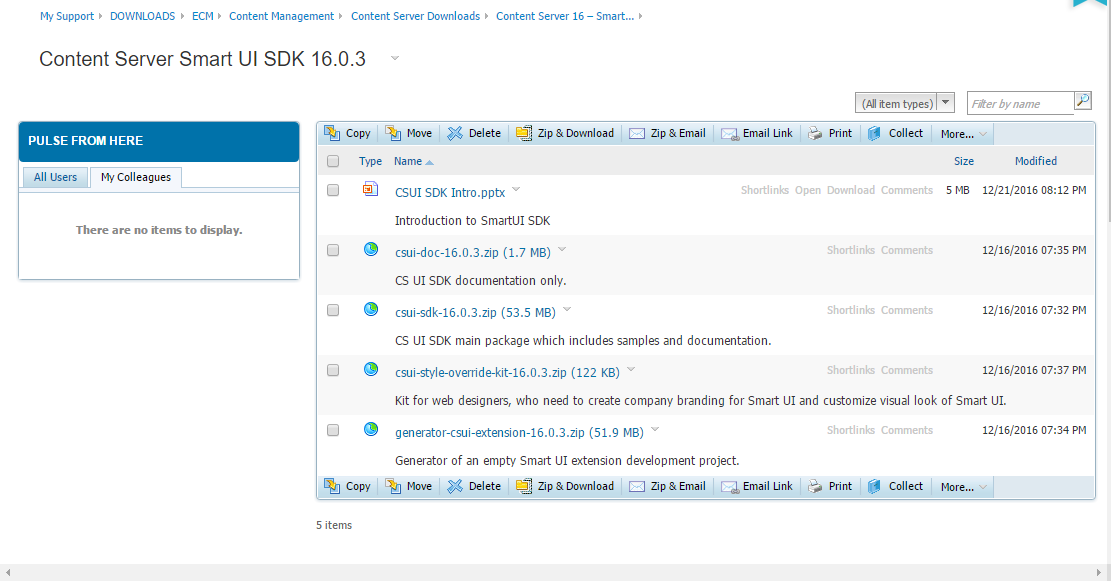
If you want to add new widgets or modify things, there is a new SDK on the knowledge center, which can be found here:
This are the components:
CSUI SDK Intro.pptx
this is a powerpoint presentation on the SDK.
csui-doc-16.0.3.zip (1.7MB)
this is the documentation as stand alone.
csui-sdk-16.0.3.zip (53.5 MB)
this is the sdk itself. It contains a copy of the documentation.
csui-style-override-kit-16.0.3.zip (122 kb)
this is a kit to provide branded css files, which will be used instead of the original ones.
generator-csui-extension-16.0.3.zip(51.9 MB)
this is a generator, which will be used to setup an empty development project.
The basic requirement is the installation of node.js at your CSIDE machine. You should be familiar with the REST API and Grunt to use the SDK.
The workflow is
Generate an empty project on the harddisc
Install all prerequisites in node.js (npm, grunt-cli)
Modify the example according to your needs
Import the module in out-module of your project into CSIDE
Copy the widgets etc into your support folder
Create the module in CSIDE and install it
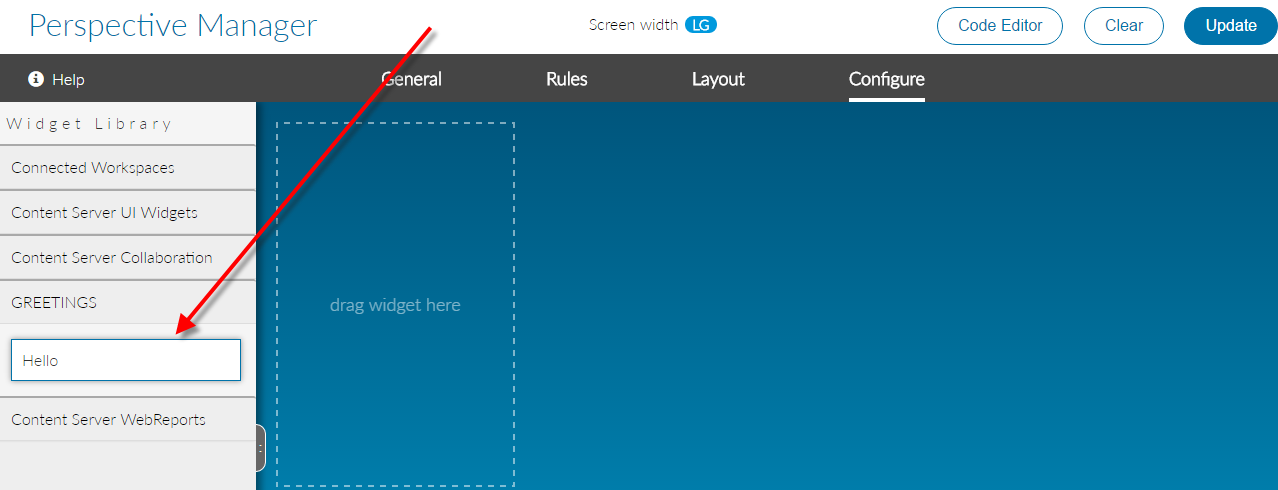
The installed new Widget
Then you should see the example widget under the name of your module in the perspective manager.
Watch for upcoming posts on this exciting new Content Server technology.