Upload a File to Content Server using REST and Javascript

This is an example how to upload a file using JavaScript and REST.

This example uploads the file c:\test.txt with the name of “MyFile123” under the folder with the node id 485336. This snipped relies on a previous login. The subtype of the file to be uploaded is “document” (144). The authorization token is saved under the variable name of “otcsticket”.

This example does not consider any categories (mantadory or not). We’ll discuss this in a later post.

6 Steps:

  1. Declare all variables needed. This is done by defining the array bodyData. At least there must be the subtpe, the parent_id, the name and the local file name.
  2. Fire an AJAX request to the URL, where your content server is, Use “api/v1/nodes” as REST command.
  3. Put the authorization ticket in the header field
  4. Put the bodyData in the data field
  5. Set the Mime Type to “application/x-www-form-urlencoded”
  6. If the request is done, process the “success” or the “failure” clauses

Put some nice HTML around it, add the authorization code and then you are done.

(At least for this example. Normally, you should provide some name check for the node name)

function upload() {
  var bodyData = {
        type: 144,
        parent_id: 485336,
        name: "Myfile123",
        file: "c:\\test.txt"
        }
      formData = new FormData();
  formData.append( "body", JSON.stringify( bodyData ) );

  formData.append( "file", "c:\\test.txt" );
  return $.ajax( {
    type: "POST",
    url: "http://[yourserver/yourcs/cs.exe/api/v1/nodes",
    data: bodyData,
    headers: { otcsticket: otcsticket },
    beforeSend: function( xhr ) {    
    xhr.overrideMimeType( "application/x-www-form-urlencoded" )
    }
  } ).then( function ( response ) {
    alert("Success")
  }, function ( jqxhr ) {
    alert("failure")
  } );
}


CSIDE Command Add Documentation Comments

There is an interesting command in the newer CSIDE versions.

Add Documentation Comments

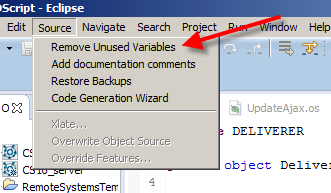
This can be found in the menu “Source”

Here is the Documentation Commands Entry

This works like the similar commands in java IDEs or in Visual Studio.

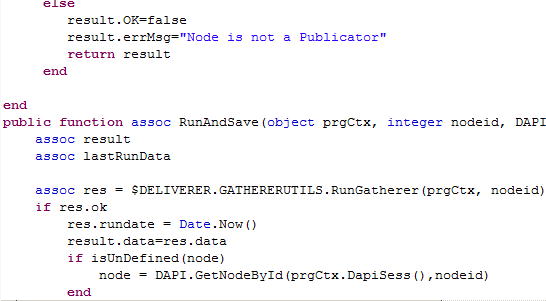
Imagine, you have a source code like this

Source Code without documentation comments

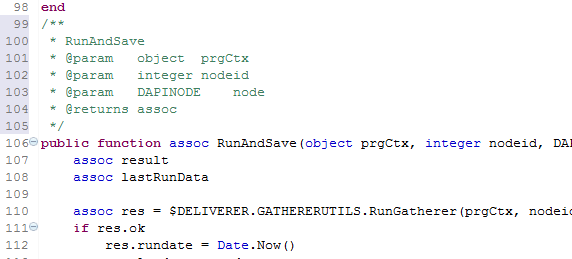
and if you use this new command, you’ll see, your source code is amended with the documentation comments like this

Source Code with documentation comments

This basic documentation comments are only a framework and they should be extended to declare the purpose of the function, the variables and the return values.

Remove Unused Variables in CSIDE

A very interesting function is “Remove Unused Variables” in CSIDE:

Where fo find the command

This command will remove all unused variables from the functions in the edit window.

The command at work

At left, you see the declaration “integer s=1”, which is not used in the function. At right, you see, this declaration is deleted after the execution of the “Remove Unused Variables” command

New CSIDE Function Format Source

The new CSIDE function allows a direct format of the OSCRIPT source code inside the IDE.

Imagine this short function in OSCRIPT. This is very unreadable.

By pressing CRTL+SHIFT+F inside the OSCRIPT window, the source code is reformatted automatically and the result looks much more readable:

Authentication (3/3) Authenticate with Webservices and Java against Content Server

To authenticate with a JAVA client against a Content Server, you should first create all client proxys. This example can be used against a Servlet Container, like Tomcat. Here, it is assumed, that it runs on port 8080.

The creation of the proxys must be done manually by typing

wsimport -keep http://yourserver:8080/cws/services/Authentication?wsdl
 [add all services you want to use]

jar cvfM webservices.jar com/opentext/*

Add the webservices.jar file in the build path of your Java application.

Then, use something like this to authenticate

String username = "[yourUser]";
  String passsword = "[yourpassword]";
  Authentication_Service authsrv = new Authentication_Service();
  Authentication authclient = authsrv.getbasicHttpBindingAuthentication();
  // the Token
  String authToken=null;
  // authenticate
  try
  {
      authToken = authclient.authenticateUser(username,password);
  } catch (SOAPFaultException e)
  {
      System.out.println("Failed! "+e.getFault().e.getFaultCode()+" : "+e.getMessage());
  }

This will, if succesful, store the authenticaten token in the string authToken.

Use this token in this way:

DocumentManagement_Service docmanSrv = new DocumentManagement_Service();

DocumentManagement docman = docmanSrv.getbasicHttpDocumentManagement();

OTAuthentication otAuth = new OTAuthentication();

otAuth.setAuthenticationToken(authToken);

Now, we have to set the token manually in the SOAP header

try

{

    final String API_NAMESPACE = "urn:api.ecm.opentext.com";
     SOAPHeader header = MessageFactory.newInstance().createMessage().getSOAPPart().getEnvelope().getHeader();
     SOAPHeaderElement authElement = header.addHeaderElement (new QName(API_NAMESPACE,"OPAuthentication"));
     SOAPElement authTokenElement = authElement.addChildElement (new QName(API_NAMESPACE, "AuthenticationToken"));
     authTokenElement.addTextNode (otAuth.getAuthenticationToken());
     ((WSBindingProvider) docMan).setOutboundHeaders (Headers.create(otAuthElement));
  } catch (SOAPExeption e)

{

[Print Error and return]

}

// now, we are ready to perform some functionality

Node node = docman.getNode(nodeId);
  1. Login and get the auth token
  2. set the auth token in the SOAP header
  3. tell your services about the auth token in the SOAP header
  4. perform operations on the server

Do not forget to refresh the token before it gets invalid. We discuss the refesh in a later posting.

Authentication (2/3) Authenticate with Webservices against the Content Server in c#

This is the second post on a series about authentication against the content server. This post explains the authentication from a c# application using Webservices.

Normally, the Webservices are used from a Java application container like Tomcat. To use this snippet, a Service Reference exist inside Visual Studio with the URL

http://[yourServer]:8080/cws/services/Authentication?wsdl

with the name of “Authentication”.

The Authentication itself is done with something like this:

Authentication.AuthenticationClient authClient = new Authentication.AuthenticationClient();

string authToken = null;
try
{
     Console.Write(“Authenticate User…”);
     authToken = authClient.AuthenticateUser(userId, password);
     Console.WriteLine(“Success \n”);
} catch (Exception e) {
     Console.WriteLine(“failed\n”);
     Console.WriteLine(“{0} : {1} \n”, e.Message, e.Source);
     return;
}
finally
{
     authClient.Close();
}

Here, the userid and the password is send to the Authentication service. If all is correct, the authentication token is send back.

This token can be used like in the following snippet. Here, the Node 485227 is requested.

DocumentManagement.DocumentManagementClient docclient = new    DocumentManagement.DocumentManagementClient();
DocumentManagement.OTAuthentication otauth = new    DocumentManagement.OTAuthentication();
otauth.AuthenticationToken = authToken;

// Get the Node 485227 
DocumentManagement.Node node = docclient.GetNode(ref otauth, 485227);

Like the Authentification Service, the DocumentManagement Service must be declared as a Service Reference in Visual Studio. When a Tomcat is used, then the declaration looks like

http://[yourServer]:8080/cws/services/DocumentManagement?wsdl

To use the token, declare an instance of Documentmanagement.OTAuthentication and put the token in the AuthenticationToken field of this instance.

Then use the webservices calls as usual, but add the instance of this OTAuthentication as a reference in the first argument of the call.

Tipp: save this instance as a copy, from time to time the first argument returns as null. Then you can re-instate the original OTAuthentication.

If you want to use Webservices in IIS, pls refer to the post from January 2017.

Authentication (1/3) How to authenticate against the Content Server in REST/Javascript

This is the first post on a series about authentication against the content server. The first post explains the authentication from a html page with Javascript and JQuery using REST

The REST API can be used to perfom things on the Content Server from nearly every thinkable language. Here is the example how to do a login from Javascript.

Replace [yourserver] with the DNS name of your Content Server, replace [yourCSInstance] with your CS instance and the cgi.

A valid URL would be for example

http://AllmyServer.mydomain.com/cs16/cs.exe/api/v1/auth

for the Authentication request.

<script>
  var otcsticket = "";
  /*
  * This function needs to be run first to authenticate the user against Content Server.
  */
  function authenticate() {
  // Set up the ajax request
  $.ajax({
  // Authenticate is a POST
  type: "POST",
  url: "http://[yourserver]/[yourCSInstance]/api/v1/auth",
  data: { username: [username], password: [password] },
  beforeSend: function( xhr ) {
  // Set the correct MimeType for the request.
  xhr.overrideMimeType( "application/x-www-form-urlencoded" )
  }
  }).done( function( data ) {

var val = JSON.parse( data );
  alert( "setting otcsticket to: " + val[ "ticket" ] );
  // Store the ticket for later use.
  otcsticket = val[ "ticket" ];

});
  }
 </script>

To authenticate, a $.ajax call is used. The REST call to do this is “/api/v1/auth”. The data must contain a valid username and a valid password for this user.

If the call is finished, then the JSON array (in the response) must be parsed for the key “ticket”. The value is the authentication token which should be stored somewhere for further use. Normally, the name otcsticket is used for this.

The token should be send as a header in any request, like in this example:

$.ajax( {
  type: "POST",
  url: "[yourURL]/api/v1/nodes",
  data: bodyData,
  headers: { otcsticket: otcsticket },
  beforeSend: function( xhr ) {
  // Set the correct MimeType for the request.
  xhr.overrideMimeType( "application/x-www-form-urlencoded" )
  }
  } ).then( function ( response ) {
  alert("Success")
  }, function ( jqxhr ) {
  alert("failure")
  } );

(This is a call to upload a file, for the complete example on uploading files with REST see the posts in January 2017)