Technical Training “How to program a Widget in the new Content Server GUI” with the CSUI SDK

Hi folks

Beeing Content Server Trainer, I was asked to provide a training “How to program a Widget for the new Content Server GUI” to several customers. This is about the content of such a training and the reason why such a training is technically really advanced.

CSUI SDK introduces a shift in paradigma, the server is no longer providing the GUI, all is done by a Javascript Application at the client side.

Basic Training (newest version 1.005 from Feb/2018)

The basic training is very compact and lasts 5 days.

First, lets take a look on the components:

As a prerequisite, a firm knowledge of CSIDE, How to build a module, the Node Structure and whats to do with Content server Nodes is necessary.

At the end of the training, you’ll have a working knowledge of:

  1. Content Server Perspectives. What are they and how you can use them to provide a user specific interface.
  2. Content Server REST. This is the only possibility for the client to communicate with the server, so its mandantory to know the REST interface from the application point of vue. And, as REST can be very slow due to unneccesary data, its also mandantory to know, how to add REST services to the Content Server to get the data you want in the fastest way.
  3. Javascript. There are Javascript Patterns, which are used heavily in the SDK. If “Javascript Object Inheritance”, “Currying/Schoenfinkelizing”, “Decorators” etc are weird words for you, this chapter is the right chapter for you.
  4. Next is the infrastructural world of the sdk.
    CSUI Components
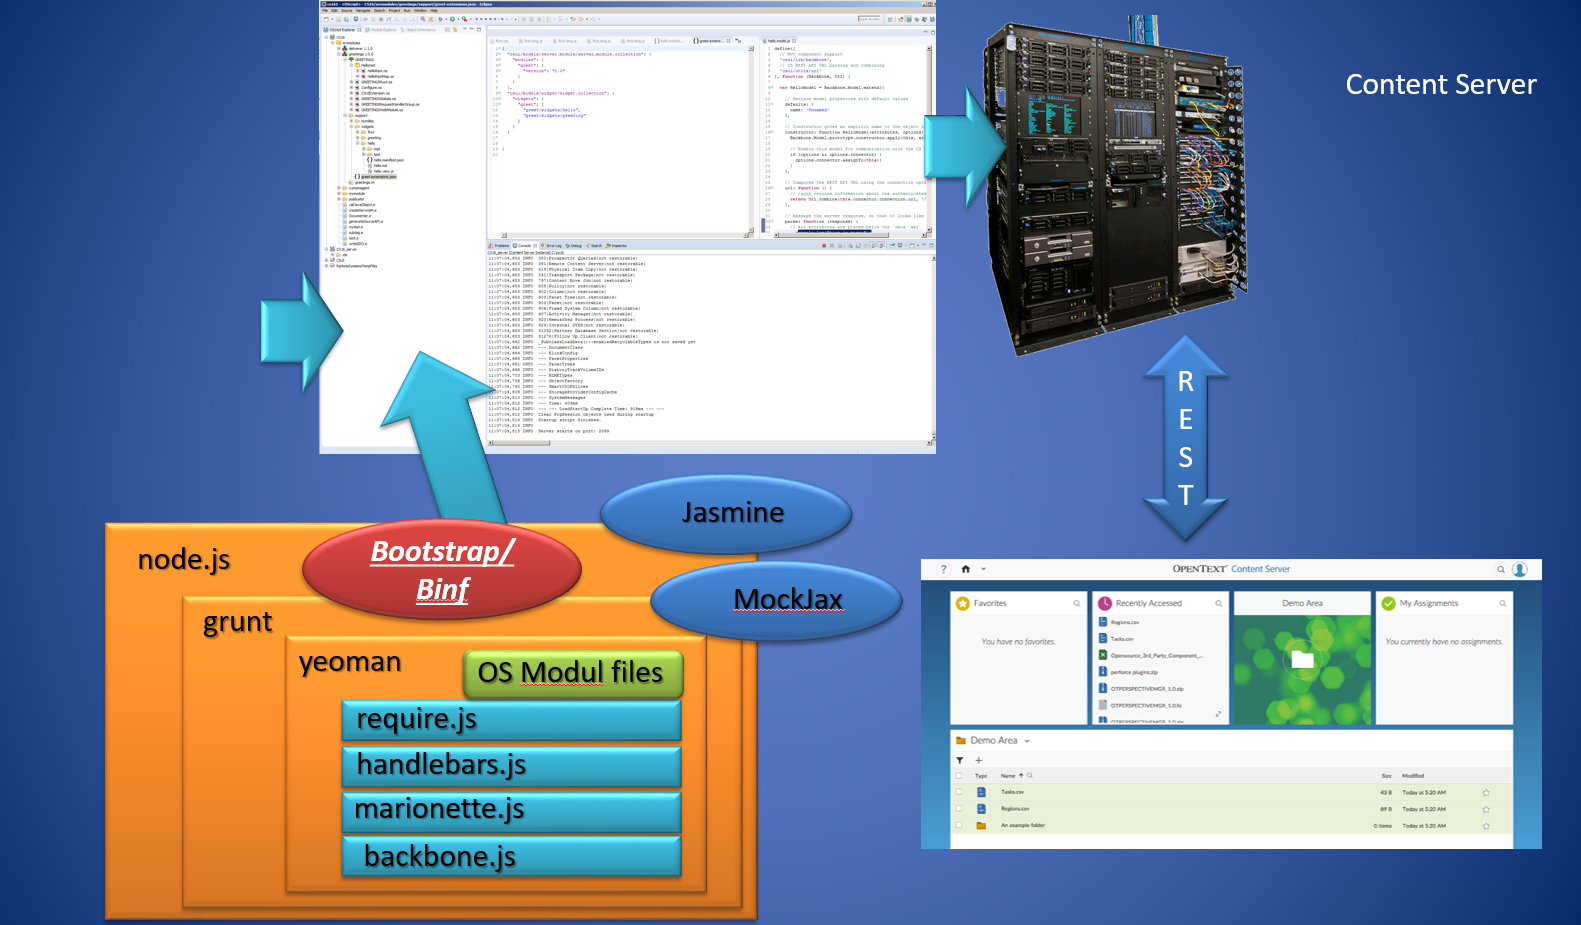
    The CSUI Components

    There are several components, which must be understood prior to build a Widget.

    1. node.js is the base Javascript system for our development
    2. grunt.js is a Javascript task runner, which we use to build, test and debug our widget
    3. yeoman is a scaffolding system, which will be used by a Opentext extension to initialize the development folder. It also creates the skeleton of a Content Server module, which is used as a “Carrier” for our Widget(s)
    4. backbone.js is the base framework to be used
    5. marionette.js is an extension to backbone.js, making Views easier.
    6. handlebars.js is the html templating framework used in the sdk
    7. require.js is the javascript module loader to be used
    8. bootstrap.js/binf.js is originally the public domain CSS/JS framework from Twitter for the appearance of the Widget. Binf is the Opentext variant, allowing to override CSS without negative effects
  5. Next is the SDK itself. Due to time restrictions, in the base training are only the base functions, the advanced training covers the other aspects. It contains
    1. Installing the SDK
    2. Building the Demo Widget
    3. CSS Style Overrides binf
    4. General Overview of the SDK
    5. Content of the SDK
    6. Routing (Preview of the Advanced Training)
    7. New Commands
    8. Custom Columns
    9. Metadata
    10. Define a new NodeType
    11. Create a Widget
    12. Base Widgets
    13. Controls
    14. Models
  6. Mockup and Test Data. How to setup mockup REST data. How to build test facilities in the SDK
  7. Anatomy of the Hello Widget. A walktrough through this widget
  8. Anatomy of the MyAssignment Widget
  9. Add another Widget to the Content Server. Change the Hello Widget and add additional fields
  10. Build a Custom Widget to be used as Client with a custom REST service. Here, a custom widget is build, which uses an extended version of the custom REST service from Part 2.
  11. If time allows: Some Tips and Tricks from a “Work-in-Progress” Widget


Advanced Training (Version 1.005 Feb/2018)

OK, thats the basic training. There are a lot of additional things inside the SDK, but to understand these, there must be a couple of weeks with practical experience in between. The advanced part has beed remodelled to include a couple of interesting things.  The advanced part contains:

  1. Chapter 1 Extended SDK Parts
    1. Additional Widgets
      1. NodesListReportView
      2. TilereportView
      3. FilteredCountChartView
      4. Carousel Widget View
      5. Userwidget eSocial
      6. ActivityFeedWidgetView
      7. ActivityFeedContent
      8. ChatWidget
    2. Datepicker
    3. switch
    4. Workflow (new in Content Server 16.2)
      1. Workflow Components
      2. Workflow in smartUI
      3. Starting Workflows
      4. URL Routes
      5. Workitem Actions
      6. Workitem Extension
      7. Writing Workflow Extensions
    5. New REST API Support (16.2) for Workflows
    6. Widgets not part of the SDK
      1. Mobile Scanning
      2. xECM: Header Widget with Business Object Infos
      3. xECM: Snapshot of current document Attachments
      4. xECM: Dossier View Widget
      5. Engineering Doc Management: Search
      6. xECM: Office365 Groups
  2. Chapter 2 Extended SDK Features
    1. Build Language Packs for Internationalization
    2. Commands
      1. Implementation and Inheritance from “CommandModel”
      2. Best Practices
      3. Using Commands
    3. Custom URL Router. Routing, adding custom Routers. Using Routers as Navigation.
    4. Behaviours. What are Behaviours?
      1. DefaultActionBehaviour
      2. BlockingBehaviour
      3. ExpandingBehaviour
      4. InfiniteScrollingBehaviour
      5. PerfectScrollingBehaviour
      6. PageLeavingBehaviour
    5. Mixins. What are Mixins? All available Mixins.
    6. Browsable Support for Collections. Using the “Browsable” support for Model-Collections.
  3. Chapter 3 Additional Things to consider
    1. Tips and Tricks (Work in Progress- List can change)
      1. Add a OTDS Ticket already in the browser to the connection object
      2. Re-using a OTDS Ticket as LLCookie
      3. Checking the paths in the test/index.html
      4. Using Helpers for supporting a select box with Handlebars
      5. Adding non CSUI supported JQuery functions in a view
    2. Handlebars advanced. A deeper look into Handlebars
    3. LESS advanced. A deepter look into LESS, the CSS language used in Bootstrap
    4. Accessibility in Bootstrap. What can be done to add support for screenreades etc to Bootstrap/Binf? Whats to avoid? Which tools are available
    5. Best Practices in Development


As you can see, there is a lot of stuff. The basic training last 5 days, the advanced training 2. But on the other side, you’ll get happy users with your new Widgets.

And that’s all what counts.

References

Javascript
  • “JavaScript Application Design “as a general introduction (covering Grunt) https://www.manning.com/books/javascript-application-design
  • Stoyanow’s JavaScript patterns http://shop.oreilly.com/product/9780596806767.do
  • Flanagan’s “JavaScript: The Definitive Guide” http://shop.oreilly.com/product/9780596805531.do
  • Crockfords “Javascript The good Parts” http://shop.oreilly.com/product/9780596517748.do
  • Flanagans “JavaScript Pocket Reference” http://shop.oreilly.com/product/0636920011460.do
Bootstrap
  • Spurlock: Bootstrap Responsive Web Development http://shop.oreilly.com/product/0636920027867.do
  • Syed Fazle Rahman: Jump Start Bootstrap: Get Up to Speed With Bootstrap in a Weekend https://www.amazon.com/gp/product/0992279437
  • Alan Forbes: The Joy of Bootstrap: A smarter way to learn the world’s most popular web framework https://www.amazon.com/gp/product/1522792813/
Require.JS
  • Greg Franko: Instant Dependency Management with RequireJS How-to https://www.amazon.com/Instant-Dependency-Management-RequireJS-How/dp/1782169067
  • David Sulc: Structuring Backbone Code with RequireJS and Marionette Modules
    https://leanpub.com/structuring-backbone-with-requirejs-and-marionette
Backbone
  • Developing Backbone.js Applications Adnan Osmani http://shop.oreilly.com/product/0636920025344.do
  • js Patterns and Best Practices Swarnendu De https://www.amazon.com/Backbone-js-Patterns-Best-Practices-Swarnendu/dp/1783283572
  • js Cookbook Vadim Mirgorod http://shop.oreilly.com/product/9781782162728.do
  • js Blueprints Andrew Burgess http://shop.oreilly.com/product/9781783286997.do


Backbone-Marionette
  • Getting Started with Backbone Marionette Raymundo Armendariz, Arturo Soto
    https://www.packtpub.com/web-development/getting-started-backbone-marionette
  • Marionette.js: A Gentle Introduction David Sulc https://leanpub.com/marionette-gentle-introduction
  • Marionette.js: A Serious Progression David Sulc https://leanpub.com/marionette-serious-progression
Mockjax and Jasmine
  • js Cookbook Vadim Mirgorod https://www.packtpub.com/mapt/book/web_development/9781782162728 Chapter 8
  • KnockoutJS Essentials Jorge Ferrando
    https://www.packtpub.com/application-development/knockoutjs-essentials
  • JavaScript Testing with Jasmine Eva Hahn https://www.safaribooksonline.com/library/view/javascript-testing-with/9781449356729/


Content Server Trainings
  • 4-0140 Content Server IDE (CSIDE) Fundamentals
  • 971-301 Livelink ECM Enterprise Server Workflow Customization Fundamentals
  • 03-0117/8 Webreports Design


Upload a File to Content Server using REST and Javascript

This is an example how to upload a file using JavaScript and REST.

This example uploads the file c:\test.txt with the name of “MyFile123” under the folder with the node id 485336. This snipped relies on a previous login. The subtype of the file to be uploaded is “document” (144). The authorization token is saved under the variable name of “otcsticket”.

This example does not consider any categories (mantadory or not). We’ll discuss this in a later post.

6 Steps:

  1. Declare all variables needed. This is done by defining the array bodyData. At least there must be the subtpe, the parent_id, the name and the local file name.
  2. Fire an AJAX request to the URL, where your content server is, Use “api/v1/nodes” as REST command.
  3. Put the authorization ticket in the header field
  4. Put the bodyData in the data field
  5. Set the Mime Type to “application/x-www-form-urlencoded”
  6. If the request is done, process the “success” or the “failure” clauses

Put some nice HTML around it, add the authorization code and then you are done.

(At least for this example. Normally, you should provide some name check for the node name)

function upload() {
  var bodyData = {
        type: 144,
        parent_id: 485336,
        name: "Myfile123",
        file: "c:\\test.txt"
        }
      formData = new FormData();
  formData.append( "body", JSON.stringify( bodyData ) );

  formData.append( "file", "c:\\test.txt" );
  return $.ajax( {
    type: "POST",
    url: "http://[yourserver/yourcs/cs.exe/api/v1/nodes",
    data: bodyData,
    headers: { otcsticket: otcsticket },
    beforeSend: function( xhr ) {    
    xhr.overrideMimeType( "application/x-www-form-urlencoded" )
    }
  } ).then( function ( response ) {
    alert("Success")
  }, function ( jqxhr ) {
    alert("failure")
  } );
}


Authentication (3/3) Authenticate with Webservices and Java against Content Server

To authenticate with a JAVA client against a Content Server, you should first create all client proxys. This example can be used against a Servlet Container, like Tomcat. Here, it is assumed, that it runs on port 8080.

The creation of the proxys must be done manually by typing

wsimport -keep http://yourserver:8080/cws/services/Authentication?wsdl
 [add all services you want to use]

jar cvfM webservices.jar com/opentext/*

Add the webservices.jar file in the build path of your Java application.

Then, use something like this to authenticate

String username = "[yourUser]";
  String passsword = "[yourpassword]";
  Authentication_Service authsrv = new Authentication_Service();
  Authentication authclient = authsrv.getbasicHttpBindingAuthentication();
  // the Token
  String authToken=null;
  // authenticate
  try
  {
      authToken = authclient.authenticateUser(username,password);
  } catch (SOAPFaultException e)
  {
      System.out.println("Failed! "+e.getFault().e.getFaultCode()+" : "+e.getMessage());
  }

This will, if succesful, store the authenticaten token in the string authToken.

Use this token in this way:

DocumentManagement_Service docmanSrv = new DocumentManagement_Service();

DocumentManagement docman = docmanSrv.getbasicHttpDocumentManagement();

OTAuthentication otAuth = new OTAuthentication();

otAuth.setAuthenticationToken(authToken);

Now, we have to set the token manually in the SOAP header

try

{

    final String API_NAMESPACE = "urn:api.ecm.opentext.com";
     SOAPHeader header = MessageFactory.newInstance().createMessage().getSOAPPart().getEnvelope().getHeader();
     SOAPHeaderElement authElement = header.addHeaderElement (new QName(API_NAMESPACE,"OPAuthentication"));
     SOAPElement authTokenElement = authElement.addChildElement (new QName(API_NAMESPACE, "AuthenticationToken"));
     authTokenElement.addTextNode (otAuth.getAuthenticationToken());
     ((WSBindingProvider) docMan).setOutboundHeaders (Headers.create(otAuthElement));
  } catch (SOAPExeption e)

{

[Print Error and return]

}

// now, we are ready to perform some functionality

Node node = docman.getNode(nodeId);
  1. Login and get the auth token
  2. set the auth token in the SOAP header
  3. tell your services about the auth token in the SOAP header
  4. perform operations on the server

Do not forget to refresh the token before it gets invalid. We discuss the refesh in a later posting.

Authentication (2/3) Authenticate with Webservices against the Content Server in c#

This is the second post on a series about authentication against the content server. This post explains the authentication from a c# application using Webservices.

Normally, the Webservices are used from a Java application container like Tomcat. To use this snippet, a Service Reference exist inside Visual Studio with the URL

http://[yourServer]:8080/cws/services/Authentication?wsdl

with the name of “Authentication”.

The Authentication itself is done with something like this:

Authentication.AuthenticationClient authClient = new Authentication.AuthenticationClient();

string authToken = null;
try
{
     Console.Write(“Authenticate User…”);
     authToken = authClient.AuthenticateUser(userId, password);
     Console.WriteLine(“Success \n”);
} catch (Exception e) {
     Console.WriteLine(“failed\n”);
     Console.WriteLine(“{0} : {1} \n”, e.Message, e.Source);
     return;
}
finally
{
     authClient.Close();
}

Here, the userid and the password is send to the Authentication service. If all is correct, the authentication token is send back.

This token can be used like in the following snippet. Here, the Node 485227 is requested.

DocumentManagement.DocumentManagementClient docclient = new    DocumentManagement.DocumentManagementClient();
DocumentManagement.OTAuthentication otauth = new    DocumentManagement.OTAuthentication();
otauth.AuthenticationToken = authToken;

// Get the Node 485227 
DocumentManagement.Node node = docclient.GetNode(ref otauth, 485227);

Like the Authentification Service, the DocumentManagement Service must be declared as a Service Reference in Visual Studio. When a Tomcat is used, then the declaration looks like

http://[yourServer]:8080/cws/services/DocumentManagement?wsdl

To use the token, declare an instance of Documentmanagement.OTAuthentication and put the token in the AuthenticationToken field of this instance.

Then use the webservices calls as usual, but add the instance of this OTAuthentication as a reference in the first argument of the call.

Tipp: save this instance as a copy, from time to time the first argument returns as null. Then you can re-instate the original OTAuthentication.

If you want to use Webservices in IIS, pls refer to the post from January 2017.

Authentication (1/3) How to authenticate against the Content Server in REST/Javascript

This is the first post on a series about authentication against the content server. The first post explains the authentication from a html page with Javascript and JQuery using REST

The REST API can be used to perfom things on the Content Server from nearly every thinkable language. Here is the example how to do a login from Javascript.

Replace [yourserver] with the DNS name of your Content Server, replace [yourCSInstance] with your CS instance and the cgi.

A valid URL would be for example

http://AllmyServer.mydomain.com/cs16/cs.exe/api/v1/auth

for the Authentication request.

<script>
  var otcsticket = "";
  /*
  * This function needs to be run first to authenticate the user against Content Server.
  */
  function authenticate() {
  // Set up the ajax request
  $.ajax({
  // Authenticate is a POST
  type: "POST",
  url: "http://[yourserver]/[yourCSInstance]/api/v1/auth",
  data: { username: [username], password: [password] },
  beforeSend: function( xhr ) {
  // Set the correct MimeType for the request.
  xhr.overrideMimeType( "application/x-www-form-urlencoded" )
  }
  }).done( function( data ) {

var val = JSON.parse( data );
  alert( "setting otcsticket to: " + val[ "ticket" ] );
  // Store the ticket for later use.
  otcsticket = val[ "ticket" ];

});
  }
 </script>

To authenticate, a $.ajax call is used. The REST call to do this is “/api/v1/auth”. The data must contain a valid username and a valid password for this user.

If the call is finished, then the JSON array (in the response) must be parsed for the key “ticket”. The value is the authentication token which should be stored somewhere for further use. Normally, the name otcsticket is used for this.

The token should be send as a header in any request, like in this example:

$.ajax( {
  type: "POST",
  url: "[yourURL]/api/v1/nodes",
  data: bodyData,
  headers: { otcsticket: otcsticket },
  beforeSend: function( xhr ) {
  // Set the correct MimeType for the request.
  xhr.overrideMimeType( "application/x-www-form-urlencoded" )
  }
  } ).then( function ( response ) {
  alert("Success")
  }, function ( jqxhr ) {
  alert("failure")
  } );

(This is a call to upload a file, for the complete example on uploading files with REST see the posts in January 2017)