From time to time you have to check, if your user is member of a defined group. The UAPI.RightsListByID returns a list of all groups, in which the specified user is a member (directly or indirectly through membership in another group).
You can use something like this snipped in your function.
object uSession = request.prgCtx.fUSession

dynamic uGroups

if isDefined(uSession) && !isError(uSession)

 uGroups = UAPI.RightsListByID(uSession.fSession, uSession.fUserId)

 if isError(uGroups)

   dynamic check = error.ErrorToString(uGroups)

  end

 end
The Dynamic check contains the RecArray of groups, in which the current user is a member. This snipped is intended to be run from a request handler.
Normally, there is a file called “opentext.ini” in the config directory of your Content Server instance. This file contains a lot of configuration values.
A content server reads this file at boot time.
But, if you use a cluster of Content Servers, its a problem changing all “opentext.ini” files for a configuration value. And rebooting them will use a lot of down-time.
In a cluster, there is another option to store configuation values, the “KIni Table” in the database. This values are read immediately from the content server(s) and do not require a reboot.
From OScript, use the database storage like this
Retrieve a value (from the “MySoftware” Section)- Default Value 50, if this is not existing)
result = CAPI.IniGet(dbConnect.fLogin, ‘MySoftware’,‘StartJob’, 50)
Set a value ( sets StartJob value of MySoftware to 50)
result = CAPI.IniPut(dbConnect.fLogin, ‘NySoftware’,‘StartJob’, 50)
List all configuration values registered under MySoftware
result = CAPI.IniList(dbConnect.fLogin, ‘MySoftware’)
Delete a configurationvalue (deletes StartJob value from MySoftware)
result = CAPI.IniDelete(dbConnect.fLogin, ‘MySoftware’, ‘StartJob’)
The dbConnect.fLogin is the CAPICONNECT(the login object) to the database.
This is an example how to upload a file using JavaScript and REST.
This example uploads the file c:\test.txt with the name of “MyFile123” under the folder with the node id 485336. This snipped relies on a previous login. The subtype of the file to be uploaded is “document” (144). The authorization token is saved under the variable name of “otcsticket”.
This example does not consider any categories (mantadory or not). We’ll discuss this in a later post.
6 Steps:
Declare all variables needed. This is done by defining the array bodyData. At least there must be the subtpe, the parent_id, the name and the local file name.
Fire an AJAX request to the URL, where your content server is, Use “api/v1/nodes” as REST command.
Put the authorization ticket in the header field
Put the bodyData in the data field
Set the Mime Type to “application/x-www-form-urlencoded”
If the request is done, process the “success” or the “failure” clauses
Put some nice HTML around it, add the authorization code and then you are done.
(At least for this example. Normally, you should provide some name check for the node name)
There is an interesting command in the newer CSIDE versions.
“Add Documentation Comments”
This can be found in the menu “Source”
Here is the Documentation Commands Entry
This works like the similar commands in java IDEs or in Visual Studio.
Imagine, you have a source code like this
Source Code without documentation comments
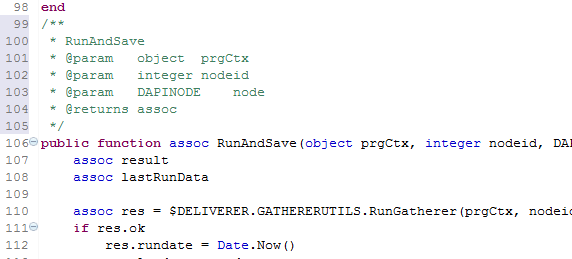
and if you use this new command, you’ll see, your source code is amended with the documentation comments like this
Source Code with documentation comments
This basic documentation comments are only a framework and they should be extended to declare the purpose of the function, the variables and the return values.
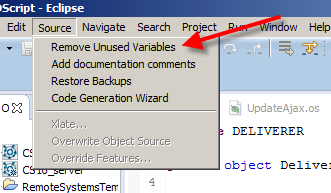
A very interesting function is “Remove Unused Variables” in CSIDE:
Where fo find the command
This command will remove all unused variables from the functions in the edit window.
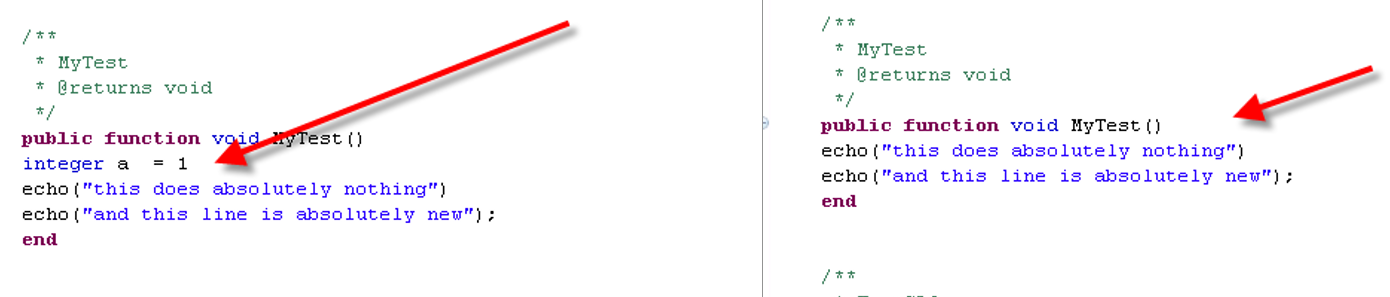
At left, you see the declaration “integer s=1”, which is not used in the function. At right, you see, this declaration is deleted after the execution of the “Remove Unused Variables” command
If you want to upload a file into the content server from your module, you can use something like this
function Assoc UploadFile(Record r, Integer FolderID, String fieldName)
    Dynamic retNodeID = -1
    DAPINODE docNode
    // Get the ATTACHMENT_FOLDER node and set some options.
    // ParentID = 2000 (Enterprise)
    Object prgSession = .PrgSession()
    Object session = prgSession.DSession()
    DAPINODE nodeFolder=    DAPI.GetNodeByID(session.fSession,DAPI.BY_DATAID,FolderID,False )
    // Make the node name from the file and eventID. It has to be unique, so
   // check it, and append a number if necessary.
    String fname=$WebDoc.WebDocUtils.GetFileUploadName(r,fieldName)
    Assoc retUniq
    String sTmp=fname
    Integer cnt=0
    retUniq=$LLIApi.NodeUtil.IsNameUnique(sTmp,nodeFolder)
    while !(retUniq.OK)
       cnt+=1
       sTmp=fname+"_"+Str.ValueToString(cnt)
       retUniq=$LLIApi.NodeUtil.IsNameUnique(sTmp,nodeFolder)
    end
    fname=sTmp
    // Upload the document as a new node.
    Assoc result = $WebDoc.WebDocUtils.CreateFileUploadDocument(nodeFolder,r,fieldName,fname)
    return(result)
  end
First, the folder ID is used to get the DAPINODE of the parent folder. The node name must be unique, so a check is necessary to ensure, that the intended nodename is not existing.
Then the file is uploaded.
Remark: This function does not consider mandatory categories, which must be added at upload time.
In the standard request handler usage scenarios, there is always a complete URL, which is send to the server. Then the server processes that and returns the result page to the client.
With a little change, these standard request handlers in a module can be modified to be used from clients asynchronously by the usage of AJAX.
Client Part
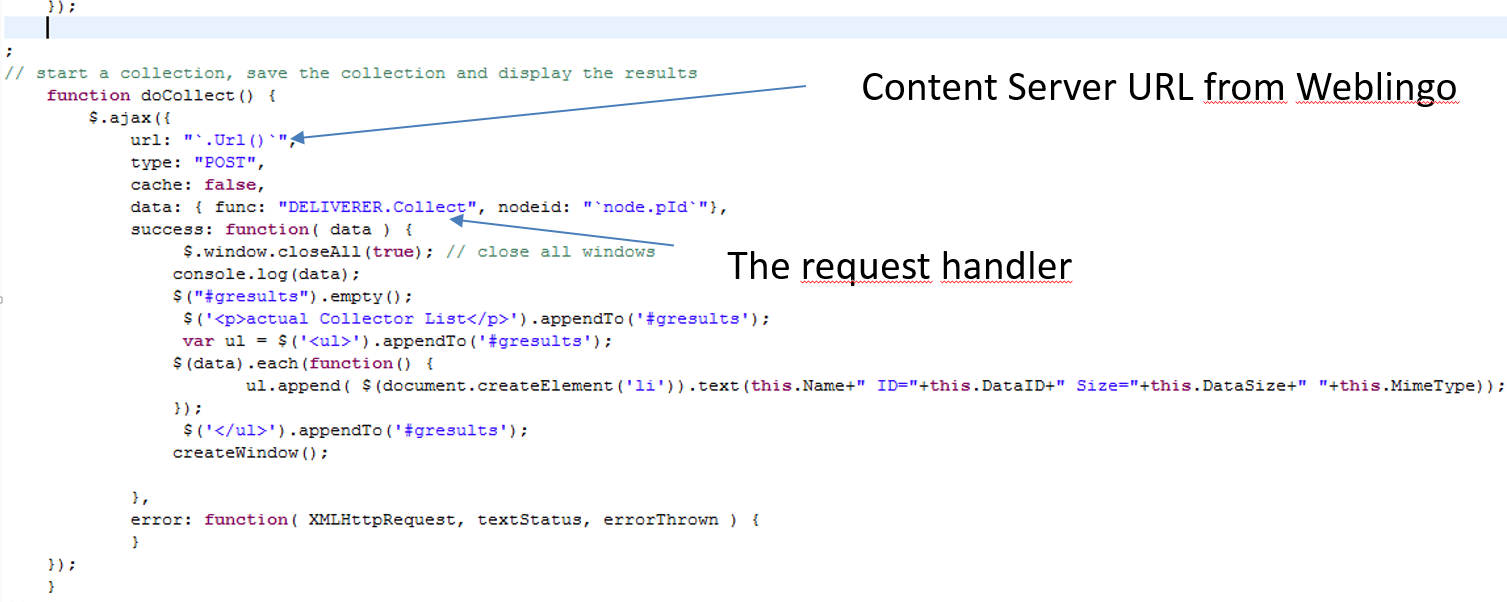
The easiest approach is to use AJAX with JQUERY (which is delivered by the content server). If the base page was built from another request handler, it can include weblingo constructs. These are OSCRIPT parts, delimited by `-Delimiters. Like JSP, the final renderer evaluates everything between two delimiters and replaces that with the result of the evaluation.
So a AJAX JQUERY command with intermixed OSCRIPT parts can look like that:
This is a simple AJAX call, calling the request handler on the server as usual. But there is a parameter called func, which contains the actual request handler address and one parameter nodeid, which is the data parameter.
AJAX Part
Server Part
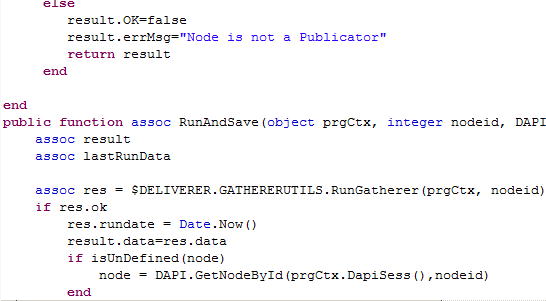
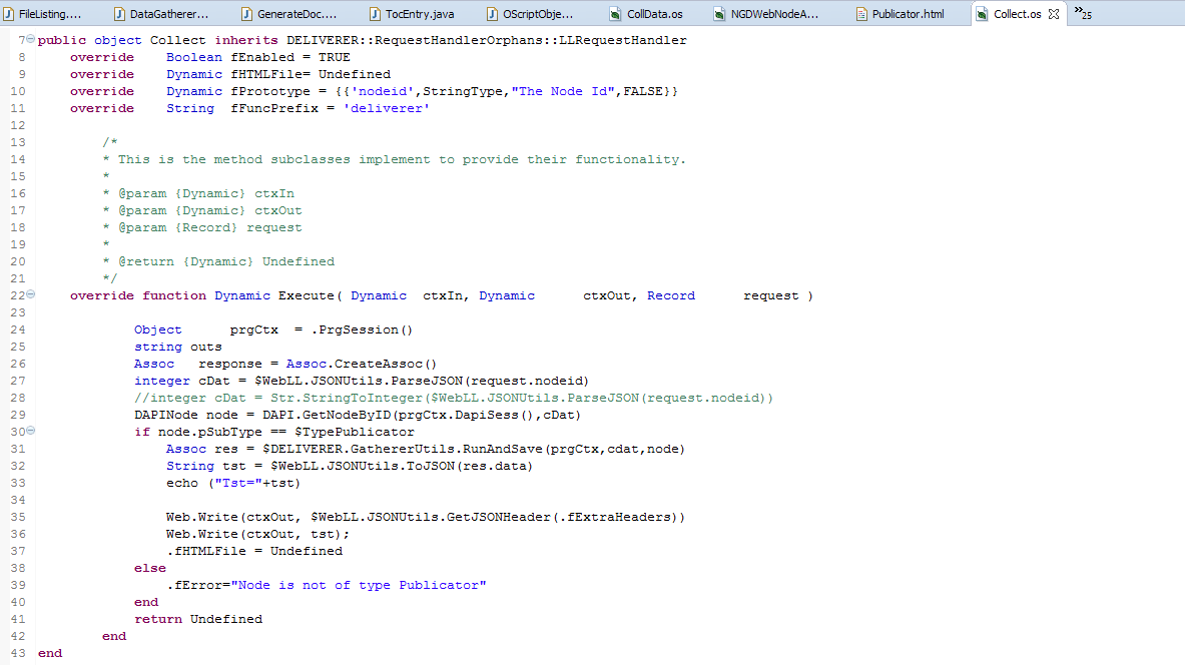
A sample request handler looks like this listing below. There is a prototype declared, this prototype must exist in the request.
Server Request Handler
The rest of the data is encapsulated in the JSON array. This array can be parsed into an assoc with the call to
$WebLL.JSONUtils.ParseJSON(request.configData)
and processed in the standard way.
Any responses should be handled in the standard way with an assoc.
This assoc is changed with a call to the ToJSON to a normal string.
Here, we do not have a output html file, so we have to use a Web.Write to write the output directly to the port. Do not forget to include the JSONHeaders.
The fHTMLFile stores normally the weblingo output file and has to be set to undefined in this case.
package DELIVERER::PUBLICATOR::AJAXHANDLERpublic object UpdateAjax inherits DELIVERER::RequestHandlerOrphans::LLRequestHandleroverride Boolean fEnabled = TRUE override String fFuncPrefix = 'deliverer' override Dynamic fHTMLFile override List fPrototype = { { 'configdata', -1, 'The config data changed at the client', FALSE } } /* * This is the Request handler to handle the Ajax Update Request(s) * Based on the original Request handlers, this handler receives an AJAX Request from the NodeAction Browse Page * and sends the Response back to the Browse Page (PUBLICATOR.html) * * @param {Dynamic} ctxIn * @param {Dynamic} ctxOut * @param {Record} request * * @return {Dynamic} Undefined */ override function Dynamic Execute( \ Dynamic ctxIn, \ Dynamic ctxOut, \ Record request )Object prgCtx = .PrgSession() Assoc response = Assoc.CreateAssoc() Assoc cDat = $WebLL.JSONUtils.ParseJSON(request.configData) integer nodeid = cDat.id DAPINode node = DAPI.GetNodeByID(prgCtx.DapiSess(),nodeid) Assoc.Delete(cDat,"id") // remove the NodeID string remark = cDat.remark Assoc.Delete(cDat,"remark"); node.pComment=remark // save configdata in pExtendedData // do not forget to include other assocs, if needed from the pExtendedData Assoc a = node.pExtendedData; //TODO Add Things a.configdata=cDat node.pExtendedData = aDAPI.UpdateNode(node) // store it// Send response response.ok="OK" response.msg="Fine" String tst = $WebLL.JSONUtils.ToJSON(response) Web.Write(ctxOut, $WebLL.JSONUtils.GetJSONHeader(.fExtraHeaders)) Web.Write(ctxOut, tst); .fHTMLFile = Undefinedreturn Undefined endend
To authenticate with a JAVA client against a Content Server, you should first create all client proxys. This example can be used against a Servlet Container, like Tomcat. Here, it is assumed, that it runs on port 8080.
The creation of the proxys must be done manually by typing
wsimport -keep http://yourserver:8080/cws/services/Authentication?wsdl[add all services you want to use]jar cvfM webservices.jar com/opentext/*
Add the webservices.jar file in the build path of your Java application.
This is the second post on a series about authentication against the content server. This post explains the authentication from a c# application using Webservices.
Normally, the Webservices are used from a Java application container like Tomcat. To use this snippet, a Service Reference exist inside Visual Studio with the URL
Here, the userid and the password is send to the Authentication service. If all is correct, the authentication token is send back.
This token can be used like in the following snippet. Here, the Node 485227 is requested.
DocumentManagement.DocumentManagementClient docclient = new DocumentManagement.DocumentManagementClient(); DocumentManagement.OTAuthentication otauth = new DocumentManagement.OTAuthentication(); otauth.AuthenticationToken = authToken;
// Get the Node 485227 DocumentManagement.Node node = docclient.GetNode(ref otauth, 485227);
Like the Authentification Service, the DocumentManagement Service must be declared as a Service Reference in Visual Studio. When a Tomcat is used, then the declaration looks like