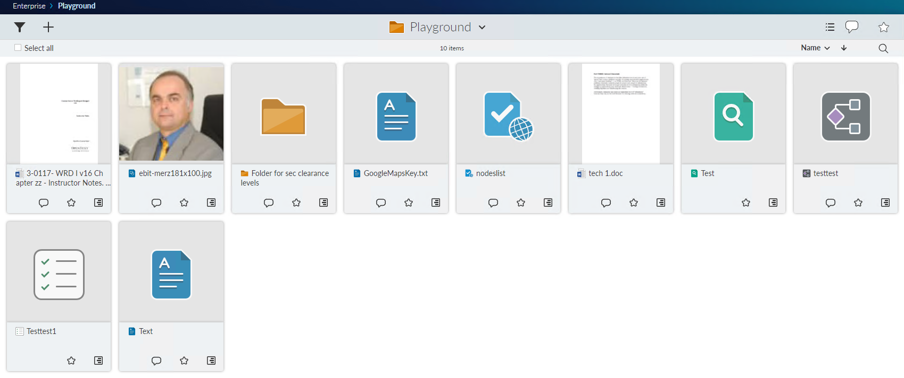
Have you seen the new smartUI thumbnail mode? You can switch the normal nodelist to the thumbnail mode quite easy by clicking on the list/images icon in the upper right. Another click switches the display back to the list mode.
Thumbnail mode displays all list entries in a more intuitive way
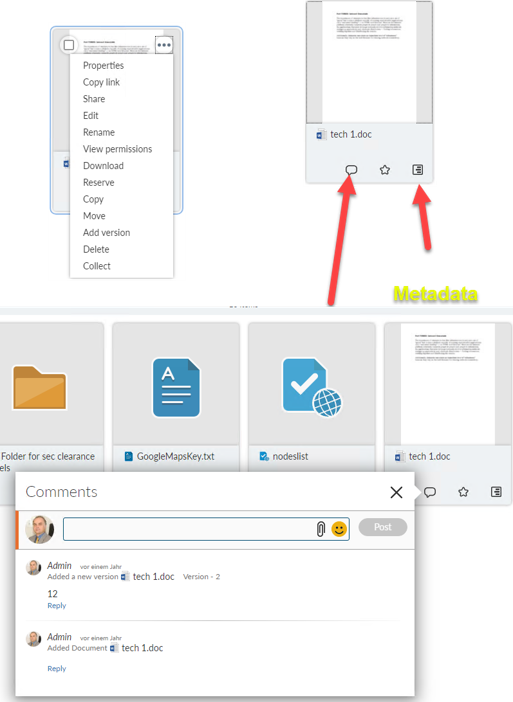
And, thumbnail mode does have also commands available
The tumbnails do have also some commands available
The actual Content Server release 16.2.8 brought a lot of improvements to the smartUI SDK, for example the xECM and the connected Workspaces Widgets are nowadays part of the SDK.
Also a lot of of people were interested in smartUI, not only Developers.
So we introduced an updated 5 days training to reflect the changes of 16.2.8 and a 2 days training to provide an overview of the SDK. Naturally, a 5 days training gives more information and also more exercises than a 2 days training, but this 2 days training can provide a good overview for Team Leaders and technical Managers.
For those with little time, there is also a 1 day training giving you a more compact overview for technical Managers and technical Evangelists. The one day training is not recommended for Developers. This training was held at the Enterprise World in Vienna 2019.
Whats new in the trainings?
New in the basic training
The Chapter 6 (SDK Intro) (5 days training Basic)
6.1 Introduction
6.2 Installing the SDK. Different Installations in 16.2.4 and 16.2.8. (NEW)
6.7 Routing Preview (see adv. Training for a more detailed discussion)
6.8 New Command
6.9 Custom Column
6.10 Metadata
6.11 Define a new Nodetype
6.12 Create a Widget
6.13 Base Widgets. Detailed info’s on base widgets.
Favorites
Recently Accessed
MyAssignments
Shortcut
Shortcuts
Metadata
NodesTable
DocumentOverview
Search Results (NEW)
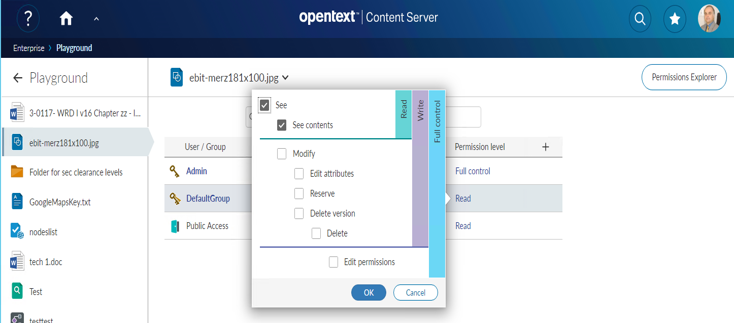
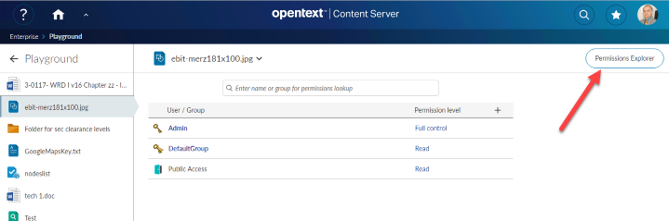
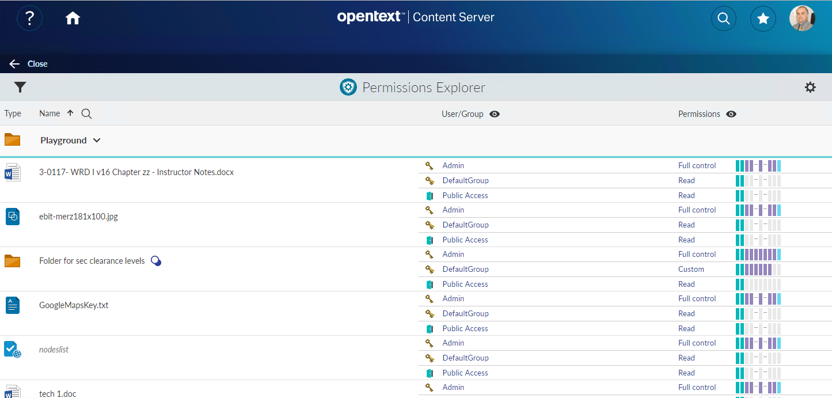
Permissions (NEW)
Html.editor (NEW)
Navigation Header (NEW)
6.14 Controls and Contexts
Controls
Node Picker
Modal Alert
File Open
Perspectives: Grid, Single, Left-Center-Right, Tabbed, Tabbed-Flow
Tile
ListView
ListItem
Signin
UserPicker
Breadcrumps
Checkbox
Dialog
Disclosure (NEW)
Error (NEW)
Form (NEW)
Globalmessage (NEW)
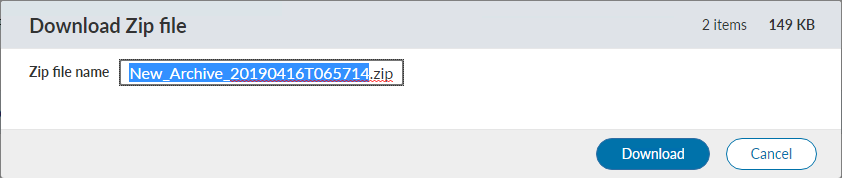
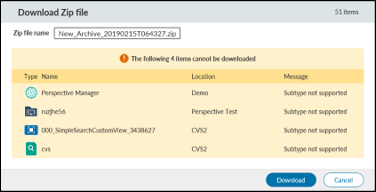
Grid (NEW)
Zip&Download (NEW)
Integration Folder Browser
Integration Target Picker
Contexts
Detached objects
Permanent objects
Temporary objects
Page Context
Browsing Context
Perspective Context
Portal Context
6.15 Models and Factories
NodeModel
Other Models
Factories
Fetchable Factory
Configurable Factory
A new Chapter 12 discusses the strategys needed to “widgedize” an existing legacy g module and to add things to an existing widget
The strange word “to widgedize”
stands for “Build a widget for a legacy module not already supporting widgets”.
The Strategies on amending a Module by adding a widget and on adding additional
functionality inside an existing widget are discussed.
Content:
Moving from a legacy gui module to a smartUI module
Examine a legacy module and rebuild a smartUI widget (here only on the client side)
As an example, the barcode widget
Add a functionality in an existing widget
Add an email functionality in the Connected Workspaces Team Widget.
Usable from inside the Widget
As an example the new team widget with email Support
New in the advanced training
The advanced training will eventually grow more and more to cover the new widgets and controls coming in future releases.
Chapter 1: Extended SDK Parts
Additional Widgets
Webreports
NodesListReportView
TilereportView
FilteredCountChartView
Carousel Widget View
parameter.prompt.form (NEW)
table.report (NEW)
status.screen (NEW)
open.webreport.js (action to show the Parameters form) (NEW)
binf-Datepicker
Using the build in datepicker
binf-switch
Using the binf-switch to turn checkboxes and radio buttons into switches
Workflow
Workflow Components
Workflow in smartUI including Workflow Status (new in 16.2.4)
Starting Workflows
URL Routes
Workitem Model
Workitem Actions
Workitem Extension
Writing Workflow Extensions
REST API Support for Workflows
Connected Workspaces
Configurationvolume (NEW)
Header (NEW)
Extended ECM
xECM: Office365 Groups (NEW)
xECM: Header Widget with Business Object Infos (NEW)
xECM: Snapshot of current document Attachments (NEW)
xECM: Dossier View Widget (NEW)
Event Action Center (NEW)
Widgets not part of the SDK
Mobile Scanning
Discussion Widget
Engineering Doc Management: Search
MyShares
The chapter 3 has also been amended
Tips and Tricks (Work in Progress- List can change)
Add a OTDS Ticket already in the browser to the connection object
Re-using a OTDS Ticket as LLCookie
Checking the paths in the test/index.html
Adding non CSUI supported jQuery functions in a view
Add additional jQuery Libraries
Adding Controls to a widget (NEW)
CKEDITOR 4 (NEW)
Intro (NEW)
JQuery Non SDK example (NEW)
Usage in the SDK (NEW)
Handlebars advanced
Handlebars QuickStart
Expressions
Helpers
Helpers with html output
Helpers with Hash Object
The Helper fn property
The helper inverse property
Partials
Helpers in the SDK
188 Handlebar Helpers
LESS advanced
LESS installation
Using LESS variables
Using Mixins in LESS
Parametric Mixins
Guarded Mixins
Accessibility in Bootstrap. Screen reader support and what’s to change in the SDK to support screen readers for visual impaired users.
What is Accessibility
Kinds of Disabilities
Accessibility and the law
WAI-ARIA
ASSETS.CMS.GOV
PayPal Bootstrap Accessibility Plugin
Web Experience Toolkit WET
Other resources
Best Practices in smartUI development
Pre-Development Steps
Preparation Steps
Development Steps
Integration Steps
Documentation Steps
Development Infrastructure for security aware Organizations (NEW)
Recommendations what’s to do if the reloading of npm modules during the creation of a widget is not wanted (NEW)
The usability of Webreports in smartUI has been improved. Now, you can, after starting a Webreport, edit the parameters of that report and receive feedbacks from the running Webreport. This makes a lot of fun!
Lets see, how this is done.
First a table.report widget can be used to list all data.
Click on a Webreport to start it
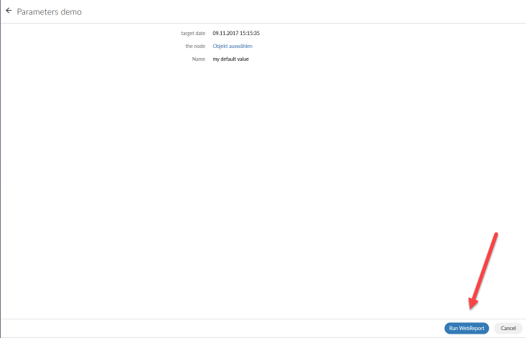
Then a Parameter Window opens. The Webreport can be startet by pressing the button “Run Webreport”
Webreport Parameters can be edited
A feedback can be given from the Webreport like this
Running webreports can give Feedbacks to SmartUI
The table.report shows a Smart UI table based on the output of WebReports data. The WebReport used by this widget must be based on either the widget_table_report_process_data_in_webreport or widget_table_report_process_data_in_datasource default reportviews which use the INSERTJSON @TABLEREPORT directive.
   // Create the data managing context
       var context = new PageContext(),
        sampleTableReportView = new TableReportView({
           context: context,
           data: {
             id: 24024,
             sortBy: "SubType",
             SortOrder: "ASC",
             columnsWithSearch: "SubType",
             titleBarIcon: 'mime_audio',
             title: 'Sample WebReports Table',
             header: true,
             swrLaunchCell: {
                 id: 12345,
                 iconClass: 'my-icon-class',
                 hoverText: 'Some hover text for my icon.'
             },
  parameters: [
                 {
                     name: 'myparm1',
                     value: 'val1'
                 },
                 {
                     name: 'myparm2',
                     value: 'val2'
                 }
             ]
           }
       }),
       // Create helpers to show the views on the page
       region = new Marionette.Region({
         el: "#content"
       });

       // Show the views on the page
       region.show(sampleTableReportView);

       // Fetch the WebReport output from the server to populate the tile with
       context.fetch();
The parameter window can be implemented like this (the xxxxxx is the node number for the webreport)
  var promptView,
         promptModel,
         contentRegion = new Marionette.Region({el: "#content"}),
         pageContext = new PageContext(),
         currentNode = pageContext.getModel(NodeModelFactory, {attributes: {id: xxxxxx}}),
         runWRModel = pageContext.getModel(PromptModelFactory, {
             attributes: {
                 node: currentNode
             }
         }),
         runWRController = new RunWRController();
         pageContext.fetch()
             .done(function () {

                 // We've got the page context, now get the runWRModel to see if there are parameters:
                 runWRController.getRunWRPreModel({
                     node: currentNode,
                     context: pageContext
                 }).done( function(){

                     // Build the prompt view and show it:
                     promptView = new PromptView({
                         context: pageContext,
                         model: currentNode,
                         promptModel: runWRController.runWRPreModel,
                         showBackIcon: false
                     });

                     contentRegion.show(promptView);
                 });
             })
A feedback is implemented by the status.screen control.
Have you seen the new Rules matching Mixin in the smartUI? Its a great mixin, allowing you to implement a colloection of rule models which are supposed one model, which rules match the input object. This is a quite powerful functionality
The following example implements the selection collection
Container = true
Subtype = 144, 749
and is type = 144 is one of the mimetypes listed
and is type = 144 or mimetype startswith “image/” of equals “pdf/x-pdf”
and is type = 144 and mimetype = “text/plain”
If run, then the action of the appripriate node is returned. Only on the base of a rules Model!!
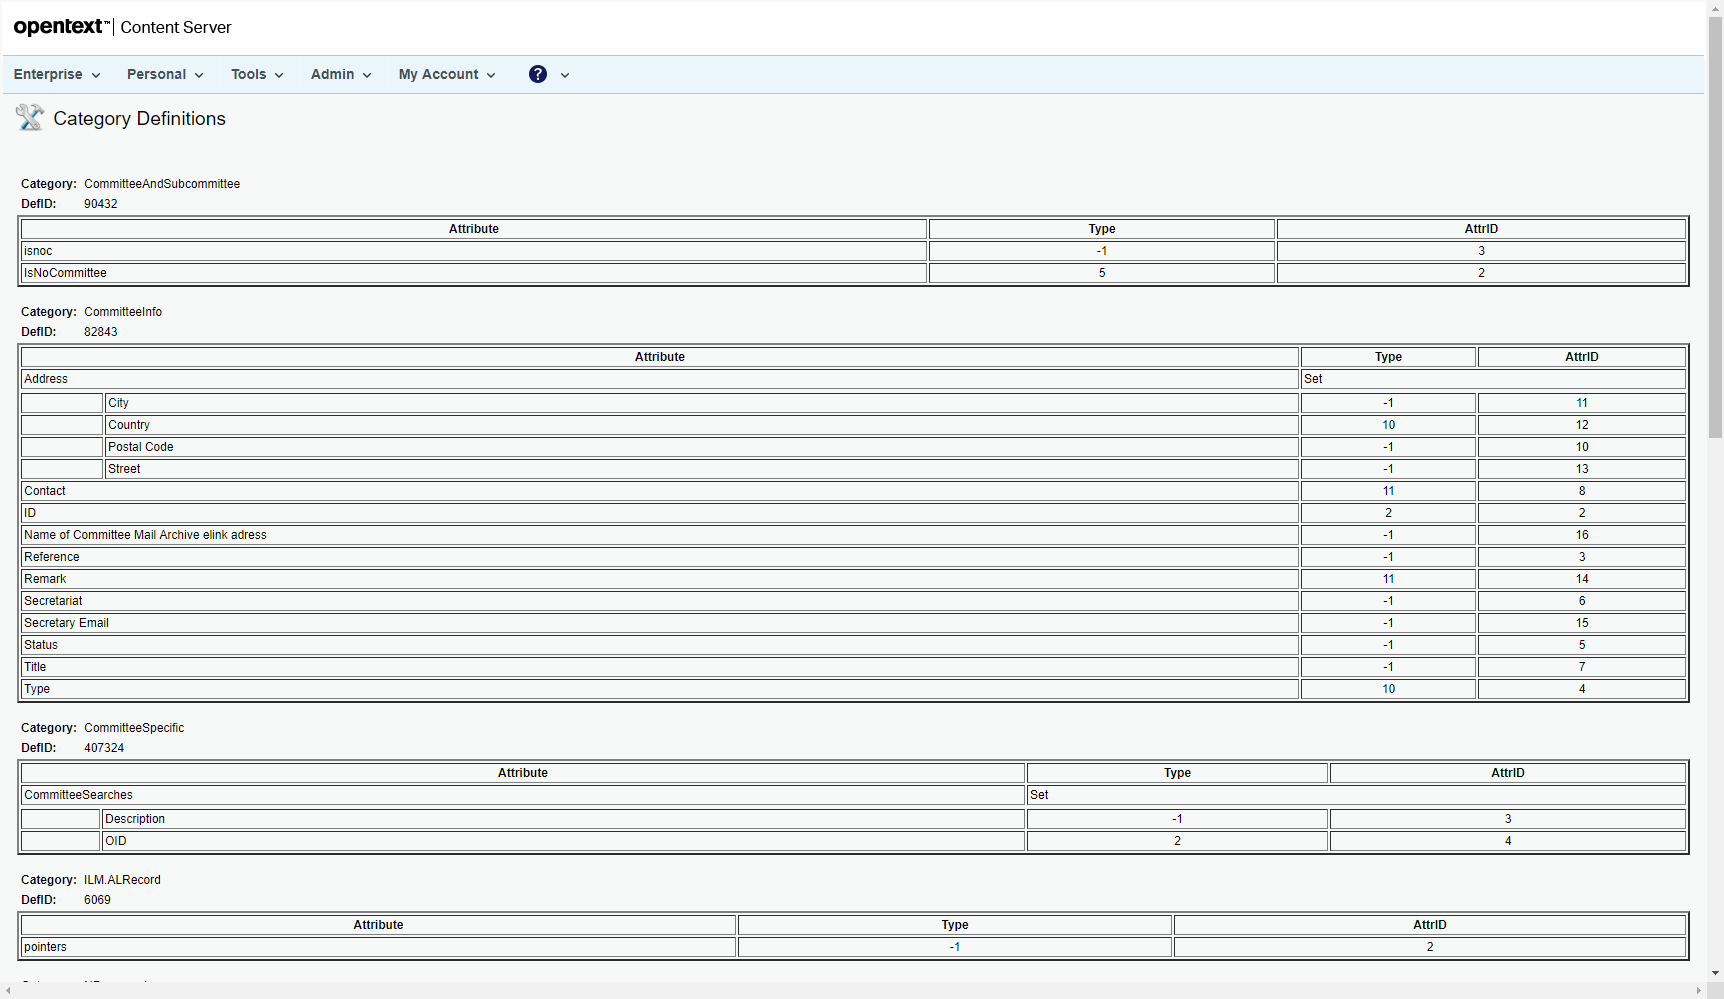
Looking for a quick list of all Categories and Attributes configured in a Content Server? Tired of browsing the Categories Volume? Want to see all attrobutes and their IDs in a list?
Widgets are controlled by perspectives, changing the data displayed in the widget requires a change of perspectives
When you restrict yourself to use only the standard REST command set, you’ll find that you fire a lot of REST commands
You lost the capability of using navigational menus with computed URLs.
This leads me to some thoughts towards webreports as an adddition to widgets.
Webreports used as widget surrogates do have this pros and cons.
Pros:
You can use standard bootstrap navigational menus and UI elements, which allows you to mimic your webreport like a widget.
You can easily build things like Wizards inside your webreport structures. This is interesting, when you require some complex categories setup at doc creation time.
Webreports can use different sources to diyplay things, all server based. You can add the complete output via asynchronous AJAX call directly in your hosting webreport.
You can start actions inside the surrounding smartUI using standard jquery and html selections.
Starting Webreports and inserting the output via AJAX makes things quite fast. Especially when you display more than 1 record.
You get the option of using normal menu structures w/o the requirement of changing the perspectives.
Its easy for experienced webreport developers to modify the menu structures and the contents of such a meta webreport.
Cons:
Storing Webreports in the database require an additional license.
You have to load jquery by yourself.
No access to binf.js, unless you build one binf library without the normal csui-hierarchy or load a plain bootstrap.js.
In the last case, you’ll loose the css overwrite capability offered by the Content Server.
Webreports tend to require large numbers of themselves. This requires a very clean process documentation for the group of webreports.
Webreports take some time to start. On performance points, Subwebreports are evil. On the other hand, Subwebreports are required for a lot of things.
Doing things via AJAX means, you enter the wunderful world of async processing. Actually, you have no control on when the async webreport is finished
Here is a short receipe howto use webreports as widget surrogates:
Add a webreport html widget to your perspective. This one will held your base webreport.
This base webreport contains all menu structures and also all js needed.
Define your webreports for the different “pages” controlled by your menu. Each webreport is a stand alone webreport.
Call these via js from your menu structure. Use AJAX calls.
Insert the output from this webreports in a html structure (like a div).
Add somewhere a home button to switch back to your first page.
Some more tips:
Consider using stored searches in your “page” webreports. These are quite fast, depending on your search infrastructure. You dont have to use multible webreports to support this, you can switch the sourceID on the AJAX call to the webreport.
Consider to use the REST tags of a webreport.
Inside the webreport html widget there used to be the opportunity to use plain html for menu or other purposes. Since 16.2.4 there is a new widget in town, a plain html widget without the need of an webreport license.
In both cases, you have to think of the new namespace (“binf”) on using bootstrap.
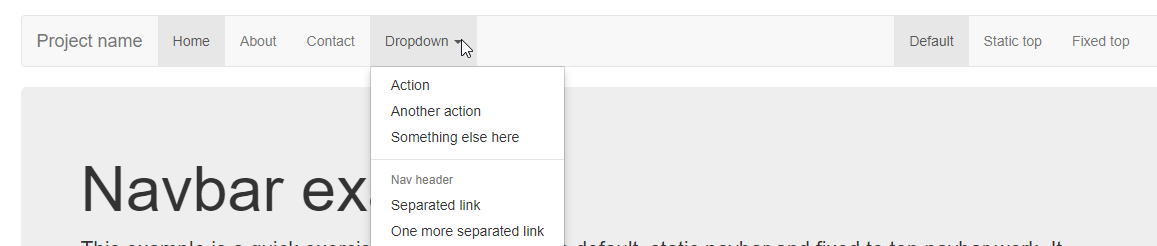
Take a bootstrap menu for example.
This is an example of a plain bootstrap menu
The plain bootstrap code wont work, because OpenText added the prefix “binf” to introduce a special namespace.
Change the plain code by adding these “binf” prefixes:
And the values you receive from the REST Calls are between -2 and 3.
How can you transfer this in a “selected” clause in the html select box?
Easy.
Ass a select helper in your main marionette view:
 Handlebars.registerHelper('select',
function (selected, options) {
Handlebars.registerHelper('select', function (selected, options)
{ return options.fn(this).replace( new RegExp(' value=\"' + selected + '\"'),
 '$& selected="selected"'); });
This handlebars helper named “select” will examine the coding tagged betweern a {{select}} and a {{/select}} in your handlebars template and insert at the option clause which is selected a ‘selected=”” ‘ clause. Then the Selectbox is ready to use.
Simply add a
status: this.model.get('status'),
to be returned in your template helper and the
{{#select status}}

...

{{/select}}
will trigger your select box helper to check for the v ariable status and to add a selected at the proper place.
Thats the magic behind the handlebars select helpers.