Setting Node ACLs via Web Services API

One of the nicest things in the content server area is, you can set Access Control Lists not only for the owner or the default group of a node, and you can add or revoke rights to the node for virtually all users and groups defined in the content server.

Here, we want do discuss how to do this using Content Server Web services. First, let’s see how ACLs are organized. A simple object would display something like this:

The ACLs for this object

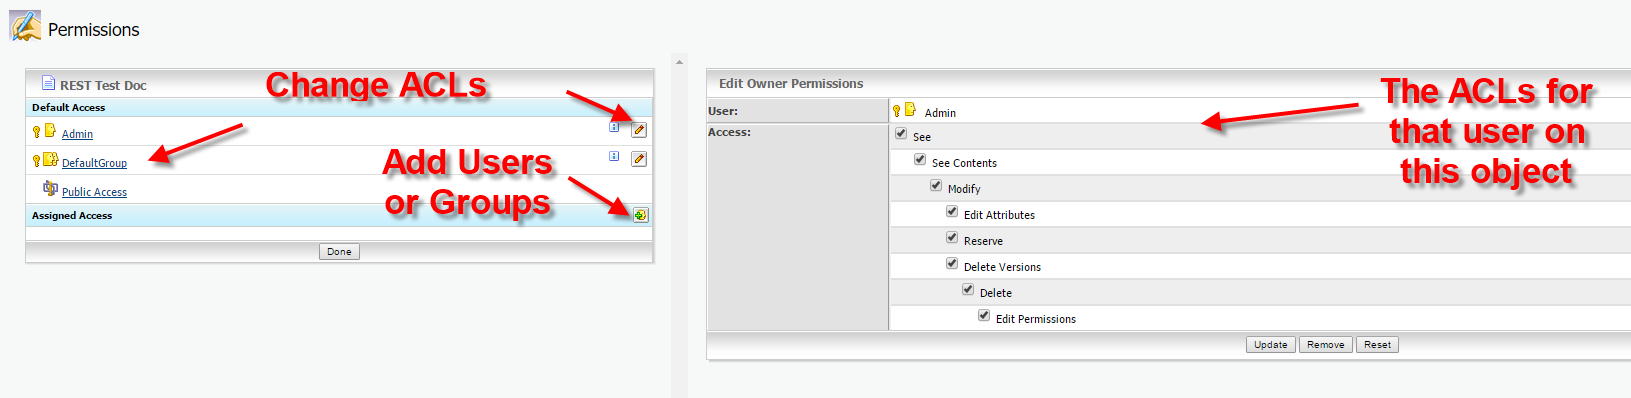
On the left hand side, you see the default access, there is always one Owner, one default group and a public group.

If you want to assign further access, you can select a user or a group by clicking on the bottom at the lower left hand side. This will select a user or a group. (Btw: It’s recommended to use groups instead of users)

On the right hand side, there are the ACLs for the selected user/group on the object. Here, we used the Administrator, therefore all rights are switched on.

Ok, how to use this on a c# client?

First, the ACLs for a given user are called NodePermissions. Use them like this. Let’s say, this is utils.setNodeRights(….)

/// <summary>
 /// Creates a Noderight Structure and returns it
 /// </summary>
 /// <param name="rights">"all" or see (see,seecontents)</param>
 /// <param name="id">the member ID for this node rights</param>
 /// <param name="type">Owner, Ownergroup, Public or ACL </param>
 /// <returns></returns>
 public DocumentManagement.NodeRight setNodeRights(string rights, long id, string type )
 {
 DocumentManagement.NodePermissions newPerm = new DocumentManagement.NodePermissions();

newPerm.SeeContentsPermission = true;
 newPerm.SeePermission = true;
 if (rights.Equals("all"))
 {
 newPerm.AddItemsPermission = true;
 newPerm.DeletePermission = true;
 newPerm.DeleteVersionsPermission = true;
 newPerm.EditAttributesPermission = true;
 newPerm.EditPermissionsPermission = true;
 newPerm.ModifyPermission = true;
 newPerm.ReservePermission = true;
 }
 DocumentManagement.NodeRight newRight = new DocumentManagement.NodeRight();
 newRight.Permissions = newPerm;
 newRight.RightID = id;
 newRight.Type =type;
 return newRight;

}

The Nodepermissions is simply a container with the single access rights set to true or false.

When the definition is finished, the NodePermissions must be encapsulated in a structure called NodeRight. This contains the ACLs defined and the user/group for the ACL. Use the id as long integer, this is the unique identifier of a user/group in the content server. You can use MemberServices to get this number, if you know the login-name.

Then, the system wants to know, which kind this user/group is. Use ACL, if these are additional users/groups, or use something like Owner, Ownergroup or Public, if the ACLs should belong to the predefined entities.

How to use this?

First, login to the Webservices.

Second. Get the node, onto which you want to set ACLs.

Thirth. Get the node rights

 NodeRightsUtilities utils = new NodeRightsUtilities();
 DocumentManagement.NodeRights nodeRights = docclient.GetNodeRights(ref otauth, pargs.nodenumber);
 Console.WriteLine("Got Noderights ");
 
 DocumentManagement.NodeRight[] nodesrights = nodeRights.ACLRights;

Forth. Set the ACLs for the standard entities (if needed). Define a NodeRight for every entity (user/group) you want to set. Define these 2 right groups.

 // setup standard permissions for base ACL group
 DocumentManagement.NodeRight newRightstandardGroup = utils.setNodeRights("see", standardGoupID, "ACL");
 DocumentManagement.NodeRight newRightsmanagerGroup = utils.setNodeRights("all", managergroupID, "ACL");

Define a special right group

 DocumentManagement.NodeRight newOwnerright = utils.setNodeRights("all", ownerID, "Owner");
 nodeRights.OwnerRight = newOwnerright;


The nodesrights on a node can contain something or be null. First, lets check, if the thing is null.

 if (nodesrights == null)
 {
 Console.WriteLine("Nodesrights not found- no external Users/groups assigned");
 Console.WriteLine("Setting a group with rights see/seecontent");
 
 DocumentManagement.NodeRight[] allrights = new DocumentManagement.NodeRight[2];
 allrights[0] = newRightstandardGroup;
 allrights[1] = newRightsmanagerGroup;
 nodeRights.ACLRights = allrights;
 docclient.SetNodeRights(ref otauth, pargs.nodenumber, nodeRights);
 authClient.Close();
 Console.WriteLine("All Rights and Groups set --- Finish");
 return;
 }

In this case we simply define a NodeRight array with two entries containing our new RightstandardGroup and our newRightmanagerGroup.

Let’s store them into our newly created array.

Let’s store this array in our nodeRights under ACLRights. This will change our copy of our structure which we downloaded before.

Next is simply a SetNodeRights with the nodenumber and the updated nodeRights array to write our changes back to the server.

If there are already entries, you should set them like this:

// Just display the first Entry of the first assigned Users/groups
 DocumentManagement.NodeRight right = nodesrights[0];
 DocumentManagement.NodePermissions nperms = right.Permissions;
 // check, if we do habe the groups already set

int newLen = nodesrights.Length;

 // copy rights into new longer Array
 DocumentManagement.NodeRight[] allrights = new DocumentManagement.NodeRight[newLen+2];
 for ( int i = 0; i < newLen;i++ )
 {
 allrights[i] = nodesrights[i];
 }
 allrights[newLen] = newRightsmanagerGroup;
 allrights[newLen + 1] = newRightstandardGroup;
 nodeRights.ACLRights = null;
 nodeRights.ACLRights = allrights;
 docclient.SetNodeRights(ref otauth, pargs.nodenumber, nodeRights);
 Console.WriteLine("All Rights and Groups set --- Finish");
 authClient.Close();

In this case, our nodesrights come from the nodeRights.ACLRights, because there are alredy entries.

Now, let’s do the same thing like we did on a new structure. But, we don’t want to delete existing entries, lets simply add our new RightstandardGroup and our newRightmanagerGroup to the ACLRights array.

One thing, if finished, first set the nodesRights.ACLRight to null and then fill it with the new extended ACL array.

Then do a SetNodeRights with the nodenumber and the updated nodeRights array to write our changes back to the server.


Finished. Quite easy, isn’t it?


BTW: There is no equivalent to do this on the REST api at the time of this post.


Installing and activating Content Server Web Services on a Content Server Installation

If you are thinking on using Content Server Webservices (CWS´) you may wonder how to activate this on a standard Content Server Installation. Normally, right out of the box, CWS is not active or installed, although you got the license to use it in your basic license.

As Administrator, you have to do a couple of things to activate CWS.

Decide which architecture you will use.

CWS can be used inside of the Microsoft Internet Information Server or inside a Java Application Server like Tomcat. Both ways to activate will be described here.

Locate the CWS Software

Look in your install directory of the content server. There, you will find a directory named “webservices”.

Webservices Basedirectory

Here, there are three entries:

  1. dotnet contains all CWS service definitions for use inside the Microsoft IIS
  2. java contains all webapps for use inside the Tomcat application server
  3. java6 contains the same thing as in 2. but for use with java 6.
Installing CWS inside the Microsoft Internet Information Server IIS

First, let’s examine how to install CWS inside IIS. Switch to the dotnet subdirectory, then to cws (do not use les-services, this is an old version supporting legacy clients)

All svc files for installation

Locate the .svc files you wish to install and use in CWS.

Open the IIS Manager. Create a new Application at the default web site

Create a new Application
App pointing to CWS

Enter the path to the dotnet\cws directory , enter for example CWS as alias.

Remark: IIS must be configured to

  • execute .NET 2.0 apps
  • allow “Read” and “Script” rights to the new app
  • execute WCF (can be ensured for example by “%SystemRoot%\Microsoft.NET\Framework\v3.0\Windows Communication Foundation\ServiceModelReg.exe -i”  (check, if something changed, if you are using newer versions)
  • allow “Read” and “Execute” rights for the ID of the Application pool on $OTHOME/webservices/dotnet

And (don’t forget), ensure that your webservides will use the same port as your content server uses.  If you use a nonstandard port (not 2099) you need to change the port in the file $OTHOME\webservices\dotnet\cws\web.conf

If you use the standard port, there is nothing for you to do.


Installing CWS in Tomcat

Alternatively, you can use Tomcat as a base for CWS.

In this case, go to the java6 base directory in the webservices dir.

The war files

In this dir, you’ll find the war (web application archive) files, which you need to deploy.

Deploy the cws.war file either to the TOMCAT\webapps directory or use the Tomcat service manager to deploy this file.

The tomcat webapps dir

Don’t forget, if you changed your port number of your content server from 2099 to something else, change also the value in the web.xml of the unpacked cws web app.

The port in the web.xml file

If you don’t use the same port numbers, the whole system will listen to different ports and will do nothing.

Test your installation

Your installation is correct, if a browser, pointing to

http://127.0.0.1:8080/cws/services/DocumentManagement  (Tomcat) or

http://127.0.0.1//cws/Documentmanagement.svc?wsdl (IIS) shows

DocumentManagement

Remark: The WSDL Urls reflect the infrastructure of course. You see “:8080” only with Tomcat.


And now, feel free to discover the new world of content web services.

Authentication (3/3) Authenticate with Webservices and Java against Content Server

To authenticate with a JAVA client against a Content Server, you should first create all client proxys. This example can be used against a Servlet Container, like Tomcat. Here, it is assumed, that it runs on port 8080.

The creation of the proxys must be done manually by typing

wsimport -keep http://yourserver:8080/cws/services/Authentication?wsdl
 [add all services you want to use]

jar cvfM webservices.jar com/opentext/*

Add the webservices.jar file in the build path of your Java application.

Then, use something like this to authenticate

String username = "[yourUser]";
  String passsword = "[yourpassword]";
  Authentication_Service authsrv = new Authentication_Service();
  Authentication authclient = authsrv.getbasicHttpBindingAuthentication();
  // the Token
  String authToken=null;
  // authenticate
  try
  {
      authToken = authclient.authenticateUser(username,password);
  } catch (SOAPFaultException e)
  {
      System.out.println("Failed! "+e.getFault().e.getFaultCode()+" : "+e.getMessage());
  }

This will, if succesful, store the authenticaten token in the string authToken.

Use this token in this way:

DocumentManagement_Service docmanSrv = new DocumentManagement_Service();

DocumentManagement docman = docmanSrv.getbasicHttpDocumentManagement();

OTAuthentication otAuth = new OTAuthentication();

otAuth.setAuthenticationToken(authToken);

Now, we have to set the token manually in the SOAP header

try

{

    final String API_NAMESPACE = "urn:api.ecm.opentext.com";
     SOAPHeader header = MessageFactory.newInstance().createMessage().getSOAPPart().getEnvelope().getHeader();
     SOAPHeaderElement authElement = header.addHeaderElement (new QName(API_NAMESPACE,"OPAuthentication"));
     SOAPElement authTokenElement = authElement.addChildElement (new QName(API_NAMESPACE, "AuthenticationToken"));
     authTokenElement.addTextNode (otAuth.getAuthenticationToken());
     ((WSBindingProvider) docMan).setOutboundHeaders (Headers.create(otAuthElement));
  } catch (SOAPExeption e)

{

[Print Error and return]

}

// now, we are ready to perform some functionality

Node node = docman.getNode(nodeId);
  1. Login and get the auth token
  2. set the auth token in the SOAP header
  3. tell your services about the auth token in the SOAP header
  4. perform operations on the server

Do not forget to refresh the token before it gets invalid. We discuss the refesh in a later posting.

Authentication (2/3) Authenticate with Webservices against the Content Server in c#

This is the second post on a series about authentication against the content server. This post explains the authentication from a c# application using Webservices.

Normally, the Webservices are used from a Java application container like Tomcat. To use this snippet, a Service Reference exist inside Visual Studio with the URL

http://[yourServer]:8080/cws/services/Authentication?wsdl

with the name of “Authentication”.

The Authentication itself is done with something like this:

Authentication.AuthenticationClient authClient = new Authentication.AuthenticationClient();

string authToken = null;
try
{
     Console.Write(“Authenticate User…”);
     authToken = authClient.AuthenticateUser(userId, password);
     Console.WriteLine(“Success \n”);
} catch (Exception e) {
     Console.WriteLine(“failed\n”);
     Console.WriteLine(“{0} : {1} \n”, e.Message, e.Source);
     return;
}
finally
{
     authClient.Close();
}

Here, the userid and the password is send to the Authentication service. If all is correct, the authentication token is send back.

This token can be used like in the following snippet. Here, the Node 485227 is requested.

DocumentManagement.DocumentManagementClient docclient = new    DocumentManagement.DocumentManagementClient();
DocumentManagement.OTAuthentication otauth = new    DocumentManagement.OTAuthentication();
otauth.AuthenticationToken = authToken;

// Get the Node 485227 
DocumentManagement.Node node = docclient.GetNode(ref otauth, 485227);

Like the Authentification Service, the DocumentManagement Service must be declared as a Service Reference in Visual Studio. When a Tomcat is used, then the declaration looks like

http://[yourServer]:8080/cws/services/DocumentManagement?wsdl

To use the token, declare an instance of Documentmanagement.OTAuthentication and put the token in the AuthenticationToken field of this instance.

Then use the webservices calls as usual, but add the instance of this OTAuthentication as a reference in the first argument of the call.

Tipp: save this instance as a copy, from time to time the first argument returns as null. Then you can re-instate the original OTAuthentication.

If you want to use Webservices in IIS, pls refer to the post from January 2017.