Improved smartUI Webreport Usability

The usability of Webreports in smartUI has been improved. Now, you can, after starting a Webreport, edit the parameters of that report and receive feedbacks from the running Webreport. This makes a lot of fun!

Lets see, how this is done.

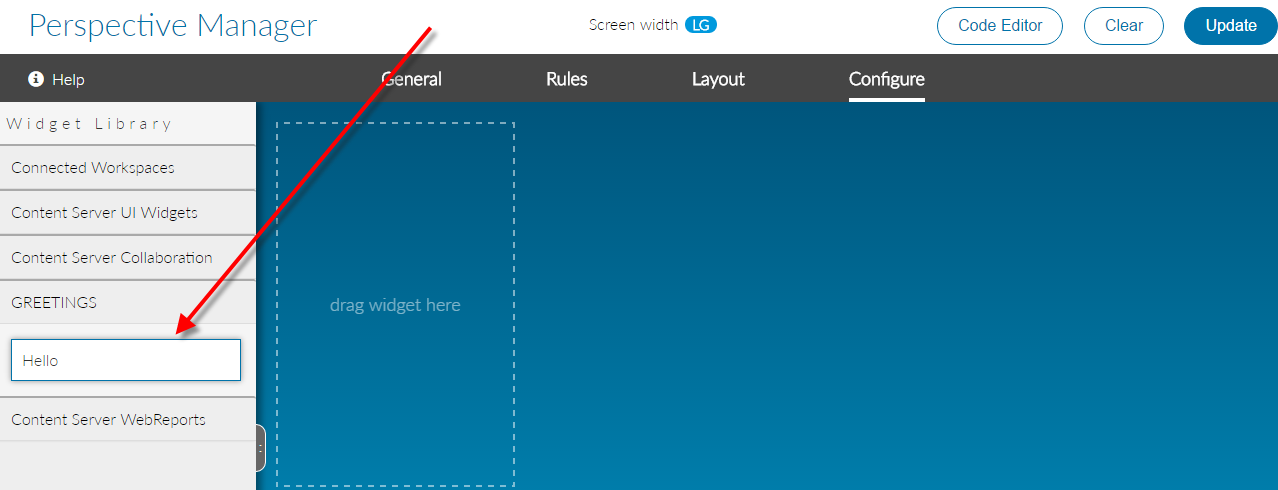
First a table.report widget can be used to list all data.

Click on a Webreport to start it

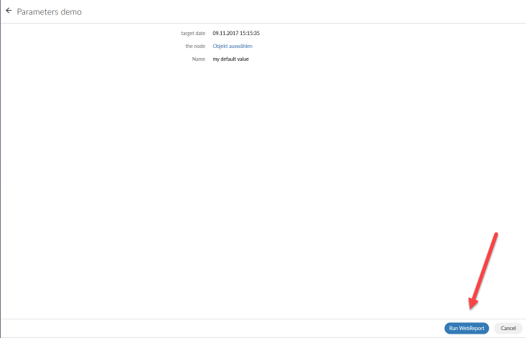
Then a Parameter Window opens. The Webreport can be startet by pressing the button “Run Webreport”

Webreport Parameters can be edited

A feedback can be given from the Webreport like this

Running webreports can give Feedbacks to SmartUI

The table.report shows a Smart UI table based on the output of WebReports data. The WebReport used by this widget must be based on either the widget_table_report_process_data_in_webreport or widget_table_report_process_data_in_datasource default reportviews which use the INSERTJSON @TABLEREPORT directive.

   // Create the data managing context
      var context = new PageContext(),
      sampleTableReportView = new TableReportView({
          context: context,
          data: {
            id: 24024,
            sortBy: "SubType",
            SortOrder: "ASC",
            columnsWithSearch: "SubType",
            titleBarIcon: 'mime_audio',
            title: 'Sample WebReports Table',
            header: true,
            swrLaunchCell: {
                id: 12345,
                iconClass: 'my-icon-class',
                hoverText: 'Some hover text for my icon.'
            },
 parameters: [
                {
                    name: 'myparm1',
                    value: 'val1'
                },
                {
                    name: 'myparm2',
                    value: 'val2'
                }
            ]
          }
      }),
      // Create helpers to show the views on the page
      region = new Marionette.Region({
        el: "#content"
      });

      // Show the views on the page
      region.show(sampleTableReportView);

      // Fetch the WebReport output from the server to populate the tile with
      context.fetch();

The parameter window can be implemented like this (the xxxxxx is the node number for the webreport)

  var promptView,
        promptModel,
        contentRegion = new Marionette.Region({el: "#content"}),
        pageContext = new PageContext(),
        currentNode = pageContext.getModel(NodeModelFactory, {attributes: {id: xxxxxx}}),
        runWRModel = pageContext.getModel(PromptModelFactory, {
            attributes: {
                node: currentNode
            }
        }),
        runWRController = new RunWRController();
pageContext.fetch()
            .done(function () {

                // We've got the page context, now get the runWRModel to see if there are parameters:
                runWRController.getRunWRPreModel({
                    node: currentNode,
                    context: pageContext
                }).done( function(){

                    // Build the prompt view and show it:
                    promptView = new PromptView({
                        context: pageContext,
                        model: currentNode,
                        promptModel: runWRController.runWRPreModel,
                        showBackIcon: false
                    });

                    contentRegion.show(promptView);
                });
            })

A feedback is implemented by the status.screen control.

  require(['csui/lib/underscore', 'csui/lib/marionette', 'csui/utils/contexts/page/page.context',  'csui/utils/contexts/factories/connector',
  'csui/controls/globalmessage/globalmessage',
  'webreports/controls/status.screen/status.screen.view',
  'webreports/models/run.webreport.pre/run.webreport.pre.model',
  'webreports/models/run.webreport/run.webreport.model',
  './status.screen.mock.js'
  ], function (_, Marionette, PageContext, ConnectorFactory, GlobalMessage, StatusScreenView, WebReportRunModelPre, WebReportRunModel, WRMock) {

  var statusView,
  context = new PageContext(),
  connector = context.getObject(ConnectorFactory),
  region = new Marionette.Region({el: "#webreport-status-screen-demo"}),
  attributes = { id: xxxxxx },
  options = { connector: connector },
  WRRunPreModel = new WebReportRunModelPre(attributes, options),
  WRRunModel = new WebReportRunModel(attributes, options);
  WRMock.enable(); // Mockup for local tests
WRRunPreModel
  .fetch()
  .done( function(){

WRRunModel
  .fetch()
  .done( function(){
statusView = new StatusScreenView({
  destinationModel: WRRunPreModel.destinationModel,
  executeModel: WRRunModel});
  region.show(statusView);
  })
  })

});

Working with WebReports and SmartUI now makes a lot of fun!

Technical Training “How to program a Widget in the new Content Server GUI” with the CSUI SDK

Hi folks

Beeing Content Server Trainer, I was asked to provide a training “How to program a Widget for the new Content Server GUI” to several customers. This is about the content of such a training and the reason why such a training is technically really advanced.

CSUI SDK introduces a shift in paradigma, the server is no longer providing the GUI, all is done by a Javascript Application at the client side.

Basic Training (newest version 1.005 from Feb/2018)

The basic training is very compact and lasts 5 days.

First, lets take a look on the components:

As a prerequisite, a firm knowledge of CSIDE, How to build a module, the Node Structure and whats to do with Content server Nodes is necessary.

At the end of the training, you’ll have a working knowledge of:

  1. Content Server Perspectives. What are they and how you can use them to provide a user specific interface.
  2. Content Server REST. This is the only possibility for the client to communicate with the server, so its mandantory to know the REST interface from the application point of vue. And, as REST can be very slow due to unneccesary data, its also mandantory to know, how to add REST services to the Content Server to get the data you want in the fastest way.
  3. Javascript. There are Javascript Patterns, which are used heavily in the SDK. If “Javascript Object Inheritance”, “Currying/Schoenfinkelizing”, “Decorators” etc are weird words for you, this chapter is the right chapter for you.
  4. Next is the infrastructural world of the sdk.

    CSUI Components
    The CSUI Components

    There are several components, which must be understood prior to build a Widget.

    1. node.js is the base Javascript system for our development
    2. grunt.js is a Javascript task runner, which we use to build, test and debug our widget
    3. yeoman is a scaffolding system, which will be used by a Opentext extension to initialize the development folder. It also creates the skeleton of a Content Server module, which is used as a “Carrier” for our Widget(s)
    4. backbone.js is the base framework to be used
    5. marionette.js is an extension to backbone.js, making Views easier.
    6. handlebars.js is the html templating framework used in the sdk
    7. require.js is the javascript module loader to be used
    8. bootstrap.js/binf.js is originally the public domain CSS/JS framework from Twitter for the appearance of the Widget. Binf is the Opentext variant, allowing to override CSS without negative effects
  5. Next is the SDK itself. Due to time restrictions, in the base training are only the base functions, the advanced training covers the other aspects. It contains
    1. Installing the SDK
    2. Building the Demo Widget
    3. CSS Style Overrides binf
    4. General Overview of the SDK
    5. Content of the SDK
    6. Routing (Preview of the Advanced Training)
    7. New Commands
    8. Custom Columns
    9. Metadata
    10. Define a new NodeType
    11. Create a Widget
    12. Base Widgets
    13. Controls
    14. Models
  6. Mockup and Test Data. How to setup mockup REST data. How to build test facilities in the SDK
  7. Anatomy of the Hello Widget. A walktrough through this widget
  8. Anatomy of the MyAssignment Widget
  9. Add another Widget to the Content Server. Change the Hello Widget and add additional fields
  10. Build a Custom Widget to be used as Client with a custom REST service. Here, a custom widget is build, which uses an extended version of the custom REST service from Part 2.
  11. If time allows: Some Tips and Tricks from a “Work-in-Progress” Widget


Advanced Training (Version 1.005 Feb/2018)

OK, thats the basic training. There are a lot of additional things inside the SDK, but to understand these, there must be a couple of weeks with practical experience in between. The advanced part has beed remodelled to include a couple of interesting things.  The advanced part contains:

  1. Chapter 1 Extended SDK Parts
    1. Additional Widgets
      1. NodesListReportView
      2. TilereportView
      3. FilteredCountChartView
      4. Carousel Widget View
      5. Userwidget eSocial
      6. ActivityFeedWidgetView
      7. ActivityFeedContent
      8. ChatWidget
    2. Datepicker
    3. switch
    4. Workflow (new in Content Server 16.2)
      1. Workflow Components
      2. Workflow in smartUI
      3. Starting Workflows
      4. URL Routes
      5. Workitem Actions
      6. Workitem Extension
      7. Writing Workflow Extensions
    5. New REST API Support (16.2) for Workflows
    6. Widgets not part of the SDK
      1. Mobile Scanning
      2. xECM: Header Widget with Business Object Infos
      3. xECM: Snapshot of current document Attachments
      4. xECM: Dossier View Widget
      5. Engineering Doc Management: Search
      6. xECM: Office365 Groups
  2. Chapter 2 Extended SDK Features
    1. Build Language Packs for Internationalization
    2. Commands
      1. Implementation and Inheritance from “CommandModel”
      2. Best Practices
      3. Using Commands
    3. Custom URL Router. Routing, adding custom Routers. Using Routers as Navigation.
    4. Behaviours. What are Behaviours?
      1. DefaultActionBehaviour
      2. BlockingBehaviour
      3. ExpandingBehaviour
      4. InfiniteScrollingBehaviour
      5. PerfectScrollingBehaviour
      6. PageLeavingBehaviour
    5. Mixins. What are Mixins? All available Mixins.
    6. Browsable Support for Collections. Using the “Browsable” support for Model-Collections.
  3. Chapter 3 Additional Things to consider
    1. Tips and Tricks (Work in Progress- List can change)
      1. Add a OTDS Ticket already in the browser to the connection object
      2. Re-using a OTDS Ticket as LLCookie
      3. Checking the paths in the test/index.html
      4. Using Helpers for supporting a select box with Handlebars
      5. Adding non CSUI supported JQuery functions in a view
    2. Handlebars advanced. A deeper look into Handlebars
    3. LESS advanced. A deepter look into LESS, the CSS language used in Bootstrap
    4. Accessibility in Bootstrap. What can be done to add support for screenreades etc to Bootstrap/Binf? Whats to avoid? Which tools are available
    5. Best Practices in Development


As you can see, there is a lot of stuff. The basic training last 5 days, the advanced training 2. But on the other side, you’ll get happy users with your new Widgets.

And that’s all what counts.

References

Javascript
  • “JavaScript Application Design “as a general introduction (covering Grunt) https://www.manning.com/books/javascript-application-design
  • Stoyanow’s JavaScript patterns http://shop.oreilly.com/product/9780596806767.do
  • Flanagan’s “JavaScript: The Definitive Guide” http://shop.oreilly.com/product/9780596805531.do
  • Crockfords “Javascript The good Parts” http://shop.oreilly.com/product/9780596517748.do
  • Flanagans “JavaScript Pocket Reference” http://shop.oreilly.com/product/0636920011460.do
Bootstrap
  • Spurlock: Bootstrap Responsive Web Development http://shop.oreilly.com/product/0636920027867.do
  • Syed Fazle Rahman: Jump Start Bootstrap: Get Up to Speed With Bootstrap in a Weekend https://www.amazon.com/gp/product/0992279437
  • Alan Forbes: The Joy of Bootstrap: A smarter way to learn the world’s most popular web framework https://www.amazon.com/gp/product/1522792813/
Require.JS
  • Greg Franko: Instant Dependency Management with RequireJS How-to https://www.amazon.com/Instant-Dependency-Management-RequireJS-How/dp/1782169067
  • David Sulc: Structuring Backbone Code with RequireJS and Marionette Modules
    https://leanpub.com/structuring-backbone-with-requirejs-and-marionette
Backbone
  • Developing Backbone.js Applications Adnan Osmani http://shop.oreilly.com/product/0636920025344.do
  • js Patterns and Best Practices Swarnendu De https://www.amazon.com/Backbone-js-Patterns-Best-Practices-Swarnendu/dp/1783283572
  • js Cookbook Vadim Mirgorod http://shop.oreilly.com/product/9781782162728.do
  • js Blueprints Andrew Burgess http://shop.oreilly.com/product/9781783286997.do


Backbone-Marionette
  • Getting Started with Backbone Marionette Raymundo Armendariz, Arturo Soto
    https://www.packtpub.com/web-development/getting-started-backbone-marionette
  • Marionette.js: A Gentle Introduction David Sulc https://leanpub.com/marionette-gentle-introduction
  • Marionette.js: A Serious Progression David Sulc https://leanpub.com/marionette-serious-progression
Mockjax and Jasmine
  • js Cookbook Vadim Mirgorod https://www.packtpub.com/mapt/book/web_development/9781782162728 Chapter 8
  • KnockoutJS Essentials Jorge Ferrando
    https://www.packtpub.com/application-development/knockoutjs-essentials
  • JavaScript Testing with Jasmine Eva Hahn https://www.safaribooksonline.com/library/view/javascript-testing-with/9781449356729/


Content Server Trainings
  • 4-0140 Content Server IDE (CSIDE) Fundamentals
  • 971-301 Livelink ECM Enterprise Server Workflow Customization Fundamentals
  • 03-0117/8 Webreports Design


A new SDK in Town: Content Server SmartUI SDK – First glimpse

Did you ever wonder, how to create new widgets or forms for the new SmartUI of the content server? The new SmartUI is responsive and can be used on mobile devices.

smartui

If you want to add new widgets or modify things, there is a new SDK on the knowledge center, which can be found here:

This are the components:

  • CSUI SDK Intro.pptx
    this is a powerpoint presentation on the SDK.
  • csui-doc-16.0.3.zip (1.7MB)
    this is the documentation as stand alone.
  • csui-sdk-16.0.3.zip (53.5 MB)
    this is the sdk itself. It contains a copy of the documentation.
  • csui-style-override-kit-16.0.3.zip (122 kb)
    this is a kit to provide branded css files, which will be used instead of the original ones.
  • generator-csui-extension-16.0.3.zip(51.9 MB)
    this is a generator, which will be used to setup an empty development project.


The basic requirement is the installation of node.js at your CSIDE machine.  You should be familiar with the REST API and Grunt to use the SDK.

The workflow is

  1. Generate an empty project on the harddisc
  2. Install all prerequisites in node.js (npm, grunt-cli)
  3. Modify the example according to your needs
  4. Import the module in out-module of your project into CSIDE
  5. Copy the widgets etc into your support folder
  6. Create the module in CSIDE and install it

The installed new Widget

Then you should see the example widget under the name of your module in the perspective manager.

Watch for upcoming posts on this exciting new Content Server technology.

Upload a File to Content Server using REST and Javascript

This is an example how to upload a file using JavaScript and REST.

This example uploads the file c:\test.txt with the name of “MyFile123” under the folder with the node id 485336. This snipped relies on a previous login. The subtype of the file to be uploaded is “document” (144). The authorization token is saved under the variable name of “otcsticket”.

This example does not consider any categories (mantadory or not). We’ll discuss this in a later post.

6 Steps:

  1. Declare all variables needed. This is done by defining the array bodyData. At least there must be the subtpe, the parent_id, the name and the local file name.
  2. Fire an AJAX request to the URL, where your content server is, Use “api/v1/nodes” as REST command.
  3. Put the authorization ticket in the header field
  4. Put the bodyData in the data field
  5. Set the Mime Type to “application/x-www-form-urlencoded”
  6. If the request is done, process the “success” or the “failure” clauses

Put some nice HTML around it, add the authorization code and then you are done.

(At least for this example. Normally, you should provide some name check for the node name)

function upload() {
  var bodyData = {
        type: 144,
        parent_id: 485336,
        name: "Myfile123",
        file: "c:\\test.txt"
        }
      formData = new FormData();
  formData.append( "body", JSON.stringify( bodyData ) );

  formData.append( "file", "c:\\test.txt" );
  return $.ajax( {
    type: "POST",
    url: "http://[yourserver/yourcs/cs.exe/api/v1/nodes",
    data: bodyData,
    headers: { otcsticket: otcsticket },
    beforeSend: function( xhr ) {    
    xhr.overrideMimeType( "application/x-www-form-urlencoded" )
    }
  } ).then( function ( response ) {
    alert("Success")
  }, function ( jqxhr ) {
    alert("failure")
  } );
}


Authentication (1/3) How to authenticate against the Content Server in REST/Javascript

This is the first post on a series about authentication against the content server. The first post explains the authentication from a html page with Javascript and JQuery using REST

The REST API can be used to perfom things on the Content Server from nearly every thinkable language. Here is the example how to do a login from Javascript.

Replace [yourserver] with the DNS name of your Content Server, replace [yourCSInstance] with your CS instance and the cgi.

A valid URL would be for example

http://AllmyServer.mydomain.com/cs16/cs.exe/api/v1/auth

for the Authentication request.

<script>
  var otcsticket = "";
  /*
  * This function needs to be run first to authenticate the user against Content Server.
  */
  function authenticate() {
  // Set up the ajax request
  $.ajax({
  // Authenticate is a POST
  type: "POST",
  url: "http://[yourserver]/[yourCSInstance]/api/v1/auth",
  data: { username: [username], password: [password] },
  beforeSend: function( xhr ) {
  // Set the correct MimeType for the request.
  xhr.overrideMimeType( "application/x-www-form-urlencoded" )
  }
  }).done( function( data ) {

var val = JSON.parse( data );
  alert( "setting otcsticket to: " + val[ "ticket" ] );
  // Store the ticket for later use.
  otcsticket = val[ "ticket" ];

});
  }
 </script>

To authenticate, a $.ajax call is used. The REST call to do this is “/api/v1/auth”. The data must contain a valid username and a valid password for this user.

If the call is finished, then the JSON array (in the response) must be parsed for the key “ticket”. The value is the authentication token which should be stored somewhere for further use. Normally, the name otcsticket is used for this.

The token should be send as a header in any request, like in this example:

$.ajax( {
  type: "POST",
  url: "[yourURL]/api/v1/nodes",
  data: bodyData,
  headers: { otcsticket: otcsticket },
  beforeSend: function( xhr ) {
  // Set the correct MimeType for the request.
  xhr.overrideMimeType( "application/x-www-form-urlencoded" )
  }
  } ).then( function ( response ) {
  alert("Success")
  }, function ( jqxhr ) {
  alert("failure")
  } );

(This is a call to upload a file, for the complete example on uploading files with REST see the posts in January 2017)