We made it. We finished a simple widget for smartUI to demonstrate a lot of features of smartUI inside our new workshop “Learning by Doing”.
This is a remote workshop and during 2 days you get the source code of the widget and learn, how this widget is developed from the standard hello widget.
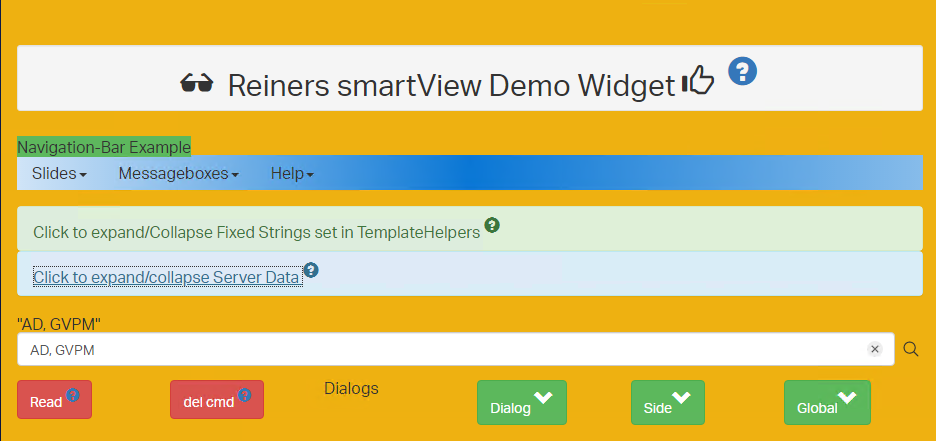
The widget features
Usage of Glyphicons in binf
programmable multi line tooltips in binf
Navigationbars in binf with commands behind the targets
expanding and collapsing of structures using binf
a dateselector on an input type=date field
switching a label to an input field and vice versa
rendering the logged in user photo from a content server behind
use a nodepicker to select a document and render the thumbnail
add a user select control after the widget is rendered
delete the “copy” command in smartUI
display messageboxes and global messageboxes
use a standard slide in and use a wizard slide in with several views
See here a short video (20min) of the features
And dont forget to register for the next workshop “smartUI Learning by Doing”
Have you ever thought of the magic of extension points in smartUI?
What is an extension point?
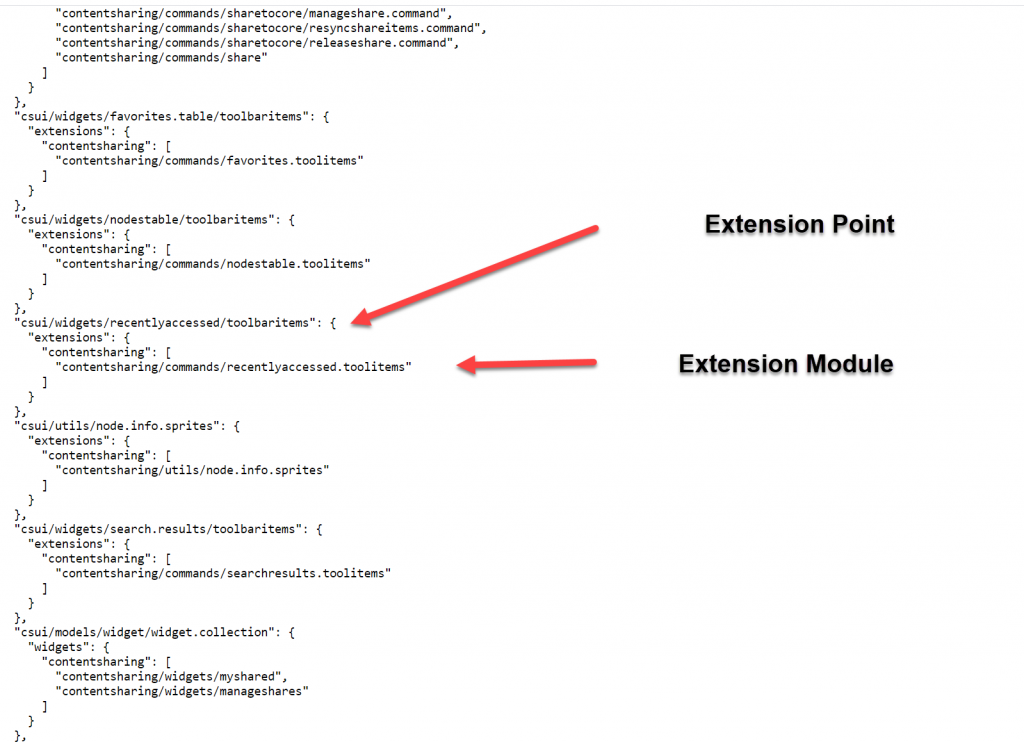
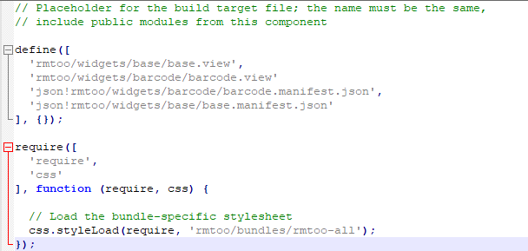
This are the dynamic configuration points of smartUI. Calling the config URL in smartUI, you will see all extension points with all configured extension modules in the current smarUI. Normally you’ll add your modules in the file <your-base-requirepath>-extensions.json in your projectstructure build by yo.
All of these modules indicated by these json files are loaded at initialization and form the dynamic smartUI system.
This is an example of an actual configuration in a Content Server System :
As you can see in the configuration, an extension point allows the extension of the extension point with several definable extension modules. Ok,this sounds like a typical lawyer sentence.
In plain english:
This technique allows you to extend the capabilities of a base module (the extension point) with the extension modules listed.
How to add your own extension point?
Use cs-ext as requirejs extensions. This is part of the SDK (/lib/src/csui/utils/load-extensions). There is the module and a very brief short documentation.
If you want more infos on custom requirejs modules, refer to the example of a conditional module,
This is a require.js module like the one which I introduced for conditional loading in Febr 2020. cs-ext is part of the smartUI core. If you want to modify the cs-ext, then use the easy way of loading an requirejs extension described in the conditional loading article.
Overview of cs-ext (in the sdk)
Lets take a look at cs-ext. But if you are more interested in the usage of cs-ext, skip the overview and go to the next chapter “Usage of cs-ext” below.
define(['module', 'csui/lib/underscore'], function (module, _) {
'use strict';
This is the standard entry to add sme vars into the configuration. Interesting is the list of modulePrefixesToRetry, includes all modules to retry a reload, if the extension point loading fails.
function handleSuccess(onLoad, parameters) {
onLoad(Array.prototype.slice.call(parameters));
}
The success handler, handles the callback
function handleError(error, onLoad) {
if (config.ignoreRequireErrors) {
console.error(error);
console.warn('Loading extensions of "' + name +
'" failed:', error.requireModules);
onLoad([]);
} else {
onLoad.error(error);
}
}
The error Handler
function retryLoading(require, name, modules, onLoad, firstError) {
var droppedModules = [],
selectedModules = .filter(modules, function (module) { var slash = module.indexOf('/'); if (slash < 0 || .contains(config.modulePrefixesToRetry,
module.substring(0, slash))) {
return true;
} else {
droppedModules.push(module);
}
});
if (selectedModules.length && droppedModules.length) {
console.error(firstError);
console.warn('Loading extensions of "' + name +
'" failed:', firstError.requireModules);
console.warn('Dropping extensions:', droppedModules);
console.warn('Retrying extensions:', selectedModules);
require(selectedModules,
function () {
handleSuccess(onLoad, arguments);
},
function (error) {
handleError(error, onLoad);
});
return true;
}
}
The retryLoading handler. Demonstrates how the reload a module, if there is an error condition. Only the modules with the prefixes listed in modulesPrefixesToRetry (see above) will be reloaded.
return {
load: function (name, require, onLoad, runtimeConfig) {
if (runtimeConfig.isBuild) {
onLoad();
} else {
var moduleConfig = runtimeConfig.config[name] || {},
modules = moduleConfig.extensions;
if (modules) {
if (!.isArray(modules)) { modules = Array.prototype.concat.apply([], .values(modules));
}
if (modules.length) {
require(modules,
function () {
handleSuccess(onLoad, arguments);
},
function (error) {
if (!retryLoading(require, name, modules, onLoad, error)) {
handleError(error, onLoad);
}
});
} else {
onLoad([]);
}
} else {
onLoad();
}
}
}
};
The main method is simply returned as js object.
All listed modules in the extension point list will be loaded and executed before the callback (the carrier module with the cs-ext entry) will be executed.
This may sound quite theoretical. Lets use cs-ext.
Usage of cs-ext
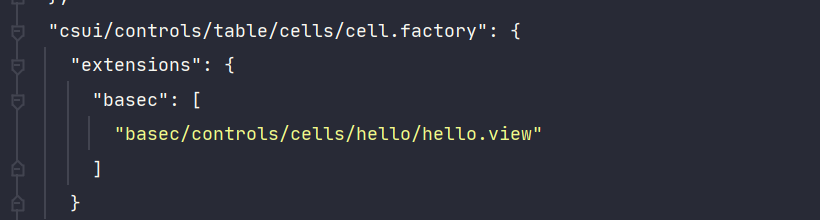
Select the module which you want to amend with an extension point. Lets use the csui/controls/table/cells/cell.factory (MUST exist) as an example.
Configure the proper extension in the project json like
Open the cell factory and examine the source code.
Notice the csui-ext! line at the end of the define-module list. This will search the require.config entries to get a list of the extension modules for this extension point. All listed modules (here hello.view) will be loaded and executed before the callback (stated in the line csui-ext) will be executed.
Back in the callback , the _.extend function extends the prototype of the cell factory by the methods “hasCellViewByOtherKey” and “getCellView”.
Summary
To make a custom extensible module (with extension point), add the csui-ext requirejs extension to your module and set the modules to be loaded in the appropriate json extension file.
Then point to your extensible module from your widget, and you are done. Then your module is configurable and extendable by using the csui-ext util module.
If you want to extend existing modules, you’ll have to spawn the widgets from the library to reflect your new module.
Lets discuss the strategies on how to “widgedize” an existing legacy GUI based module to support smartUI.
As we are discussing smartUI, we do only discuss the client side, the things to do on the server side are only drawn.
Ok, let’s start:
To keep the example easy, we use the Barcode Module, which is part of the core Content Server and is providing a very easy service.
Allows to mark a folder and to enter a filename and will print out the coversheet at the right
Used to be the designator of a document to be scanned with Enterprise Scan. The document wll be scanned and stored under the folder (defined by the path) and the name (defined by the Document name) in the Content Server.
Base for a Scan-Workflow
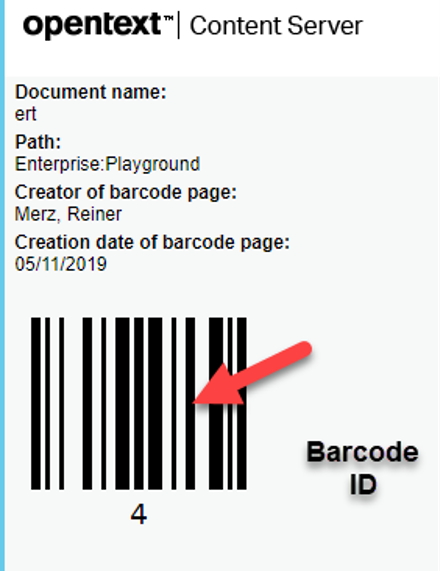
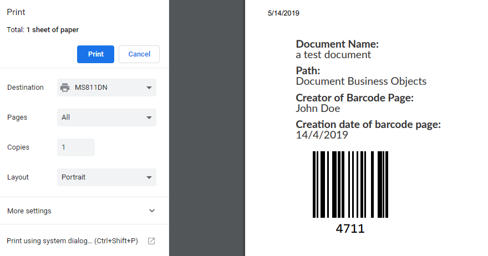
The Barcode module gives this as result
Result of the Barcode Module Execution
This gives a Barcode ID, the Document Name and the Content Server Path. This sheet can be prited and scanned using Enterprise Scan. Then the next scanned document will be stored in the Content Server with that name and that path.
First, we have to do some investigations.
Investigate the GUI
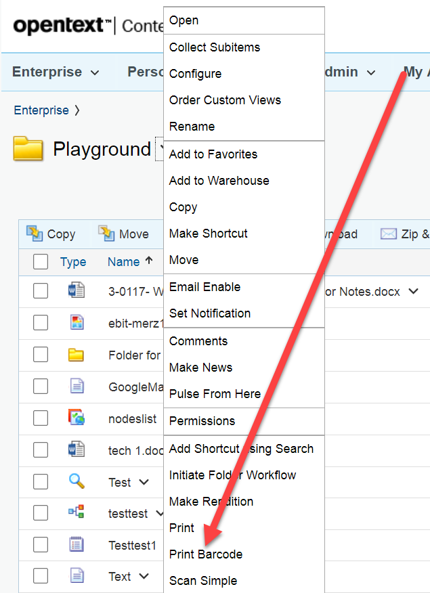
Invoked by clicking on „Print Barcode“ at the container node menu
Will ask for the name of the scanned document and output the cover sheet for the scan order
Is available at the Node menu in the legacy guiThen the Name of the document can be entered
Investigate the module
•Next, the module is interrogated for
Data Storage
Request handler
Internal processing
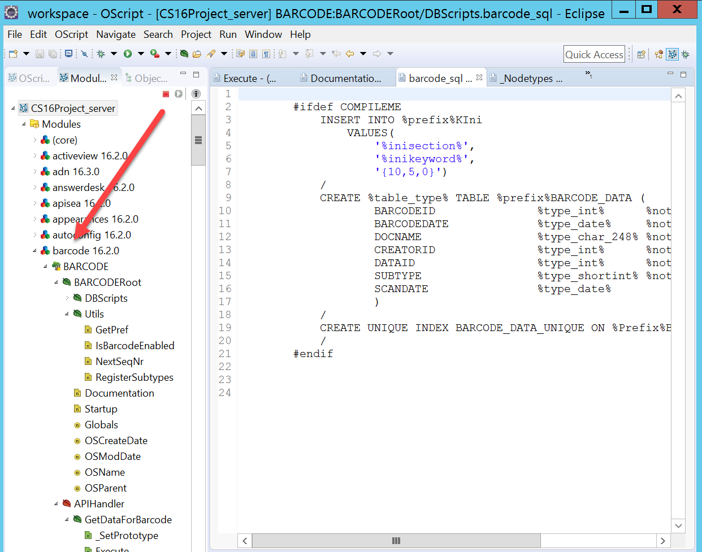
This can be done with the help of CSIDE
Use the Module-Tab and DONT(!) unlock the module or import.
Results
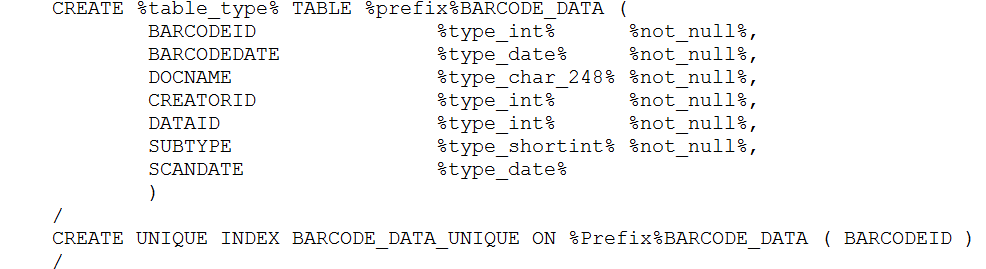
Obviously the module uses a table with this format
The barcode table format in SQL
With a unique index on the barcodeid. This is the number which is printed as barcode.
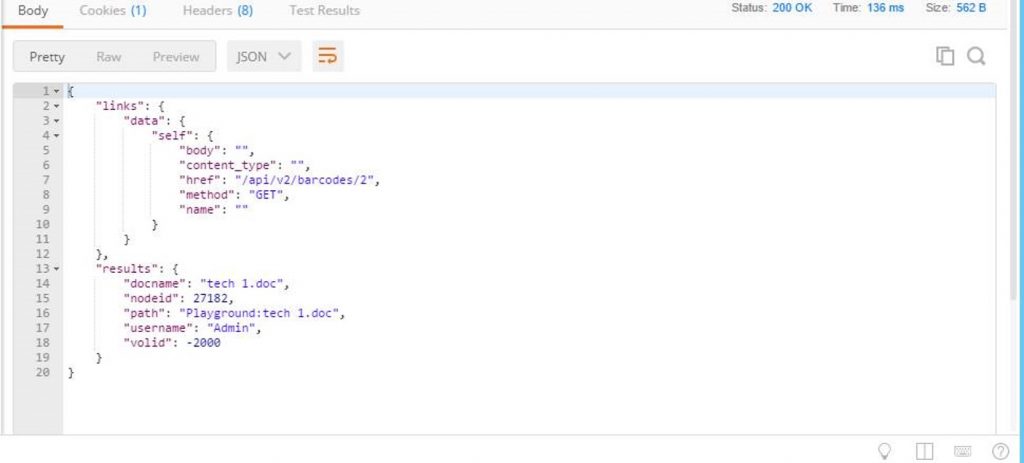
There is also one REST command existing. This REST command /api/v2/barcodes/{barcodeid} is obviously used by the Enterprise Scan to store the doc in the Content Server. It gives this JSON answers:
To be implemented
Server Side (Not part of this example)
Rest Services
To get the next unique number
To store the Barcode ID, Document name, the Path, the User and the Date in the barcode table
Client Side
New Barcode Widget
To select the parent container
To query for Document Name
To process all dates
To print the cover sheet locally
To be used as a small widget under connected workspaces
Client Side Development
Copy the base demo widget to a new folder under [yourprojDir]/src/widgets with a new name (p.ex.barcode)
Rename all references from the base demo widget to the new name (using wingrep etc)
Rename all files to the new widget name
Use the test\index.html to verify that all in the copying procedure was successful.
At this point the new widget should display the same output as the base widget
Add a Nodepicker to get the parent node
Use fiddler to search for the REST commands used by the nodepicker
Use postman to get the REST answers against an existing CS
Setup the REST mock up to test without the need to install the widget (text\index.html)
Put the output of the nodepicker to a text field to avoid typos
The Nodepicker ControlThe Nodepicker Start Button in our Widget
Add a document name input field with a label of „Document name“
The Document name Input field
Next, you can add a „Process Barcode“ button, because everything is gathered. The User Name is in the Context, the Date is today. Process Barcode should (not part of this exercise) report the next sequence number from the table, store all data in the table and render
Add a display field for the cover sheet. First with dummy data, then with the actual data filled in. Ensure that the actual user is requested by using the base model.
Add a Print-Button
Add some Print Functionality using browser printer capabilities
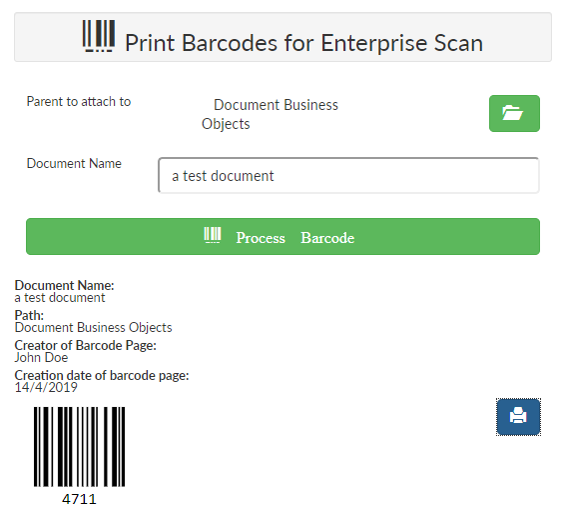
The complete widget would look like
The complete barcode Widget in preliminary layout
ToDo if the Widget is correct
Implement the REST Services in the server
Add the REST client functionality in the widget
Add the REST calls in the mockup
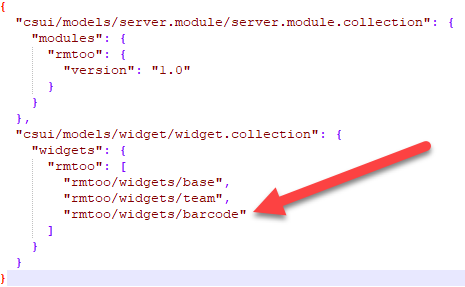
Add the barcode widget in the project-name-extensions.json
Add the widget and the widgets manifest to the bundles file
Grunt
Copy the resulting files to the support dir of your carrier module
Test it
Adding the barcode widget in xxxxx-extensions.jsonAdding the barcode widget in the bundles file
And you have added smartUI support to the barcode module and any Enterprise Scan workflows.
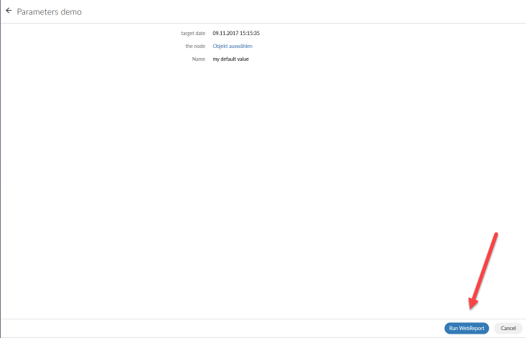
The usability of Webreports in smartUI has been improved. Now, you can, after starting a Webreport, edit the parameters of that report and receive feedbacks from the running Webreport. This makes a lot of fun!
Lets see, how this is done.
First a table.report widget can be used to list all data.
Click on a Webreport to start it
Then a Parameter Window opens. The Webreport can be startet by pressing the button “Run Webreport”
Webreport Parameters can be edited
A feedback can be given from the Webreport like this
Running webreports can give Feedbacks to SmartUI
The table.report shows a Smart UI table based on the output of WebReports data. The WebReport used by this widget must be based on either the widget_table_report_process_data_in_webreport or widget_table_report_process_data_in_datasource default reportviews which use the INSERTJSON @TABLEREPORT directive.
   // Create the data managing context
       var context = new PageContext(),
        sampleTableReportView = new TableReportView({
           context: context,
           data: {
             id: 24024,
             sortBy: "SubType",
             SortOrder: "ASC",
             columnsWithSearch: "SubType",
             titleBarIcon: 'mime_audio',
             title: 'Sample WebReports Table',
             header: true,
             swrLaunchCell: {
                 id: 12345,
                 iconClass: 'my-icon-class',
                 hoverText: 'Some hover text for my icon.'
             },
  parameters: [
                 {
                     name: 'myparm1',
                     value: 'val1'
                 },
                 {
                     name: 'myparm2',
                     value: 'val2'
                 }
             ]
           }
       }),
       // Create helpers to show the views on the page
       region = new Marionette.Region({
         el: "#content"
       });

       // Show the views on the page
       region.show(sampleTableReportView);

       // Fetch the WebReport output from the server to populate the tile with
       context.fetch();
The parameter window can be implemented like this (the xxxxxx is the node number for the webreport)
  var promptView,
         promptModel,
         contentRegion = new Marionette.Region({el: "#content"}),
         pageContext = new PageContext(),
         currentNode = pageContext.getModel(NodeModelFactory, {attributes: {id: xxxxxx}}),
         runWRModel = pageContext.getModel(PromptModelFactory, {
             attributes: {
                 node: currentNode
             }
         }),
         runWRController = new RunWRController();
         pageContext.fetch()
             .done(function () {

                 // We've got the page context, now get the runWRModel to see if there are parameters:
                 runWRController.getRunWRPreModel({
                     node: currentNode,
                     context: pageContext
                 }).done( function(){

                     // Build the prompt view and show it:
                     promptView = new PromptView({
                         context: pageContext,
                         model: currentNode,
                         promptModel: runWRController.runWRPreModel,
                         showBackIcon: false
                     });

                     contentRegion.show(promptView);
                 });
             })
A feedback is implemented by the status.screen control.
From time to time, you may want to execute a livereport from an OScript function and get the results for further processing. This can be done quite easy.
First, you should have the node id of the report to execute.
In this scriptlet, the node id of this livereport to execute is nodeid
Second, you should setup a list with all input parameters. For each input parameter, create an assoc with inputType, label, prompt, textvalue and value of the parameter.
Add this assoc to the list of input parameters.
Store this list in the pExtendedData field of report node.