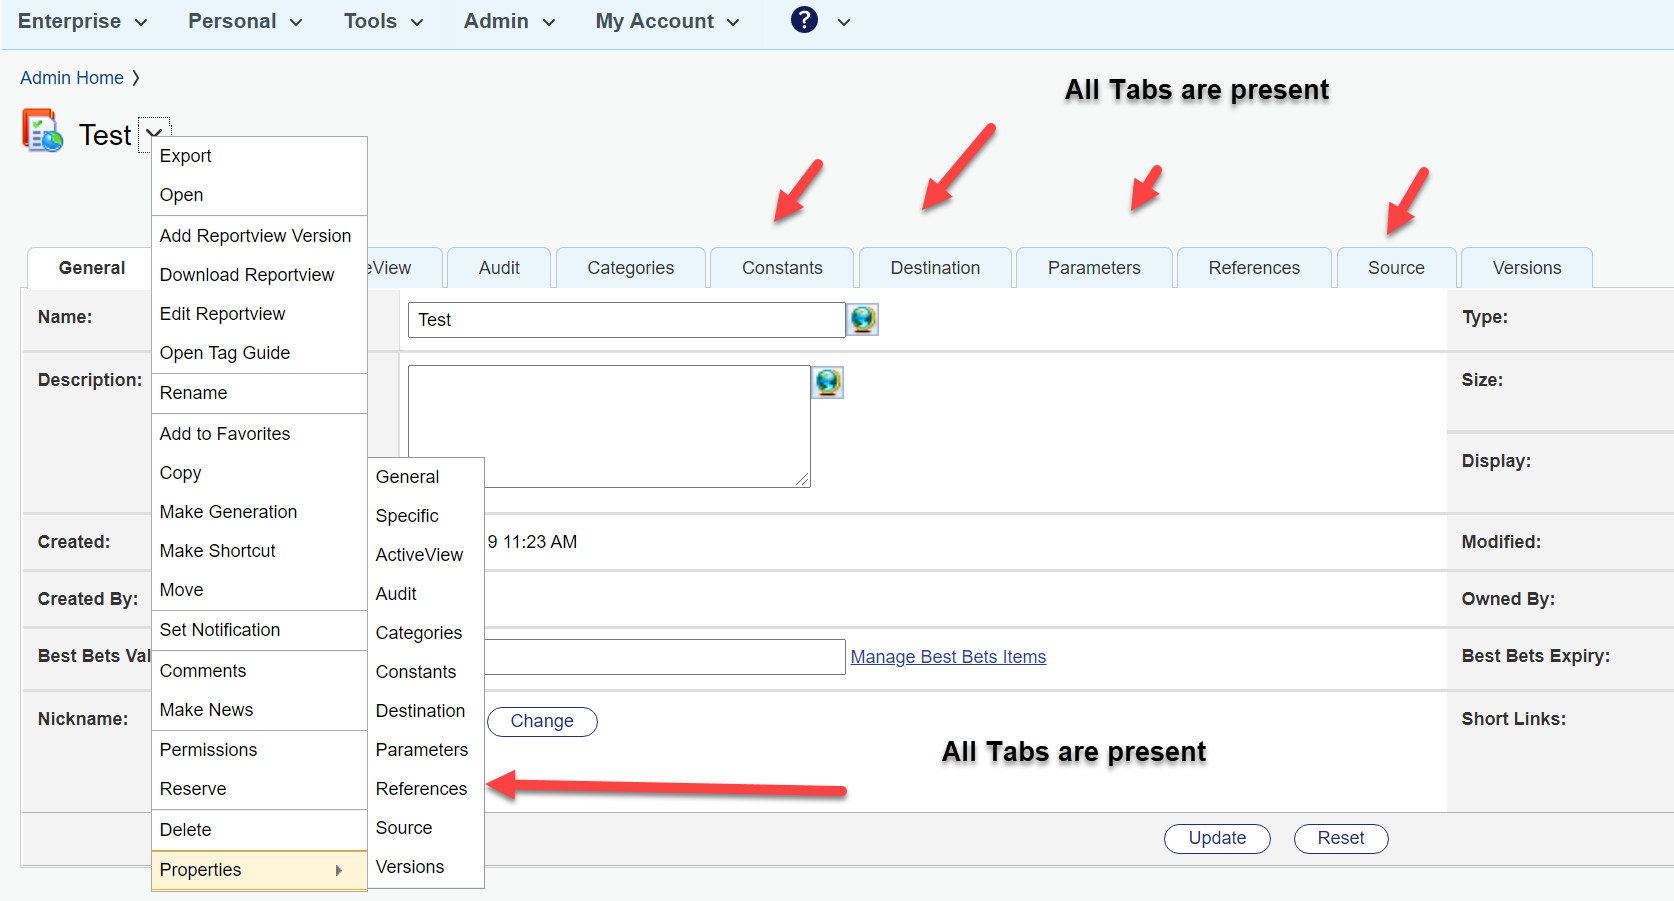
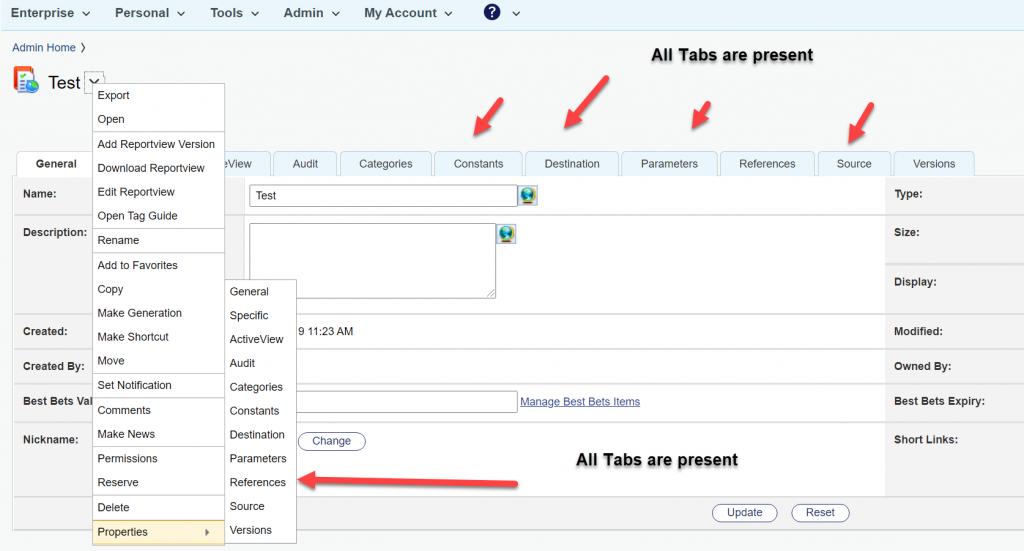
A short, but sometimes time consuming thing are the missing Webreport Tabs. Imagine, you have a Content Server with an jetty based internal Admin Server or an external Admin server on a fast machine.
The problem
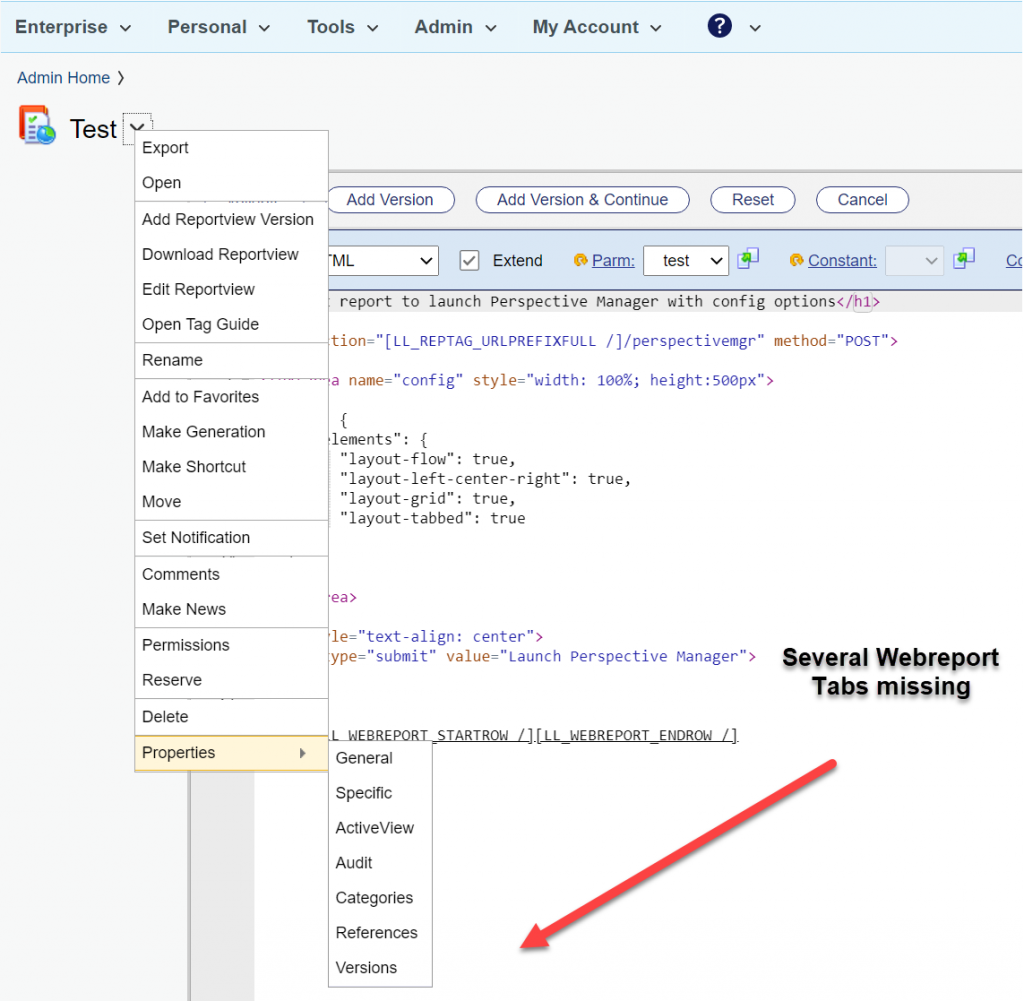
Then, from time to time, you will see this on editing a webreport:
All Edit Tabs for the webreport are missing. Although you can start the missing functions within the URL, its annoying.
The Cure
If this happens, use this Magic Trick N,12:
Simply stop Content Server and Admin Server. Start the Admin Server and wait at least 5 min before starting the Content Server.
Then you’ll see everything is there.
Wow. You made it. You are a great wizard.
Seriously:
There is a timing problem in the Content/Admin Server. If the Content Server starts to fast, COntent Server thinks, there is no license for webreports at first. Later, it gets the license, but the GUI is drawn without the webreports tabs.
Wait for your Content Server to start up. Wait at least for 5 min. Then everything will be drawn in the GUI.
smartUI does have a couple of interesting objects, but the actual documentation about them is not very clear. So lets take a look on the objects.
First, we’ll examine the connection object a little bit more in detail. The page context will follow in another post.
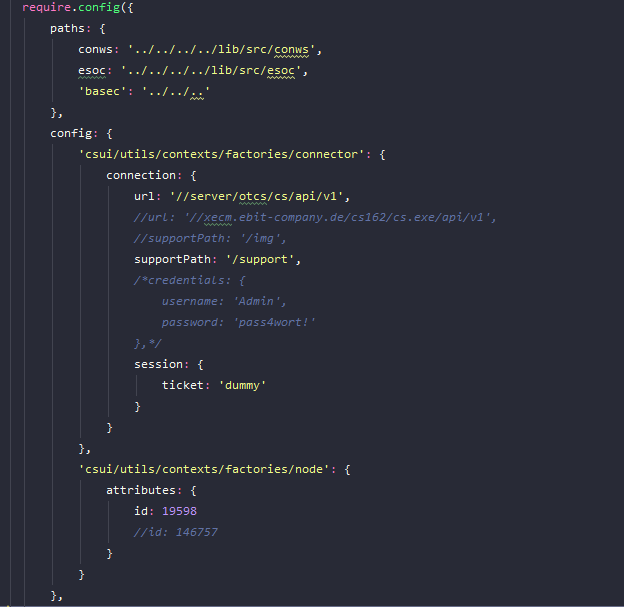
The connection object provides information about the content server to connect with. Normally, this object comes from the content server but has to be constructed manually when you use the index.html testing facility.
Lets take a look at a typical index.html with the connection object setup
Remember, the widget will get everything beeing perfectly setup from the content server, but using the test faciliy, you have to mock up this.
Parameters:
url – the url which is the content server url in your mockup data
supportPath – where is your content server support directory
credentials – in case you want to log in, use this clause
session- when you want to ignore the ticketing etc, use ticket:”dummy”
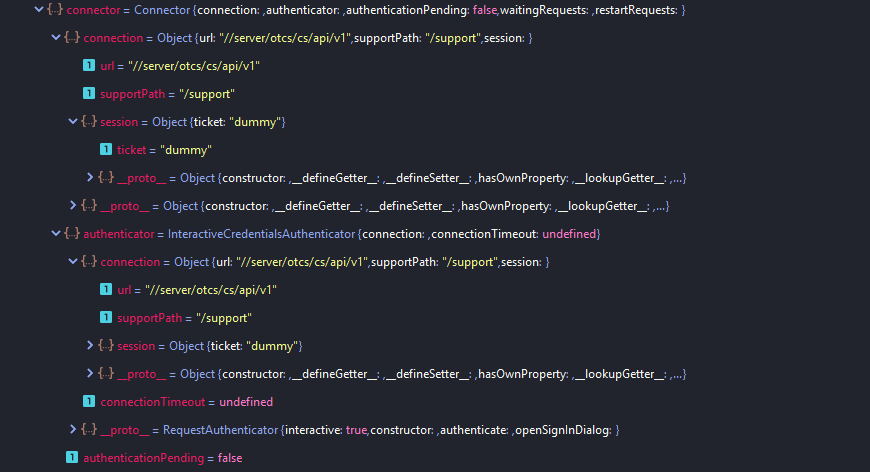
Lets see what this object is doing:
(here the page is running and this is a screenshot from the debugger)
We see, there is a connector object beeing the parent for the connection object. The connection object contains all parameter setups from the index.html, mainly the url and the session infos.
There is also an Authenticator in this connector object, which contains another copy of this connection object but also with the information, how the automatic re-login for a valid session ticked should be done. And of course, the type of Authenticator (here InteractiveCredentialsAuthenticator)
(Remember: The security token timeout will cancel your session (within typically 300 sec) if you do not a relogin).
This is the mechanism to avoid permanent logins. Take a look at the available authenticators to see the possibilities.
You can always refer the Connection Object to get the url of the server. This url os merged with the parameters in the Model URL function to build the final REST call.
A useful object. Normally we get it automatically from the server, only while testing with Mock-Up Data we need to setup this object manually.
From time to time you’ll have to deal with distributed agents inside content server. This can be a little confusing, so maybe this post is helpful there
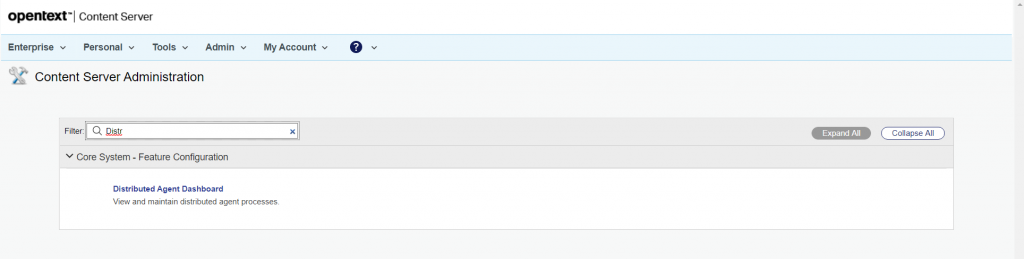
In the Admin Pages, you’ll find a dashboard to control the default setup. Either add a func=distributedAgent.AgentStatus to your servers URL or search inside the admin pages for distributed Agent things like this
Click on Distributed Agent Dashboard.
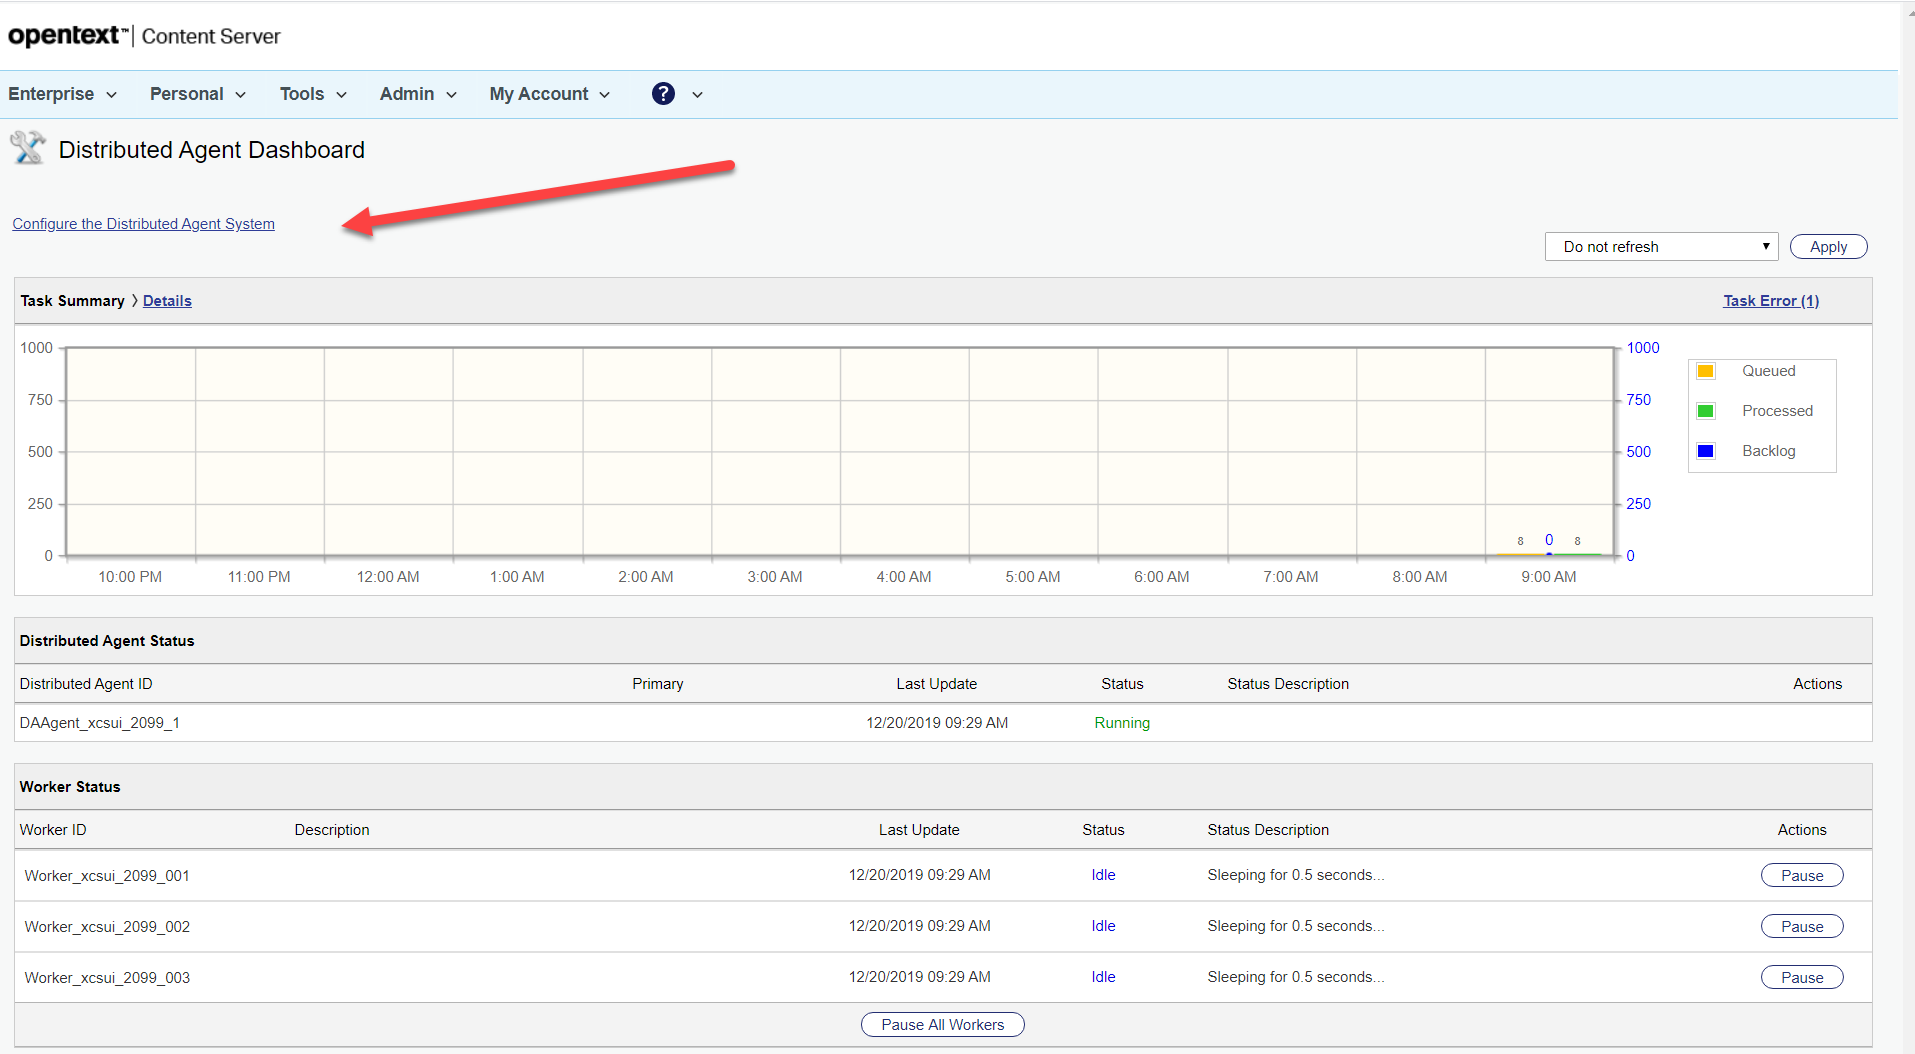
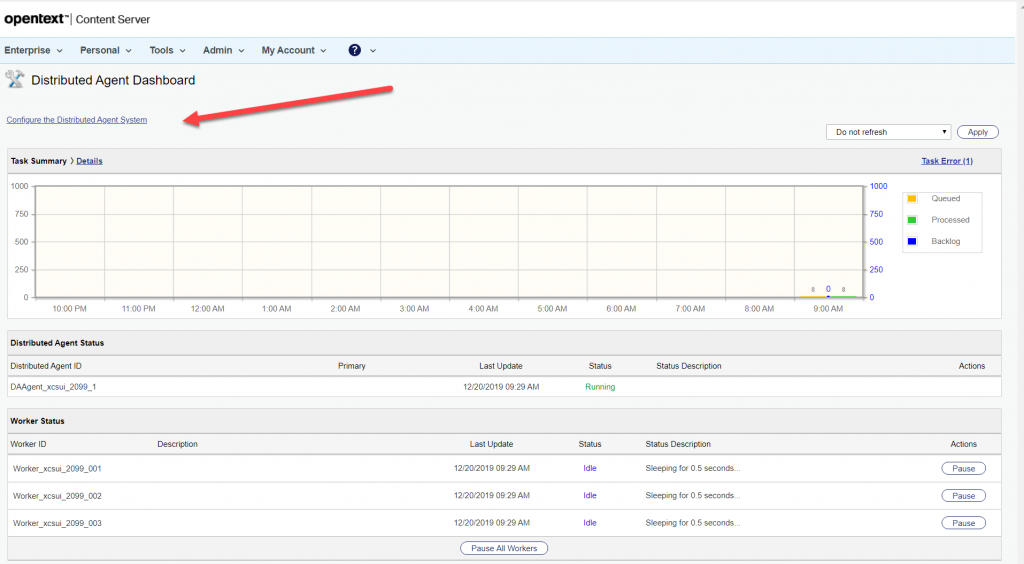
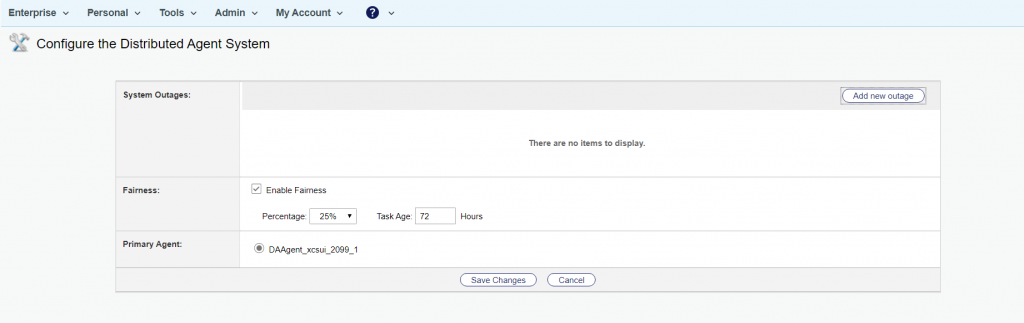
Then you’ll see the distributed Agent dasshboard
Here you’ll find all information about the current state of the system and the configuration of the distributed agent system
Per default a content server has one distributed agent with three workers. You can change the number of workers used by the agent by changing the number of workers in the opentext.ini file in the [distributedagent] section.
You can configure the whole distributed Agent system by clicking on the link indicated with the red arrow above. Then the configuration page opens:
Here you can set up values for the the treatment of low priority tasks (Enable Fairness). The agent can spent between 5% to 50% on low priority tasks, which will be processed aftera minimal age set by “Task Age”.
When you have more than 1 agent in the system, you can switch the priority Agent here also. OpenText recommends that you select the Distributed Agent with the greatest capacity to be your Primary Distributed Agent. Typically, the Distributed Agent with the greatest capacity resides on your most powerful or your least busy computer.
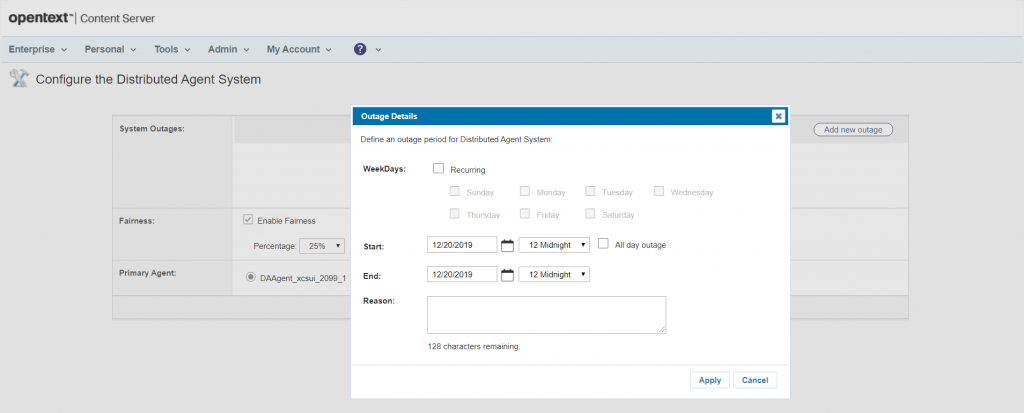
If you want a defined outage to be set, you can do this for the Agent by clicking on “Add new Outage” at the upper right. You can do the same for specific workers, we’ll discuss this later.
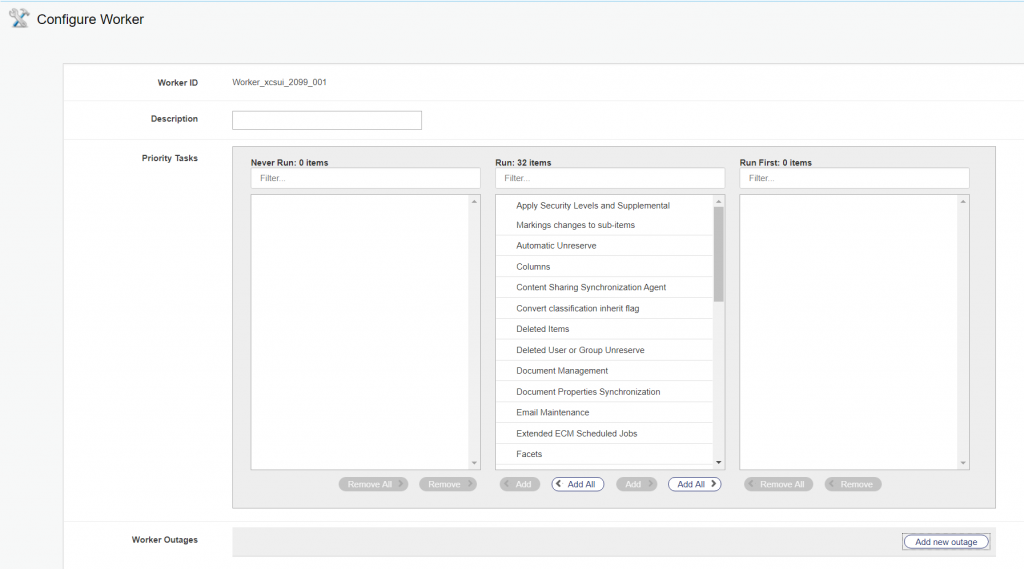
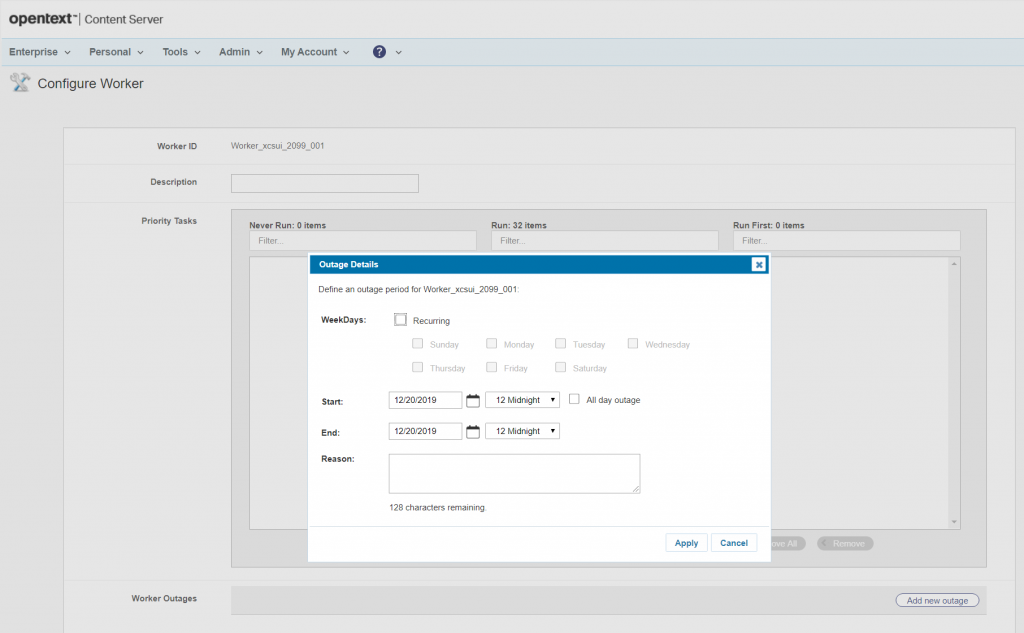
Back on the DashBoard, you cal also modify single workers. SImply click on the name of a worker, then the “Configure Worker” page opens
If you want to set a more specific name as that automatically generated, fill the Description field.
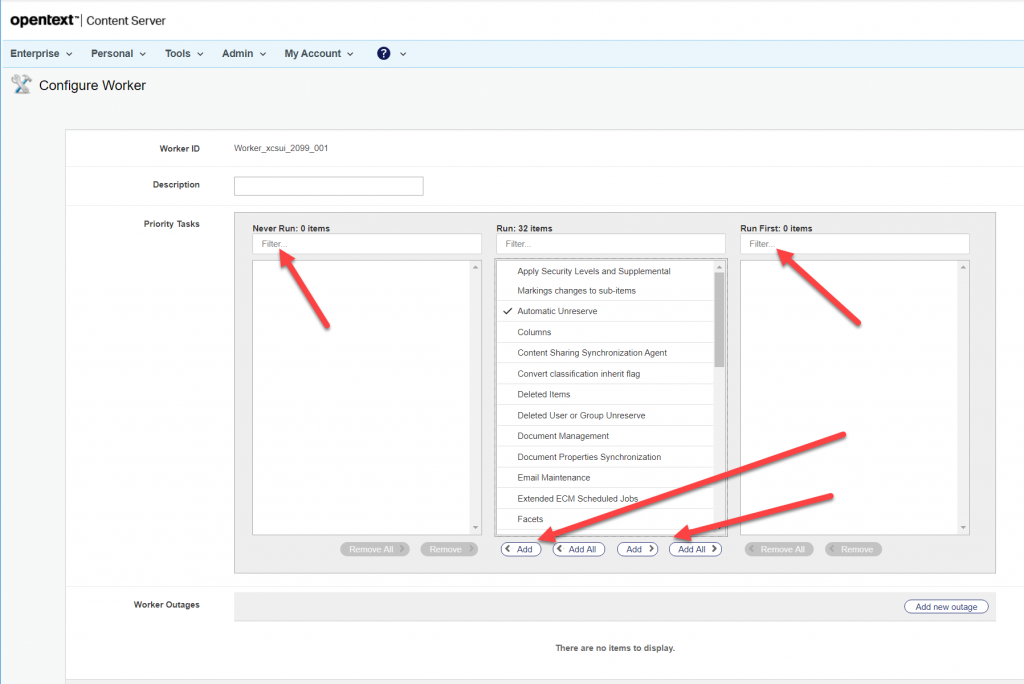
Much more important are the three columns “Never Run”, “Run” and “Run First”. The Run column contains all tasks this worker is supposed to do.
You can exclude tasks from this worker, then this worker will never execute this task. You can also prioritize a task, which means this worker will do this task at first.
To configure this, select either all of the tasklist under “Run” or one or more tasks from the tasklist and move the entries either to “Never Run” on the left (worker will never execute the tasks) or to “Run First” on the right (worker will execute this tasks at first).
This allows you an effective task prioritizing for a single worker.
You can also define an outage for this worker by clicking on the Button “Add new Outage” on the lower right.
Normally, when building REST Services for smartUI, you’ll have to read complex attributes from categories to send them for display to a widget.
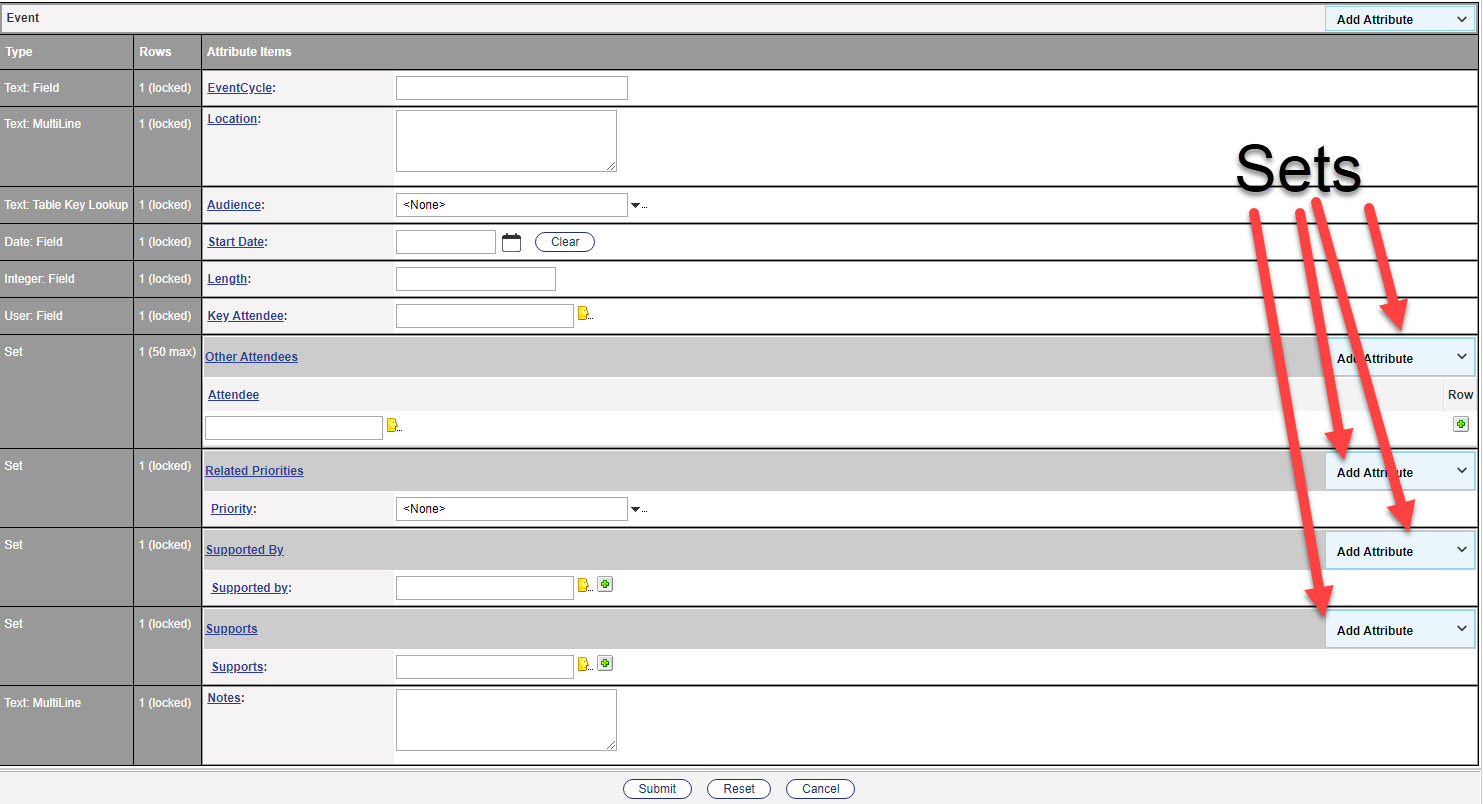
Lets use this example
A complex category with multible sets and table lookups (click to enlarge)
In your REST handler, you r task would be to get the values of the category attached to a node, read them and send them to the client using REST.
In this writing, we’ll focus on the “Read them” part. Our trick is
object  LLNODE = $LLIAPI.LLNodeSubsystem.GetItem(node.pSubtype)
result = LLNODE.NodeCategoriesGet(node)
Thos gives us all Categories connected to a node.
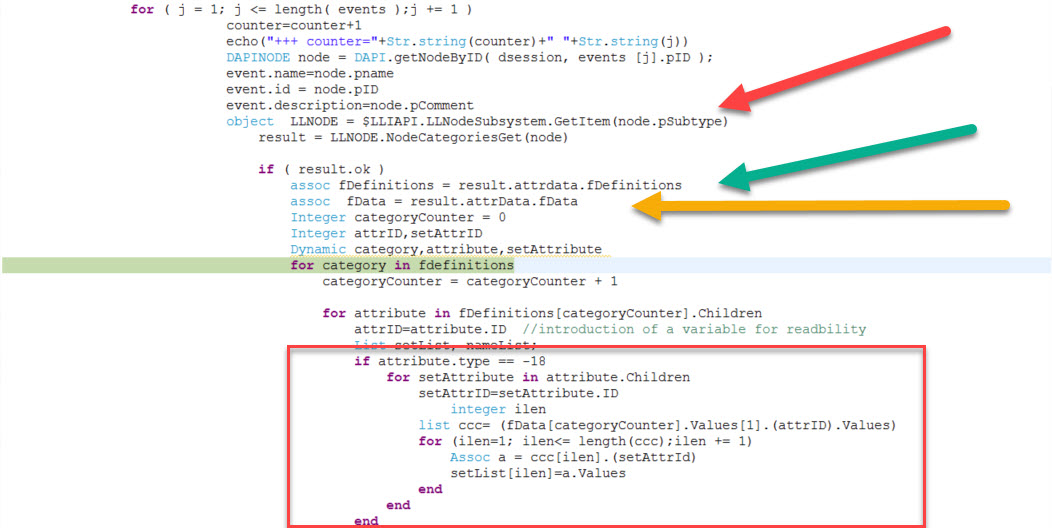
When we receive the REST call in ther server handler, we should do
find the node id of the the object to examine.
find the categories attached to this node (Red Arrow in the Screenshot)
iterate over all categories and get the attributes we want. This is based on
the attribute definitions (Green Arrow on the Screenshot)
the attribute values (Yellow Arrow on the Screenshot)
if you encounter a set (-18 as attribute type), you also will have to iterate over the set (Red Rectangle)
The REST Handler to get the Values of a complex category
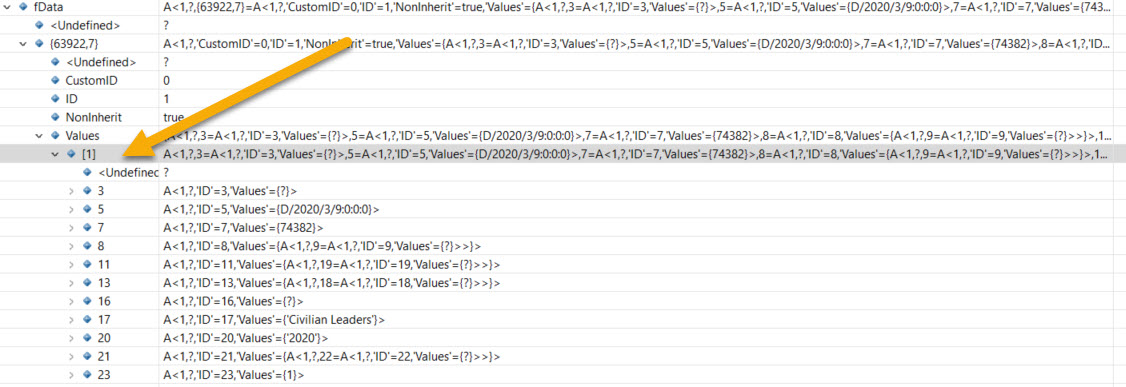
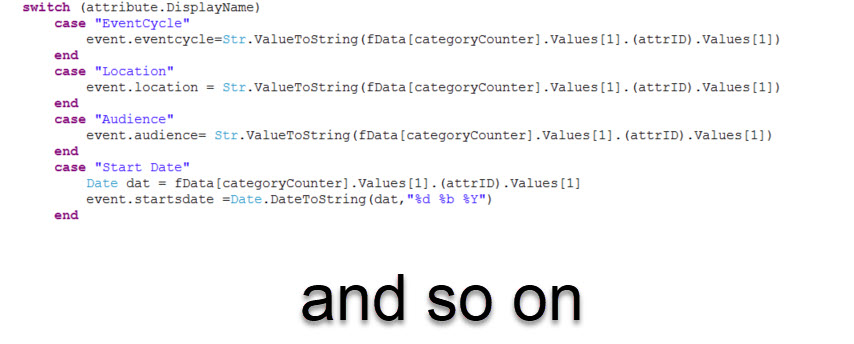
Lets take a look on the Values of a single Category. They are inside an assoc with one entry per attribute id.
i
The value list in CSIDE
Now you are almost done. Put a switch construct to get all values of the attributes on which you are intersted and get them out of the fdata assoc. The Value is found in the fdata assoc of the n-th Category unter the content of the first Value entry. Then we have to pick the attribute id where we find the content of the attribute in the first Value entry.
The Str,ValueTostring typecasts the output to be a string. So when we finished the job, we’ll see in the entry event.eventcycle the value of the attribute with the name “EventCycle”.
The switch construct to get the attributes of interest
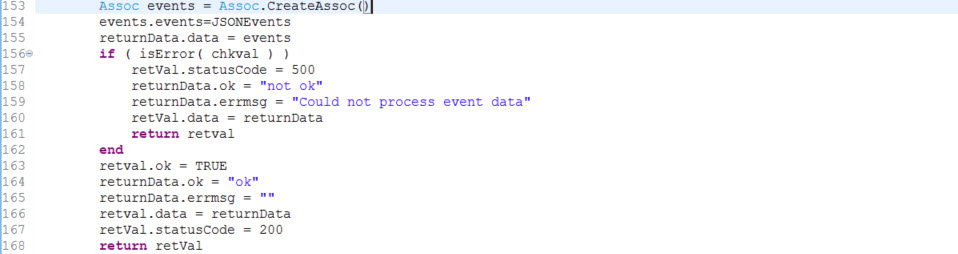
The only thing to do is put the values in assocs and send them to the smartUI widget under the main clause “events” in the JSON array
Send the values back. Support 200 (ok) and 500 (error) as status code.
So you see, Categories are no Monsters. They are quite user friendly. Using the same mechanism, you can even update complex Categories with one REST call.
Happy smartUI programming.
New: We are offering custom widget development. Interested? Send an e-mail to merz at ebit-company.de stating the purpose of the widget and requesting aqoute
3-5 days,
depending on the skills of the attendees.
Here, an EVENT Management system in the Content Server is built from the scratch. Events can be anything, from a Music Concert to Keysessions or anything else. To manage Events, all necessary Notes, Documents, Feedbacks can be stored in the Content Server.
Each event is mapped to a Business Workspace and has several folders to hold all documentation and feedback. Events can be related to other events. Each Event is containing Documents according to the template and has a Team of Coworkers. We also implement a Dashboard to see all Events in smartUI. If an Event is clicked in the Dashboard then the corresponding Connected WorkSpace Business Object is opened. Both parts, the Dashboard and the Business Workspace correspond via REST Service, which is also to be implemented during this workshop.
Uses the Content Server 16.2.10, the smartUI SDK and the D3 library, which is part of the smartUi SDK.
New: We are offering custom widget development. Interested? Send an e-mail to merz at ebit-company.de stating the purpose of the widget and requesting aqoute
1 day. Here,
some practical parts of the SDK usage are discussed. First, we discuss, what’s
to do, if somebody wants to use the Barcode Command (Enterprise Scan) as a
widget in smartUI. We discuss what’s to investigate using CSIDE and implement
the widget. Then the appropriate REST Services are implemented on the Content
Server side. Then we add an email functionality to the TEAM widget by
implementing this as a view and interconnecting this with the original widget
using a command.
Practical Experience in the SDK or the Base Workshop is required.
New: We are offering custom widget development. Interested? Send an e-mail to merz at ebit-company.de stating the purpose of the widget and requesting aqoute
open.webreport.js (action to show
the Parameters form)
binf-Datepicker
Using
the build in datepicker
binf-switch
Using
the binf-switch to turn checkboxes and radio buttons into switches
Workflow
Workflow
Components
Workflow
in smartUI including Workflow Status (new in 16.2.4)
Starting
Workflows
URL
Routes
Workitem
Model
Workitem
Actions
Workitem
Extension
Writing
Workflow Extensions
REST
API Support for Workflows
Connected
Workspaces
Configurationvolume
Header
xECM:
Office365 Groups
Extended
ECM
xECM:
Header Widget with Business Object Infos
xECM:
Snapshot of current document Attachments
xECM:
Dossier View Widget
Event
Action Center
Widgets
not part of the SDK
Mobile
Scanning
Discussion
Widget
Engineering
Doc Management: Search
MyShares
“Extended SDK Features” 0.75 days
Content:
Build
Language Packs for Internationalization
How
to build an English language template
How
to build the language pack
Commands
Implementation
and Inheritance from “CommandModel”
Best
Practices
Attributes,
Methods
Using
Commands
Custom
URL Router.
Routing,
adding custom Routers.
Using
Routers as Navigation.
Perspective
Routers
Authenticators
and Regions
Authenticators
Non-Attaching
Region
Non-Emptying
Region
Script
Executing Region
Behaviors.
What are Behaviors?
DefaultActionBehavior
ExpandingBehavior
InfiniteScrollingBehavior
PerfectScrollingBehavior
Search
Behavior
CollectionErrorBehavior
CollectionStateBehavior
ItemErrorBehavior
ItemStateBehavior
Mixins.
What
are Mixins?
Discussion
of the main mixins
LayoutViewEventsPropagationMixin
ViewEventsPropagationMixin
AutoFetchableMixin
NodeAutoFetchableMixin
ConnectableMixin
NodeConnectableMixin
FetchableMixin
ResourceMixin
NodeResourceMixin
UploadableMixin
CommandableMixin
ExpandableMixin
AdditionalResourcesV2Mixin
V2CommandableMixin
ExpandableV2Mixin
FieldsV2Mixin
RulesMatchingMixin
SyncableFromMultipleSourcesMixin
Browsable
Support for Collections.
Using
the “Browsable” support for Model-Collections.
Widget
Options for the Perspective Manager
Wire
up your widget options that they can be configured at the Perspective Manager
Level
“Additional things to consider” 0.75 days
Tips and Tricks
Add a OTDS Ticket already in the browser to the connection object
Re-using a OTDS Ticket as LLCookie
Checking the paths in the test/index.html
Adding non CSUI supported jQuery functions in a view
Add additional jQuery Libraries
Adding Controls to a widget
CKEDITOR 4
Intro
JQuery Non-SDK example
Usage in the SDK
Handlebars advanced
Handlebars QuickStart
Expressions
Helpers
Helpers with html output
Helpers with Hash Object
The Helper fn property
The helper inverse property
Partials
Helpers in the SDK
188 Handlebar Helpers
LESS advanced
LESS installation
Using LESS variables
Using Mixins in LESS
Parametric Mixins
Guarded Mixins
D3
What is D3
Basic Elements
Zooming and Panning
D3 in the smartUI SDK
Moment
What is Moment?
Performing Time Calculations
Alpaca
What is Alpaca?
Content Server Support for Alpaca
Alpaca Tutorial
“One or two more things” 0.5 days optional
Accessibility in Bootstrap. Screen reader support and what’s to change in the SDK to support screen readers for visual impaired users.
What is Accessibility
Kinds of Disabilities
Accessibility and the law
WAI-ARIA
ASSETS.CMS.GOV
PayPal Bootstrap Accessibility Plugin
Web Experience Toolkit WET
Other resources
Best Practices in smartUI development
Pre-Development Steps
Preparation Steps
Development Steps
Integration Steps
Documentation Steps
Development Infrastructure for security aware Organizations
Recommendations what’s to do if the reloading of npm modules during the creation of a widget is not wanted
1 Day optional Discussion
of actual problems
Discussion
of actual problems
Here actual problems from the widget development are discussed. This part has to be discussed and defined in advance.
New: We are offering custom widget development. Interested? Send an e-mail to merz at ebit-company.de stating the purpose of the widget and requesting aqoute
This is a 4-5
days’ Workshop covering the additional Parts of the SDK, the xECM, Webreports,
Workflow etc. Modules. Here, some of the more advanced concepts are discussed,
like how to make Widgets configurable in the Perspective Manager.
Also, there are overviews of D3 (Graphic Package) and Alpaca (Forms Package) inside the SDK. The complete Training is configurable.
This is an
overview of the Content Server part in the SDK. At the end, simple Widgets
based on the standard demo widget can be build and set up in the Content
Server. This Workshop in available in various lengths to allow a different
depth of Understanding. See the complete 5 days Agenda on the next pages. The 1
day and 2 days workshops are subsets of the complete 5 days workshop-
1 Day Content Server Smart UI Workshop Basic
Suited for Managers to get a technical overview of the SDK (Content Server Part) and what’s to do with it. First held at the Enterprise World Vienna 2019.
2 Days Content Server Smart UI Workshop Basic
Suited for technical Team Leaders or Consultants to get a technical overview of the SDK (Content Server Part) and what’s to do with it. Gets more in-depth as the 1-day workshop with more exercises. Forst held at the Enterprise World Toronto 2019.
5 Days Content Server Smart UI Workshop Basic
This is the complete training, covering all areas (JS Patterns, REST, SDK Infrastructure, SDK, Exercises) in the SDK (Content Server Part)
New: We are offering custom widget development. Interested? Send an e-mail to merz at ebit-company.de stating the purpose of the widget and requesting aqoute
Content Server 16.2.10 gave us a lot of new Features, which require a new Traininigs.
Therefore there is a Workshop Line of smartUI Trainings and a new Practical Series.
Workshop Line: The two Workshops Content Server SmartUI Workshop Basic and Contnent Server smartUI Workshop advanced have been extended to 16.2.10. As always this Workshops give the explanation, what and why is going on in der SDK
The Practical Series include a complete Implementation of Widgets, REST Services and Contnent Server based Applications in the form of Business Workspaces. So this part is more a Workshop for the practical usage of smartUI. As the content of the Workshop Line is required in the Practical Series, a knowledge comparable to this Workshop Line is recommended for attending the practical Series.
Practical Series I: Strategies to “widgedize” an existing Content Server module and to add functionality in an existing widget.
Practical Series II: Building an EVENT Management System in the Content Server using a graphical smartUI Dashboard and Connected Workspaces
New: We are offering custom widget development. Interested? Send an e-mail to merz at ebit-company.de stating the purpose of the widget and requesting aqoute