In the tabbed perspective there is a nice game of hide and seek implemented. This gives you excellent entertainment, but you can amend this to simply display tabs as usually in any non-gaming environment. All examples here are displayed using the index.html from the /lib/src/csui/perspectives/tabbed.text/index.html. (Version 21.1)
The described way tabbed perspectives behave in smartUI is not a bug, its a feature.
The initial game
It goes like this:
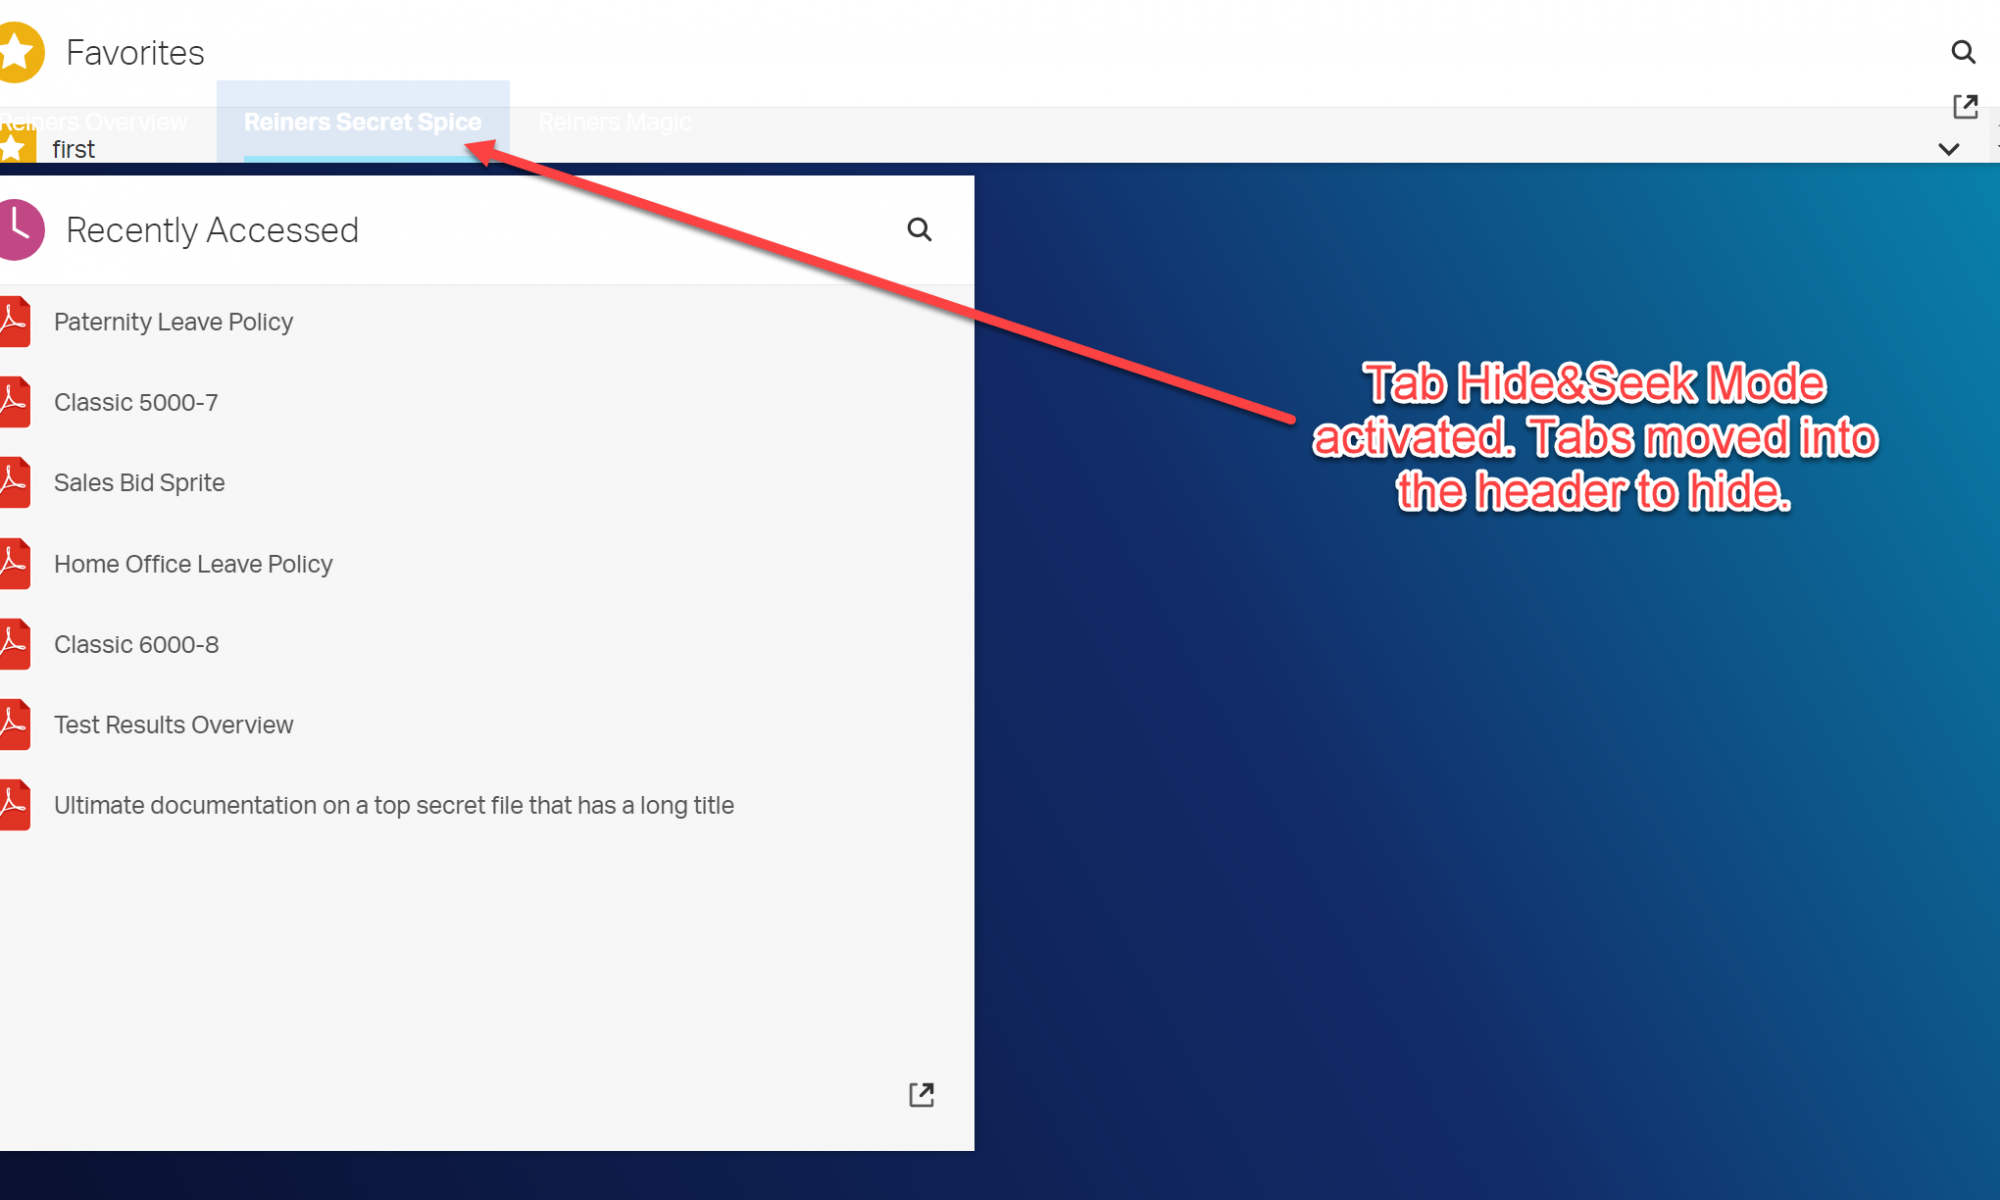
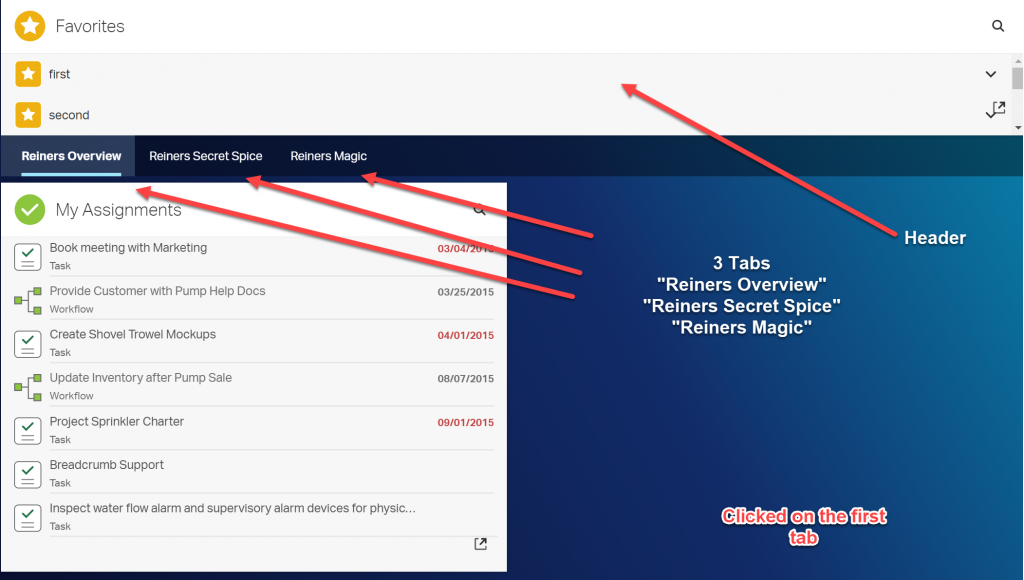
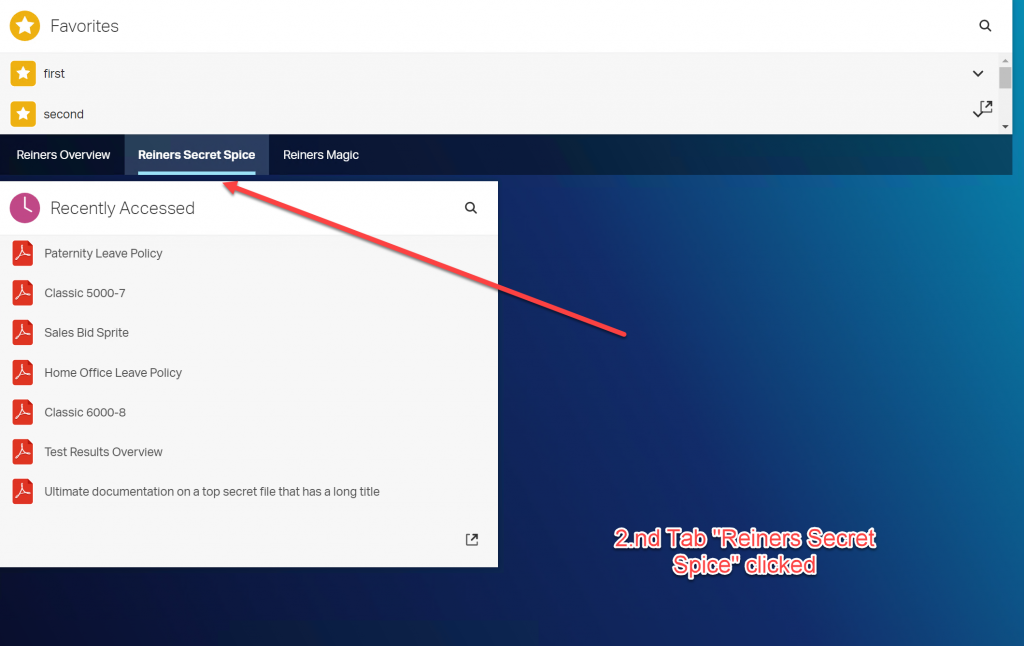
If you have defined a header and several tabs, filled with standard data, you’ll see this initially. But when you click on any but the first header, the game is activated.
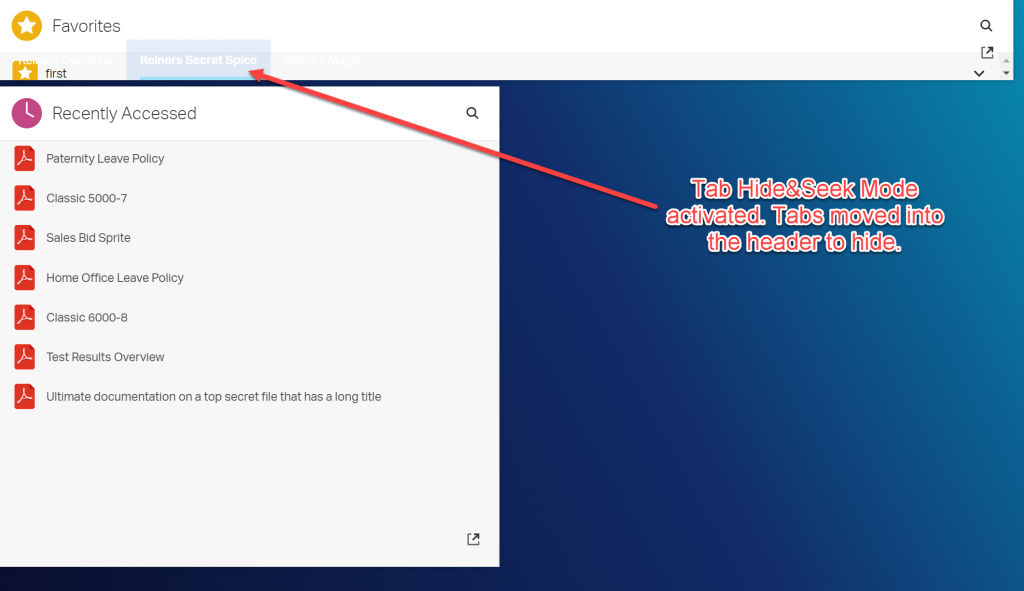
A simple click on the tab name activates the hide &seek mode. The tabs try to hide and you are supposed to seek for them. This is really a nice and entertaining game.
The conservative Amendment
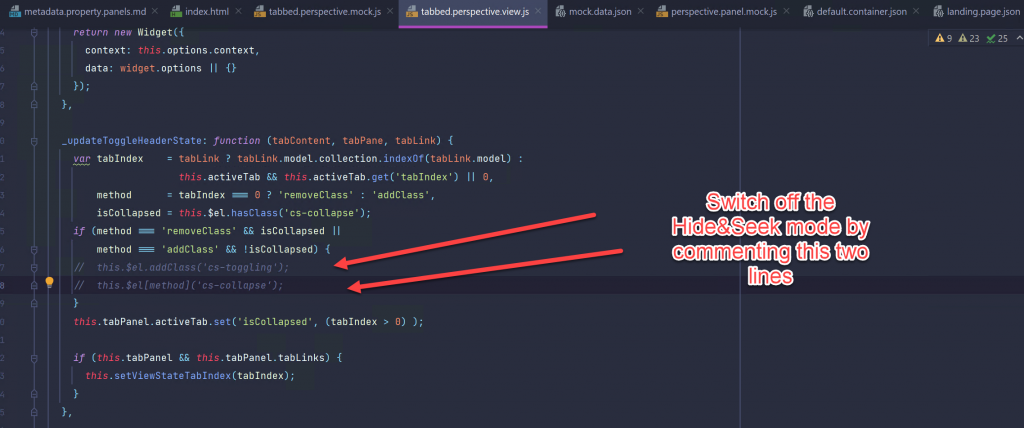
But what if you want to switch off this challenging mode?
The build in hide&seek mode can be switched off by commenting this two lines in the tabbed.perspective.view.js.
A reload of the test page gives you by clicking to the second or thirth tab this:
Although you switched of the hide&seek mode, you can now use the SDK to display the tabs in a more conservative way.
The smartUI SDK is very versatile and can be used for several purposes, even for conservative tab displays.
The only thing to decide for you is how to change that in the smartUI. Either spawn this into your own perspective or map your changed .js file over the standard requirejs path, this is up to you. You can even try to clear the cs-collapse.css and cs-toggling.css classes using the csui-stype-override-kit (I have not tested that for side-effects).
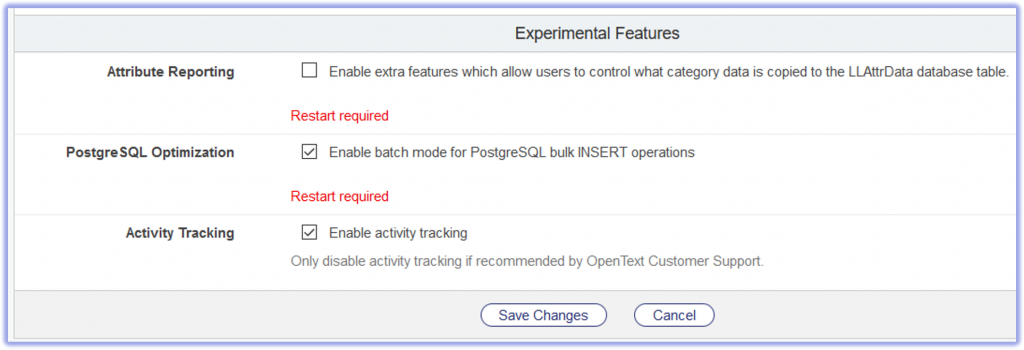
There is a new CAPI.ExecN command special for Postgres operations.
Oscript, the final frontier. We write the year 2021 and the OScript universe is going to expand. The newest member is CAPI.ExecN.
CAPI.ExecN
Bulk Postgres operations are slow. There is a new implementation of CAPI.ExecN, which fixes this. But there is no free beer in the universe. This new implementation exposes Postgres SQL weaknesses (throws SQL errors).
As for 21.1, this is an experimental feature. IN 21.2, it will be activated by default.
For all the explorers in the world, this feature has to be actiated manually in 21.1.
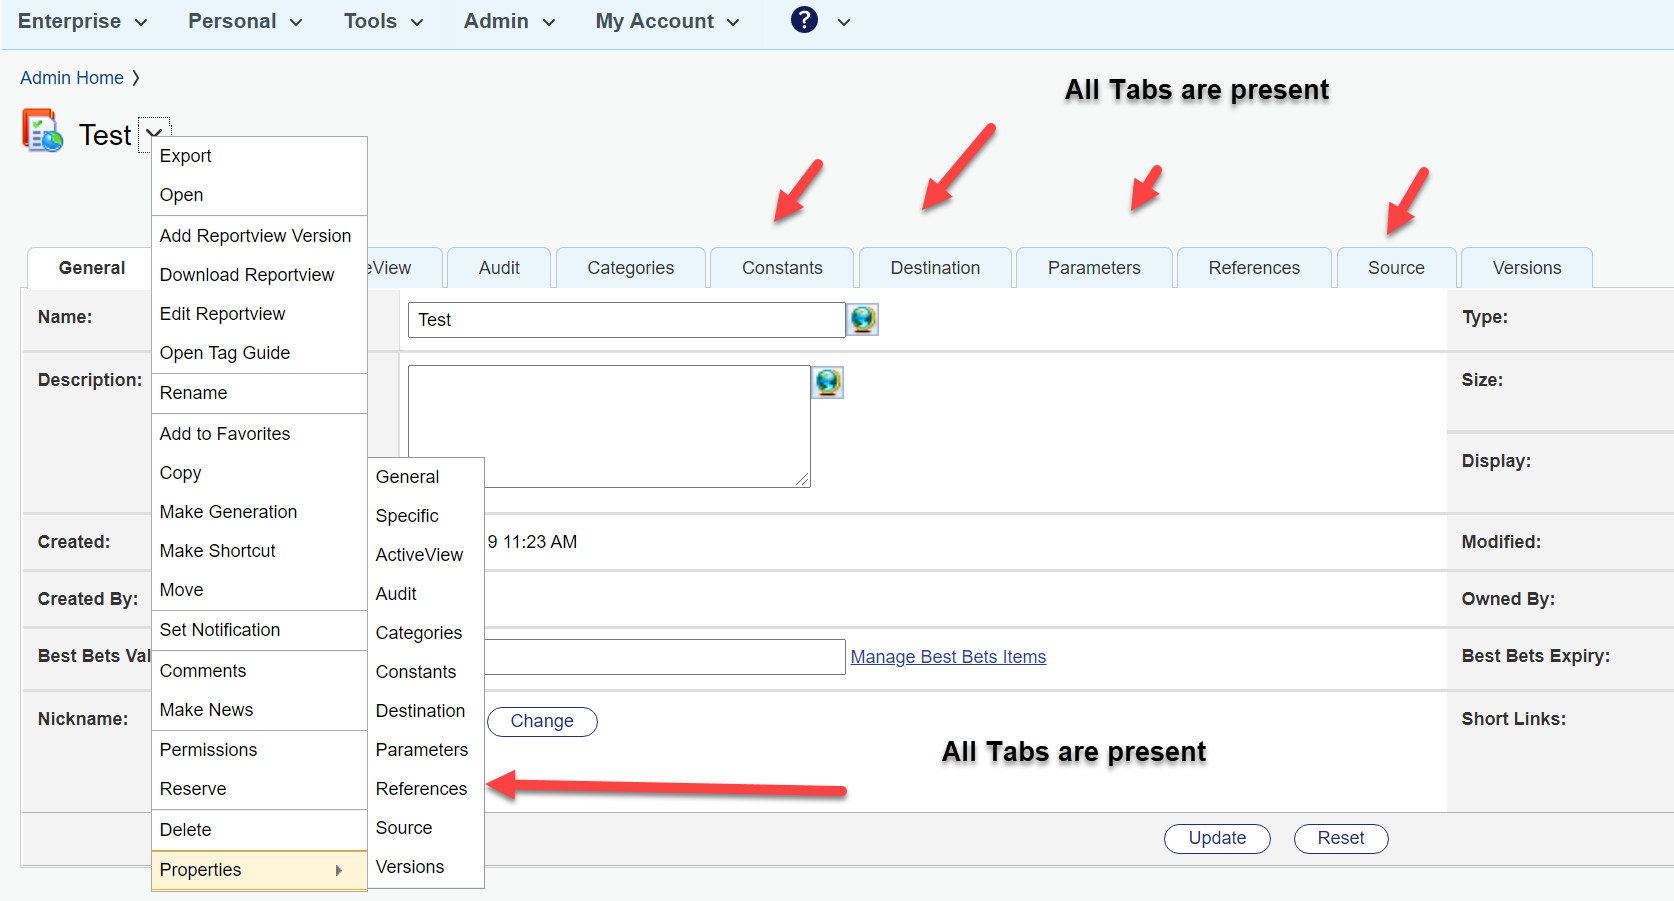
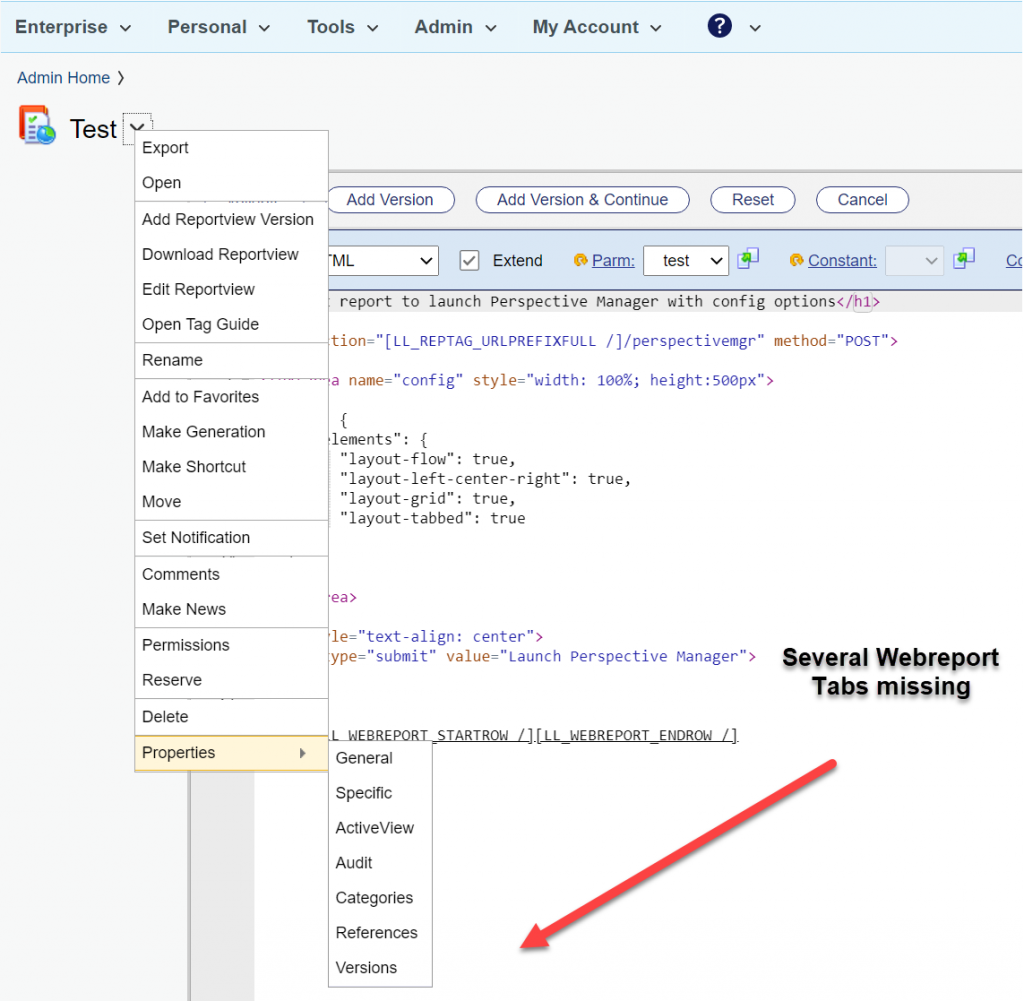
A short, but sometimes time consuming thing are the missing Webreport Tabs. Imagine, you have a Content Server with an jetty based internal Admin Server or an external Admin server on a fast machine.
The problem
Then, from time to time, you will see this on editing a webreport:
All Edit Tabs for the webreport are missing. Although you can start the missing functions within the URL, its annoying.
The Cure
If this happens, use this Magic Trick N,12:
Simply stop Content Server and Admin Server. Start the Admin Server and wait at least 5 min before starting the Content Server.
Then you’ll see everything is there.
Wow. You made it. You are a great wizard.
Seriously:
There is a timing problem in the Content/Admin Server. If the Content Server starts to fast, COntent Server thinks, there is no license for webreports at first. Later, it gets the license, but the GUI is drawn without the webreports tabs.
Wait for your Content Server to start up. Wait at least for 5 min. Then everything will be drawn in the GUI.
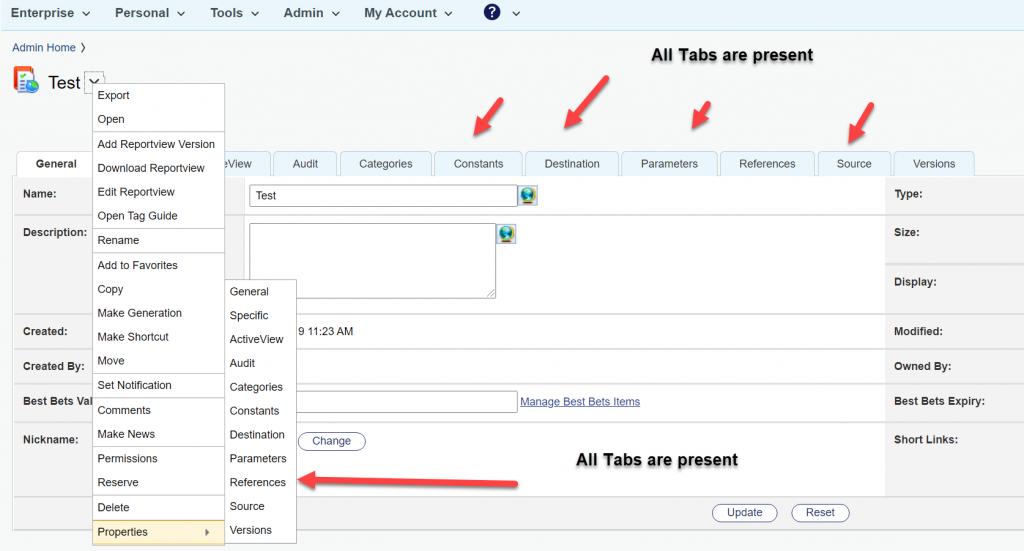
Have you ever thought of the magic of extension points in smartUI?
What is an extension point?
This are the dynamic configuration points of smartUI. Calling the config URL in smartUI, you will see all extension points with all configured extension modules in the current smarUI. Normally you’ll add your modules in the file <your-base-requirepath>-extensions.json in your projectstructure build by yo.
All of these modules indicated by these json files are loaded at initialization and form the dynamic smartUI system.
This is an example of an actual configuration in a Content Server System :
As you can see in the configuration, an extension point allows the extension of the extension point with several definable extension modules. Ok,this sounds like a typical lawyer sentence.
In plain english:
This technique allows you to extend the capabilities of a base module (the extension point) with the extension modules listed.
How to add your own extension point?
Use cs-ext as requirejs extensions. This is part of the SDK (/lib/src/csui/utils/load-extensions). There is the module and a very brief short documentation.
If you want more infos on custom requirejs modules, refer to the example of a conditional module,
This is a require.js module like the one which I introduced for conditional loading in Febr 2020. cs-ext is part of the smartUI core. If you want to modify the cs-ext, then use the easy way of loading an requirejs extension described in the conditional loading article.
Overview of cs-ext (in the sdk)
Lets take a look at cs-ext. But if you are more interested in the usage of cs-ext, skip the overview and go to the next chapter “Usage of cs-ext” below.
define(['module', 'csui/lib/underscore'], function (module, _) {
'use strict';
This is the standard entry to add sme vars into the configuration. Interesting is the list of modulePrefixesToRetry, includes all modules to retry a reload, if the extension point loading fails.
function handleSuccess(onLoad, parameters) {
onLoad(Array.prototype.slice.call(parameters));
}
The success handler, handles the callback
function handleError(error, onLoad) {
if (config.ignoreRequireErrors) {
console.error(error);
console.warn('Loading extensions of "' + name +
'" failed:', error.requireModules);
onLoad([]);
} else {
onLoad.error(error);
}
}
The error Handler
function retryLoading(require, name, modules, onLoad, firstError) {
var droppedModules = [],
selectedModules = .filter(modules, function (module) { var slash = module.indexOf('/'); if (slash < 0 || .contains(config.modulePrefixesToRetry,
module.substring(0, slash))) {
return true;
} else {
droppedModules.push(module);
}
});
if (selectedModules.length && droppedModules.length) {
console.error(firstError);
console.warn('Loading extensions of "' + name +
'" failed:', firstError.requireModules);
console.warn('Dropping extensions:', droppedModules);
console.warn('Retrying extensions:', selectedModules);
require(selectedModules,
function () {
handleSuccess(onLoad, arguments);
},
function (error) {
handleError(error, onLoad);
});
return true;
}
}
The retryLoading handler. Demonstrates how the reload a module, if there is an error condition. Only the modules with the prefixes listed in modulesPrefixesToRetry (see above) will be reloaded.
return {
load: function (name, require, onLoad, runtimeConfig) {
if (runtimeConfig.isBuild) {
onLoad();
} else {
var moduleConfig = runtimeConfig.config[name] || {},
modules = moduleConfig.extensions;
if (modules) {
if (!.isArray(modules)) { modules = Array.prototype.concat.apply([], .values(modules));
}
if (modules.length) {
require(modules,
function () {
handleSuccess(onLoad, arguments);
},
function (error) {
if (!retryLoading(require, name, modules, onLoad, error)) {
handleError(error, onLoad);
}
});
} else {
onLoad([]);
}
} else {
onLoad();
}
}
}
};
The main method is simply returned as js object.
All listed modules in the extension point list will be loaded and executed before the callback (the carrier module with the cs-ext entry) will be executed.
This may sound quite theoretical. Lets use cs-ext.
Usage of cs-ext
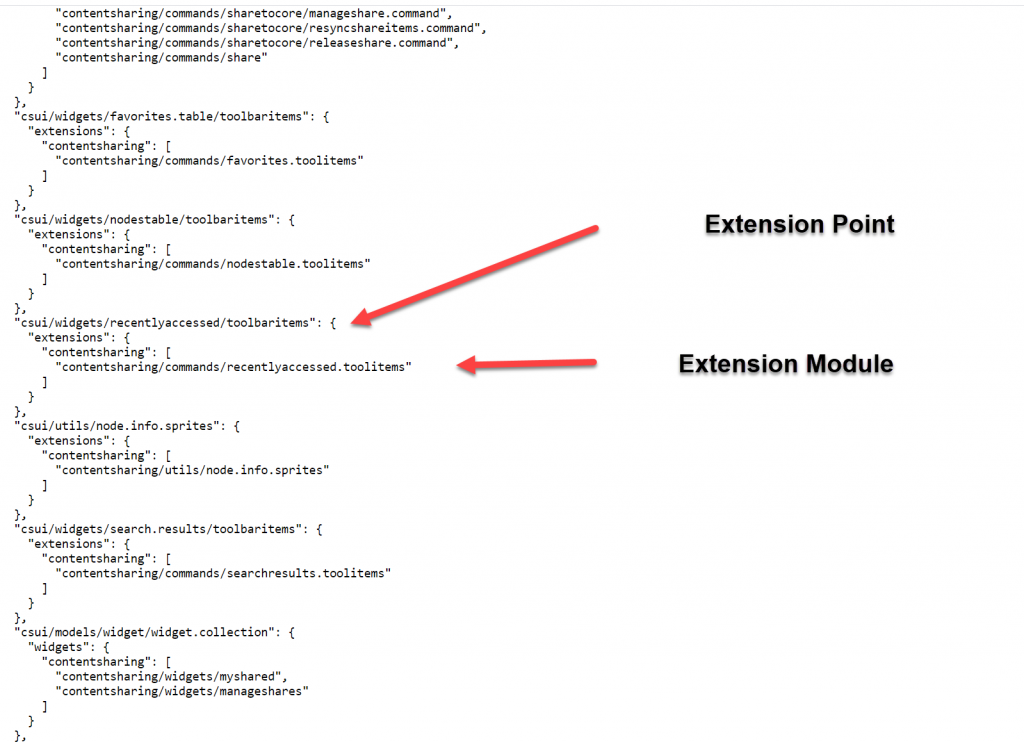
Select the module which you want to amend with an extension point. Lets use the csui/controls/table/cells/cell.factory (MUST exist) as an example.
Configure the proper extension in the project json like
Open the cell factory and examine the source code.
Notice the csui-ext! line at the end of the define-module list. This will search the require.config entries to get a list of the extension modules for this extension point. All listed modules (here hello.view) will be loaded and executed before the callback (stated in the line csui-ext) will be executed.
Back in the callback , the _.extend function extends the prototype of the cell factory by the methods “hasCellViewByOtherKey” and “getCellView”.
Summary
To make a custom extensible module (with extension point), add the csui-ext requirejs extension to your module and set the modules to be loaded in the appropriate json extension file.
Then point to your extensible module from your widget, and you are done. Then your module is configurable and extendable by using the csui-ext util module.
If you want to extend existing modules, you’ll have to spawn the widgets from the library to reflect your new module.
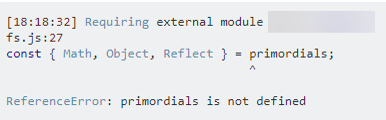
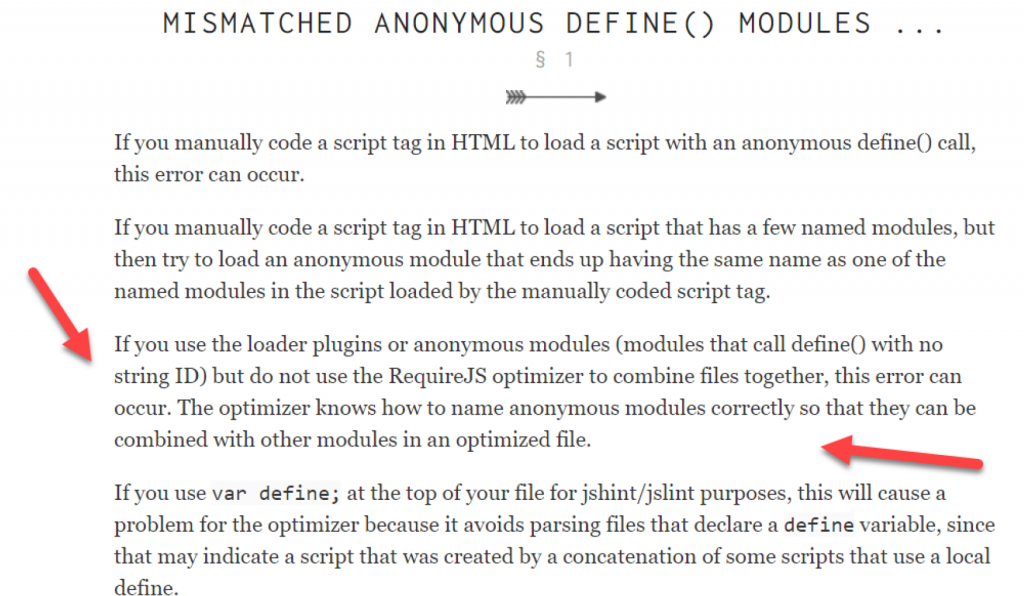
In the content server 20.4 you’ll encounter from time to time a requirejs error “define is not defined”. Normally on defining icons. This is very entertaining.
In 16.2.10 the same thing worked as a charm.
Dont panic, in the “Hitchhikers Guide to the Galaxy” you’ll find the solution.
42 (As always)
(Just kidding. Lets be serious.)
Serious
The case in 16.2.10:
In 20.2 and above
Ups. Looking insane.
Cure
Examine the browser console output. At the debug level.
Browser Console
As a nice addition for the entertainment, the module is uglyfied, it makes no sense to search for this strings, as they are produced during the grunt tasks. But on the other hand, a couple of lines further down there are some complaints of the grid.view.js that the “getSpritePath” is missing. And the offending module is supposed to return the getSpritePath function.
So, a search on getSpritePath gave the offending module, the sprite.js, which was introduced in 20.2 and is obviously required, when a widget wants to display sprites.
The module shows
Lets consult the requirejs error page mentioned in the browser console.
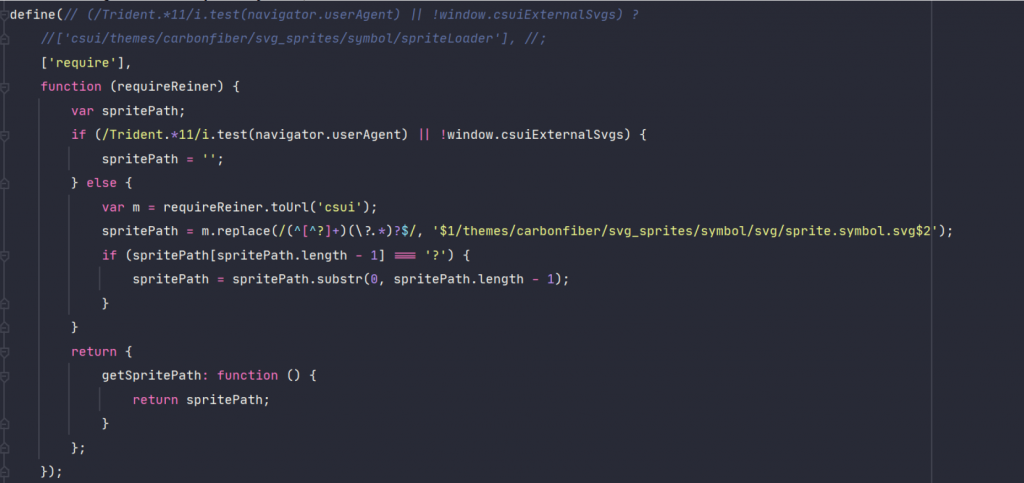
A check of stackoverflow.com gave me the resolution “name collisions can produce this” so I changed the sprite.js to
Changed Sprite.js
Changed the function argument from require to requireReiner. The name doesnt matter.
Result
Everything runs under 20.2 like it used to in previous releases. No more mismatched anonymous define() modules.
But be careful: You’ll get the old js file in all new SDK releases. You should override the old file with the corrected one in all js projects.
As always:
Disclaimer: This works for me. The usage requires proper testing and I will not be liable for any problems whatsoever on that.
This is the thirth article on calling Java from OScript. If you want to refer the first two articles on how to call Java from Oscript, please take a look at the first article and the second article here.
The equivalent data types in java and oscript are:
Disclaimer: This requires a modification of app.html. Doing that will put you in the club of villains who intentionally change internal weblingo files.
OK, you’ve been warned.
Just kidding.
Permanent modifications
Lets take a look on the result. Maybe you need such a thing to comply with federal rules, to setup any “Impressum” or any links with GPDR of other infos. Then this example is for you:
A permanent footer A permanent footer in the nodelist
This is not a thing you can do with perspectives. So the easiest way is to change the app.html which starts smartUI. This time, a serious disclaimer:
As always, the app.html can be changed by patches or with new versions of Content Server without a notice. You should test these things after applying patches/new versions to check, if the modifications are still inside this html file.
But this is normal. At least on 20.4 this is running.
So how to do this?
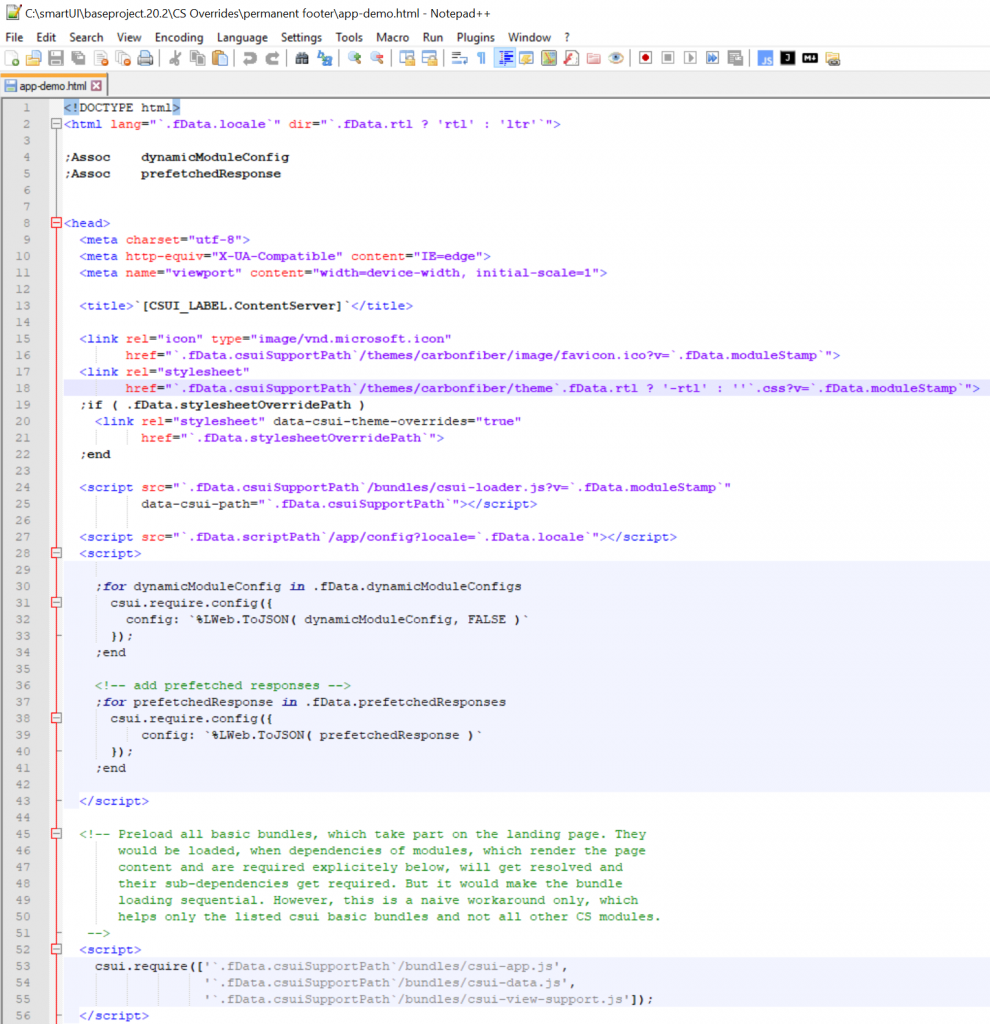
Lets take a look on app.html (hier its named app-demo.html, I can switch between footer version and normal version by simply copying the appropriate html files).
First half is quite standard. The page adds the theme stylesheet and, if the CSS-Override is switched on, loads the custom stylesheet at last.
Then the Oscript based configuration of dynamic JS module parameters is loaded and the csui modules on the client side are configurated with that parameters by sending JSON arrays to csui.config.
Then all bundles are required for csui.
As mentioned, straitforward and not very complex.
The second part is simply an empty body. csui is using JQuery to add the perspective contents in the main body.
So you can simply add permanent things in that main body.
Csui will append the content after your content.
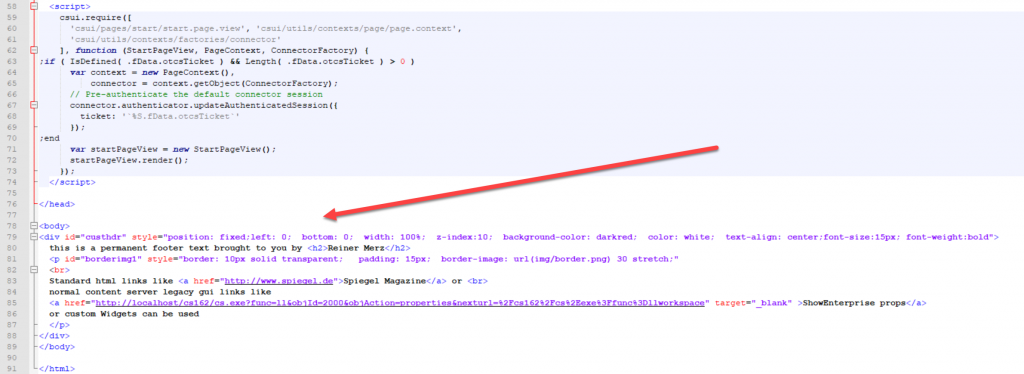
The content to make the red footer (see above) is
<body>
<div id="custhdr"
   style="position: fixed;
   left: 0;  bottom: 0;  width: 100%;  z-index:10;
   background-color: darkred;  color: white;
   text-align: center;font-size:15px; font-weight:bold">
       <p id="borderimg1" style="border: 10px solid transparent;   padding: 15px;  border-image:          url(img/border.png) 30 stretch;">
        Standard html links like <a href="www.spiegel.de">Spiegel Magazine</a>  or
        normal content server legacy gui links like
<a href="http://localhost/cs162/cs.exe?func=ll&objId=2000&objAction=properties&nexturl=%2Fcs162%2Fcs%2Eexe%3Ffunc%3Dllworkspace" target="_blank" >Enterprise Workspace</a> of custom widgets can be used
</p>

</div>
</body>
First, lets define a div with our custom extension. The positioning is done via an internal style and serves as an example. The position can be set to any direction, I put it down as footer.
Then inside a p element is the content. First, to make things more nicely, a border image is put around the p element. Then standard text, standard html links or links to the content server content can be used as content.
You can even add a widget here, but this follows no perspective conventions. It will be fixed on the screen.
The smartUI will follow later after the closing </div>.
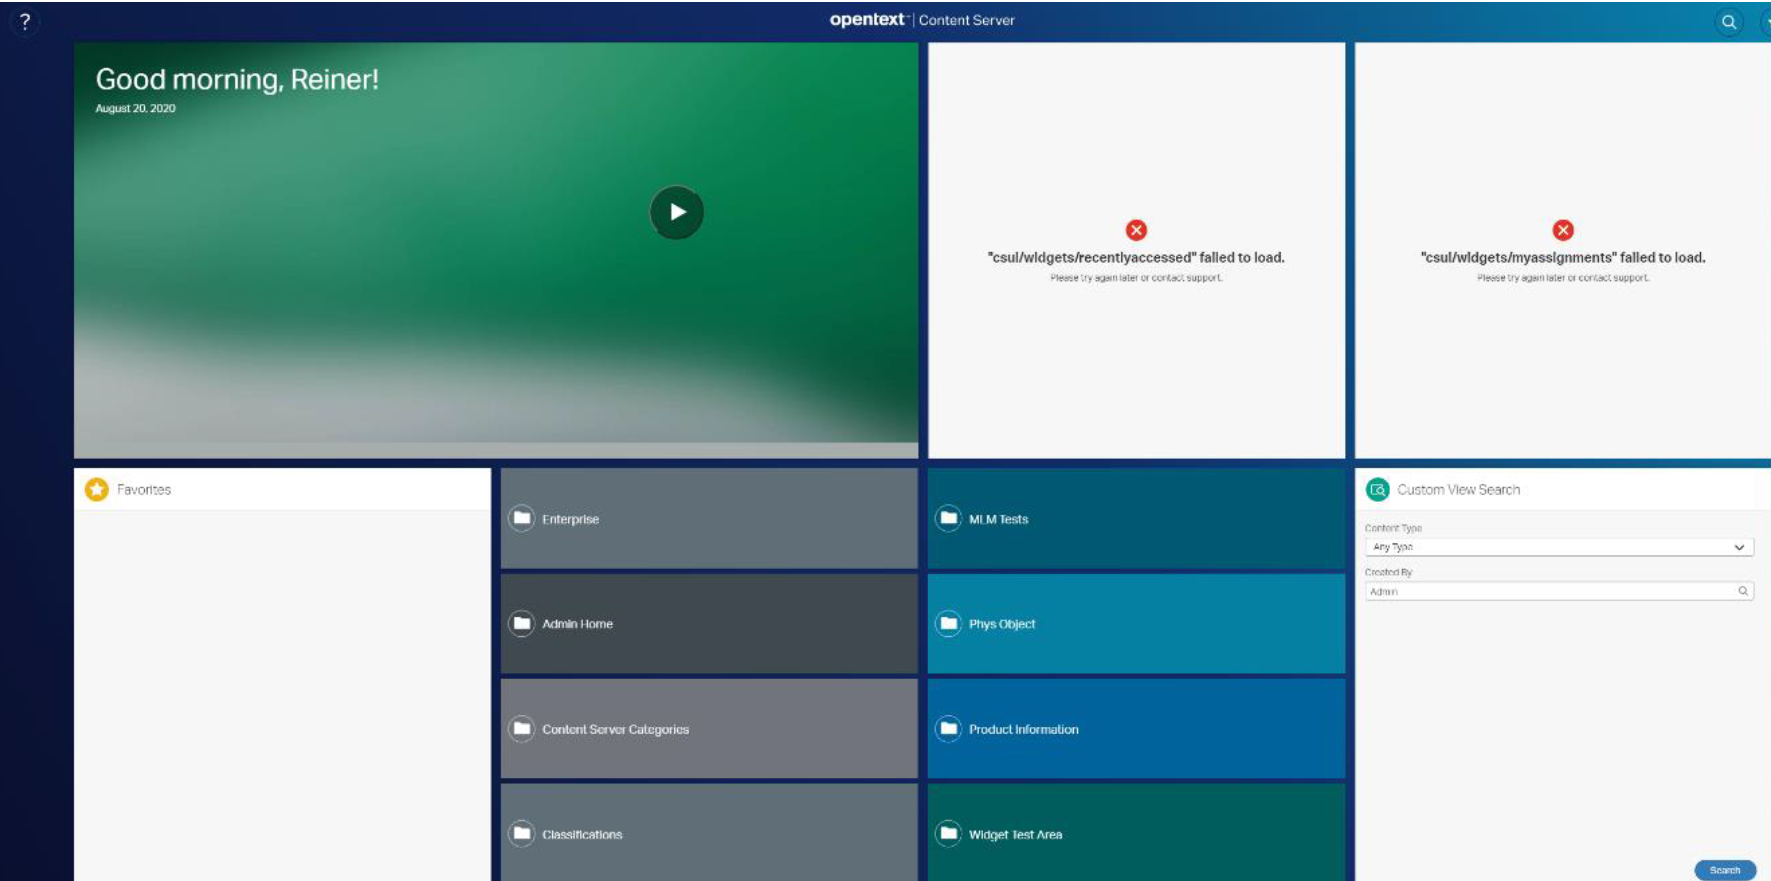
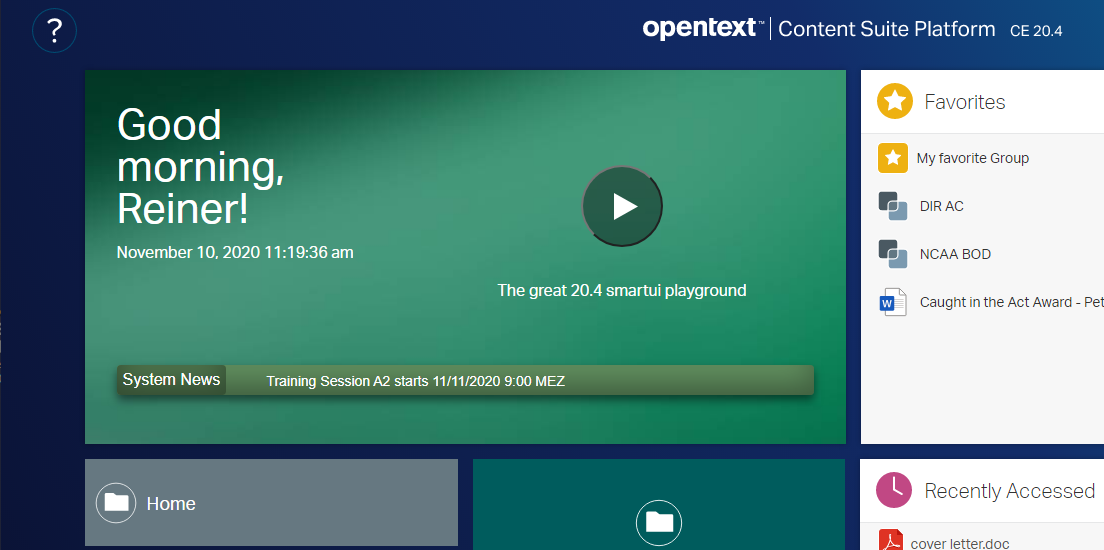
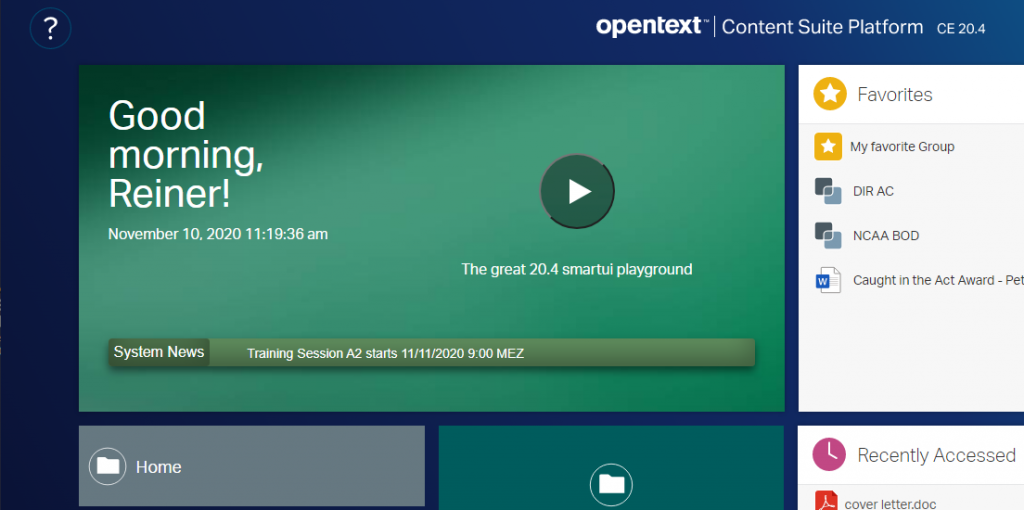
Remember the System Messages in the Content Server? This is an handy tool to display system related messages, like: “Next weekend we have maintenance” to inform users on issues with the system.
Normally, System Messages are added or deleted in the Admin pages. Here is an example:
A name of the Message, the message itself, an option URL for any explanatory pages and an effective date build together the System Message. Per default the System Message has a timeout period of 2 days after publishing, but this can be set in the opentext.ini file by setting a value to NewsDFTExpiration.
From this source the System Messages will be displayed in the legacy gui like this
But whats if somebody uses smartUI? Unfortunately, there is no possibility to display System Messages in smartUI.
Until the otherwise senseless Welcome Widget is amended. It can look like this:
System Messages – the new feature in the Welcome Widget.
(Disclaimer: This widget is NOT in the OpenText SDK. This is made by me. Contact me if you interested in using that)
The widget gets its system messages directly from an REST call which extracts this Messages and delivers them to the widget.
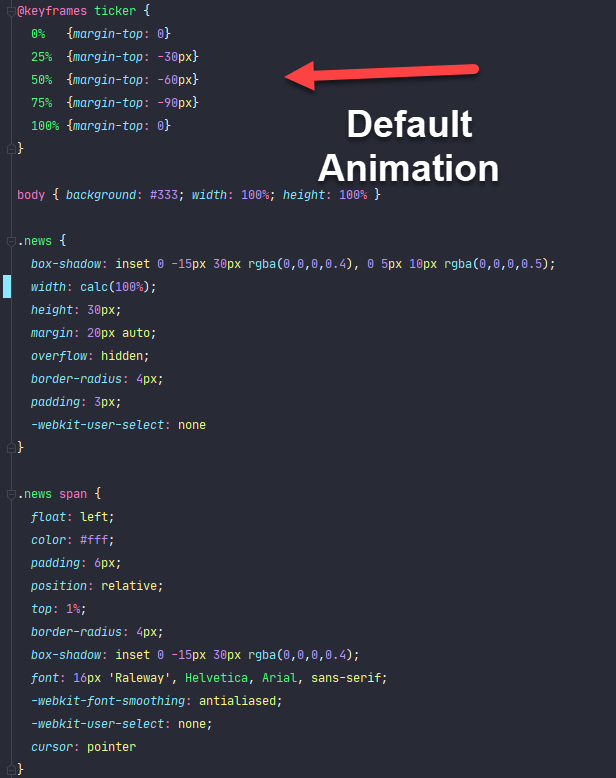
The news player is basically an unordered list with an <li> for each news entry. all news were rendered in the <ul> This is a screenshot of the handlebars template.
If any url is in the System Messages, the link opens up in a new tab or a new window.
The news entries scroll with a pure CSS3 animation, no additional Javascript is needed for that. Here is the animation part of the news
And the magic of animation is done with this:
And suddenly the Welcome Widget supports System Messages.
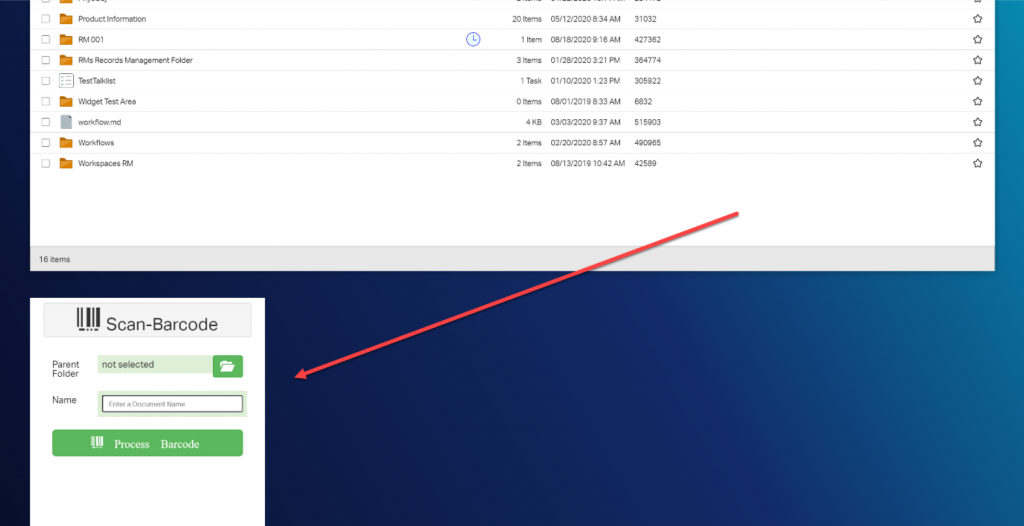
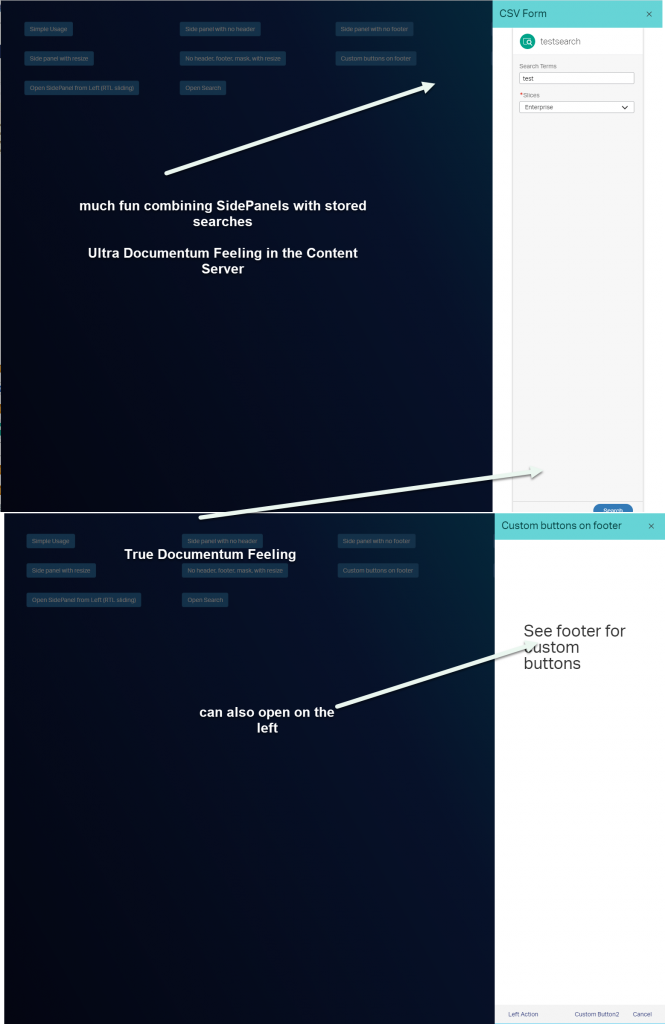
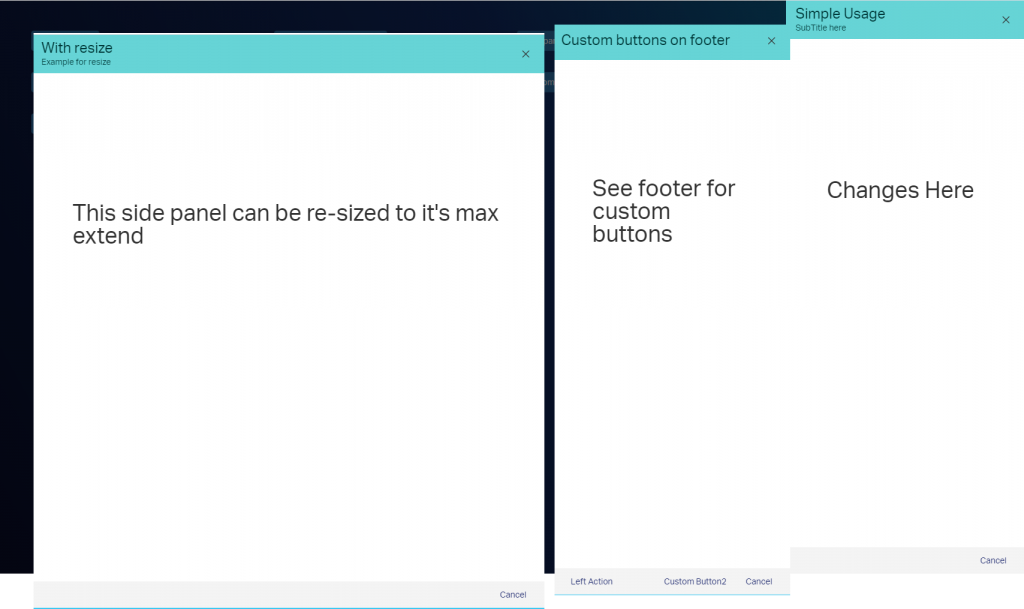
One of the most interesting controls in the SDK is the side.panel. Reminds somehow to the good Documentum side panels, but is native in the new SDK for Content Server 20.4.
This can be used as a simple control to show things like search forms or oanything you like. Also, multiple views (slides) can be shown in a “Wizard Style”.
First lets take a look on the the sidepanel right out of the box. Quite astonishing, there is a index.html actually working under csui/controls/side.panel/test/index.html. If somebody starts this file, we’ll see side.panel in action:
Shows a nice panel sliding from left/right based on the configuration. This view can be used to show a single view or multiple views (as slides) as per configuration provided to it.
Quite interesting is the fact that if slides provided to the panel, panel’s footer include navigation buttons along with the button provided to the respective slide as part of configuration.
side.panel has modal (dialog) behaviour by default which optionally can pass using constructor param as well (options.modal).
There are several usage possibilities.
Simple Usage (on the right of the screenshot above):
var sidePanel = new SidePanelView({
                      title: 'Simple Usage Title',
                      content: new Backbone.View(),
                      buttons: [{
                            label: 'Button1'
                       }]
                      });
sidePanel.show();
If you want to have several buttons on the footer (in the middle of the screenshot above):
var sidePanel = new SidePanelView({
                      headerView: new Backbone.View(),
                      content: new Backbone.View(),
                      footer: {
                           leftButtons: [{
                                 label: 'Button1'
                           }],
                      rightButtons: [{
                                 label: 'Button2',
                                 id: 'btn2'
                           }]
});
sidePanel.show();
An example for a “wizard style” sidepanel sliding from the left or the right into the screen