Rethinking smartUI Part 4-B

Forms Rest command

Some weeks ago I published a new video on Rethinking smartUI on Youtube. Now we have Rethinking smartUI Part 4-B discussing the main part of gathering and displaying thr documents data.

If you havn’t it seen yet, here is the short video. In this posts, we’ll go though the technical aspects of this new kind of approach to smartUI. This demo is a Document Pad (or short DocPad), displaying all document properties in a SCIFI GUI arrangement.

A warning at the beginning: To use this code with IE11 is a perfect way to test all js error messages. Use this code only with the newest browsers. Its tested with Chrome (V98), Chrome Canary (V98), FF Developer (95.0b4), Edge (95.0) and Firefox (93.0)

The other parts of this post were

Part 4-A The Javascript Part 1

Part 3 The Infrastructure and the CSS

Part 2 The HTML

Part 1 Overview

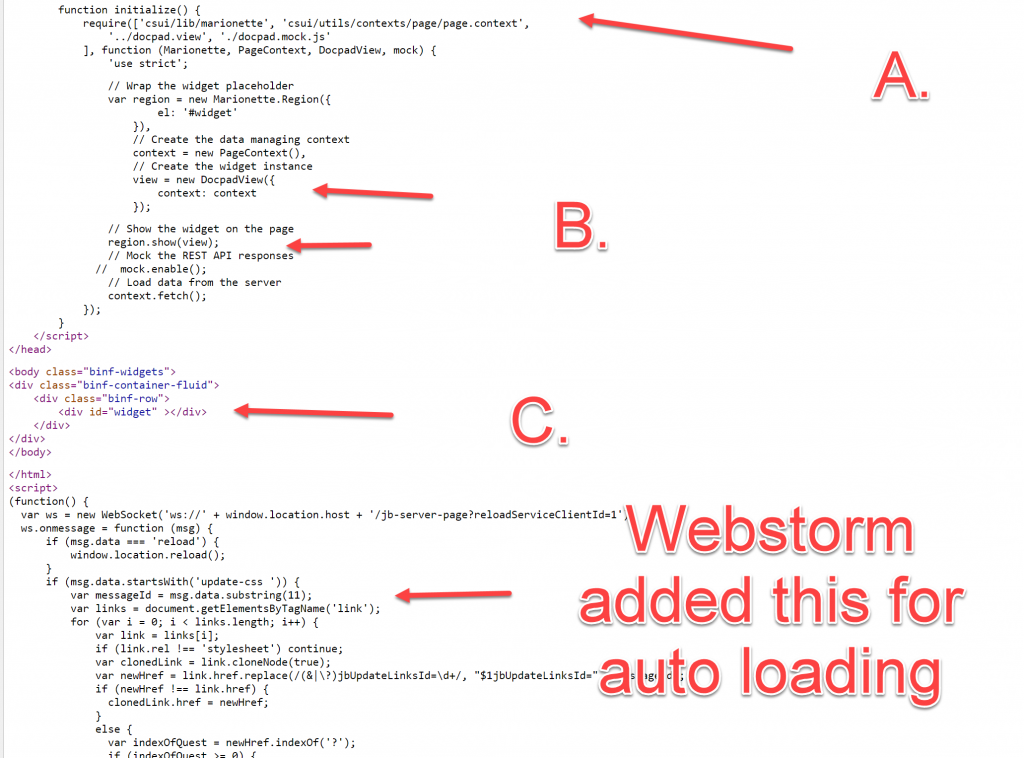
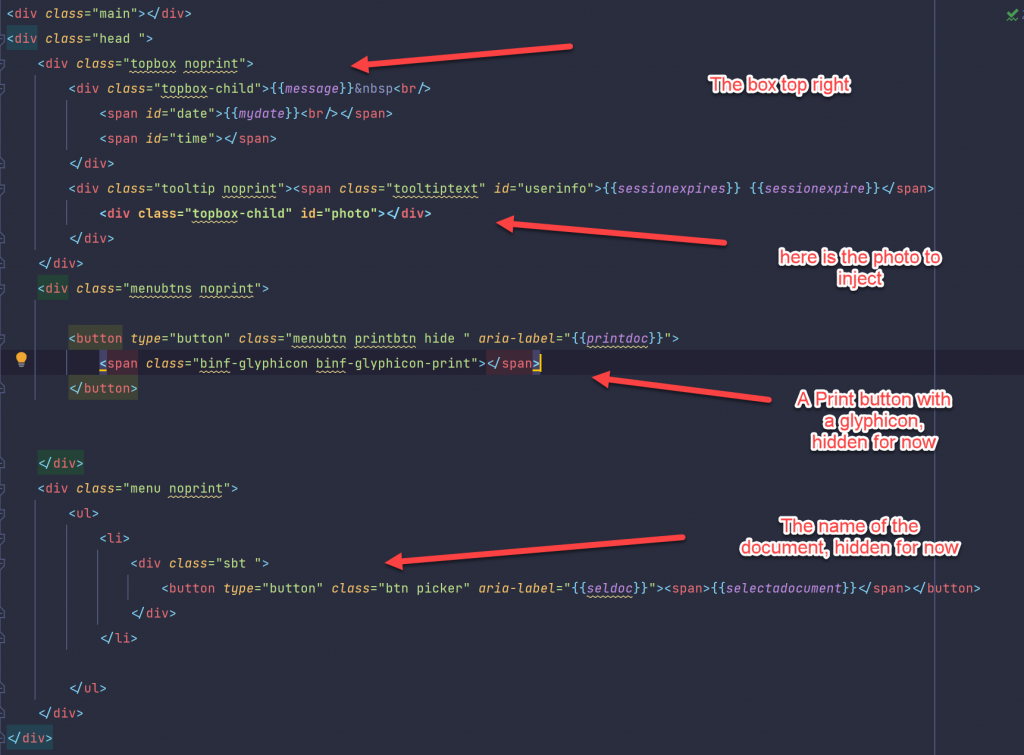
In the part 4A, we had discussed all the js responsible for the perimeter of the whdgetz. Not lets discuss the main part which is responsible to gather and displad this data:
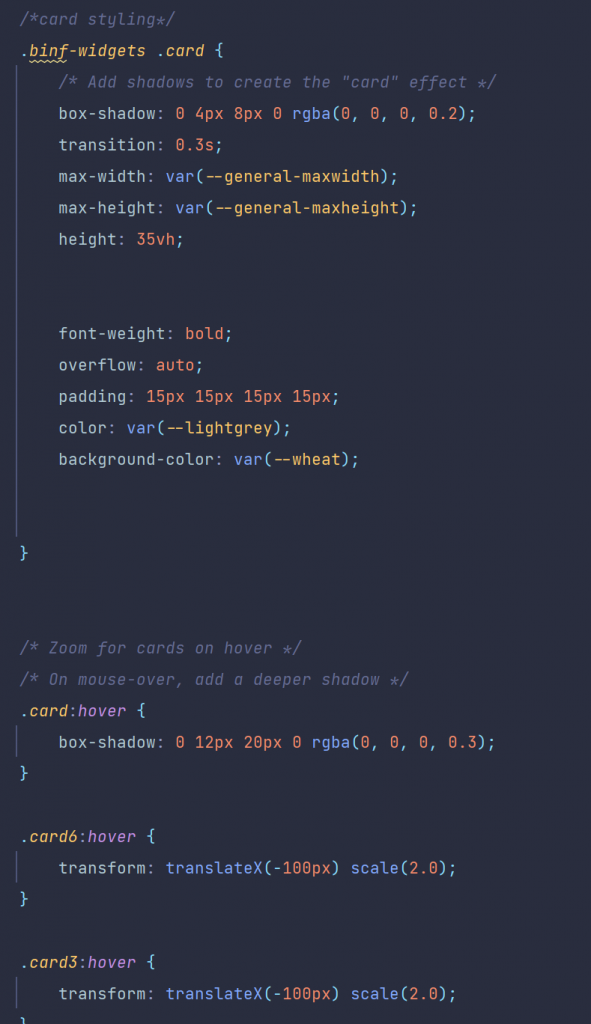
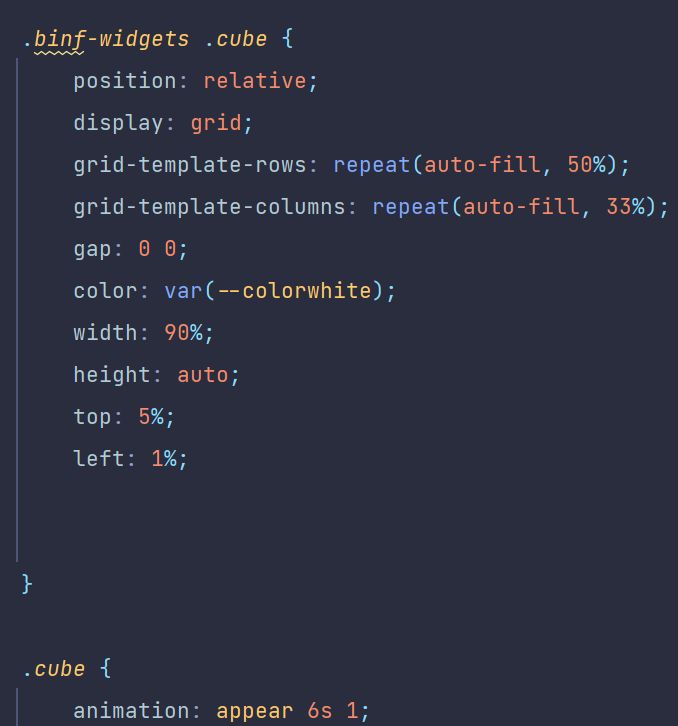
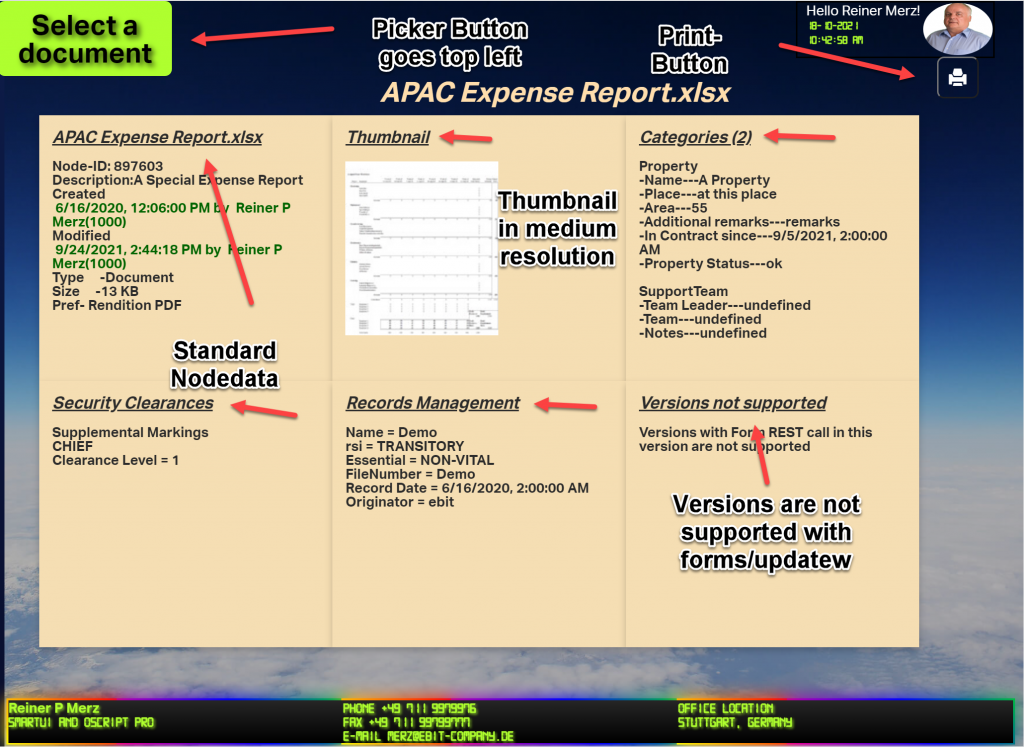
docdisplay

A CSS Grid

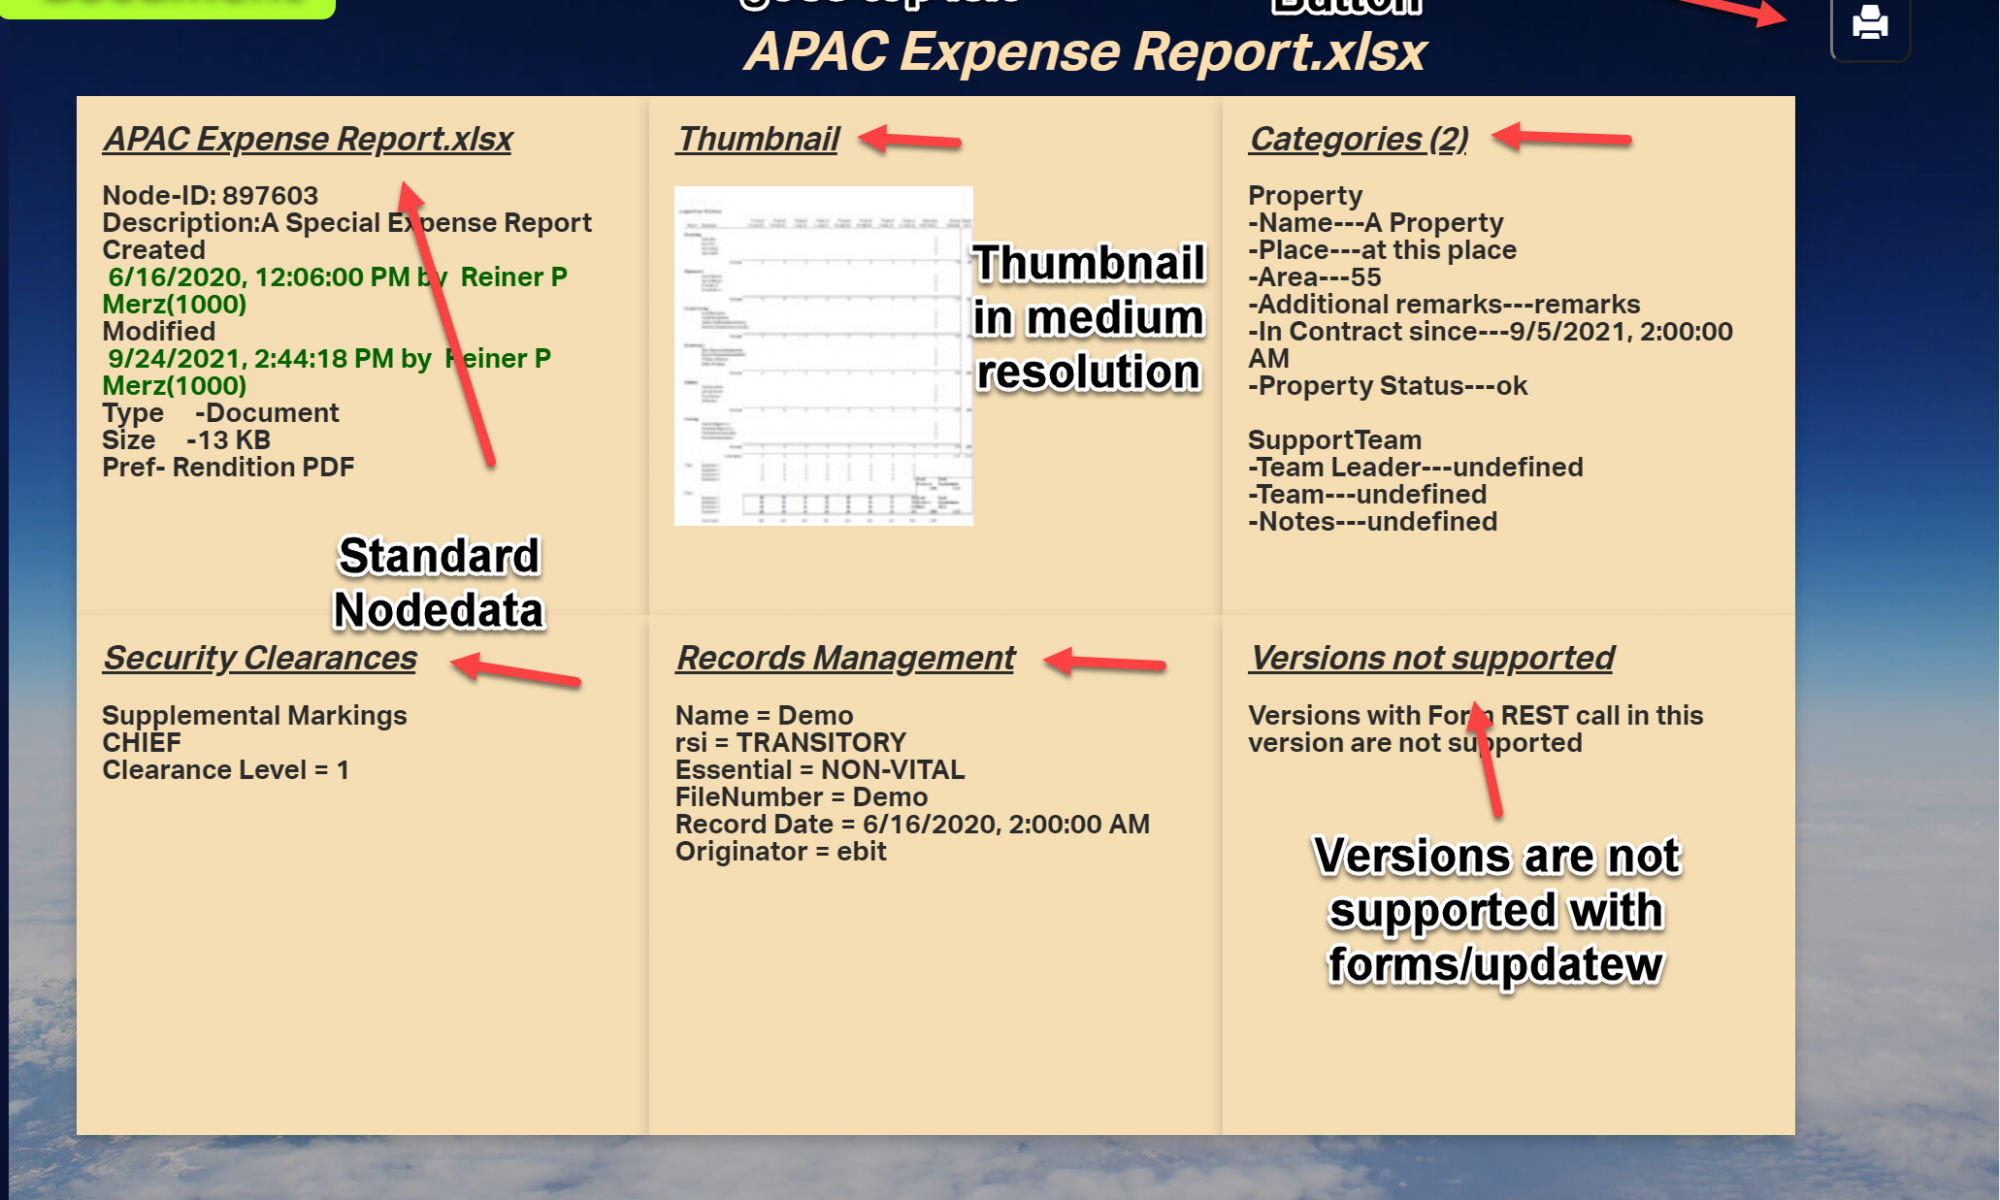
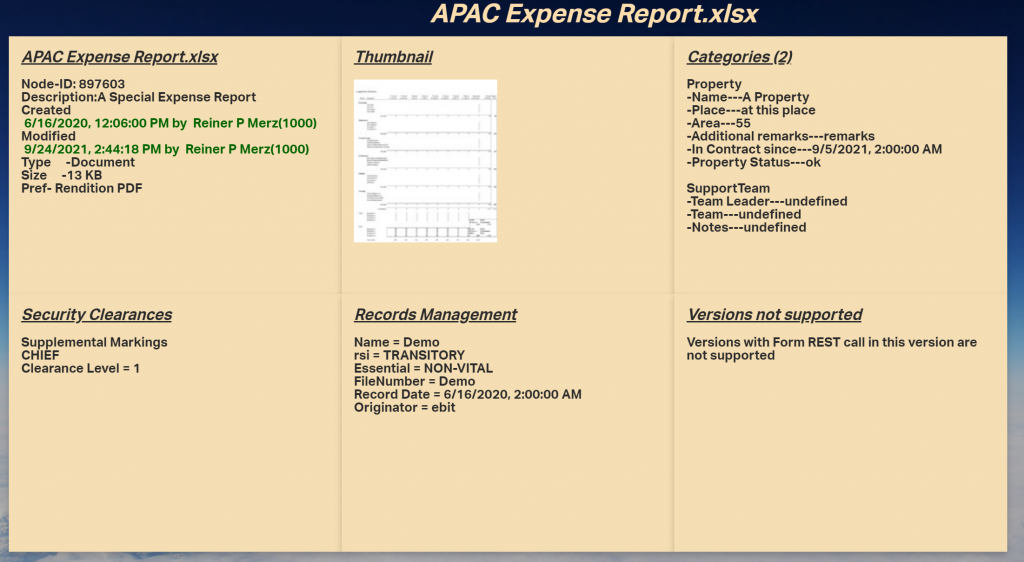
As you can see, there are 6 panels arranged in a CSS grid.

For infos on the css, please review this post, the part 3 of this series.

So let’s start with the panel at top left.

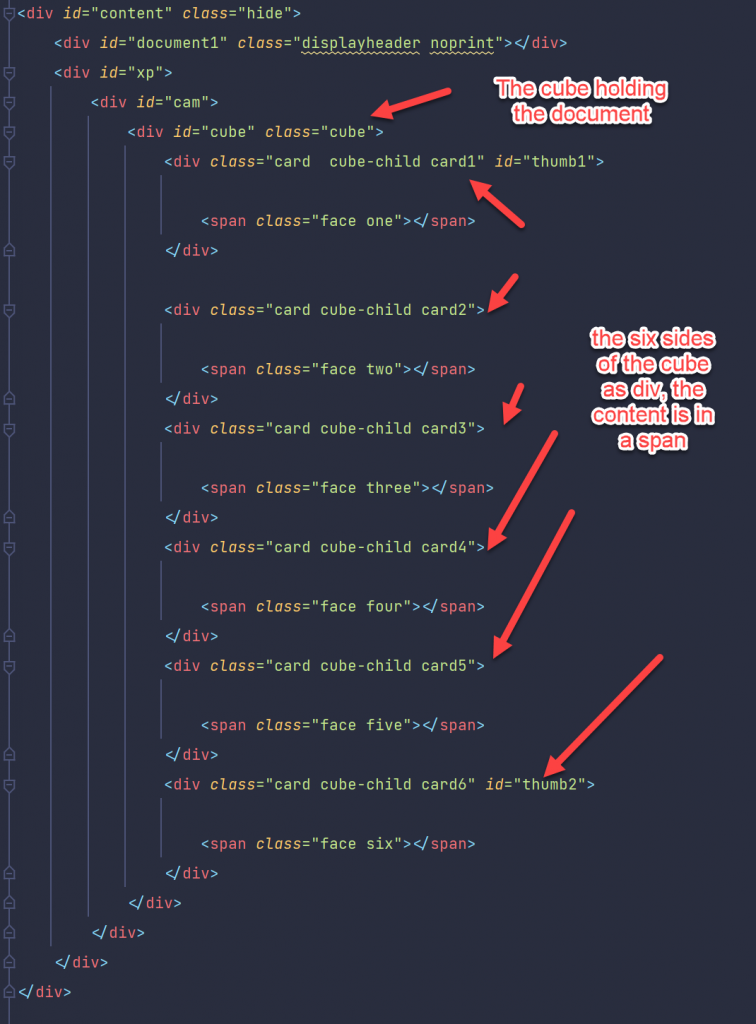
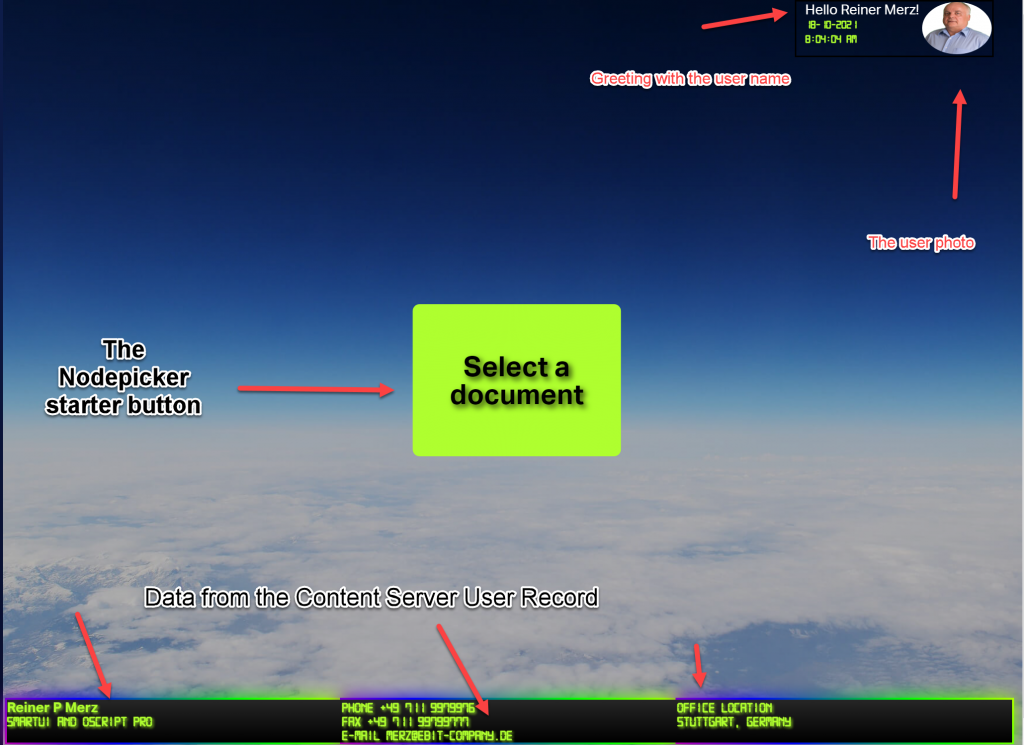
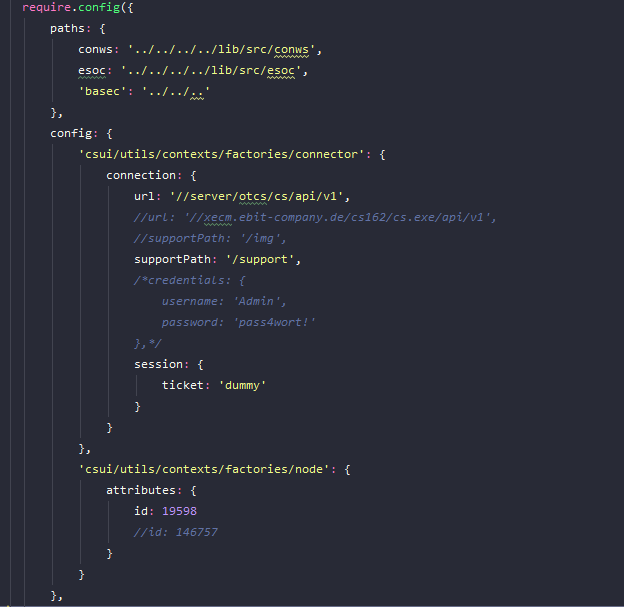
The documents metadata

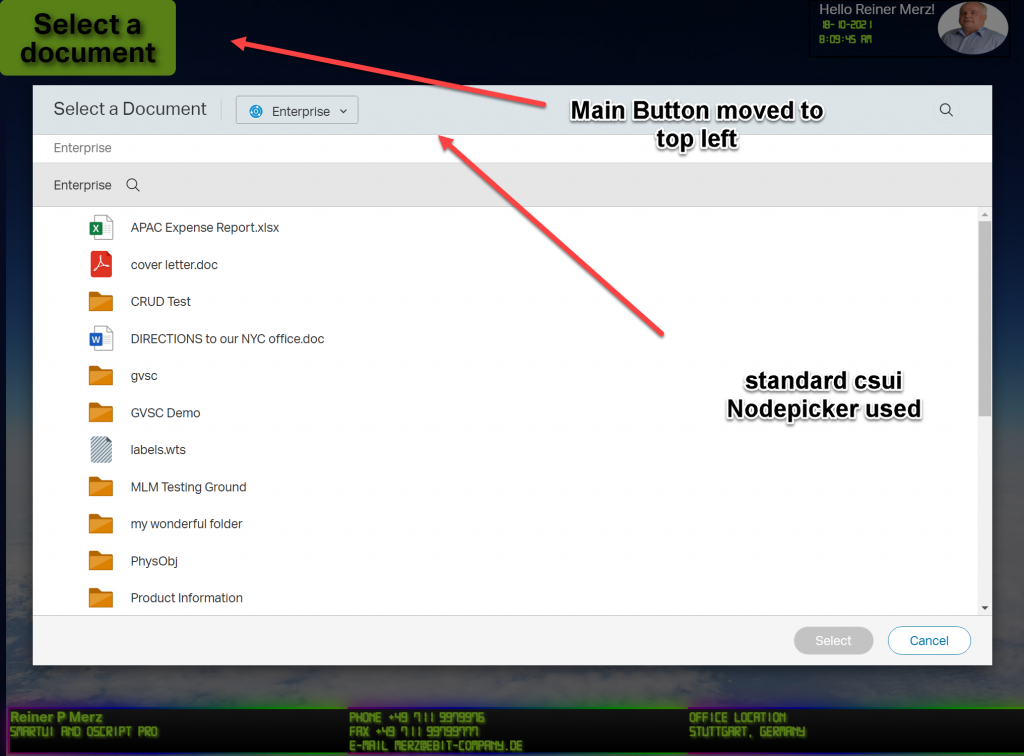
This is more or less the data which is related directly to the document. The documents node number was the output from the node picker . The nodepicker was closed by the done() callback.

Nodepicker

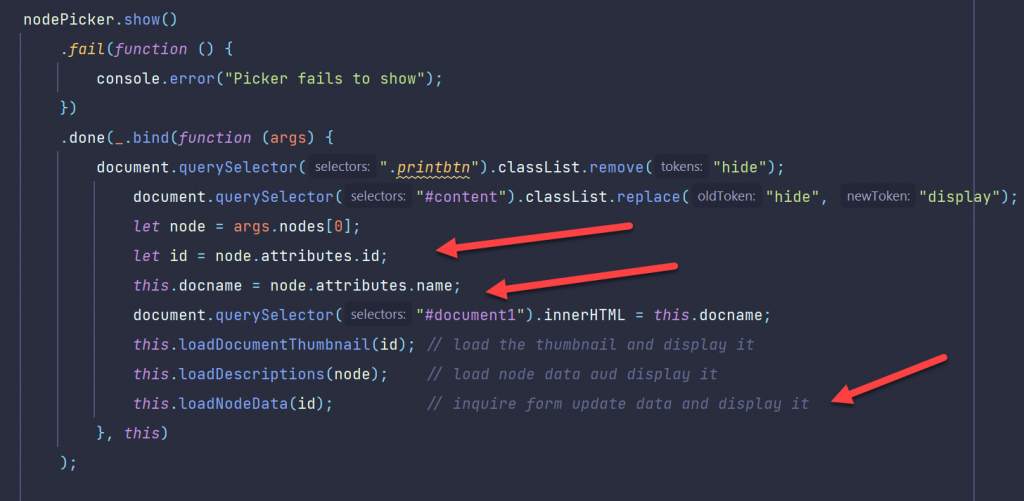
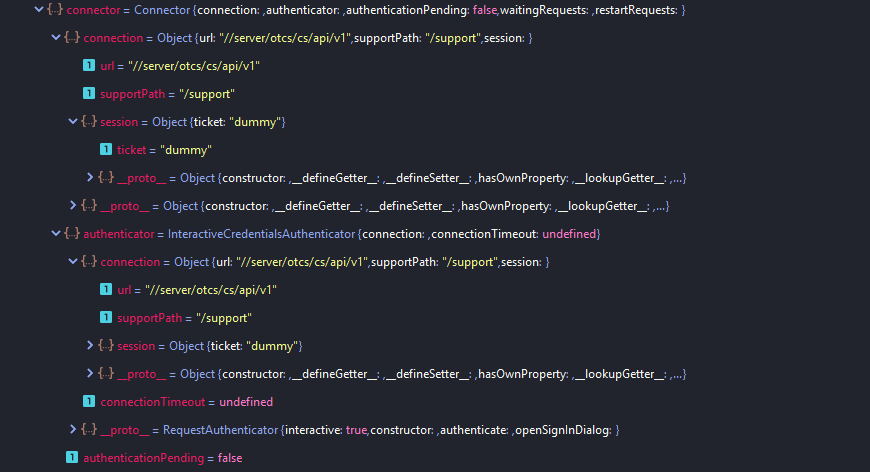
Here we are in the this function of the nodepicker. We extract the node from the callbacks arguments an get the id with the topmost arrow. We extract the name of the node and put this name inside the id #document.

The loadDescriptions function does the work.

loadDescriptions

The prelude is simply to select the first face “.face.one”

Prelude
Begin

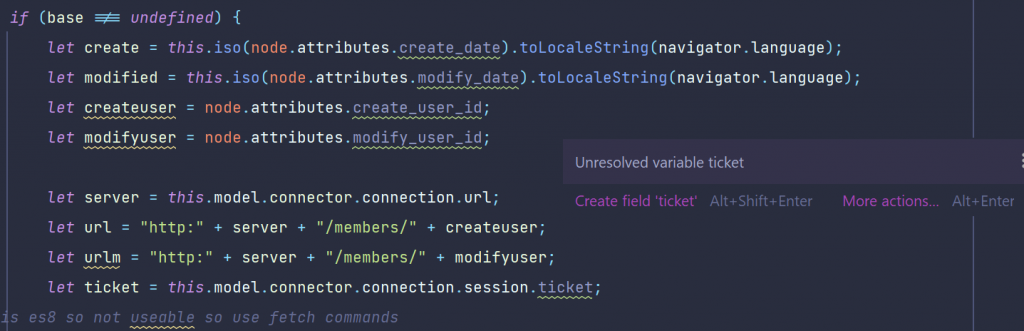
If this is not undefined (remember, smartUI always makes 2 runs, so its always a goot idea to test if its defined) the create and modify dates are extracted and translated in a standard js data. For non-US readers it will be always a difference between p.ex 04-05-20 and 4.Mai 2020 (US and german dates for the Star Wars day May the fourth), thats why we translate the dates.

Also we need to get the users of the creation and the modification. But these are numbers, so we want to translate them to names.

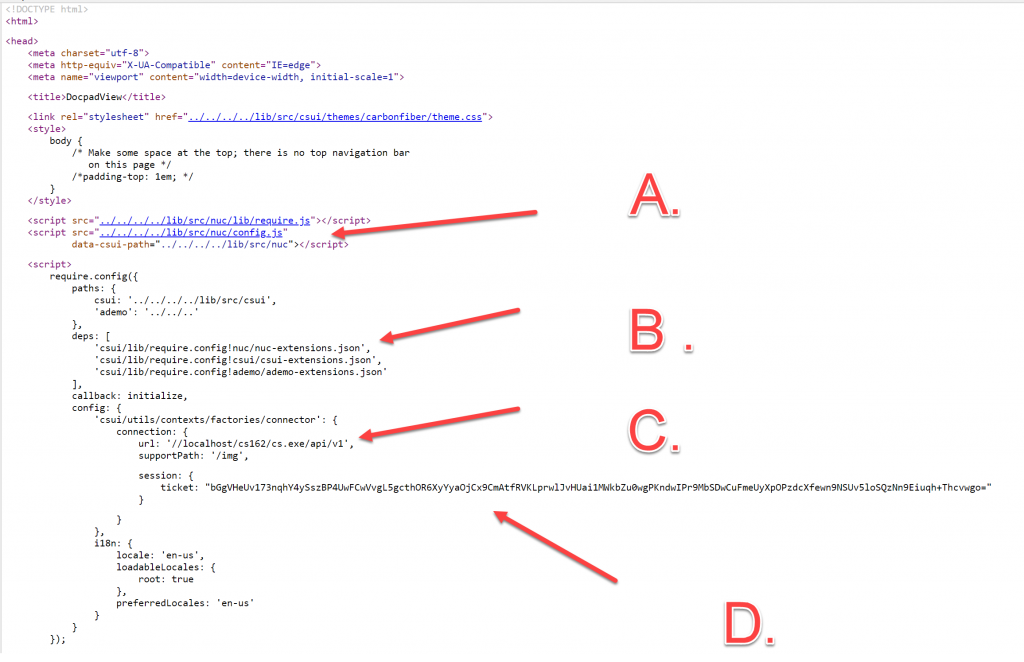
Next, extract the server from the connection and construct the members REST command to get these names.

First view: The fetch command

fetch is new in js 6. In this older, antique times you would have used some ajax variants like xmlhttprequest or some similar methods which we will use in other calls for comparism.

Fetch command

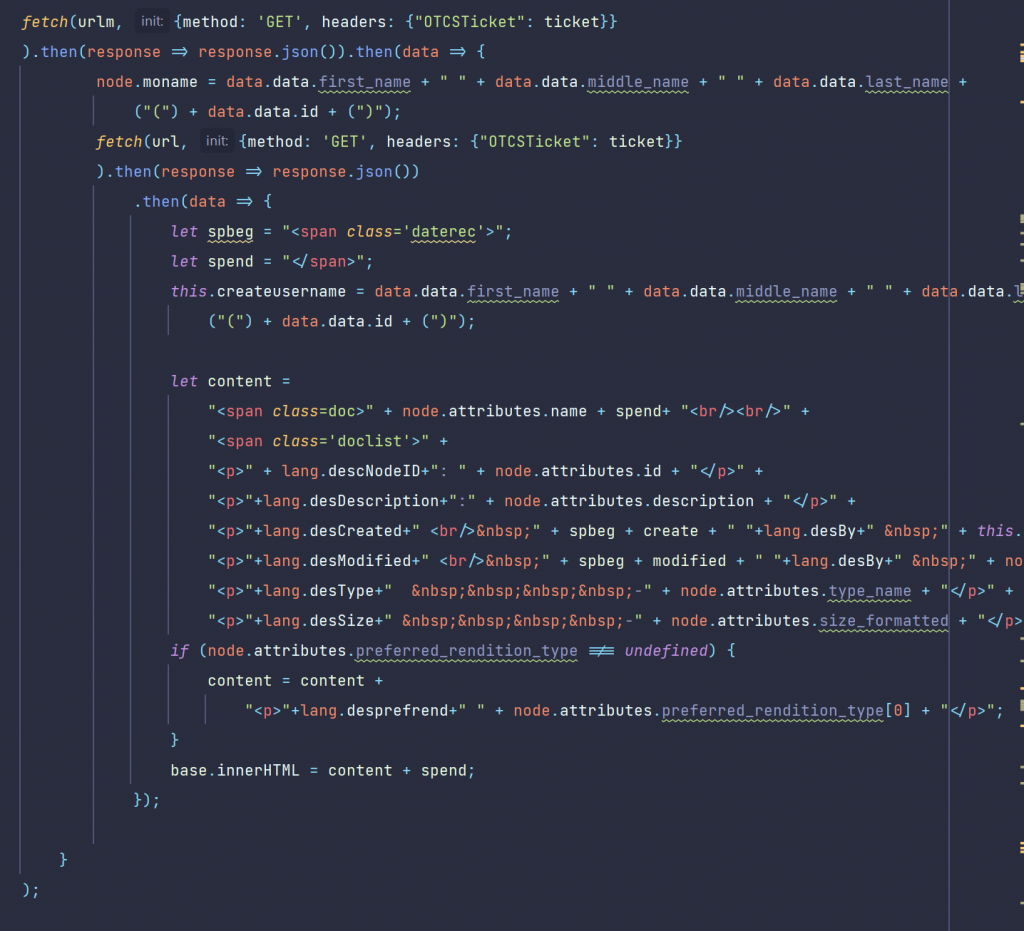
Technically, we have to issue two REST calls to /member/ to get the names of the createuser and the modifyuser. We use the fetch command.

Remark: the famous async/await would be much more handy for that, but we wanted to limit the language scope to js6 for these posts.

Once we get the responses, we’ll put that names simply as innerHTML on the panel.

Technically, you can use all other avaliable methods to put text on the panel, from template-strings to create a and fill a text nodein the DOM. You can even invite handlebars to do this for you.

loadDocumentThumbnail

In the top middle panel we added the document thumbnail, which is created automatically during indexing on the server.

Thumbnail

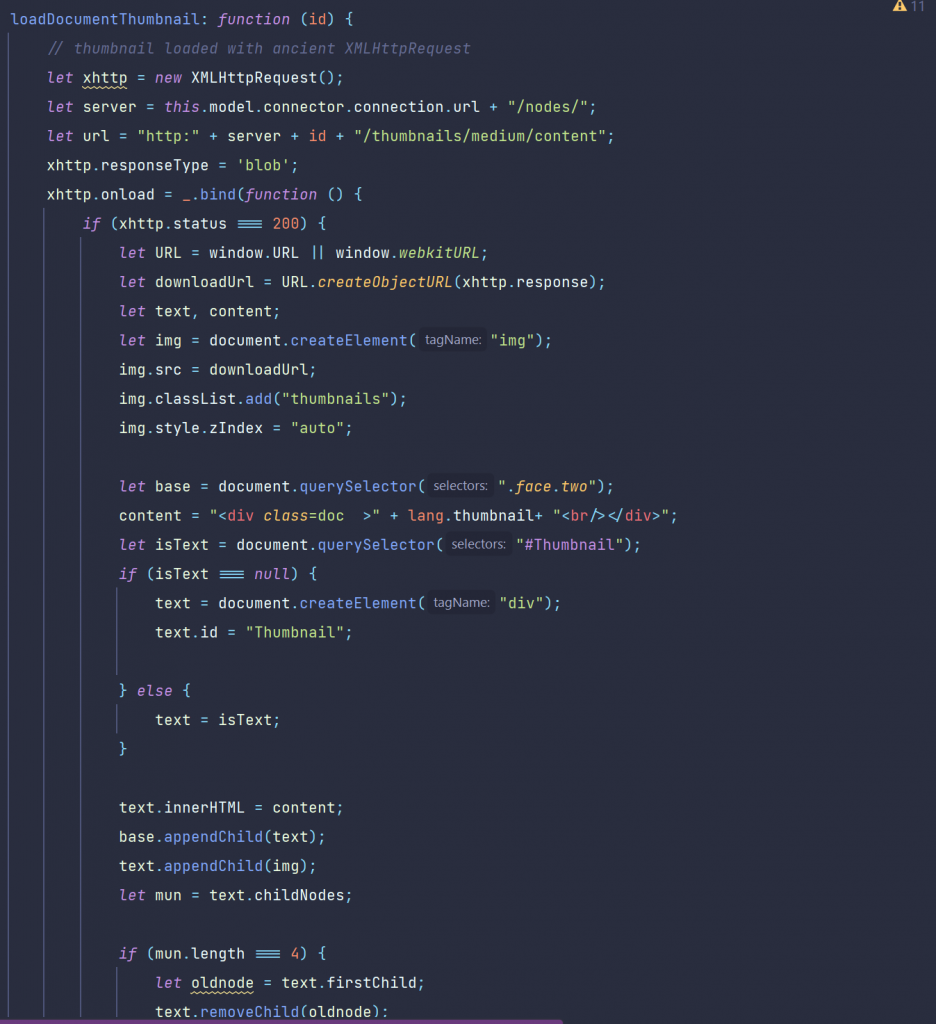
We must enter the nodeid in the REST command /thumbnails/medium/content to get the medium resolution version of the thumbnail.

To show the diffence to the fetch comand, the old archaic XMLHttpRequest was used.

The receiving image is put into a div with the id “Thumbnail”.

Image Correction

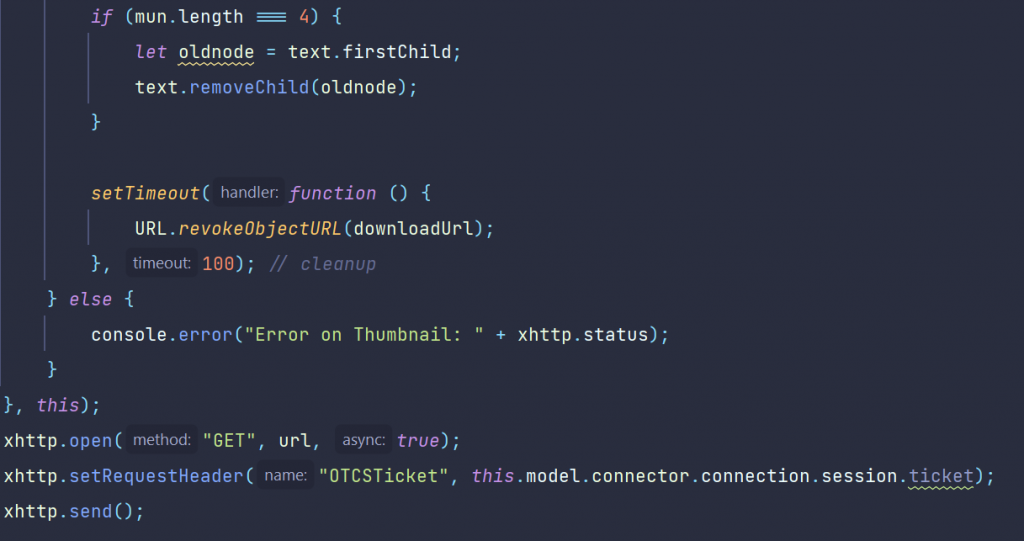
In the case the user selects another document the old thumbnail would remain. So we remove the old image element.

Almost done, we need to put our otcsticket in the request header and to send the request to the server.

loadNodeData

In this function, we use exactly one REST call to get all data at once. This is done by the function /forms/update?id=xx whick will deliver all data for that nodeid at once. Expecially the categories take a while, so a css-fog was used to cloak the image of the approaching grid until the data was received (revisit the video). Then the css fog is cleared and trhe categories are displayed.

The call is also done with the old XMLHttpRequest to show the diffences to the modern fetch command.

Local functions were used instead of those in “this” to keep the scope clean.

forms/update

The categories and the attributes

Categories

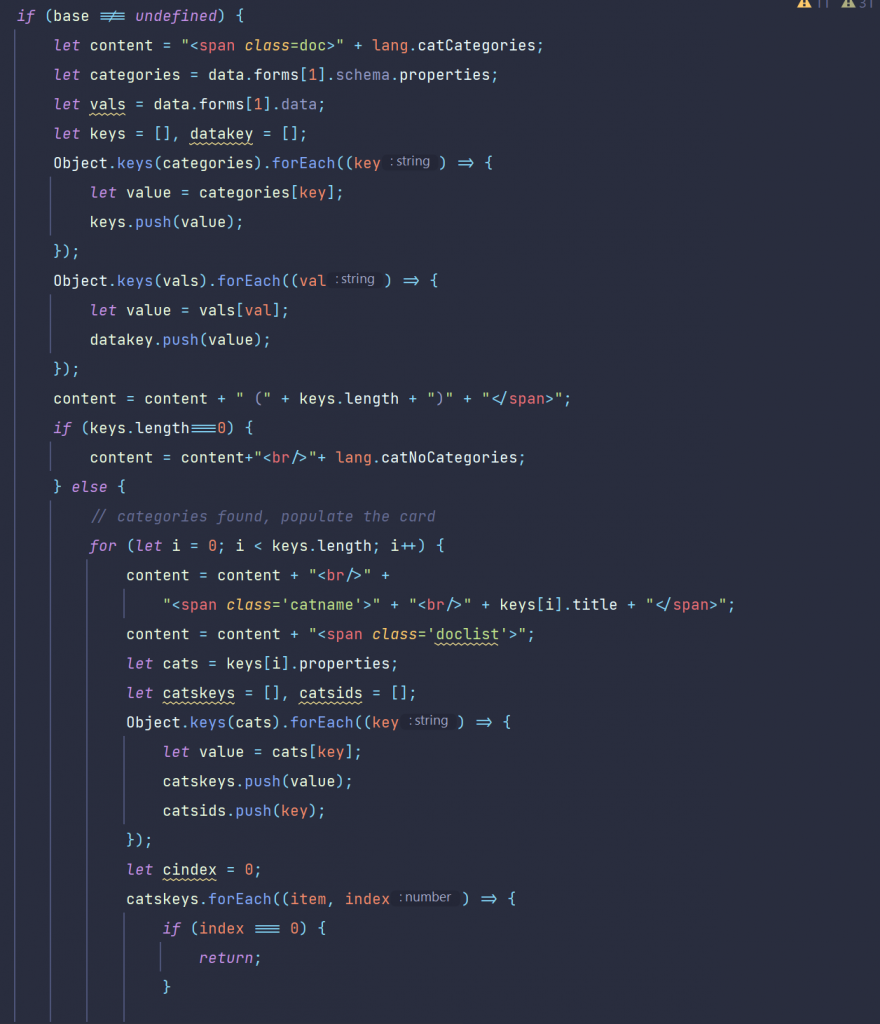
Categories were returned in an object with their category name a title in the entry. To get the attributes we have to do a little bit more.

Attributes

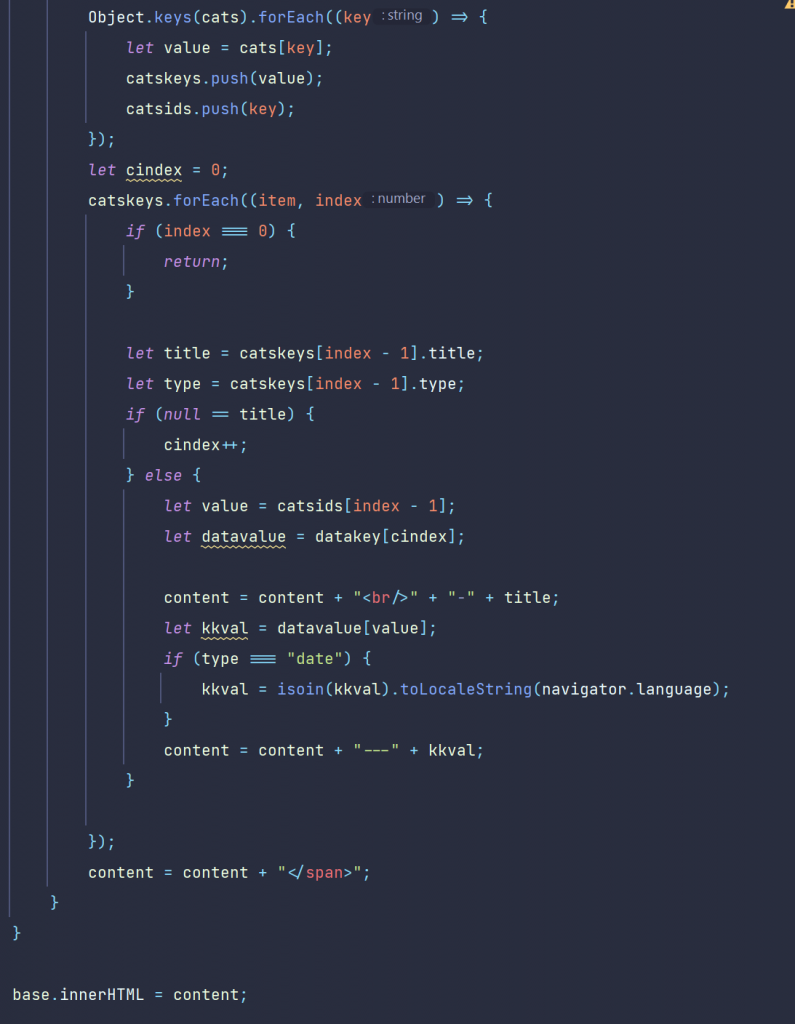
We split the result into several arrays to extract the values. If we have “date” in the type field, we have to use our date translation also on that to display the dates correct.

Security Clearances

All security related data is on the fouth face, the one on the lower left.

Security Clearances

Here, all security levels and markings were displayed inside a span.

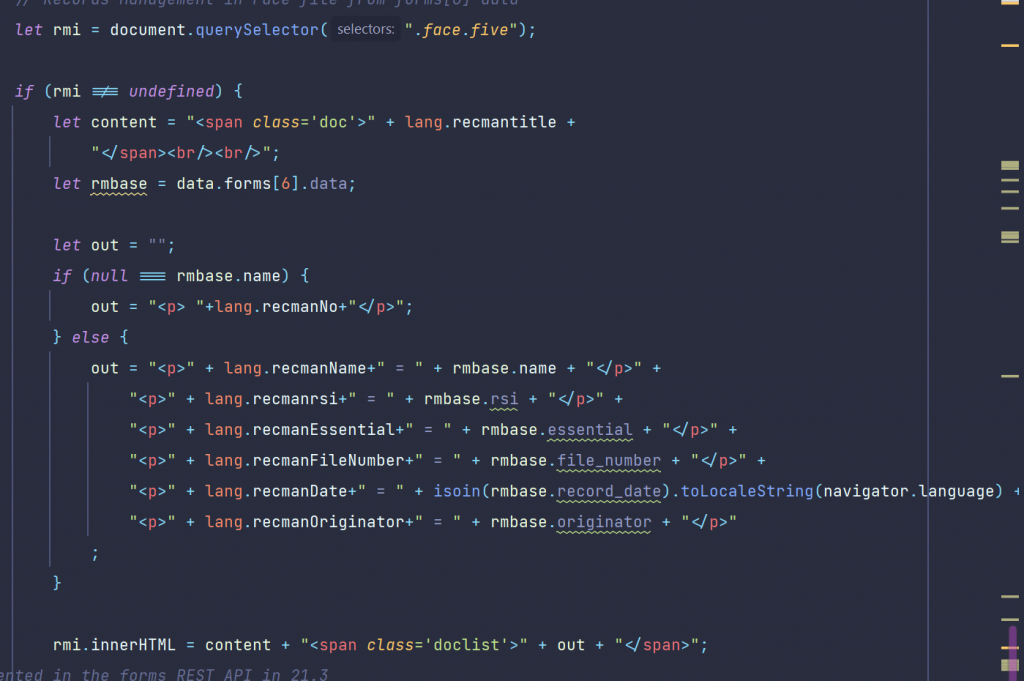
Records Management Data

here we extract and fill the data on the lower middle panel.
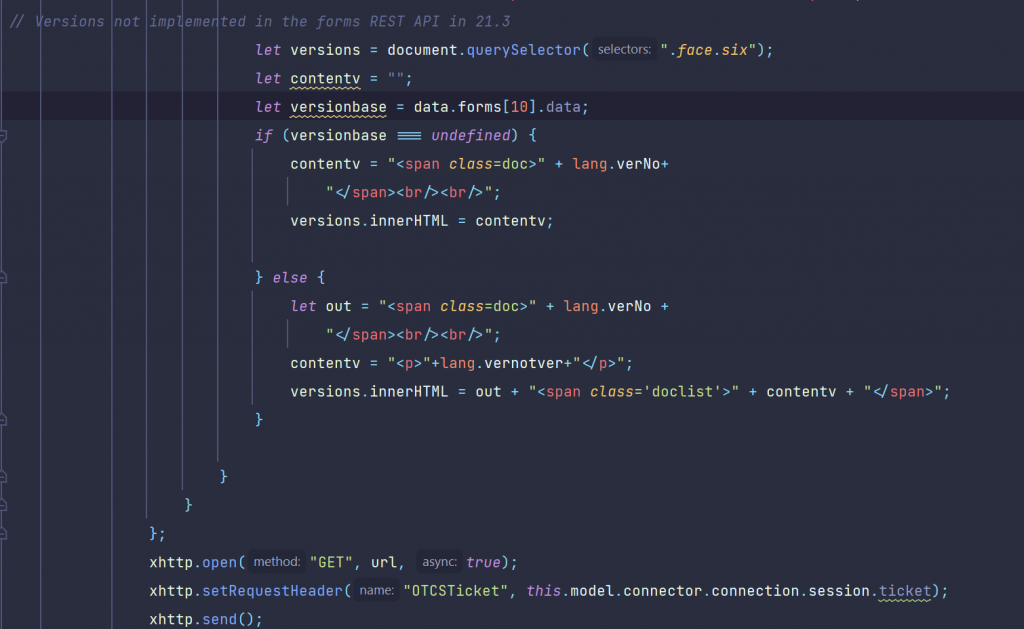
Records Management

The Versions Data

Here, the REST commend has a problem. Versions are not included in the answer of the REST command, at least in the Content Server versions 21.3 and 21.4. So let’s ionform the user on this fact and display a local language string of this fact.

Tip: Maybe there will be a patch to fix this in the near future.

Versions Data

So we had all parts discussed.

We offer a one day remote training to understand the javascript code. If you are already a sophisticated Javascript Developer, you can get the free Sources also from https://github.com/ReinerMerz/reinerdemo (a public repository on Github).

Warning: This is only the sourcetree of the project, so you have to insert this in your own project file.

The data returned from the formsupdate?id=nn REST command

The whole data structure is send back in response to a forms/update?id=nnn REST call. Some of these entries take quite a while, so try using some css to cache this.

Forms Rest command

Have fun on discovering the endless possibilities of Dashboards and other Contentserver smartUI extensions using javascript6 and css3.

The sky is the limit.

Rethinking smartUI Part 4-A

Rethinking smartUI

Three weeks ago I published a new video on Rethinking smartUI on Youtube. Now we have Rethinking smartUI Part 4-A discussing Javascript. If you havn’t it seen yet, here is the short video. In this posts, we’ll go though the technical aspects of this new kind of approach to smartUI. This demo is a Document Pad (or short DocPad), displaying all document properties in a SCIFI GUI arrangement.

This is Part 4-A of a multipart post covering Javascript of DocPad. For the css refer to part 3 of Rethinking smartUI.

Warning: This is a lot of js code, so I subdivided this Part 4 into Part 4-A and 4-B (getting all documents infos with 1 Rest call). Part 4-B will be published next week.

We offer a one day remote training to understand the javascript code. If you are already a sophisticated Javascript Developer, you can get the Sources also from https://github.com/ReinerMerz/reinerdemo (a public repository on Github).

Warning: This is only the sourcetree of the project, so you have to insert this in your own project file.

The post parts until now

Part 4-A The Javascript Part 1

Part 3 The Infrastructure and the CSS

Part 2 The HTML

Part 1 Overview

But first to Rethinking smartUI Part 4-A.

The Javascript auxiliary files

Using the model factory

The idea of a model factory is to combine several functions in one.

a. Create a model and return it.

b. Load server data into this model for use in the main constructor function

A typical factory looks like this:

// the factory for the model
define([
‘csui/utils/contexts/factories/factory’, // Factory base to inherit from
‘csui/utils/contexts/factories/connector’, // Factory for the server connector
‘ademo/widgets/docpad/impl/docpad.model’ // Model to create the factory for
], function (ModelFactory, ConnectorFactory, DocpadModel) {

‘use strict’;
var DocpadModelFactory = ModelFactory.extend({
propertyPrefix: ‘docpad’,
constructor: function DocpadModelFactory(context, options) {
ModelFactory.prototype.constructor.apply(this, arguments);
var connector = context.getObject(ConnectorFactory, options);
// Expose the model instance in the property key on this factory instance to be // used by the context
this.property = new DocpadModel(undefined, {connector: connector});
},
fetch: function (options) {
return this.property.fetch(options);
}
});
return DocpadModelFactory;
});

The main Javascript files

The lang.js file(s)

The language system consists of those strings which are pupposed to change per language.

define({
helloMessage: ‘Hello {0} {1}!’,
waitMessage: ‘Please wait’,
seldoc: ‘Select a Document’,
printdoc: ‘Print the selected Document’,
pickerTitle: ‘Select a Document’,
selectPickerButtonLabel: ‘Select’,
descNodeID: ‘Node-ID’,
desDescription: ‘Description’,
desCreated: ‘Created’,
desModified: ‘Modified’,
……more …..
});

The standard model from Backbone.js

define([
‘csui/lib/backbone’,
‘csui/utils/url’
], function (Backbone, Url) {
‘use strict’;

let DocpadModel = Backbone.Model.extend({
defaults: {
name: ‘Unnamed’
},

constructor: function DocpadModel(attributes, options) {
Backbone.Model.prototype.constructor.apply(this, arguments);

// Enable this model for communication with the CS REST API
if (options && options.connector) {
options.connector.assignTo(this);
}
},
// Computes the REST API URL using the connection options
// /auth returns information about the authenticated user
// usage of => not possible because of “this” is used for urls
url: function () {
return Url.combine(this.connector.connection.url, ‘/auth’);
} ,

parse: (response) => response.data

}];

return DocpadModel;

}];


Remark: The Arrow Function at parse is pure js6. But let me quote developer.mozilla.com here

An arrow function expression is a compact alternative to a traditional function expression, but is limited and can’t be used in all situations.

Differences & Limitations:

(Endquote)

This means, its not possibe to use when any limitation will take place, like in the constructor.

The docpad.view.js

The stages of docpad.view.js

Get infos via the Bootstrap model

constructor: function DocpadView(options) {
options.model = options.context.getModel(DocpadModelFactory);
Marionette.ItemView.prototype.constructor.call(this, options);
this.listenTo(this.model, ‘change’, this.render);
}

First, we initiate the model (and read the data) via a standard model using the model factory. Then we call the constructor in the prototype with the cs options. Lastly we listen to a change of the data and (in case) we rerender the widget.

Load the photo

The user data contains (eventually) a photo of the user. This is loaded and inserted in the DOM with the function loadPhoto. Here the js6+ fetch function is exposed to get the photo and insert it into after the element woth the .photo class in the dom.

loadPhoto: function () {
let server = this.model.connector.connection.url;
server = server.substr(0, server.search(“api/v1”));
let url = server + this.photo_url;
let ticket = this.model.connector.connection.session.ticket;
fetch(url, {method: ‘GET’, headers: {“OTCSTicket”: ticket}})
.then(response => response.blob())
.then(function (myBlob) {
const URL = window.URL || window.webkitURL;
let photo = URL.createObjectURL(myBlob);
let img = document.createElement(“img”);
img.classList.add(“photo”);
img.src = photo;
document.querySelector(“#photo”).appendChild(img);
setTimeout(() => {
URL.revokeObjectURL(photo);
}, 100); // cleanup
}
);
},

       
Using the Node-Picker

The Node-Picker is a standard function in the sdk, so we use it.

The file ‘csui/dialogs/node.picker/node.picker’, // the csui node picker

is required at the beginning of the docpad.view.js file under the local name of NodePicker like this:

define([
‘csui/lib/underscore’, // Cross-browser utility belt
‘csui/lib/marionette’, // Marionetter
‘csui/lib/moment’, // the date/time lib in csui
‘ademo/widgets/docpad/impl/docpad.model.factory’, // Factory for the data model
‘csui/dialogs/node.picker/node.picker’, // the csui node picker
‘i18n!ademo/widgets/docpad/impl/nls/lang’, // Use localizable texts
‘hbs!ademo/widgets/docpad/impl/docpad’, // Template to render the HTML
‘css!ademo/widgets/docpad/impl/base’, // base Stylesheet needed for this view
‘css!ademo/widgets/docpad/impl/adv’, // adv stylesheet for this app
‘css!ademo/widgets/docpad/impl/print’ // print style sheet
], function ( _, Marionette, Moment, DocpadModelFactory, NodePicker, lang, template)

The picker is started by pressing the big button, this actually calls showThePicker. Types of 144 (only Documents) and on the enterprise volume are among the start conditions.

The title and other strings are extacted from the appropriate lang.js language file(s). The command nodePicker.show() at the beginn of the chain displays the nodePicker

showThePicker: function () {
if (undefined === this) {
return;
}
let btn = document.querySelector(“.btn”);
btn.classList.remove(“animate-large”);
btn.classList.add(“animate-large-backward”);

let nodePicker = new NodePicker({
connector: this.model.connector,
selectableTypes: [144],
dialogTitle: lang.pickerTitle,
selectButtonLabel: lang.selectPickerButtonLabel,
startLocation: ‘enterprise.volume’
});
nodePicker.s how()
.fail(function () {
console.error(“Picker fails to show”);
})
.done(_.bind(function (args) {
document.querySelector(“.printbtn”).classList.remove(“hide”);
document.querySelector(“#content”).classList
.replace(“hide”, “display”);
let node = args.nodes[0];
let id = node.attributes.id;
this.docname = node.attributes.name;
document.querySelector(“#document1”).innerHTML = this.docname;
this.loadDocumentThumbnail(id); // load the thumbnail and display it
this.loadDescriptions(node); // load node data and display it
this.loadNodeData(id); // inquire form update data and display it
}, this)
);

},

The callback in the .done clause simply extracts the node id and the name from the results and stores them in the docpad “this”.

In the next week part “Rethinking smartUI Part 4-B” we’ll discuss the REST Commad how to get all document data (nearly) at once.

Rethinking smartUI Part 3

The upper PART

Two weeks ago I published a new video on Rethinking smartUI on Youtube. If you havn’t it seen yet, here is the short video. In this posts, we’ll go though the technical aspects of this new kind of approach to smartUI. This demo is a Document Pad (or short DocPad), displaying all document properties in a SCIFI GUI arrangement.

This is Part 3 of a multipart post covering the technical start of DocPad and the associated CSS

The post parts until now

Part 4-A The Javascript Part 1

Part 3 The Infrastructure and the CSS

Part 2 The HTML

Part 1 Overview

A. The technical infrastructure

Die DocPad is started via the index.html, found in the test folder of the docpad. This is because of its much easier to test modifications via index.html compared to installing the finished widget in the content server and trying it then.

The first part of index.html

The first part of index html

The whole page is more or less standard. We habe 4 areas of interest in the first part. Dont forget, nuc was introduced in 21.2. In older versions nuc was not existant.

  • A. Here, you see the config is moved to the nuc area
  • B. Change A will also require to add the nuc-extensions to the list of dependancies for csui. Thed whole js code is loaded by the “ademo” extension.
  • C. My machine is on a VM. This means, if you put this on your machine, you’ll have to enter your url and your support directory (called supportPath) in the configuration.
  • D. I’ve used my ticket to provide the login. You can use username and password to login the more convential way or also provide a ticket of youfself here. The displayed ticket won’t work at your site.

The second part of index.html

Part 2 of index html

Here we have this points of interest

  • A. The require parts of needed modules. It is a docpad.mock.js in the list of modules, but its not recommended to use the mockup facility because there is lot of traffic from and to the server. Its much easier to add a real content server behind that index.html.
  • B. Standard procedure. Instanciate the widget with the context, display it in the region and fetch the context from the server. As mentioned, its easiere to use a real server as data source so switch the mockup off.
  • C. The marionette region is associated with the id=”widget” of this div, so the widget is displayed here.

At the end there is immediate function starting with

(function() {
var ws = new WebSocket('ws://' + window.location.host + '/jb-server-page?reloadServiceClientId=1');

This is inserted by Webstorm (my JS IDE) to allow auto-reload of changed files. You can ignore that, other IDEs will solve that differently.

B. The CSS

The CSS

Here, all css files used in the docpad are listed in the require.js list of required modules. For demo purposed and to keep things simple, I used 3 css files:

base.css

This file contains the basic css instructions to style the .hbd template shown at the top of list.

adv.css

contains the more advanced css instructions for docpad

print.css

is the print style sheet to provide a proper output on paper.

Disclaimer: The css instructions selected do not impose or propose any styles to be followed, instead they are used for pure demo purposes here.

The base.css File

Here the main functionality of the css is found. One of the feature of css3, the variables, is used. In the pseudo element :root all variables used in different rules are defined.

css setup

At the end of the snipped you’ll see a media query, saying the following is used tor screen display.

Lets discuss several stages:

The header + the footer

Header
Footer

These two structures exploit the standard userinfo with REST from the content server in a standard backbone model. “Hello xxxxxx” is a structure from the hello world demo with the word “hello” and the signed in user. The photo is downloaded from the content server and dosplayed.

The bottom structure simply prints out other user data on the screen .

Points of interest:

Font used

The nice digital effect is build with the font “digital-7”

The header is done with

The header

Ther photo is inserted at the position of the .photo class in the size of 80×60 pixel. Then the photo gets this nioce rounded look using border-radius.

the footer conststs of three divs, which are positioned in 3 columns

The footer

The divs have the classes .boxcell and .leftbox and are descendants of the .footerbox

The document display

The document display consists of six divs and are positioned using a css grid.

docdisplay

They have numbers, the numbers range from one (“card1”) to 6 (“card6”). The css part is (shown here only a fraction):

Cards

They are all children of the cube, using the display mode grid and displaying the 6 cards in two rows and threee columns.

cube

Using the diffent REST methods in the js code, these cards were filled by the standard methods of DOM interaction from js. This will be the main theme of next weeks post, the js code of “Rethinking smartUI” Part 3.

Rethinking smartUI Part 2

Last week I published a new video on Rethinking smartUI on Youtube. If you havnt seen yet, here is the short video. In this posts, we’ll go though the technical aspects of this new kind of approach to smartUI. This demo is a Document Pad (or short DocPad), displaying all document properties in a SCIFI GUI arrangement.

This is Part 2 of a multipart post covering all aspects of this Docpad.

The post parts until now

Part 4-A The Javascript Part 1

Part 3 The Infrastructure and the CSS

Part 2 The HTML

Part 1 Overview

The html

First, lets take a look on the html (in out case the .hbs file). This is the top part of the widget,

The HBS file, Part 1

The div with the class “topbox” contains the Username and the Photo. There is also a Print-Button, if a document is selected.

A button, class “picker” is sorted in a div with “picker”. This is the button used to start the node picker component. Its hidden now, will be used later, when a document is selected.

The documents data is displayed using a cube. A cube has six sides so all sides can be presented using a css grid or …. (arranged in a 3D cube which can be rotated in 3D. But thhis is not part of this demo).

The whole thing is arranged in a div with the id of “content”. The top element is a div with the class “cube”, holding six divs for the six sides

The html of the cude

Just for fun, the cube is surrounded by a div with the class “cam”. If you want to display the cube as 3d cube. This is used to set the perspective on a 3d Cube. If you are interested in learning more on 3D css cubes, refer to https://css-tricks.com/simplifying-css-cubes-custom-properties/

Lets see the Actions.

The Actions in Detail

After starting the aplication, there are several stages, They are

a. Application started

Docpad started
Docpad started

Here, the application is just started. the “Select a document” started from the top left and moved in the center of the window. This button will initiate the nodepicker, a standard component of the smartUI library.

Until now, we queried the user logged in. Then, we greet the user, extract the photo from the Content Server Database and display this photo in the top right. To make it more interesting, we displayed the photo in round form via css.

In the three panels at the bottom we displayed the rest of the user record. Just for fun we surrounded the three botton panels with a border animation.

b. Nodepicker selected

The next stage is the nodepicker. After pressing the “Select a document” button, it is started and delivers a list folders and documents on the associated Content Server. Meanwhile, the Button moved again back to upper left corner.

c. Document selected

After the user selects a document, all data of this document is read from the server. In this case, the “APAC Expense Report.xlsx” is selected. (Refer to part 1 to see which REST commmands are used).

As of do have a document, we can display the header and the print button.

As you can see when playing the video, the cube starts in some distance and is a little but foggy during the approach and clears when we receive all data.

Display of the document

The reason is, that the forms/update REST call takes longer and we use CSS animations ans css view filters to hide that fact from the user. When in doubt, view the video on top of this post again.

For beauty there are also some hovering effects added, on the panels and on the thumbnail.

d.Document to Print

The last stage is (besides selecting a new document to display) is to print the document.

Here we have the print previev in Chrome

Print stylesheet in action

As we can see. the node data is printed in the form of a css grid on paper. The display is in standard layout. A media query selects a print style sheet instead of the normal stylesheet(s).

In the next week we discuss in Part 3 the index.html to start the widget standalone and css stylesheets (there are really several). We’ll then conclude this series in Part 4 discussing the Javascript made for this demo.

We’ll use the 4 steps of the application as the schema for Part 3 and 4.

See you next week!

Rethinking smartUI

Rethinking smartUI

Yesterday I published a new video on Rethinking smartUI on Youtube. If you havnt seen yet, here is the short video. In this posts, we’ll go though the technical aspects of this new kind of approach to smartUI. This demo is a Document Pad (or short DocPad), displaying all document properties in a SCIFI GUI arrangement.

This is Part 1 of a multipart post covering all aspects of this Docpad.

The post parts until now

Part 4-A The Javascript Part 1

Part 3 The Infrastructure and the CSS

Part 2 The HTML

Part 1 Overview

Part 1: Overview

This demo is supposed to do this:

  • Demonstrate the usage of html5, javascript 6 and css3. Especially how to use this modern components inside the smartUI framework. For example, the famous parse function in the standard demo widget will change this way:

js5
parse: function (response) {
// All attributes are placed below the data key
return response.data;
}

js6
parse: (response) => response.data

  • Compare the methods of getting data via REST using the methods
    • Model (as usual in Backbone)
    • XMLHttpRequest (the good old XMLHttpRequest as used since long)
    • Fetch (the modern javascript 6 method to get REST data)
    • Not used: async/await. Despite the fact that async/await is very handy, this appeared in javascript 8 and is beyond the scope of the demo.
  • Exploit the power of css by using
    • different display methods as Grid and Table
    • use panels in a cube. Origionally this was planned as moveable 3D cube. In this case, all metadata were written on the sides of the cube. Here is a very good technical description how to do it. Unfortunately the cube idea seems to be very impractical for the demo and was dropped
    • “burning borders”, fog and animations as element of the UI
    • provide an additional print style sheet to make this screen infos printeable in a normal way
  • Except some Icons of Bootstrap, nothing is to be used from Bootstrap. These Icons can be replaced by those in the fontawesome font
  • JQuery is not used
  • These Content Server REST commands are used
    • The log in is done in the index.html page, but when used as a dashboard widget the user is already logged in. If a separate login panel is required (p.ex. for a stand aloane dashboard on a tablet) then its necessary to provide a login via post […]/v1/auth
    • then the user info is retrieved via get […]/v1/auth
    • if the user has stored a photo in his profile, then the photo is retrieved by get […][photo-url] and then inserted in the DOM.
    • Then the standard Node-Picker Control is called. All Node-Picker interactions with the server are managed by this control. As a result, the nodeid of the selected Document is returned.
    • Next, the DAPINode infos of the selected node are retrieved by get […]/v1/nodes/{id}
    • for the “created_by” and “modified_by” there is only a nujmber returned, the userid. For this two cases, the username is retrieved from the server by get […]/v1/members
    • Its always nice to exploit the thumbnail of the document to the user. This is done by get […]/nodes/{id}/thumbnails/medium/content
    • To get all other data , a special trick is used. The command get […]/v1/forms/nodes/update returns all categories and the othere nodeinfos using one REST call. This commmand takes a while to execute, so the user is entertained using some css animations.

In the next week, we explore the infrastructure of this Docpad demo.

The Connection Object in smartUI

Setup of the Connection Object

smartUI does have a couple of interesting objects, but the actual documentation about them is not very clear. So lets take a look on the objects.

First, we’ll examine the connection object a little bit more in detail. The page context will follow in another post.

The connection object provides information about the content server to connect with. Normally, this object comes from the content server but has to be constructed manually when you use the index.html testing facility.

Lets take a look at a typical index.html with the connection object setup

Setup of the connection object

Remember, the widget will get everything beeing perfectly setup from the content server, but using the test faciliy, you have to mock up this.

Parameters:

  • url – the url which is the content server url in your mockup data
  • supportPath – where is your content server support directory
  • credentials – in case you want to log in, use this clause
  • session- when you want to ignore the ticketing etc, use ticket:”dummy”

Lets see what this object is doing:

(here the page is running and this is a screenshot from the debugger)

A debugging session with the connection object

We see, there is a connector object beeing the parent for the connection object. The connection object contains all parameter setups from the index.html, mainly the url and the session infos.

There is also an Authenticator in this connector object, which contains another copy of this connection object but also with the information, how the automatic re-login for a valid session ticked should be done. And of course, the type of Authenticator (here InteractiveCredentialsAuthenticator)

(Remember: The security token timeout will cancel your session (within typically 300 sec) if you do not a relogin).

This is the mechanism to avoid permanent logins. Take a look at the available authenticators to see the possibilities.

You can always refer the Connection Object to get the url of the server. This url os merged with the parameters in the Model URL function to build the final REST call.

A useful object. Normally we get it automatically from the server, only while testing with Mock-Up Data we need to setup this object manually.

Switch the smartUI SDK to Javascript ES6

When you start GRUNT, you will get errors on ES6 keywords, each LET will be flagged as error,

Have you ever wondered, why the SDK is not accepting JavaScript ES6? The wonderful new level of Javascript avoids for example the Variables Hoisting Effect by using LET instead of VAR. (Reduces the scope of the variables)

On the other hand, not all Browsers support ES6. So be aware that you may have to switch it back, if your browsers provide no support for ES6.

To change it:

  • open the node-modules folder in your project dir
  • scoll down until you find the module eslint-config-default . Edit the file .eslintrc in a tect editor (screenshots are from WebStorm IDE)
eslint config default in node_modules
eslint.rc

in this file, you’ll see that the file off.js is used for configuration. Open this file in a text editor.

The file off.js

Here you see, that es6 is set to false (Yellow Arrow). Change this to true and save the file (maybe under another name. In this case, correct the require command to reflect the new name).

So now the GRUNT-file is producing no problems when it encouters a LET.

But be aware: If your bropwsers lack some support for es6, you must switch back to ES5.

The smartUI Page Context

•The simplest context in smartUI is the Page Context, which can include and fetch models and collections, but does not provide any other functionality. If you use it with widgets, which expect changes based on their context-changing models, you will have to handle these changes yourself.

You can use the page context like this

 
 require(['csui/lib/jquery', '../page.context', 'csui/utils/contexts/factories/connector',
       'csui/utils/contexts/factories/user', './page.context.mock'
     ], function ($, PageContext, ConnectorFactory, UserModelFactory, PageContextMock) {
       var contentElement = $('body'),
           context = new PageContext(),
           connector = context.getObject(ConnectorFactory),
           currentUser = context.getModel(UserModelFactory);
       $('<p>')
           .text('Connected to the server ' + connector.connection.url)
           .appendTo(contentElement);
 
       PageContextMock.enable();
       context.fetch()
           .done(function () {
             $('<p>')
                 .text('Current user is ' + currentUser.get('name'))
                 .appendTo(contentElement);
           });
     }); 

This results in

New Permissions Explorer in smartUI

Have you seen the new permissions explorer in smartUI? Open up the permissions on an object and you’ll see the new selection.

Permission Selection
The Permissions Explorer

The permissions explorer is opened with a click on the “Permissions Explorer” Button on the upper right.

Inside the Permissions Explorer

This will give you the option to edit all permissions of the objects in this folder at once.

New smartUI Training for Content Server 16.2.8

The actual Content Server release 16.2.8 brought a lot of improvements to the smartUI SDK, for example the xECM and the connected Workspaces Widgets are nowadays part of the SDK.

Also a lot of of people were interested in smartUI, not only Developers.

So we introduced an updated 5 days training to reflect the changes of 16.2.8 and a 2 days training to provide an overview of the SDK. Naturally, a 5 days training gives more information and also more exercises than a 2 days training, but this 2 days training can provide a good overview for Team Leaders and technical Managers.

For those with little time, there is also a 1 day training giving you a more compact overview for technical Managers and technical Evangelists. The one day training is not recommended for Developers. This training was held at the Enterprise World in Vienna 2019.

Whats new in the trainings?

New in the basic training

The Chapter 6 (SDK Intro) (5 days training Basic)

  • 6.1 Introduction
  • 6.2 Installing the SDK. Different Installations in 16.2.4 and 16.2.8. (NEW)
  • 6.3 Building the Demo Widget
  • 6.4 CSS Style Overrides Binf (OpenText Bootstrap Version)
  • 6.5 General Overview
    • General Overview
    • General Architecture, Coding Guidelines
    • Logging, Internationalization and Localization
  • 6.6 Content of the SDK
  • 6.7 Routing Preview (see adv. Training for a more detailed discussion)
  • 6.8 New Command
  • 6.9 Custom Column
  • 6.10 Metadata
  • 6.11 Define a new Nodetype
  • 6.12 Create a Widget
  • 6.13 Base Widgets. Detailed info’s on base widgets.
    • Favorites
    • Recently Accessed
    • MyAssignments
    • Shortcut
    • Shortcuts
    • Metadata
    • NodesTable
    • DocumentOverview
    • Search Results (NEW)
    • Permissions (NEW)
    • Html.editor (NEW)
    • Navigation Header (NEW)
  • 6.14 Controls and Contexts
    • Controls
      • Node Picker
      • Modal Alert
      • File Open
      • Perspectives: Grid, Single, Left-Center-Right, Tabbed, Tabbed-Flow
      • Tile
      • ListView
      • ListItem
      • Signin
      • UserPicker
      • Breadcrumps
      • Checkbox
      • Dialog
      • Disclosure (NEW)
      • Error (NEW)
      • Form (NEW)
      • Globalmessage (NEW)
      • Grid (NEW)
      • Zip&Download (NEW)
      • Integration Folder Browser
      • Integration Target Picker
    • Contexts
      • Detached objects
      • Permanent objects
      • Temporary objects
      • Page Context
      • Browsing Context
      • Perspective Context
      • Portal Context
  • 6.15 Models and Factories
    • NodeModel
    • Other Models
    • Factories
      • Fetchable Factory
      • Configurable Factory

A new Chapter 12 discusses the strategys needed to “widgedize” an existing legacy g module and to add things to an existing widget

The strange word “to widgedize” stands for “Build a widget for a legacy module not already supporting widgets”. The Strategies on amending a Module by adding a widget and on adding additional functionality inside an existing widget are discussed.

Content:

  • Moving from a legacy gui module to a smartUI module
    • Examine a legacy module and rebuild a smartUI widget (here only on the client side)
    • As an example, the barcode widget
  • Add a functionality in an existing widget
    • Add an email functionality in the Connected Workspaces Team Widget.
    • Usable from inside the Widget
    • As an example the new team widget with email Support

New in the advanced training

The advanced training will eventually grow more and more to cover the new widgets and controls coming in future releases.

Chapter 1: Extended SDK Parts

  • Additional Widgets
    • Webreports
      • NodesListReportView
      • TilereportView
      • FilteredCountChartView
      • Carousel Widget View
      • parameter.prompt.form (NEW)
      • table.report (NEW)
      • status.screen (NEW)
      • open.webreport.js (action to show the Parameters form) (NEW)
  • binf-Datepicker
    • Using the build in datepicker
  • binf-switch
    • Using the binf-switch to turn checkboxes and radio buttons into switches
  • Workflow
    • Workflow Components
    • Workflow in smartUI including Workflow Status (new in 16.2.4)
    • Starting Workflows
    • URL Routes
    • Workitem Model
    • Workitem Actions
    • Workitem Extension
    • Writing Workflow Extensions
    • REST API Support for Workflows
  • Connected Workspaces
    • Configurationvolume (NEW)
    • Header (NEW)
  • Extended ECM
    • xECM: Office365 Groups (NEW)
    • xECM: Header Widget with Business Object Infos (NEW)
    • xECM: Snapshot of current document Attachments (NEW)
    • xECM: Dossier View Widget (NEW)
    • Event Action Center (NEW)
  • Widgets not part of the SDK
    • Mobile Scanning
    • Discussion Widget
    • Engineering Doc Management: Search
    • MyShares

The chapter 3 has also been amended

  • Tips and Tricks (Work in Progress- List can change)
    • Add a OTDS Ticket already in the browser to the connection object
    • Re-using a OTDS Ticket as LLCookie
    • Checking the paths in the test/index.html
    • Adding non CSUI supported jQuery functions in a view
    • Add additional jQuery Libraries
    • Adding Controls to a widget (NEW)
    • CKEDITOR 4 (NEW)
      • Intro (NEW)
      • JQuery Non SDK example (NEW)
      • Usage in the SDK (NEW)
    • Handlebars advanced
      • Handlebars QuickStart
      • Expressions
      • Helpers
      • Helpers with html output
      • Helpers with Hash Object
      • The Helper fn property
      • The helper inverse property
      • Partials
      • Helpers in the SDK
      • 188 Handlebar Helpers
    • LESS advanced
      • LESS installation
      • Using LESS variables
      • Using Mixins in LESS
      • Parametric Mixins
      • Guarded Mixins
    • Accessibility in Bootstrap. Screen reader support and what’s to change in the SDK to support screen readers for visual impaired users.
      • What is Accessibility
      • Kinds of Disabilities
      • Accessibility and the law
      • WAI-ARIA
      • ASSETS.CMS.GOV
      • PayPal Bootstrap Accessibility Plugin
      • Web Experience Toolkit WET
      • Other resources
    • Best Practices in smartUI development
      • Pre-Development Steps
      • Preparation Steps
      • Development Steps
      • Integration Steps
      • Documentation Steps
  • Development Infrastructure for security aware Organizations (NEW)
    • Recommendations what’s to do if the reloading of npm modules during the creation of a widget is not wanted (NEW)

The agendas are available as pdf here

  • 2 day Agenda the training with more details and more exercises