Rethinking smartUI Part 4-B

Forms Rest command

Some weeks ago I published a new video on Rethinking smartUI on Youtube. Now we have Rethinking smartUI Part 4-B discussing the main part of gathering and displaying thr documents data.

If you havn’t it seen yet, here is the short video. In this posts, we’ll go though the technical aspects of this new kind of approach to smartUI. This demo is a Document Pad (or short DocPad), displaying all document properties in a SCIFI GUI arrangement.

A warning at the beginning: To use this code with IE11 is a perfect way to test all js error messages. Use this code only with the newest browsers. Its tested with Chrome (V98), Chrome Canary (V98), FF Developer (95.0b4), Edge (95.0) and Firefox (93.0)

The other parts of this post were

Part 4-A The Javascript Part 1

Part 3 The Infrastructure and the CSS

Part 2 The HTML

Part 1 Overview

In the part 4A, we had discussed all the js responsible for the perimeter of the whdgetz. Not lets discuss the main part which is responsible to gather and displad this data:
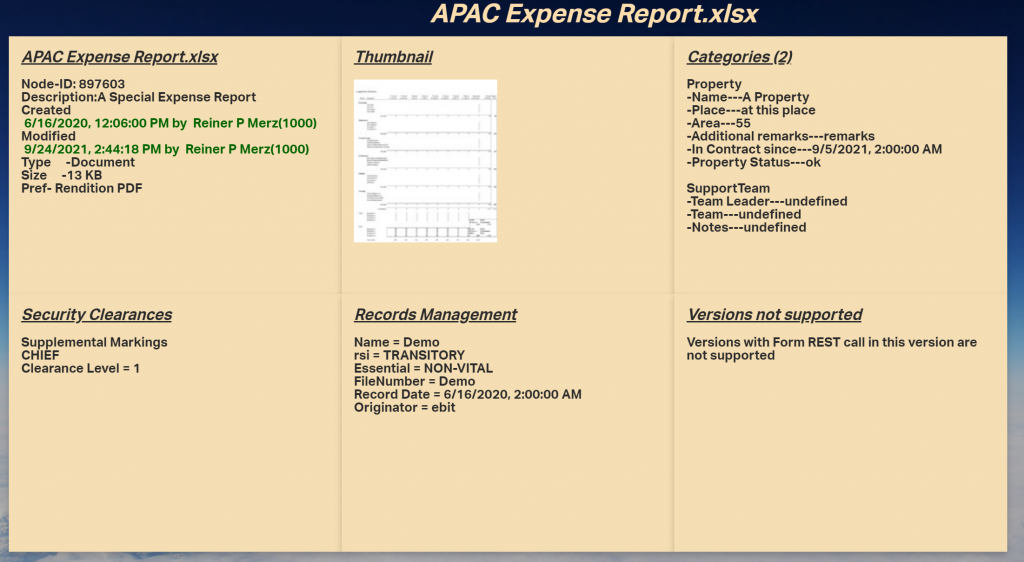
docdisplay

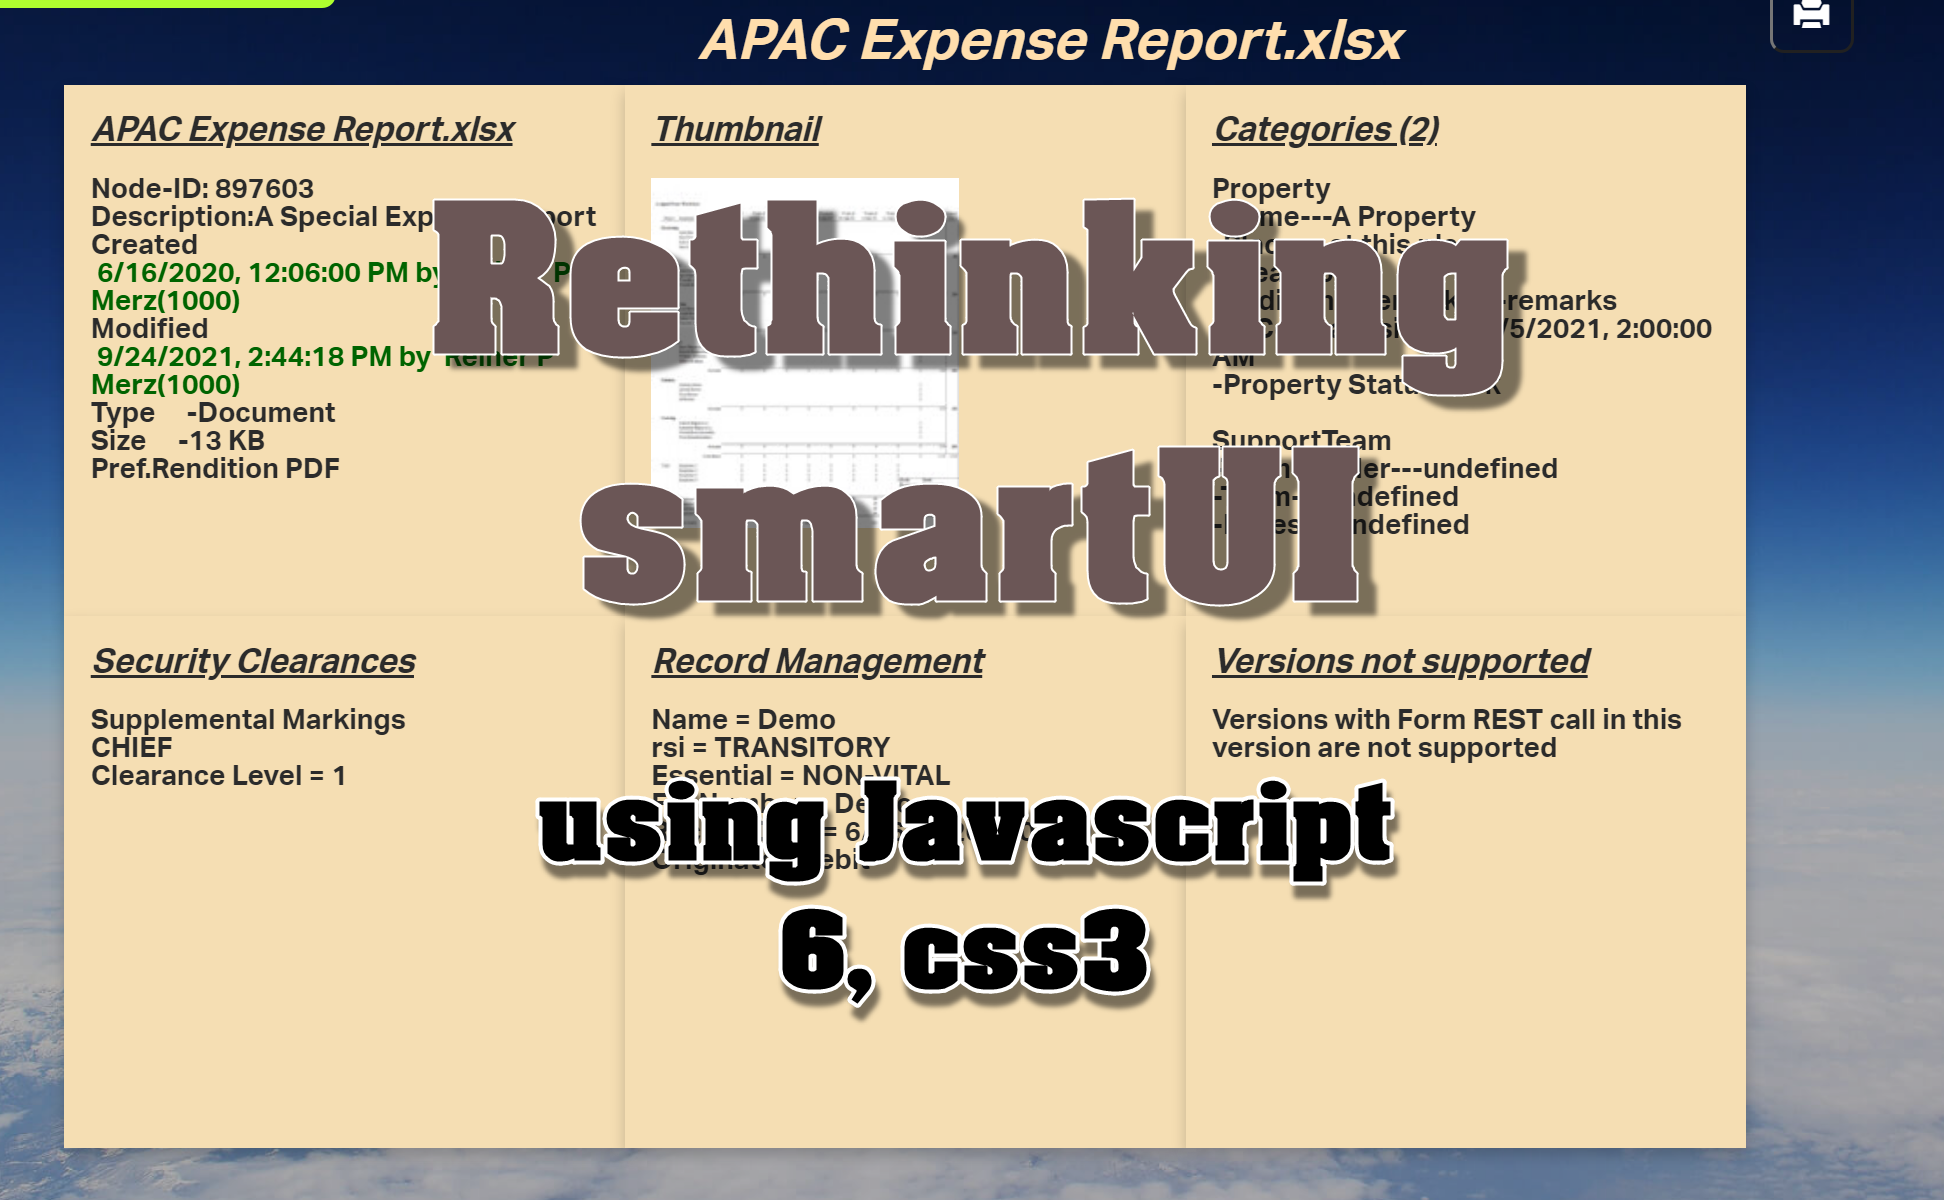
A CSS Grid

As you can see, there are 6 panels arranged in a CSS grid.

For infos on the css, please review this post, the part 3 of this series.

So let’s start with the panel at top left.

The documents metadata

This is more or less the data which is related directly to the document. The documents node number was the output from the node picker . The nodepicker was closed by the done() callback.
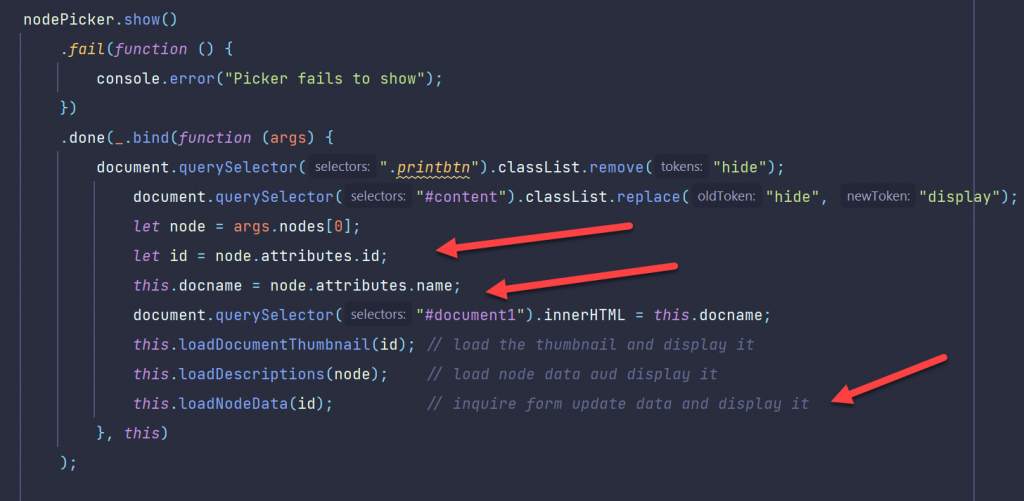
Nodepicker

Here we are in the this function of the nodepicker. We extract the node from the callbacks arguments an get the id with the topmost arrow. We extract the name of the node and put this name inside the id #document.

The loadDescriptions function does the work.

loadDescriptions

The prelude is simply to select the first face “.face.one”

Prelude
Begin

If this is not undefined (remember, smartUI always makes 2 runs, so its always a goot idea to test if its defined) the create and modify dates are extracted and translated in a standard js data. For non-US readers it will be always a difference between p.ex 04-05-20 and 4.Mai 2020 (US and german dates for the Star Wars day May the fourth), thats why we translate the dates.

Also we need to get the users of the creation and the modification. But these are numbers, so we want to translate them to names.

Next, extract the server from the connection and construct the members REST command to get these names.

First view: The fetch command

fetch is new in js 6. In this older, antique times you would have used some ajax variants like xmlhttprequest or some similar methods which we will use in other calls for comparism.
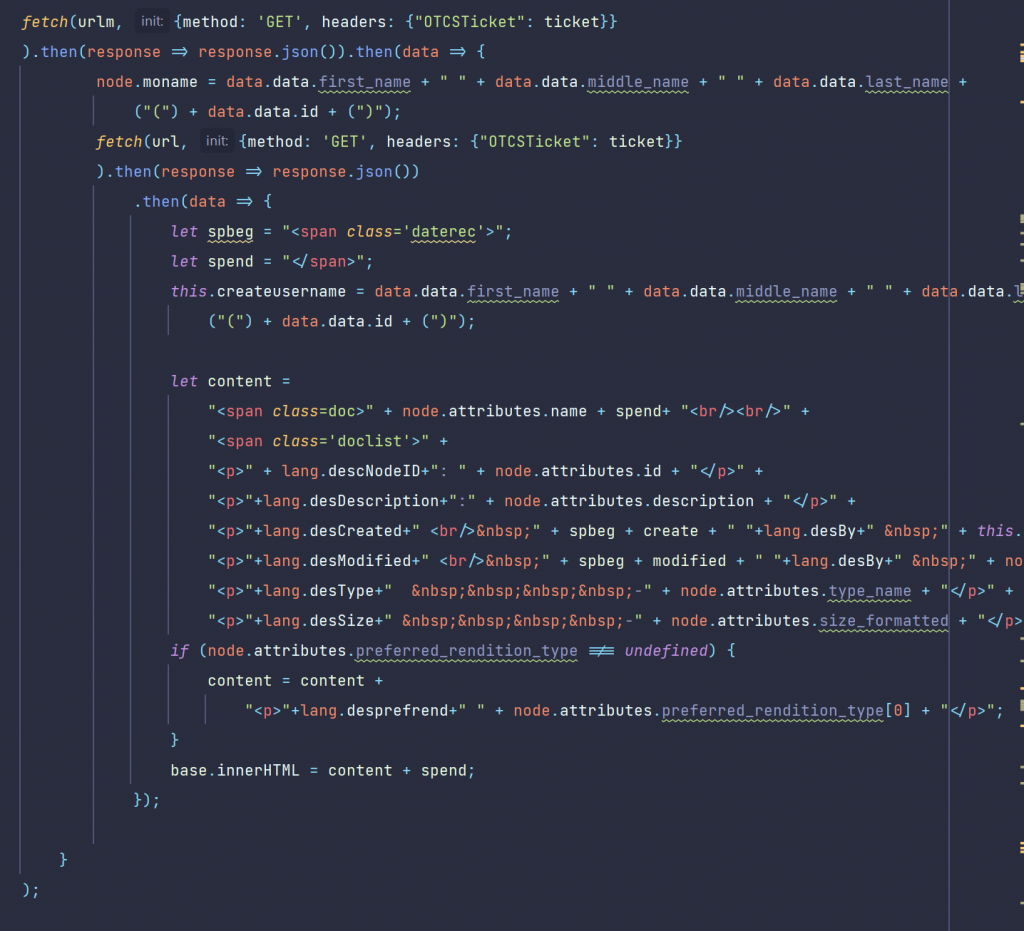
Fetch command

Technically, we have to issue two REST calls to /member/ to get the names of the createuser and the modifyuser. We use the fetch command.

Remark: the famous async/await would be much more handy for that, but we wanted to limit the language scope to js6 for these posts.

Once we get the responses, we’ll put that names simply as innerHTML on the panel.

Technically, you can use all other avaliable methods to put text on the panel, from template-strings to create a and fill a text nodein the DOM. You can even invite handlebars to do this for you.

loadDocumentThumbnail

In the top middle panel we added the document thumbnail, which is created automatically during indexing on the server.
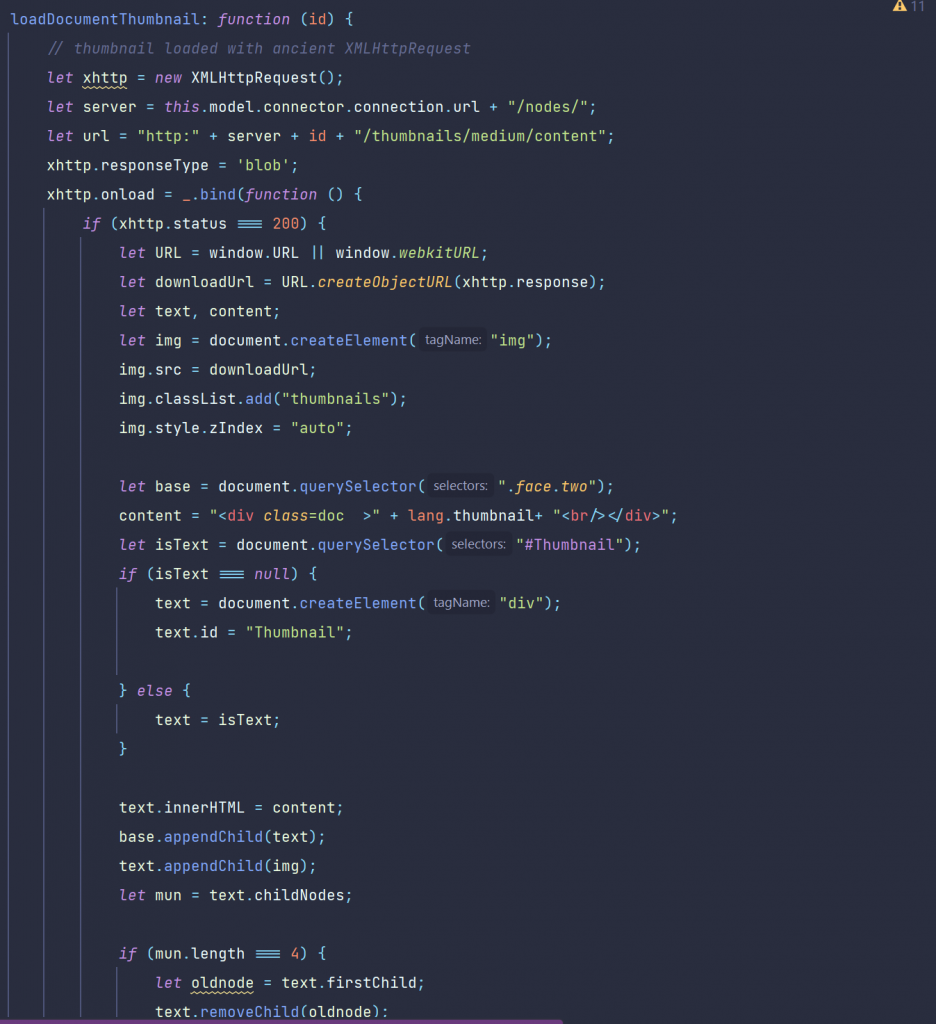
Thumbnail

We must enter the nodeid in the REST command /thumbnails/medium/content to get the medium resolution version of the thumbnail.

To show the diffence to the fetch comand, the old archaic XMLHttpRequest was used.

The receiving image is put into a div with the id “Thumbnail”.
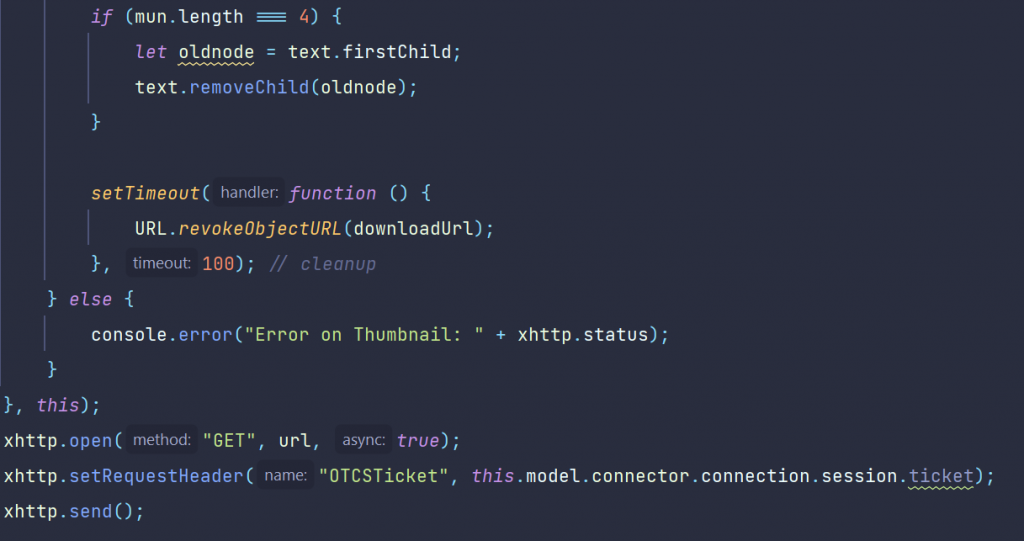
Image Correction

In the case the user selects another document the old thumbnail would remain. So we remove the old image element.

Almost done, we need to put our otcsticket in the request header and to send the request to the server.

loadNodeData

In this function, we use exactly one REST call to get all data at once. This is done by the function /forms/update?id=xx whick will deliver all data for that nodeid at once. Expecially the categories take a while, so a css-fog was used to cloak the image of the approaching grid until the data was received (revisit the video). Then the css fog is cleared and trhe categories are displayed.

The call is also done with the old XMLHttpRequest to show the diffences to the modern fetch command.

Local functions were used instead of those in “this” to keep the scope clean.
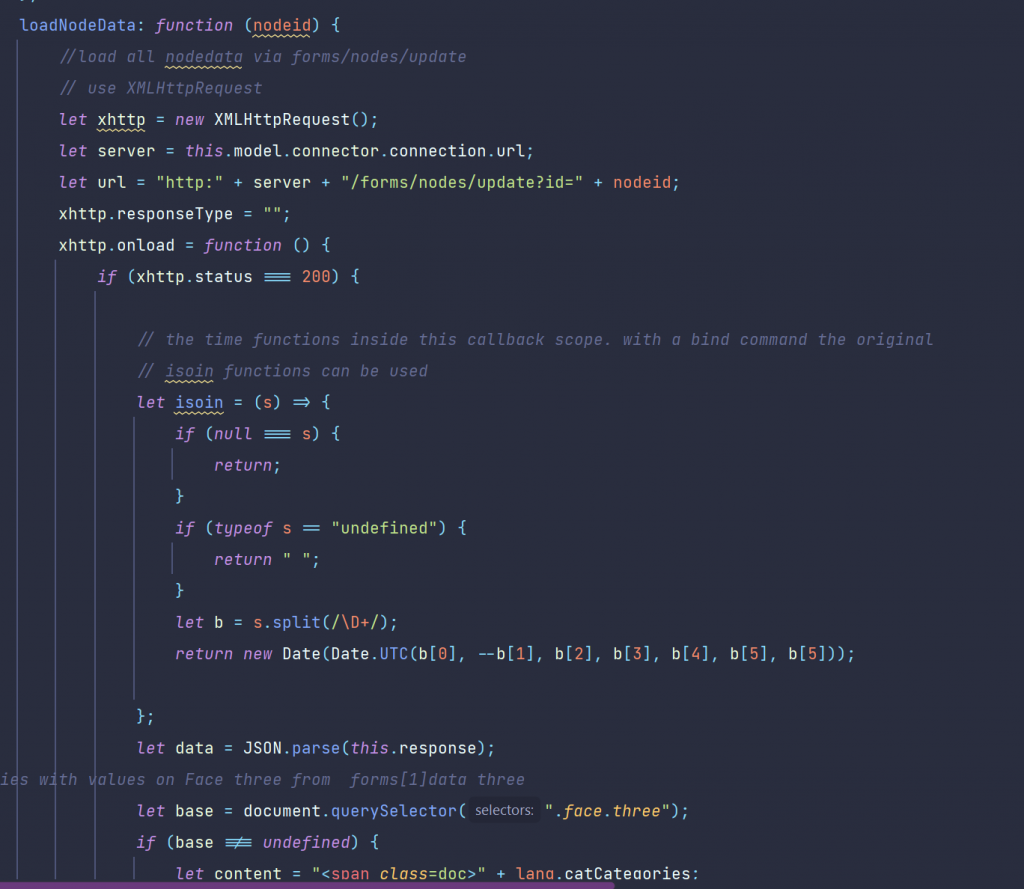
forms/update

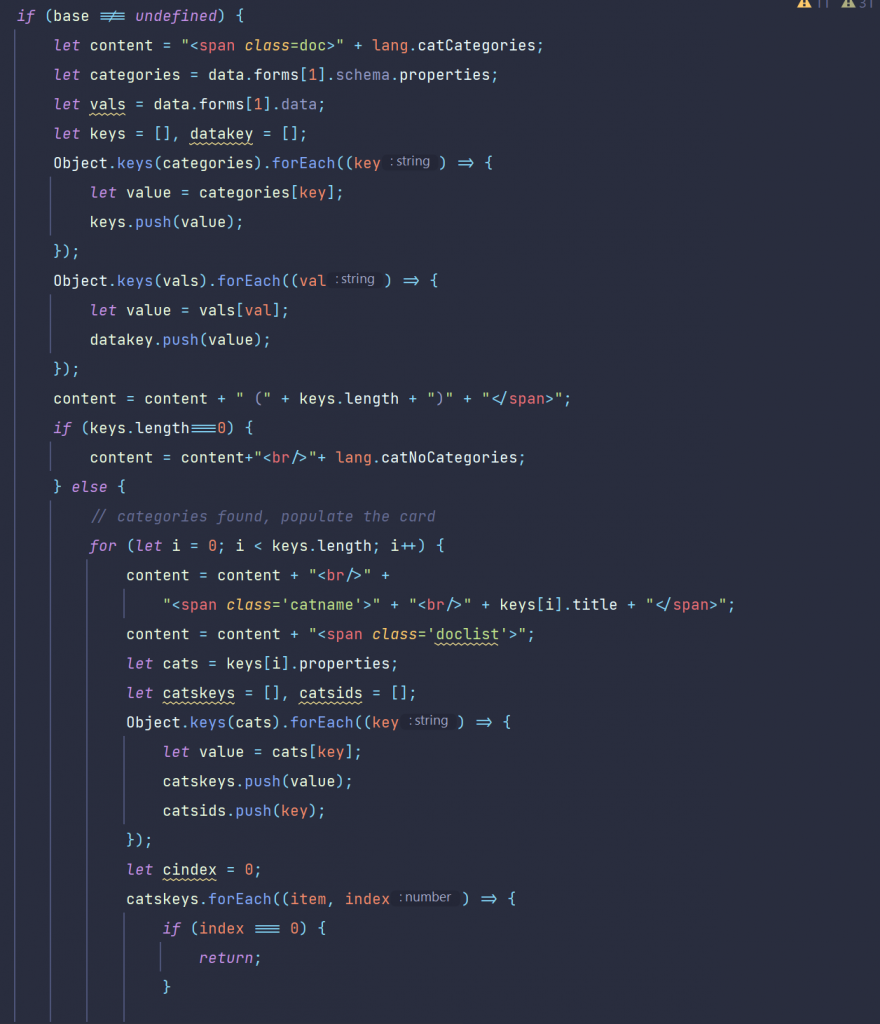
The categories and the attributes

Categories

Categories were returned in an object with their category name a title in the entry. To get the attributes we have to do a little bit more.
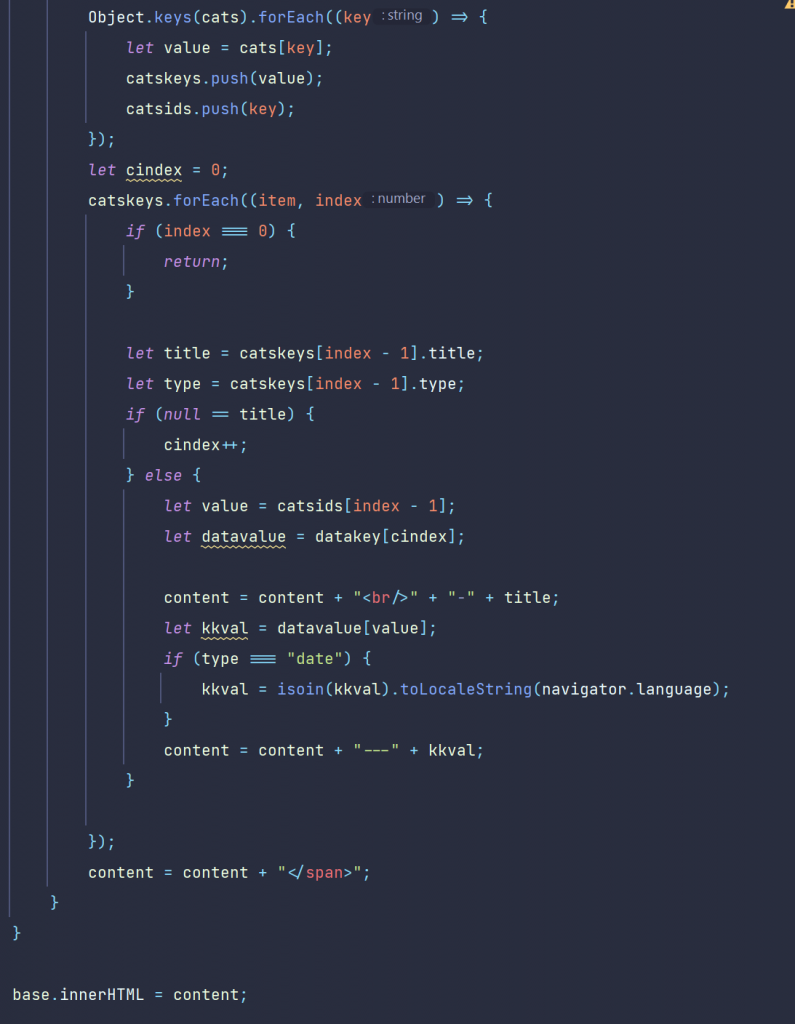
Attributes

We split the result into several arrays to extract the values. If we have “date” in the type field, we have to use our date translation also on that to display the dates correct.

Security Clearances

All security related data is on the fouth face, the one on the lower left.
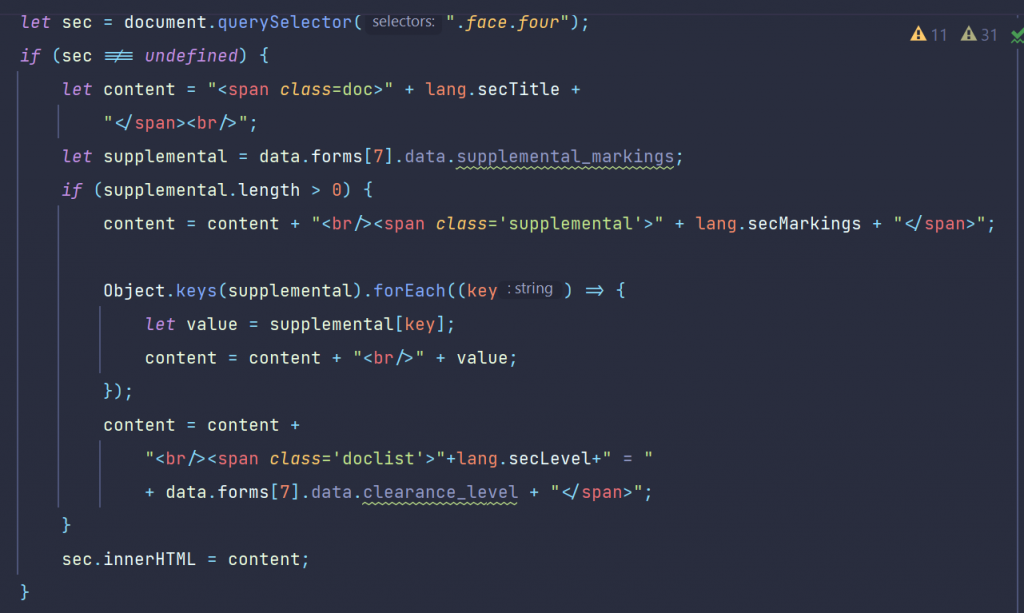
Security Clearances

Here, all security levels and markings were displayed inside a span.

Records Management Data

here we extract and fill the data on the lower middle panel.
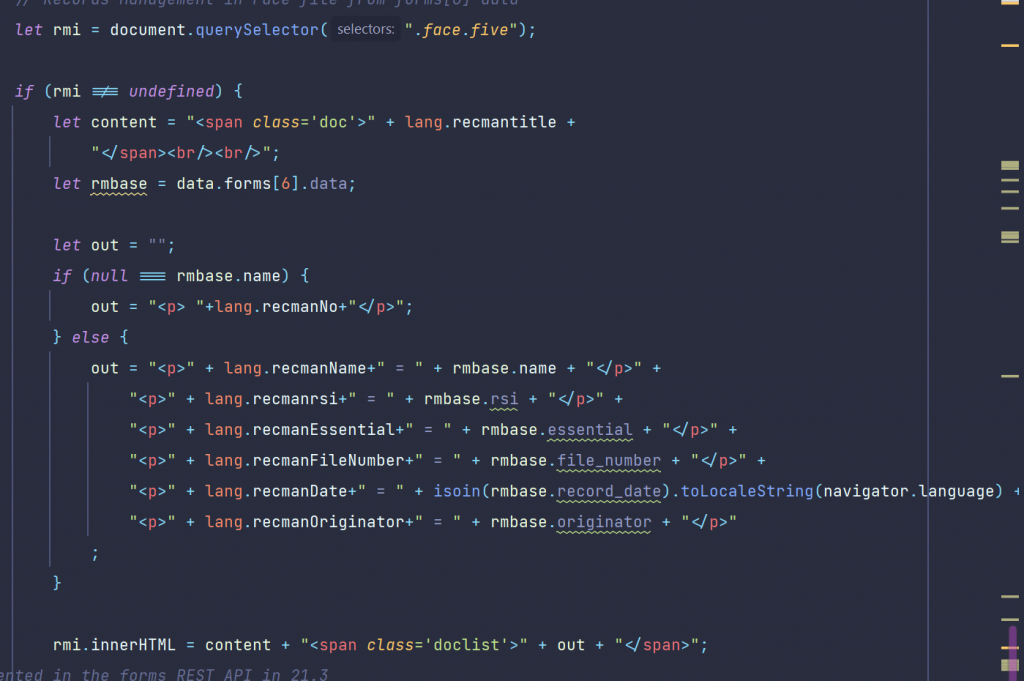
Records Management

The Versions Data

Here, the REST commend has a problem. Versions are not included in the answer of the REST command, at least in the Content Server versions 21.3 and 21.4. So let’s ionform the user on this fact and display a local language string of this fact.

Tip: Maybe there will be a patch to fix this in the near future.
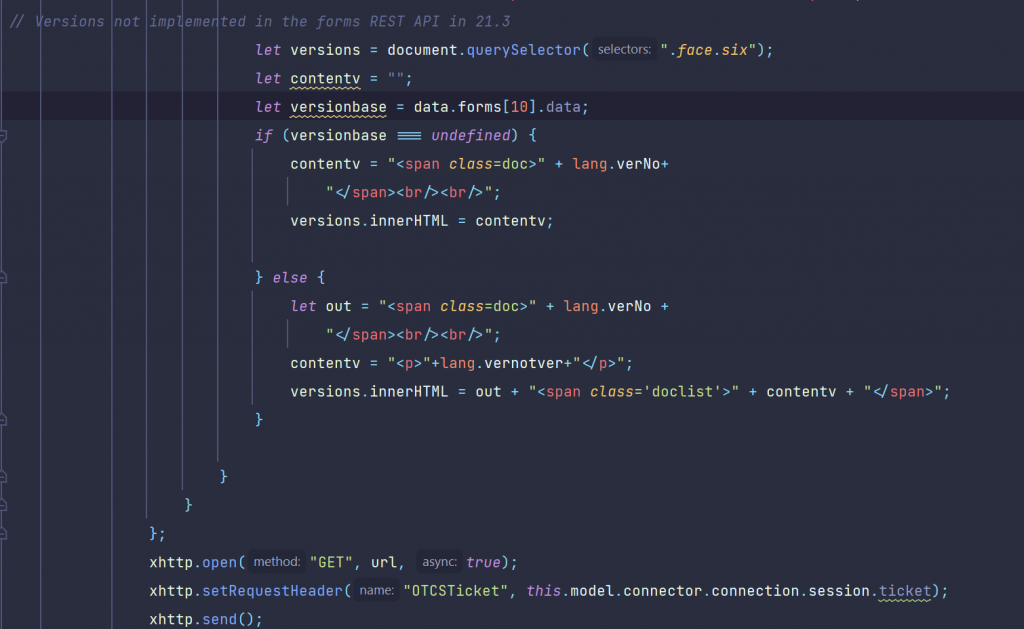
Versions Data

So we had all parts discussed.

We offer a one day remote training to understand the javascript code. If you are already a sophisticated Javascript Developer, you can get the free Sources also from https://github.com/ReinerMerz/reinerdemo (a public repository on Github).

Warning: This is only the sourcetree of the project, so you have to insert this in your own project file.

The data returned from the formsupdate?id=nn REST command

The whole data structure is send back in response to a forms/update?id=nnn REST call. Some of these entries take quite a while, so try using some css to cache this.
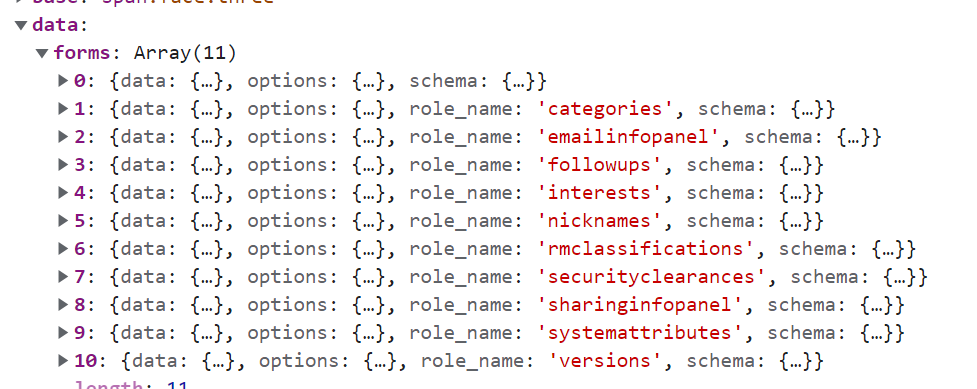
Forms Rest command

Have fun on discovering the endless possibilities of Dashboards and other Contentserver smartUI extensions using javascript6 and css3.

The sky is the limit.

Rethinking smartUI

Rethinking smartUI

Yesterday I published a new video on Rethinking smartUI on Youtube. If you havnt seen yet, here is the short video. In this posts, we’ll go though the technical aspects of this new kind of approach to smartUI. This demo is a Document Pad (or short DocPad), displaying all document properties in a SCIFI GUI arrangement.

This is Part 1 of a multipart post covering all aspects of this Docpad.

The post parts until now

Part 4-A The Javascript Part 1

Part 3 The Infrastructure and the CSS

Part 2 The HTML

Part 1 Overview

Part 1: Overview

This demo is supposed to do this:

  • Demonstrate the usage of html5, javascript 6 and css3. Especially how to use this modern components inside the smartUI framework. For example, the famous parse function in the standard demo widget will change this way:

js5
parse: function (response) {
// All attributes are placed below the data key
return response.data;
}

js6
parse: (response) => response.data

  • Compare the methods of getting data via REST using the methods
    • Model (as usual in Backbone)
    • XMLHttpRequest (the good old XMLHttpRequest as used since long)
    • Fetch (the modern javascript 6 method to get REST data)
    • Not used: async/await. Despite the fact that async/await is very handy, this appeared in javascript 8 and is beyond the scope of the demo.
  • Exploit the power of css by using
    • different display methods as Grid and Table
    • use panels in a cube. Origionally this was planned as moveable 3D cube. In this case, all metadata were written on the sides of the cube. Here is a very good technical description how to do it. Unfortunately the cube idea seems to be very impractical for the demo and was dropped
    • “burning borders”, fog and animations as element of the UI
    • provide an additional print style sheet to make this screen infos printeable in a normal way
  • Except some Icons of Bootstrap, nothing is to be used from Bootstrap. These Icons can be replaced by those in the fontawesome font
  • JQuery is not used
  • These Content Server REST commands are used
    • The log in is done in the index.html page, but when used as a dashboard widget the user is already logged in. If a separate login panel is required (p.ex. for a stand aloane dashboard on a tablet) then its necessary to provide a login via post […]/v1/auth
    • then the user info is retrieved via get […]/v1/auth
    • if the user has stored a photo in his profile, then the photo is retrieved by get […][photo-url] and then inserted in the DOM.
    • Then the standard Node-Picker Control is called. All Node-Picker interactions with the server are managed by this control. As a result, the nodeid of the selected Document is returned.
    • Next, the DAPINode infos of the selected node are retrieved by get […]/v1/nodes/{id}
    • for the “created_by” and “modified_by” there is only a nujmber returned, the userid. For this two cases, the username is retrieved from the server by get […]/v1/members
    • Its always nice to exploit the thumbnail of the document to the user. This is done by get […]/nodes/{id}/thumbnails/medium/content
    • To get all other data , a special trick is used. The command get […]/v1/forms/nodes/update returns all categories and the othere nodeinfos using one REST call. This commmand takes a while to execute, so the user is entertained using some css animations.

In the next week, we explore the infrastructure of this Docpad demo.

smartUI in practice: SMART TOOLS(4) –Direct Access of Renditions – Technical

smart tools
Cell Renderer

Overview

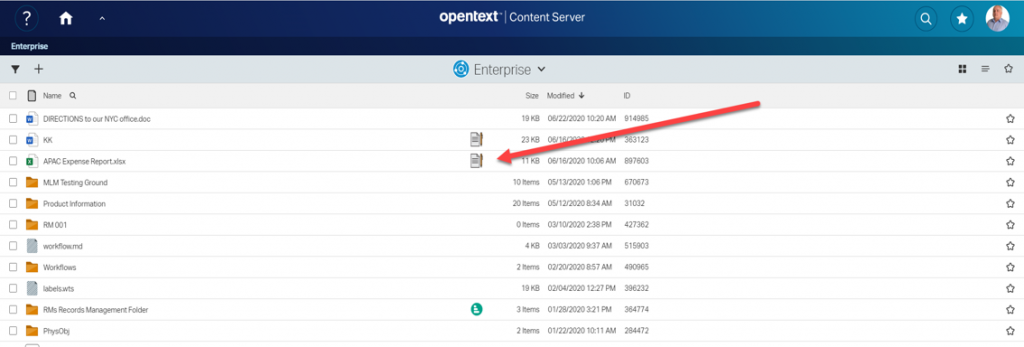
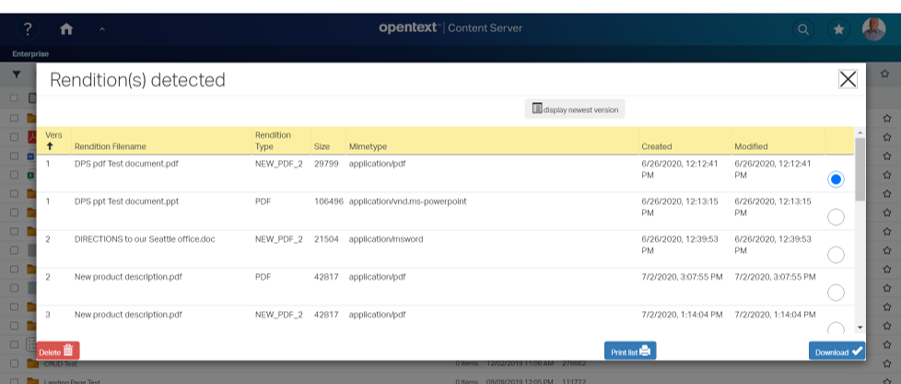
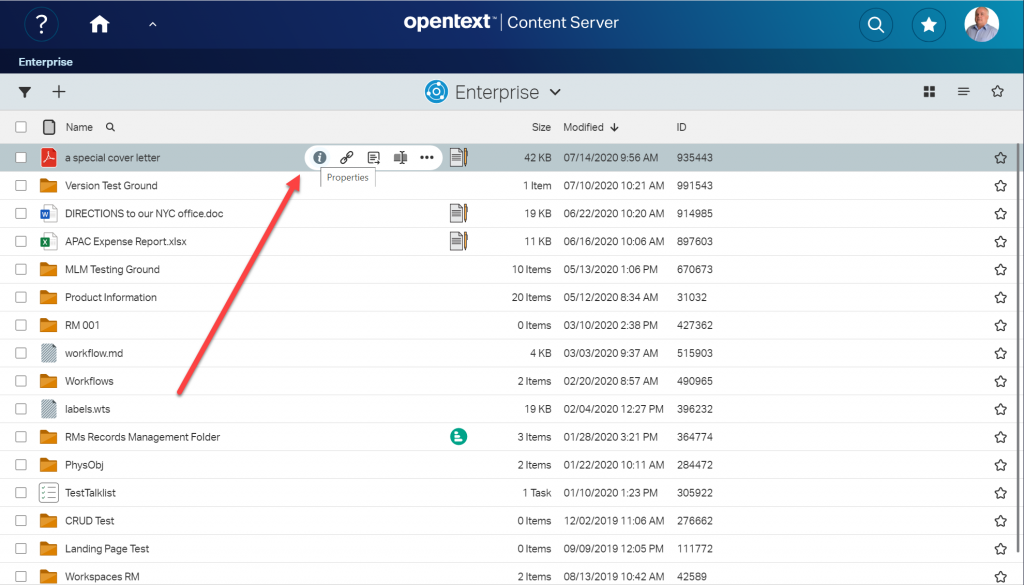
Last week, we discussed a possible implementation of the direct access to renditions. This icon is drawn an a document, which das renditions at the newest version. Clicking on that icon opens a panel which lets the user select one of the renditions to download or delete.

Direct Access Rendition

Selecting one of the renditions will download this rendition or (if permissions allow it)( delete the rendition.

Technical

The whole thing is based on a cell renderer. This relies on the extension point node.state.icons which is (as always) declared in the extensions.json file:

"csui/controls/table/cells/node.state/node.state.icons": {
"extensions": {
    "csuia": [
       "csuia/cells/node.state/node.rendition/node.state.icons"
             ]
      }
},

This declaration points direct to the appropriate node.state.icons

define(['csuia/cells/node.state/node.rendition/rendition.view'
],
function (RenditionView) {
'use strict';
return [ { sequence: 60, iconView: RenditionView } ]; });

This basically declares the required view named “rendition.view.js” as responsible to draw the icon at sequence position 60.

This is the template used for the view.

Cell renderer Template

The image is drawn cia the css seen above.

Encapsulating this inside a link allows to make the svg clickable.

Enable the direct access

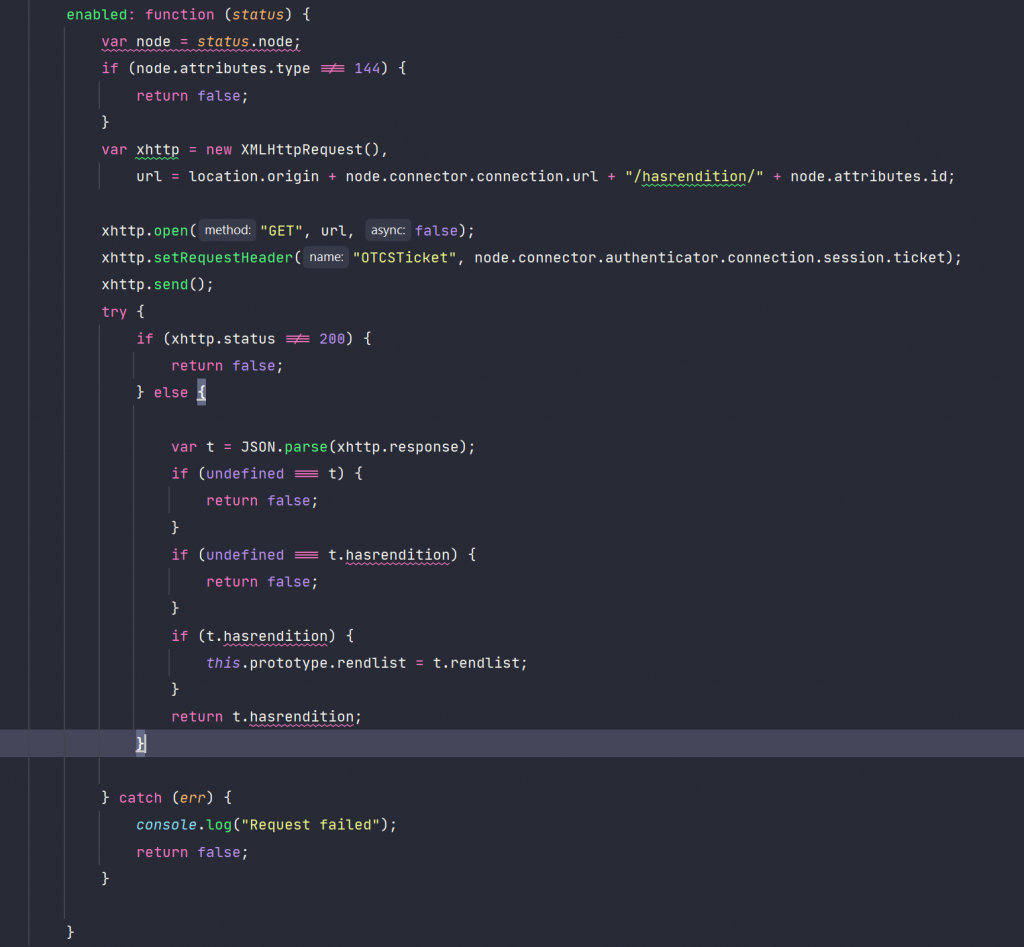
The first point is the decision, if the cell renderer is to be drawn or not. This is a static method at the view, returning true or false. We dont have ony clue if the nodeid does have a rendition at the newest version, so we have to implement a new REST command at the server to get the information. The REST must be called synchronously.

the static enable function

This is done via a simple XMLHTTPRequest. If the result is true, we return true and store the number of each rendition types at the node in the prototype for further processing.

Then lets take a look on the events:

events

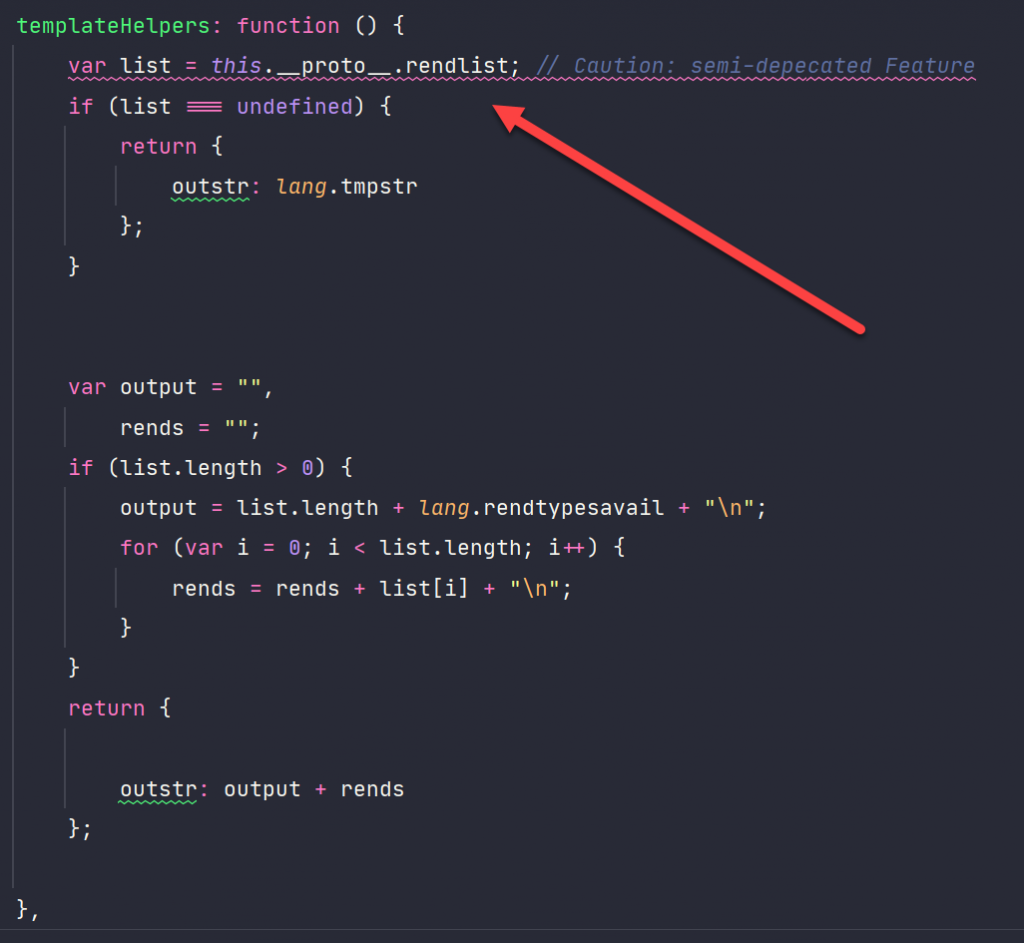
This means, a click on the class of our link in the template will call onOpenView. Before we look at that, look at this in the templateHelpers:

Open the Panel after the click

Remember, we got the number of each rendition types from the server? We want tzo display these numbers as a tooltip over the icon, so this is the way to formet the output string. A note to the knights of the holy JS-grail: Referencing this.__proto__ instead of finding the prototype via object maybe depreciated, but at least its also in ECMA 6! So nowadays its a valid method.

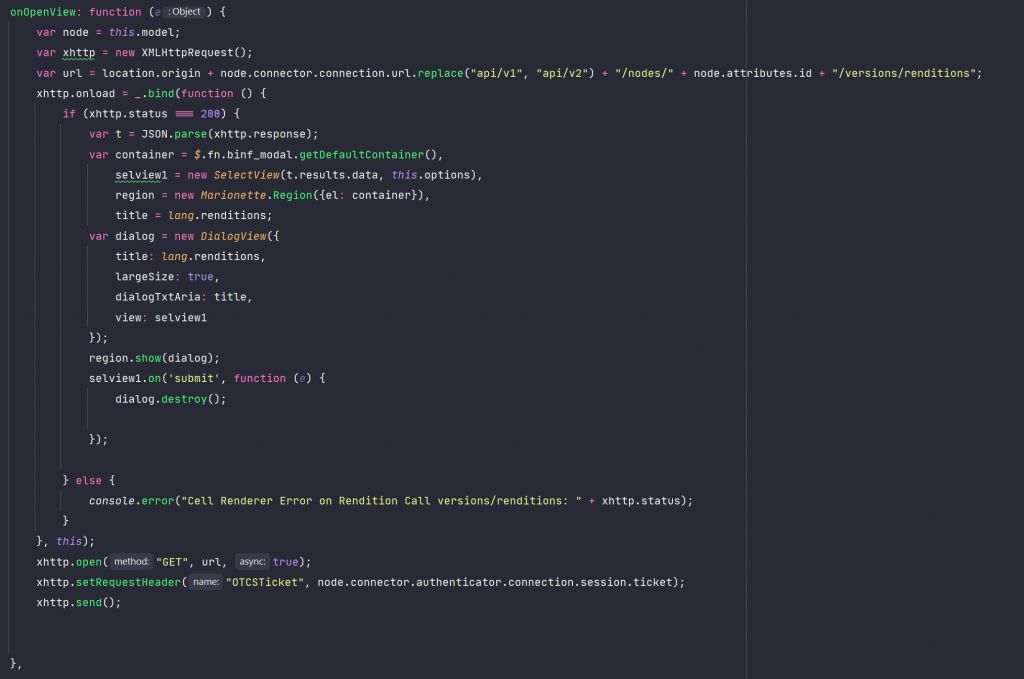
When we click on the icon, we want to open a DialogView from the sdk toolkit with an embedded view (SelectView) in the method onOpenView:

OpenDialog

Before we open this view, we call the server to get the renditionlist of this node via XMLHTTPRequest. If we get the list (status=200) we intiantiate the view (selview1) and display the DialogView containing the instantiated view at the bin_modal default EL anchor.

Then lets show this region and store a event handler (string “submit”), which is listening on the view selview1 for that string. If it receives that string, the DialogView is closed.

Next week, we’ll examine the SelectView.

Missed something in the Posts? Here are the parts already posted:

smartUI in practice: SMART TOOLS(3) – Renditions

smart UI in practice: SMART TOOLS(2) – Multilingual Metadata

smart UI in practice: SMART TOOLS(1) – the beginning

smart UI in practice: SMART TOOLS(1) – the beginning

smart tools

Using OpenText Content Server as as developer, you have to face it sooner or later: Write an application in smartUI. This will give you a lot of experience for smartUI projects, especially on the Cost/Times/Materials base.

I did chose to build a product called SMART TOOLS with Renditions and Multilingual Metadata Support. Product means, it can be sold by other OT partners as well.

This is a multipart post. Today we talk about the basics of the application running in Content Server 20.2. Additional posts will explain the usage and some technical aspects

Features

SMART TOOLS includes these features:

  • Adds support for Multilingual Metadata to smartUI
    • Automatic Translations for the multilingual data using Microsoft Azure REST service (as nobody speaks all languages on this planet)
    • Add print lists (to get a list of the data entered for editing)
    • Add/edit mlm data directly
    • Integrated in the standard nodelist widget using the property manager
  • Adds support for Renditions
    • List all Versions and Renditions
    • Use “view as webpage” as a base viewer
    • Download renditions
    • Delete renditions
    • Replace renditions
    • Add Renditon as command
    • A cell icon marks all documents in the document list having renditions at the newest version. Clicking on the icon will open a window to show all renditions. Download or delete a rendition.
  • Adds configuration support for the javascript client software from the Admin pages. Critical things like MS Rest API key can be protected by sending this things at the page creation time to the client.

The SMART Tools are build for Content Server 20.2. A a considerable amount of new REST services also to be implemented in the Content Server.

The Integration

Integration is simply direct in the nodelist widget using the property manager.

Open the property manager

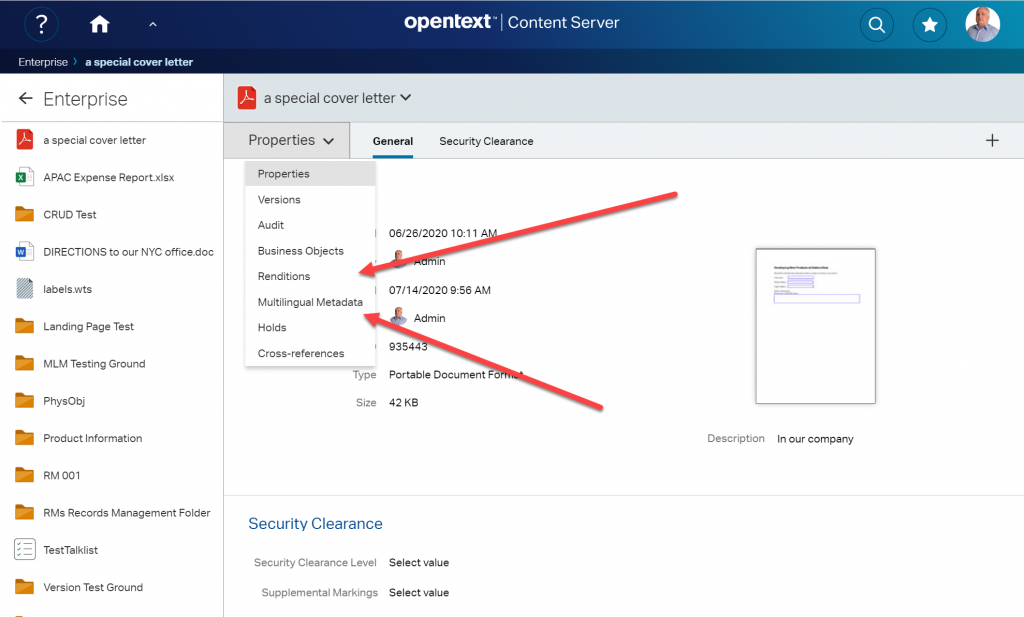
By clicking in the first icon in the list, the property manager opens.

Renditions and Multilingual Metadata

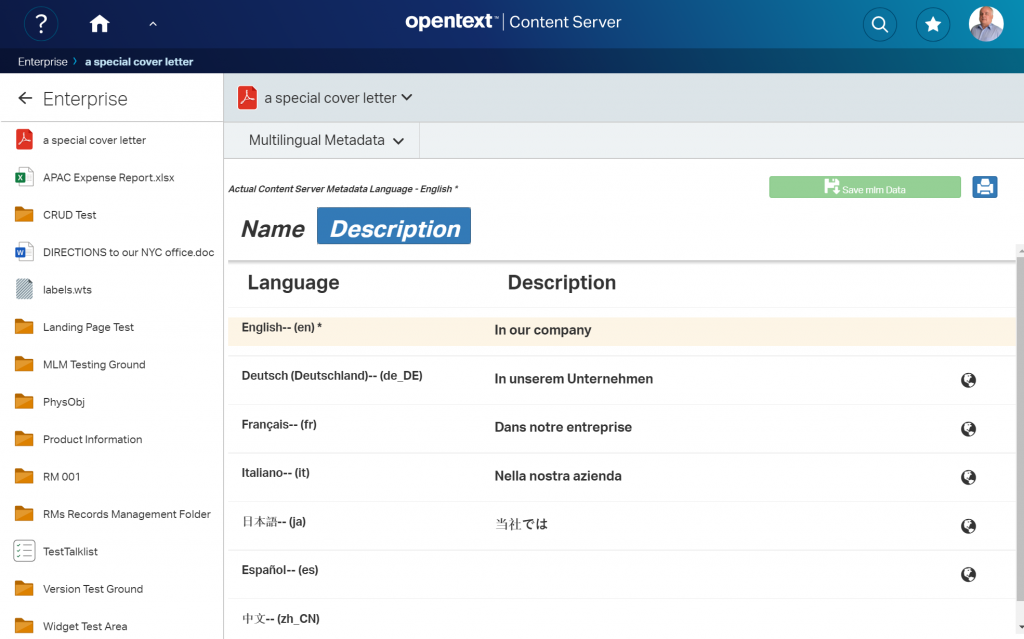
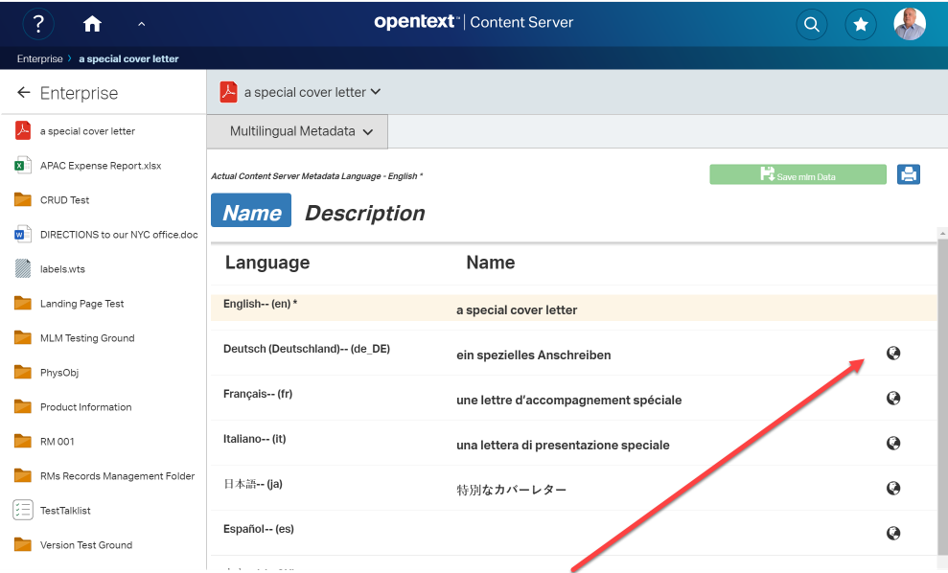
The panels adressed by this menu are the multilingual metadata panel (with the two fields Name and Description) and the rendition panel. Here you see the mlm panel with the autotranslate Icon (the globe at the right).

mlm main panel

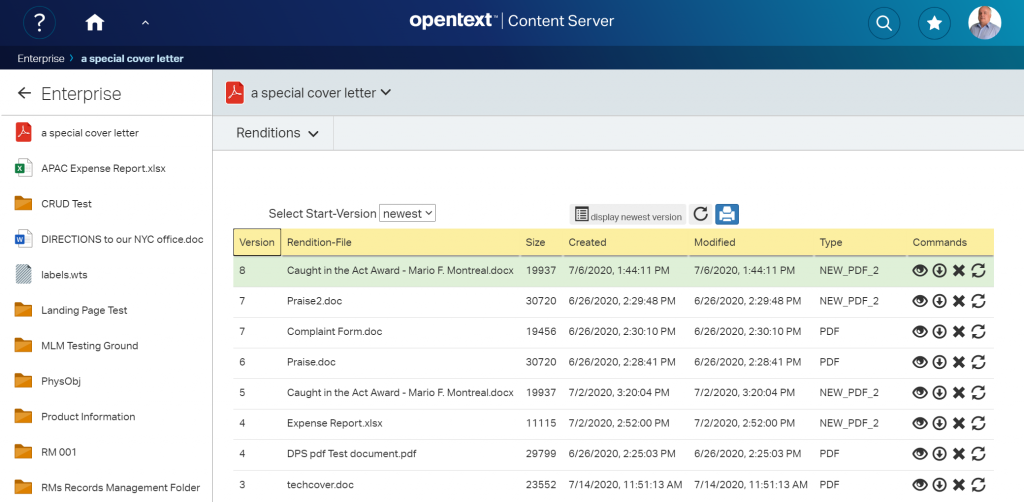
This is the rendition panel which shows all renditions attached to all versions.

Renditions main panel

Language support

The SMART TOOLS support a couple of UI languages like

  • English
  • German
  • French
  • Spanish
  • Italian

This is one example on the multilingual metadata dialog using German, French and English.

The nls feature of smartUI is nice, isn’t it? I even tried it (experimental) for Arabic, and it worked!

Lets go more in detail in the next posts, as this here is intended to be a simple overview.

Next week I will describe the multilingual metadata support of smartUI

Practical Series II: Building an EVENT Management System in the Content Server using a graphical smartUI Dashboard and Connected Workspaces.

3-5 days, depending on the skills of the attendees.

Here, an EVENT Management system in the Content Server is built from the scratch. Events can be anything, from a Music Concert to Keysessions or anything else. To manage Events, all necessary Notes, Documents, Feedbacks can be stored in the Content Server.

Each event is mapped to a Business Workspace and has several folders to hold all documentation and feedback. Events can be related to other events. Each Event is containing Documents according to the template and has a Team of Coworkers. We also implement a Dashboard to see all Events in smartUI. If an Event is clicked in the Dashboard then the corresponding Connected WorkSpace Business Object is opened. Both parts, the Dashboard and the Business Workspace correspond via REST Service, which is also to be implemented during this workshop.

Uses the Content Server 16.2.10, the smartUI SDK and the D3 library, which is part of the smartUi SDK.

New: We are offering custom widget development. Interested? Send an e-mail to merz at ebit-company.de stating the purpose of the widget and requesting a qoute

Technical Training “How to program a Widget in the new Content Server GUI” with the CSUI SDK

Hi folks

Beeing Content Server Trainer, I was asked to provide a training “How to program a Widget for the new Content Server GUI” to several customers. This is about the content of such a training and the reason why such a training is technically really advanced.

CSUI SDK introduces a shift in paradigma, the server is no longer providing the GUI, all is done by a Javascript Application at the client side.

Basic Training (newest version 1.005 from Feb/2018)

The basic training is very compact and lasts 5 days.

First, lets take a look on the components:

As a prerequisite, a firm knowledge of CSIDE, How to build a module, the Node Structure and whats to do with Content server Nodes is necessary.

At the end of the training, you’ll have a working knowledge of:

  1. Content Server Perspectives. What are they and how you can use them to provide a user specific interface.
  2. Content Server REST. This is the only possibility for the client to communicate with the server, so its mandantory to know the REST interface from the application point of vue. And, as REST can be very slow due to unneccesary data, its also mandantory to know, how to add REST services to the Content Server to get the data you want in the fastest way.
  3. Javascript. There are Javascript Patterns, which are used heavily in the SDK. If “Javascript Object Inheritance”, “Currying/Schoenfinkelizing”, “Decorators” etc are weird words for you, this chapter is the right chapter for you.
  4. Next is the infrastructural world of the sdk.

    CSUI Components
    The CSUI Components

    There are several components, which must be understood prior to build a Widget.

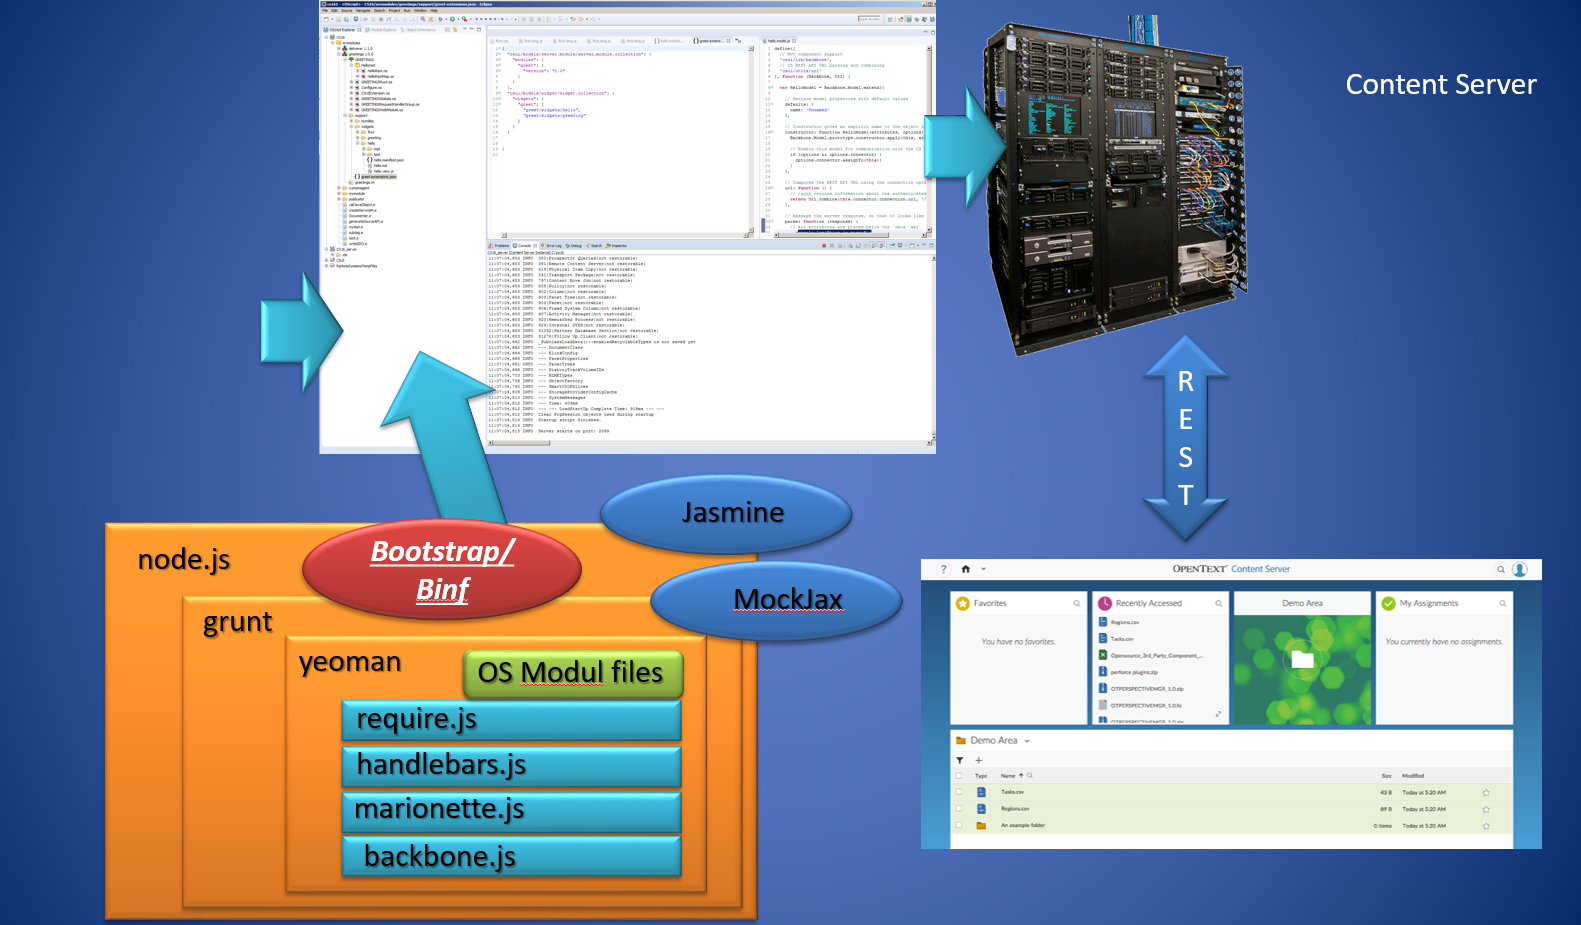
    1. node.js is the base Javascript system for our development
    2. grunt.js is a Javascript task runner, which we use to build, test and debug our widget
    3. yeoman is a scaffolding system, which will be used by a Opentext extension to initialize the development folder. It also creates the skeleton of a Content Server module, which is used as a “Carrier” for our Widget(s)
    4. backbone.js is the base framework to be used
    5. marionette.js is an extension to backbone.js, making Views easier.
    6. handlebars.js is the html templating framework used in the sdk
    7. require.js is the javascript module loader to be used
    8. bootstrap.js/binf.js is originally the public domain CSS/JS framework from Twitter for the appearance of the Widget. Binf is the Opentext variant, allowing to override CSS without negative effects
  5. Next is the SDK itself. Due to time restrictions, in the base training are only the base functions, the advanced training covers the other aspects. It contains
    1. Installing the SDK
    2. Building the Demo Widget
    3. CSS Style Overrides binf
    4. General Overview of the SDK
    5. Content of the SDK
    6. Routing (Preview of the Advanced Training)
    7. New Commands
    8. Custom Columns
    9. Metadata
    10. Define a new NodeType
    11. Create a Widget
    12. Base Widgets
    13. Controls
    14. Models
  6. Mockup and Test Data. How to setup mockup REST data. How to build test facilities in the SDK
  7. Anatomy of the Hello Widget. A walktrough through this widget
  8. Anatomy of the MyAssignment Widget
  9. Add another Widget to the Content Server. Change the Hello Widget and add additional fields
  10. Build a Custom Widget to be used as Client with a custom REST service. Here, a custom widget is build, which uses an extended version of the custom REST service from Part 2.
  11. If time allows: Some Tips and Tricks from a “Work-in-Progress” Widget


Advanced Training (Version 1.005 Feb/2018)

OK, thats the basic training. There are a lot of additional things inside the SDK, but to understand these, there must be a couple of weeks with practical experience in between. The advanced part has beed remodelled to include a couple of interesting things.  The advanced part contains:

  1. Chapter 1 Extended SDK Parts
    1. Additional Widgets
      1. NodesListReportView
      2. TilereportView
      3. FilteredCountChartView
      4. Carousel Widget View
      5. Userwidget eSocial
      6. ActivityFeedWidgetView
      7. ActivityFeedContent
      8. ChatWidget
    2. Datepicker
    3. switch
    4. Workflow (new in Content Server 16.2)
      1. Workflow Components
      2. Workflow in smartUI
      3. Starting Workflows
      4. URL Routes
      5. Workitem Actions
      6. Workitem Extension
      7. Writing Workflow Extensions
    5. New REST API Support (16.2) for Workflows
    6. Widgets not part of the SDK
      1. Mobile Scanning
      2. xECM: Header Widget with Business Object Infos
      3. xECM: Snapshot of current document Attachments
      4. xECM: Dossier View Widget
      5. Engineering Doc Management: Search
      6. xECM: Office365 Groups
  2. Chapter 2 Extended SDK Features
    1. Build Language Packs for Internationalization
    2. Commands
      1. Implementation and Inheritance from “CommandModel”
      2. Best Practices
      3. Using Commands
    3. Custom URL Router. Routing, adding custom Routers. Using Routers as Navigation.
    4. Behaviours. What are Behaviours?
      1. DefaultActionBehaviour
      2. BlockingBehaviour
      3. ExpandingBehaviour
      4. InfiniteScrollingBehaviour
      5. PerfectScrollingBehaviour
      6. PageLeavingBehaviour
    5. Mixins. What are Mixins? All available Mixins.
    6. Browsable Support for Collections. Using the “Browsable” support for Model-Collections.
  3. Chapter 3 Additional Things to consider
    1. Tips and Tricks (Work in Progress- List can change)
      1. Add a OTDS Ticket already in the browser to the connection object
      2. Re-using a OTDS Ticket as LLCookie
      3. Checking the paths in the test/index.html
      4. Using Helpers for supporting a select box with Handlebars
      5. Adding non CSUI supported JQuery functions in a view
    2. Handlebars advanced. A deeper look into Handlebars
    3. LESS advanced. A deepter look into LESS, the CSS language used in Bootstrap
    4. Accessibility in Bootstrap. What can be done to add support for screenreades etc to Bootstrap/Binf? Whats to avoid? Which tools are available
    5. Best Practices in Development


As you can see, there is a lot of stuff. The basic training last 5 days, the advanced training 2. But on the other side, you’ll get happy users with your new Widgets.

And that’s all what counts.

References

Javascript
  • “JavaScript Application Design “as a general introduction (covering Grunt) https://www.manning.com/books/javascript-application-design
  • Stoyanow’s JavaScript patterns http://shop.oreilly.com/product/9780596806767.do
  • Flanagan’s “JavaScript: The Definitive Guide” http://shop.oreilly.com/product/9780596805531.do
  • Crockfords “Javascript The good Parts” http://shop.oreilly.com/product/9780596517748.do
  • Flanagans “JavaScript Pocket Reference” http://shop.oreilly.com/product/0636920011460.do
Bootstrap
  • Spurlock: Bootstrap Responsive Web Development http://shop.oreilly.com/product/0636920027867.do
  • Syed Fazle Rahman: Jump Start Bootstrap: Get Up to Speed With Bootstrap in a Weekend https://www.amazon.com/gp/product/0992279437
  • Alan Forbes: The Joy of Bootstrap: A smarter way to learn the world’s most popular web framework https://www.amazon.com/gp/product/1522792813/
Require.JS
  • Greg Franko: Instant Dependency Management with RequireJS How-to https://www.amazon.com/Instant-Dependency-Management-RequireJS-How/dp/1782169067
  • David Sulc: Structuring Backbone Code with RequireJS and Marionette Modules
    https://leanpub.com/structuring-backbone-with-requirejs-and-marionette
Backbone
  • Developing Backbone.js Applications Adnan Osmani http://shop.oreilly.com/product/0636920025344.do
  • js Patterns and Best Practices Swarnendu De https://www.amazon.com/Backbone-js-Patterns-Best-Practices-Swarnendu/dp/1783283572
  • js Cookbook Vadim Mirgorod http://shop.oreilly.com/product/9781782162728.do
  • js Blueprints Andrew Burgess http://shop.oreilly.com/product/9781783286997.do


Backbone-Marionette
  • Getting Started with Backbone Marionette Raymundo Armendariz, Arturo Soto
    https://www.packtpub.com/web-development/getting-started-backbone-marionette
  • Marionette.js: A Gentle Introduction David Sulc https://leanpub.com/marionette-gentle-introduction
  • Marionette.js: A Serious Progression David Sulc https://leanpub.com/marionette-serious-progression
Mockjax and Jasmine
  • js Cookbook Vadim Mirgorod https://www.packtpub.com/mapt/book/web_development/9781782162728 Chapter 8
  • KnockoutJS Essentials Jorge Ferrando
    https://www.packtpub.com/application-development/knockoutjs-essentials
  • JavaScript Testing with Jasmine Eva Hahn https://www.safaribooksonline.com/library/view/javascript-testing-with/9781449356729/


Content Server Trainings
  • 4-0140 Content Server IDE (CSIDE) Fundamentals
  • 971-301 Livelink ECM Enterprise Server Workflow Customization Fundamentals
  • 03-0117/8 Webreports Design


Setting Node ACLs via Web Services API

One of the nicest things in the content server area is, you can set Access Control Lists not only for the owner or the default group of a node, and you can add or revoke rights to the node for virtually all users and groups defined in the content server.

Here, we want do discuss how to do this using Content Server Web services. First, let’s see how ACLs are organized. A simple object would display something like this:

The ACLs for this object

On the left hand side, you see the default access, there is always one Owner, one default group and a public group.

If you want to assign further access, you can select a user or a group by clicking on the bottom at the lower left hand side. This will select a user or a group. (Btw: It’s recommended to use groups instead of users)

On the right hand side, there are the ACLs for the selected user/group on the object. Here, we used the Administrator, therefore all rights are switched on.

Ok, how to use this on a c# client?

First, the ACLs for a given user are called NodePermissions. Use them like this. Let’s say, this is utils.setNodeRights(….)

/// <summary>
 /// Creates a Noderight Structure and returns it
 /// </summary>
 /// <param name="rights">"all" or see (see,seecontents)</param>
 /// <param name="id">the member ID for this node rights</param>
 /// <param name="type">Owner, Ownergroup, Public or ACL </param>
 /// <returns></returns>
 public DocumentManagement.NodeRight setNodeRights(string rights, long id, string type )
 {
 DocumentManagement.NodePermissions newPerm = new DocumentManagement.NodePermissions();

newPerm.SeeContentsPermission = true;
 newPerm.SeePermission = true;
 if (rights.Equals("all"))
 {
 newPerm.AddItemsPermission = true;
 newPerm.DeletePermission = true;
 newPerm.DeleteVersionsPermission = true;
 newPerm.EditAttributesPermission = true;
 newPerm.EditPermissionsPermission = true;
 newPerm.ModifyPermission = true;
 newPerm.ReservePermission = true;
 }
 DocumentManagement.NodeRight newRight = new DocumentManagement.NodeRight();
 newRight.Permissions = newPerm;
 newRight.RightID = id;
 newRight.Type =type;
 return newRight;

}

The Nodepermissions is simply a container with the single access rights set to true or false.

When the definition is finished, the NodePermissions must be encapsulated in a structure called NodeRight. This contains the ACLs defined and the user/group for the ACL. Use the id as long integer, this is the unique identifier of a user/group in the content server. You can use MemberServices to get this number, if you know the login-name.

Then, the system wants to know, which kind this user/group is. Use ACL, if these are additional users/groups, or use something like Owner, Ownergroup or Public, if the ACLs should belong to the predefined entities.

How to use this?

First, login to the Webservices.

Second. Get the node, onto which you want to set ACLs.

Thirth. Get the node rights

 NodeRightsUtilities utils = new NodeRightsUtilities();
 DocumentManagement.NodeRights nodeRights = docclient.GetNodeRights(ref otauth, pargs.nodenumber);
 Console.WriteLine("Got Noderights ");
 
 DocumentManagement.NodeRight[] nodesrights = nodeRights.ACLRights;

Forth. Set the ACLs for the standard entities (if needed). Define a NodeRight for every entity (user/group) you want to set. Define these 2 right groups.

 // setup standard permissions for base ACL group
 DocumentManagement.NodeRight newRightstandardGroup = utils.setNodeRights("see", standardGoupID, "ACL");
 DocumentManagement.NodeRight newRightsmanagerGroup = utils.setNodeRights("all", managergroupID, "ACL");

Define a special right group

 DocumentManagement.NodeRight newOwnerright = utils.setNodeRights("all", ownerID, "Owner");
 nodeRights.OwnerRight = newOwnerright;


The nodesrights on a node can contain something or be null. First, lets check, if the thing is null.

 if (nodesrights == null)
 {
 Console.WriteLine("Nodesrights not found- no external Users/groups assigned");
 Console.WriteLine("Setting a group with rights see/seecontent");
 
 DocumentManagement.NodeRight[] allrights = new DocumentManagement.NodeRight[2];
 allrights[0] = newRightstandardGroup;
 allrights[1] = newRightsmanagerGroup;
 nodeRights.ACLRights = allrights;
 docclient.SetNodeRights(ref otauth, pargs.nodenumber, nodeRights);
 authClient.Close();
 Console.WriteLine("All Rights and Groups set --- Finish");
 return;
 }

In this case we simply define a NodeRight array with two entries containing our new RightstandardGroup and our newRightmanagerGroup.

Let’s store them into our newly created array.

Let’s store this array in our nodeRights under ACLRights. This will change our copy of our structure which we downloaded before.

Next is simply a SetNodeRights with the nodenumber and the updated nodeRights array to write our changes back to the server.

If there are already entries, you should set them like this:

// Just display the first Entry of the first assigned Users/groups
 DocumentManagement.NodeRight right = nodesrights[0];
 DocumentManagement.NodePermissions nperms = right.Permissions;
 // check, if we do habe the groups already set

int newLen = nodesrights.Length;

 // copy rights into new longer Array
 DocumentManagement.NodeRight[] allrights = new DocumentManagement.NodeRight[newLen+2];
 for ( int i = 0; i < newLen;i++ )
 {
 allrights[i] = nodesrights[i];
 }
 allrights[newLen] = newRightsmanagerGroup;
 allrights[newLen + 1] = newRightstandardGroup;
 nodeRights.ACLRights = null;
 nodeRights.ACLRights = allrights;
 docclient.SetNodeRights(ref otauth, pargs.nodenumber, nodeRights);
 Console.WriteLine("All Rights and Groups set --- Finish");
 authClient.Close();

In this case, our nodesrights come from the nodeRights.ACLRights, because there are alredy entries.

Now, let’s do the same thing like we did on a new structure. But, we don’t want to delete existing entries, lets simply add our new RightstandardGroup and our newRightmanagerGroup to the ACLRights array.

One thing, if finished, first set the nodesRights.ACLRight to null and then fill it with the new extended ACL array.

Then do a SetNodeRights with the nodenumber and the updated nodeRights array to write our changes back to the server.


Finished. Quite easy, isn’t it?


BTW: There is no equivalent to do this on the REST api at the time of this post.


Installing and activating Content Server Web Services on a Content Server Installation

If you are thinking on using Content Server Webservices (CWS´) you may wonder how to activate this on a standard Content Server Installation. Normally, right out of the box, CWS is not active or installed, although you got the license to use it in your basic license.

As Administrator, you have to do a couple of things to activate CWS.

Decide which architecture you will use.

CWS can be used inside of the Microsoft Internet Information Server or inside a Java Application Server like Tomcat. Both ways to activate will be described here.

Locate the CWS Software

Look in your install directory of the content server. There, you will find a directory named “webservices”.

Webservices Basedirectory

Here, there are three entries:

  1. dotnet contains all CWS service definitions for use inside the Microsoft IIS
  2. java contains all webapps for use inside the Tomcat application server
  3. java6 contains the same thing as in 2. but for use with java 6.
Installing CWS inside the Microsoft Internet Information Server IIS

First, let’s examine how to install CWS inside IIS. Switch to the dotnet subdirectory, then to cws (do not use les-services, this is an old version supporting legacy clients)

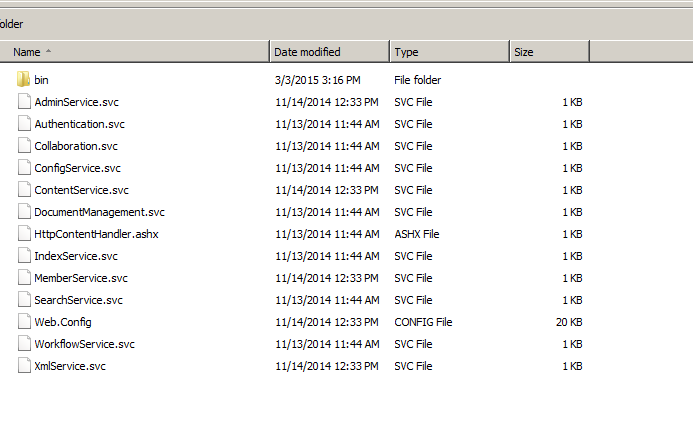
All svc files for installation

Locate the .svc files you wish to install and use in CWS.

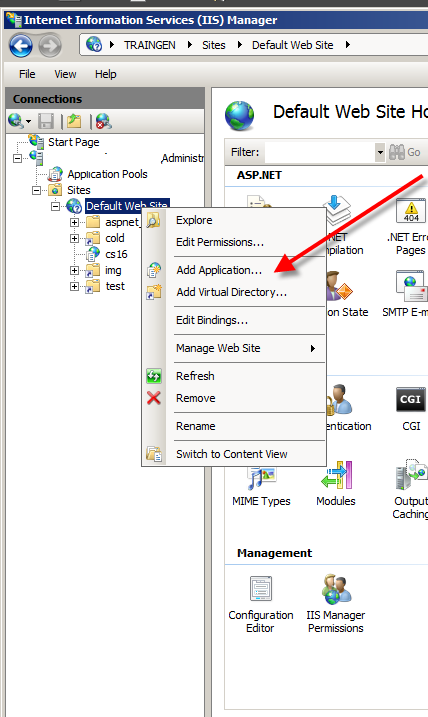
Open the IIS Manager. Create a new Application at the default web site

Create a new Application

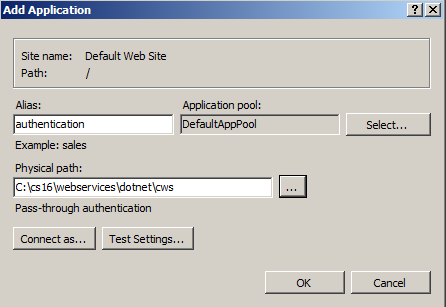
App pointing to CWS

Enter the path to the dotnet\cws directory , enter for example CWS as alias.

Remark: IIS must be configured to

  • execute .NET 2.0 apps
  • allow “Read” and “Script” rights to the new app
  • execute WCF (can be ensured for example by “%SystemRoot%\Microsoft.NET\Framework\v3.0\Windows Communication Foundation\ServiceModelReg.exe -i”  (check, if something changed, if you are using newer versions)
  • allow “Read” and “Execute” rights for the ID of the Application pool on $OTHOME/webservices/dotnet

And (don’t forget), ensure that your webservides will use the same port as your content server uses.  If you use a nonstandard port (not 2099) you need to change the port in the file $OTHOME\webservices\dotnet\cws\web.conf

If you use the standard port, there is nothing for you to do.


Installing CWS in Tomcat

Alternatively, you can use Tomcat as a base for CWS.

In this case, go to the java6 base directory in the webservices dir.

The war files

In this dir, you’ll find the war (web application archive) files, which you need to deploy.

Deploy the cws.war file either to the TOMCAT\webapps directory or use the Tomcat service manager to deploy this file.

The tomcat webapps dir

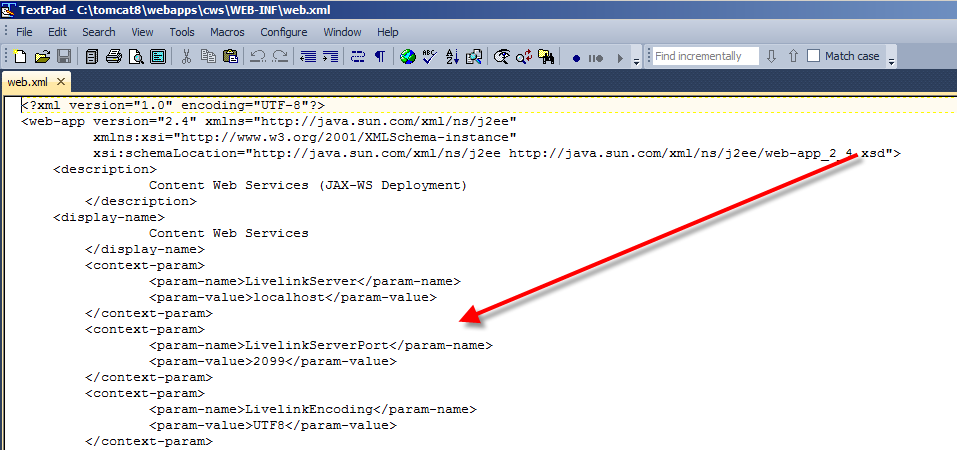
Don’t forget, if you changed your port number of your content server from 2099 to something else, change also the value in the web.xml of the unpacked cws web app.

The port in the web.xml file

If you don’t use the same port numbers, the whole system will listen to different ports and will do nothing.

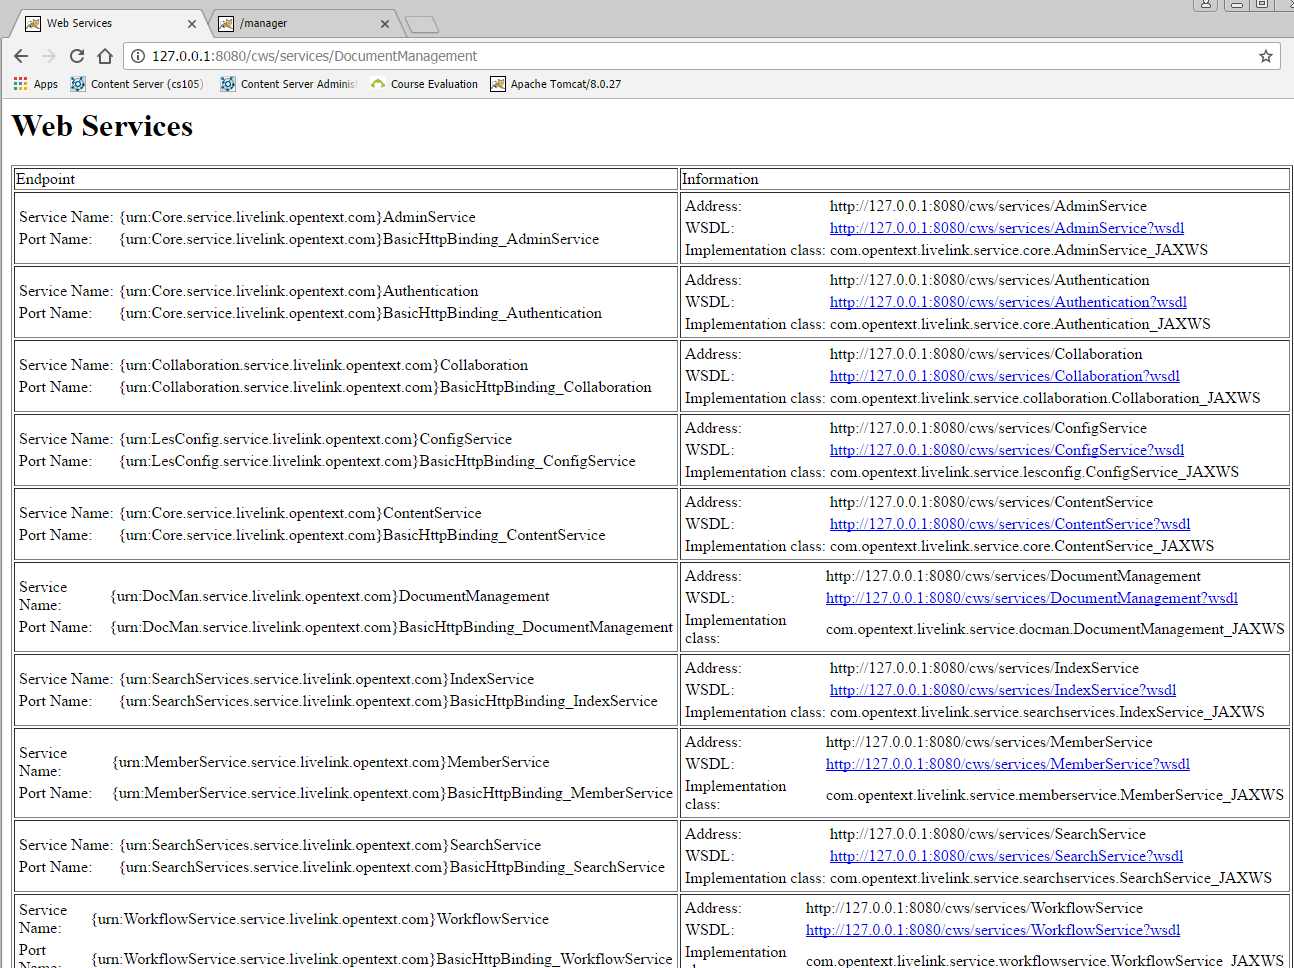
Test your installation

Your installation is correct, if a browser, pointing to

http://127.0.0.1:8080/cws/services/DocumentManagement  (Tomcat) or

http://127.0.0.1//cws/Documentmanagement.svc?wsdl (IIS) shows

DocumentManagement

Remark: The WSDL Urls reflect the infrastructure of course. You see “:8080” only with Tomcat.


And now, feel free to discover the new world of content web services.

A new SDK in Town: Content Server SmartUI SDK – First glimpse

Did you ever wonder, how to create new widgets or forms for the new SmartUI of the content server? The new SmartUI is responsive and can be used on mobile devices.

smartui

If you want to add new widgets or modify things, there is a new SDK on the knowledge center, which can be found here:

This are the components:

  • CSUI SDK Intro.pptx
    this is a powerpoint presentation on the SDK.
  • csui-doc-16.0.3.zip (1.7MB)
    this is the documentation as stand alone.
  • csui-sdk-16.0.3.zip (53.5 MB)
    this is the sdk itself. It contains a copy of the documentation.
  • csui-style-override-kit-16.0.3.zip (122 kb)
    this is a kit to provide branded css files, which will be used instead of the original ones.
  • generator-csui-extension-16.0.3.zip(51.9 MB)
    this is a generator, which will be used to setup an empty development project.


The basic requirement is the installation of node.js at your CSIDE machine.  You should be familiar with the REST API and Grunt to use the SDK.

The workflow is

  1. Generate an empty project on the harddisc
  2. Install all prerequisites in node.js (npm, grunt-cli)
  3. Modify the example according to your needs
  4. Import the module in out-module of your project into CSIDE
  5. Copy the widgets etc into your support folder
  6. Create the module in CSIDE and install it

The installed new Widget

Then you should see the example widget under the name of your module in the perspective manager.

Watch for upcoming posts on this exciting new Content Server technology.

Upload a File to Content Server using REST and Javascript

This is an example how to upload a file using JavaScript and REST.

This example uploads the file c:\test.txt with the name of “MyFile123” under the folder with the node id 485336. This snipped relies on a previous login. The subtype of the file to be uploaded is “document” (144). The authorization token is saved under the variable name of “otcsticket”.

This example does not consider any categories (mantadory or not). We’ll discuss this in a later post.

6 Steps:

  1. Declare all variables needed. This is done by defining the array bodyData. At least there must be the subtpe, the parent_id, the name and the local file name.
  2. Fire an AJAX request to the URL, where your content server is, Use “api/v1/nodes” as REST command.
  3. Put the authorization ticket in the header field
  4. Put the bodyData in the data field
  5. Set the Mime Type to “application/x-www-form-urlencoded”
  6. If the request is done, process the “success” or the “failure” clauses

Put some nice HTML around it, add the authorization code and then you are done.

(At least for this example. Normally, you should provide some name check for the node name)

function upload() {
  var bodyData = {
        type: 144,
        parent_id: 485336,
        name: "Myfile123",
        file: "c:\\test.txt"
        }
      formData = new FormData();
  formData.append( "body", JSON.stringify( bodyData ) );

  formData.append( "file", "c:\\test.txt" );
  return $.ajax( {
    type: "POST",
    url: "http://[yourserver/yourcs/cs.exe/api/v1/nodes",
    data: bodyData,
    headers: { otcsticket: otcsticket },
    beforeSend: function( xhr ) {    
    xhr.overrideMimeType( "application/x-www-form-urlencoded" )
    }
  } ).then( function ( response ) {
    alert("Success")
  }, function ( jqxhr ) {
    alert("failure")
  } );
}