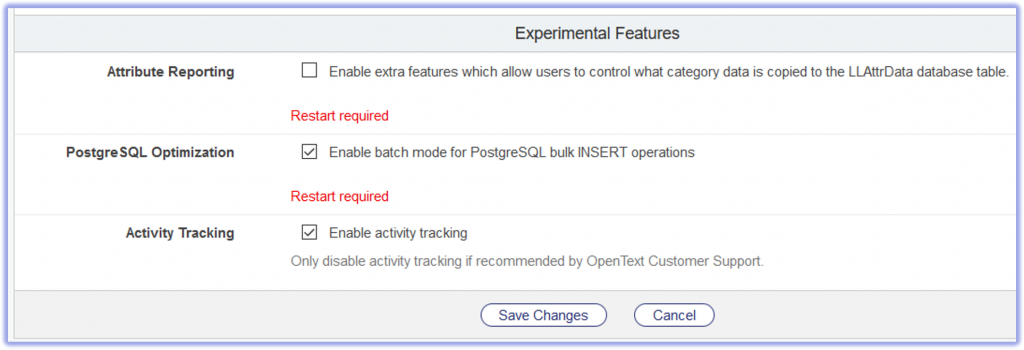
There is a new CAPI.ExecN command special for Postgres operations.
Oscript, the final frontier. We write the year 2021 and the OScript universe is going to expand. The newest member is CAPI.ExecN.
CAPI.ExecN
Bulk Postgres operations are slow. There is a new implementation of CAPI.ExecN, which fixes this. But there is no free beer in the universe. This new implementation exposes Postgres SQL weaknesses (throws SQL errors).
As for 21.1, this is an experimental feature. IN 21.2, it will be activated by default.
For all the explorers in the world, this feature has to be actiated manually in 21.1.
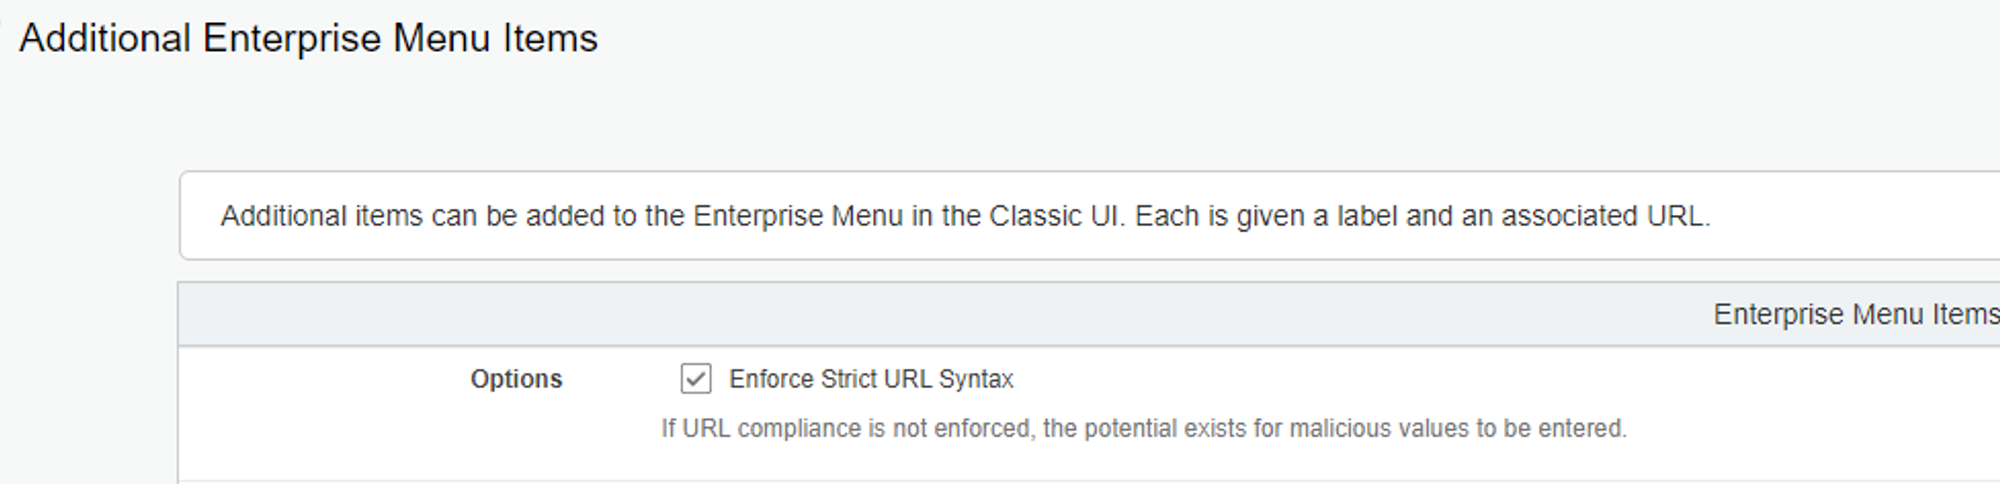
In 21. there is a new checkbox in the “Additional Enterprise Menu Items” Admin page. This allows you to enforce a stroct URL Syntax without Javascript or relative URL Syntax.
A small extension to 21.1, but a giant leap for Administrators to enforce more security on the Enterprise-Menus.
The Admins have an option to overrule this restriction by unchecking the new option. But this page is restricted to Content Server Administrators and not available for Business Administrators.
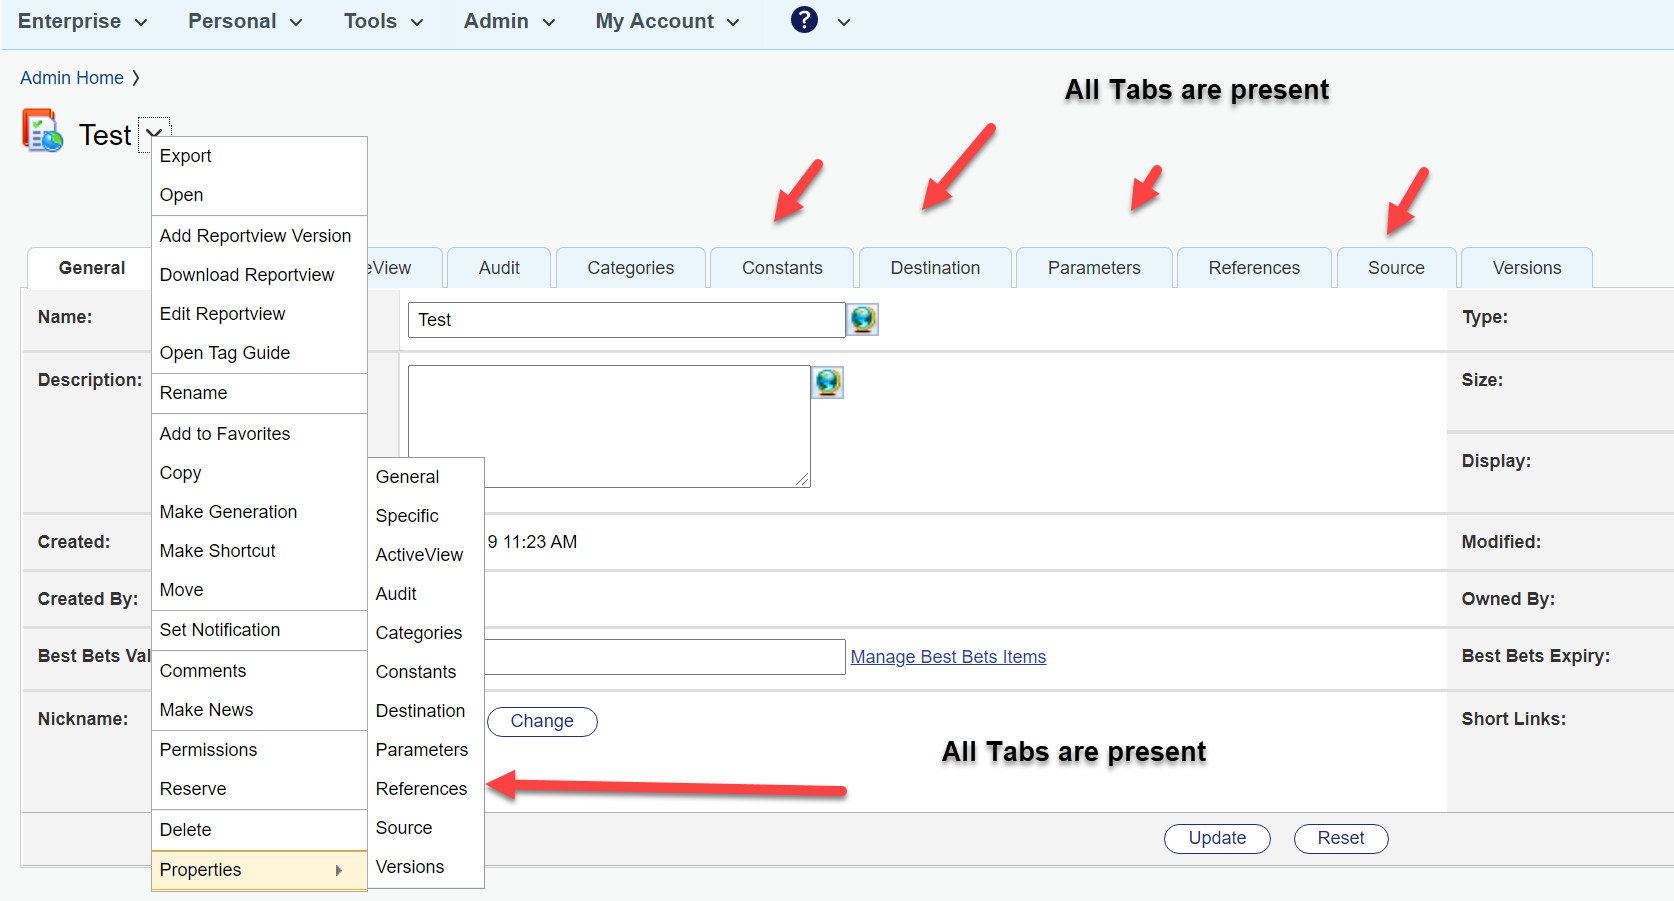
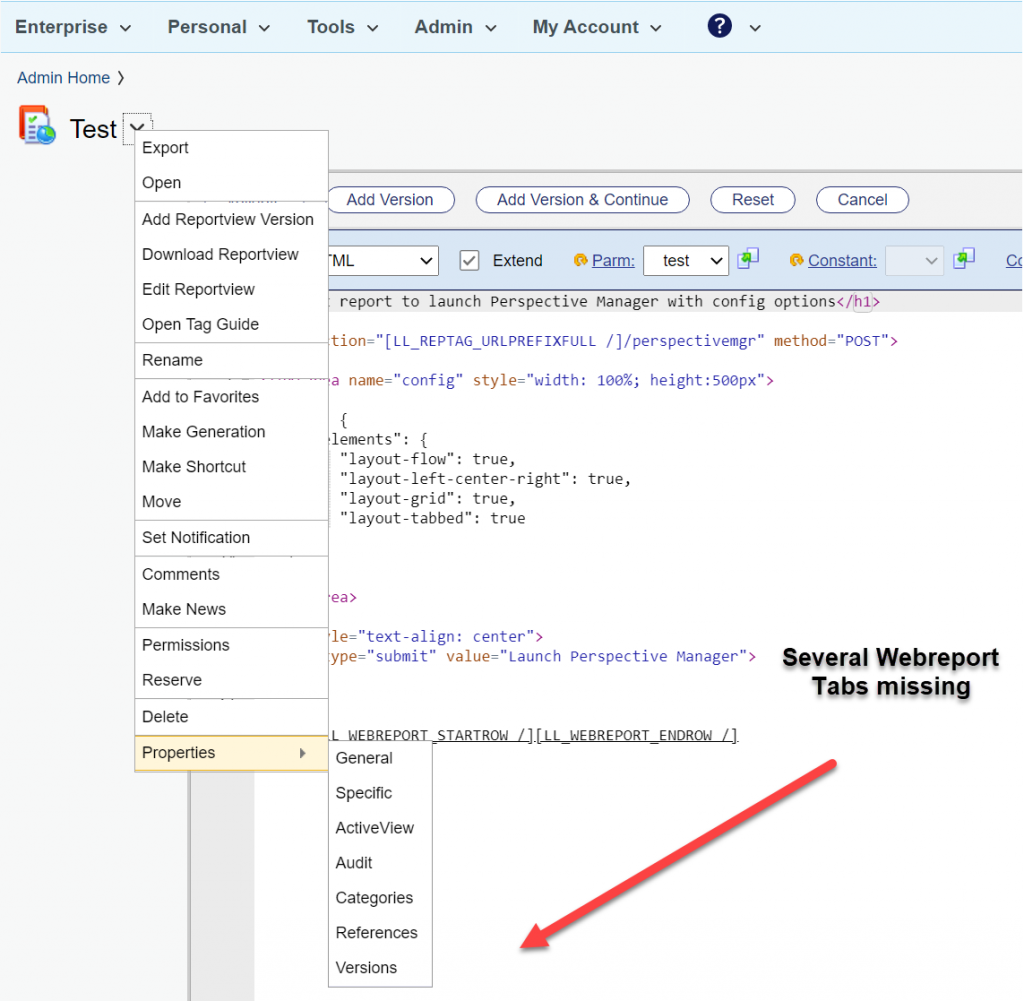
A short, but sometimes time consuming thing are the missing Webreport Tabs. Imagine, you have a Content Server with an jetty based internal Admin Server or an external Admin server on a fast machine.
The problem
Then, from time to time, you will see this on editing a webreport:
All Edit Tabs for the webreport are missing. Although you can start the missing functions within the URL, its annoying.
The Cure
If this happens, use this Magic Trick N,12:
Simply stop Content Server and Admin Server. Start the Admin Server and wait at least 5 min before starting the Content Server.
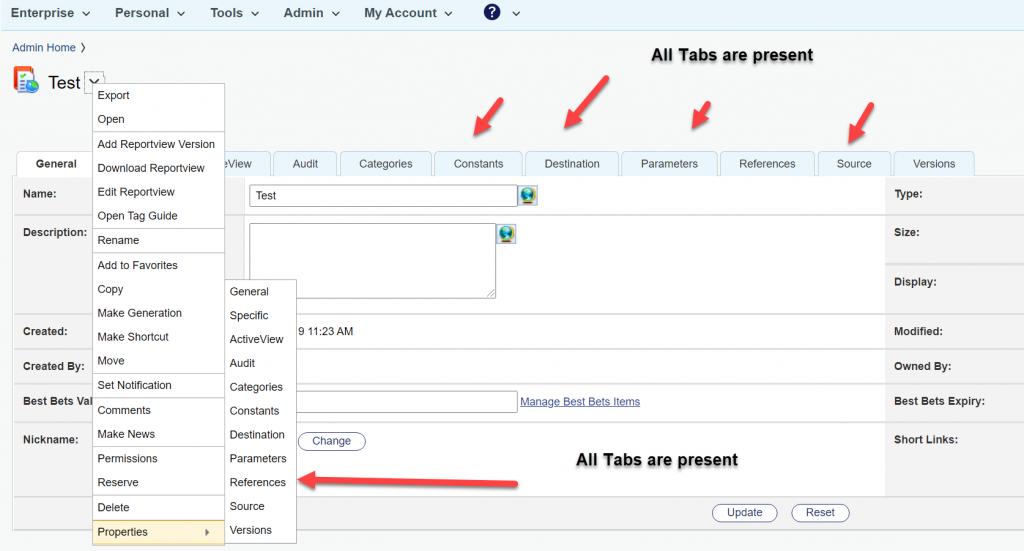
Then you’ll see everything is there.
Wow. You made it. You are a great wizard.
Seriously:
There is a timing problem in the Content/Admin Server. If the Content Server starts to fast, COntent Server thinks, there is no license for webreports at first. Later, it gets the license, but the GUI is drawn without the webreports tabs.
Wait for your Content Server to start up. Wait at least for 5 min. Then everything will be drawn in the GUI.
The latest addition in OpenTexts Template technology are Folder-Templates.
Reason for the new Folder-Templates:
Here is a couple of use cases:
Create a folder from template within in Workspace: Create some optional folders (not applicable to every Workspace) with predefined folder names, folder permissions, etc.
Create folder from template in the enterprise directory: Create a hierarchical structure with predefined folder names, folder permissions, etc
Folder-Templates – How do they work?
Lets explain this in a step-by-step example:
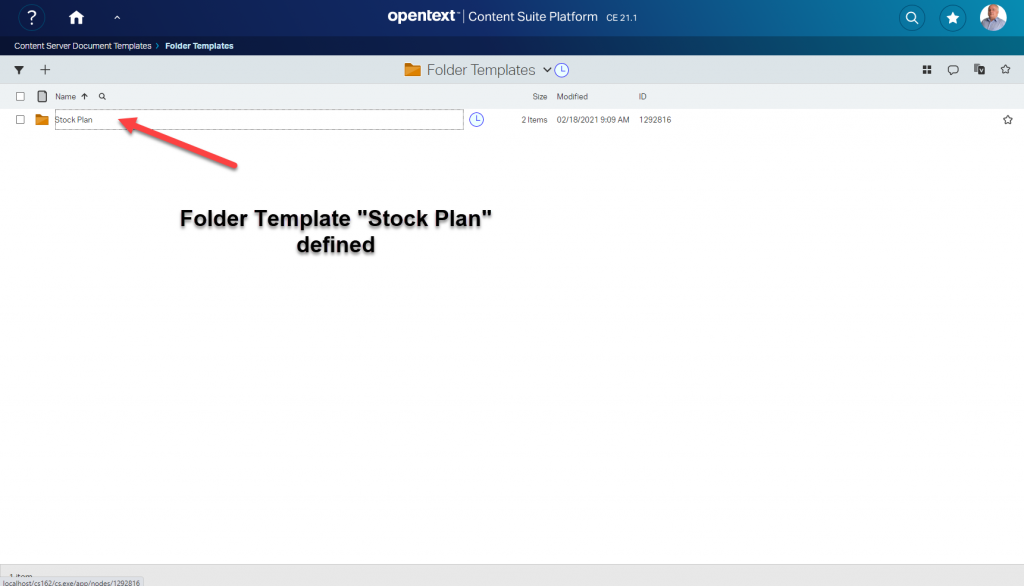
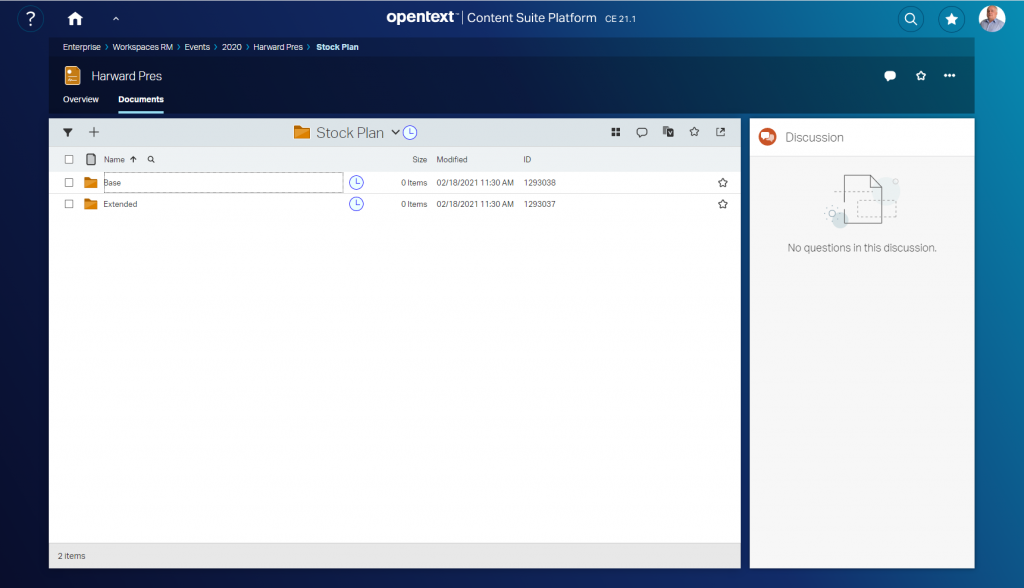
Create the Top Folder structure in “Content Server Document Templates”. Dont forget to add the Classifications according to your schema. Here the main structure is named “Stock Plan”
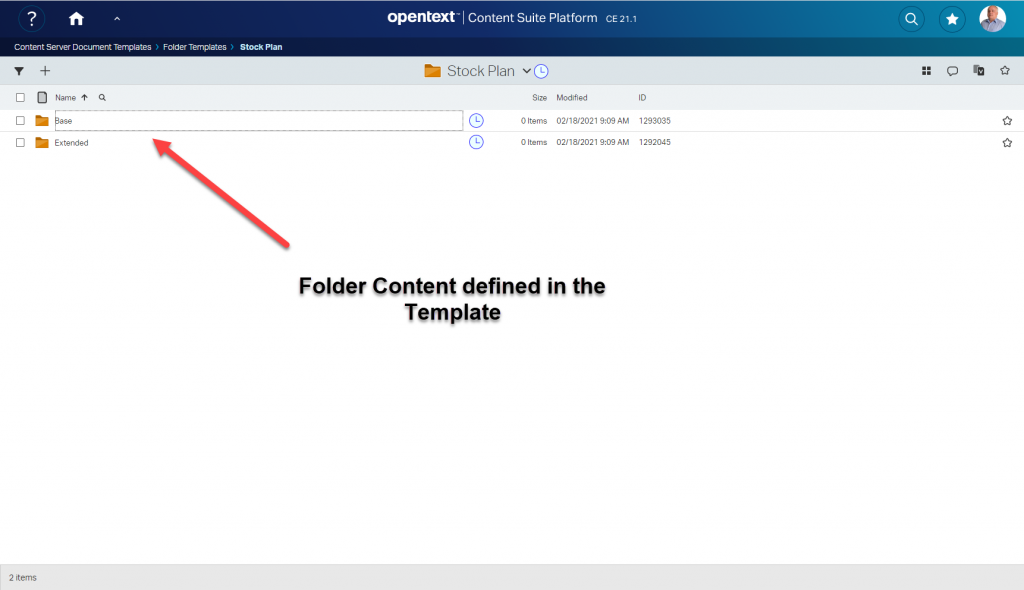
2. Create the folder structure as required.
3. Add the folder structure at any connected workspace you like. Here a smartUI based workspace is displayed. At the “+”, you can add the Folder Structure “Stock Plan” by one simple click.
5. Then the folder structure is added. The clock icon is a smartUI indicator, that this structure is new. (See my posts on this topic)
Annd there are all subfolders defined.
All Classifications, Categories etc applied to the template will also be present at this copy, like in any other template.
The Sky is the Limit!
Happy Templating.
Next week we’ll discuss the Improvements in Content Intelligence (3 new Widgets) and the Modifications in the Webreports in the amazing new Version 21.1 of Content Server.
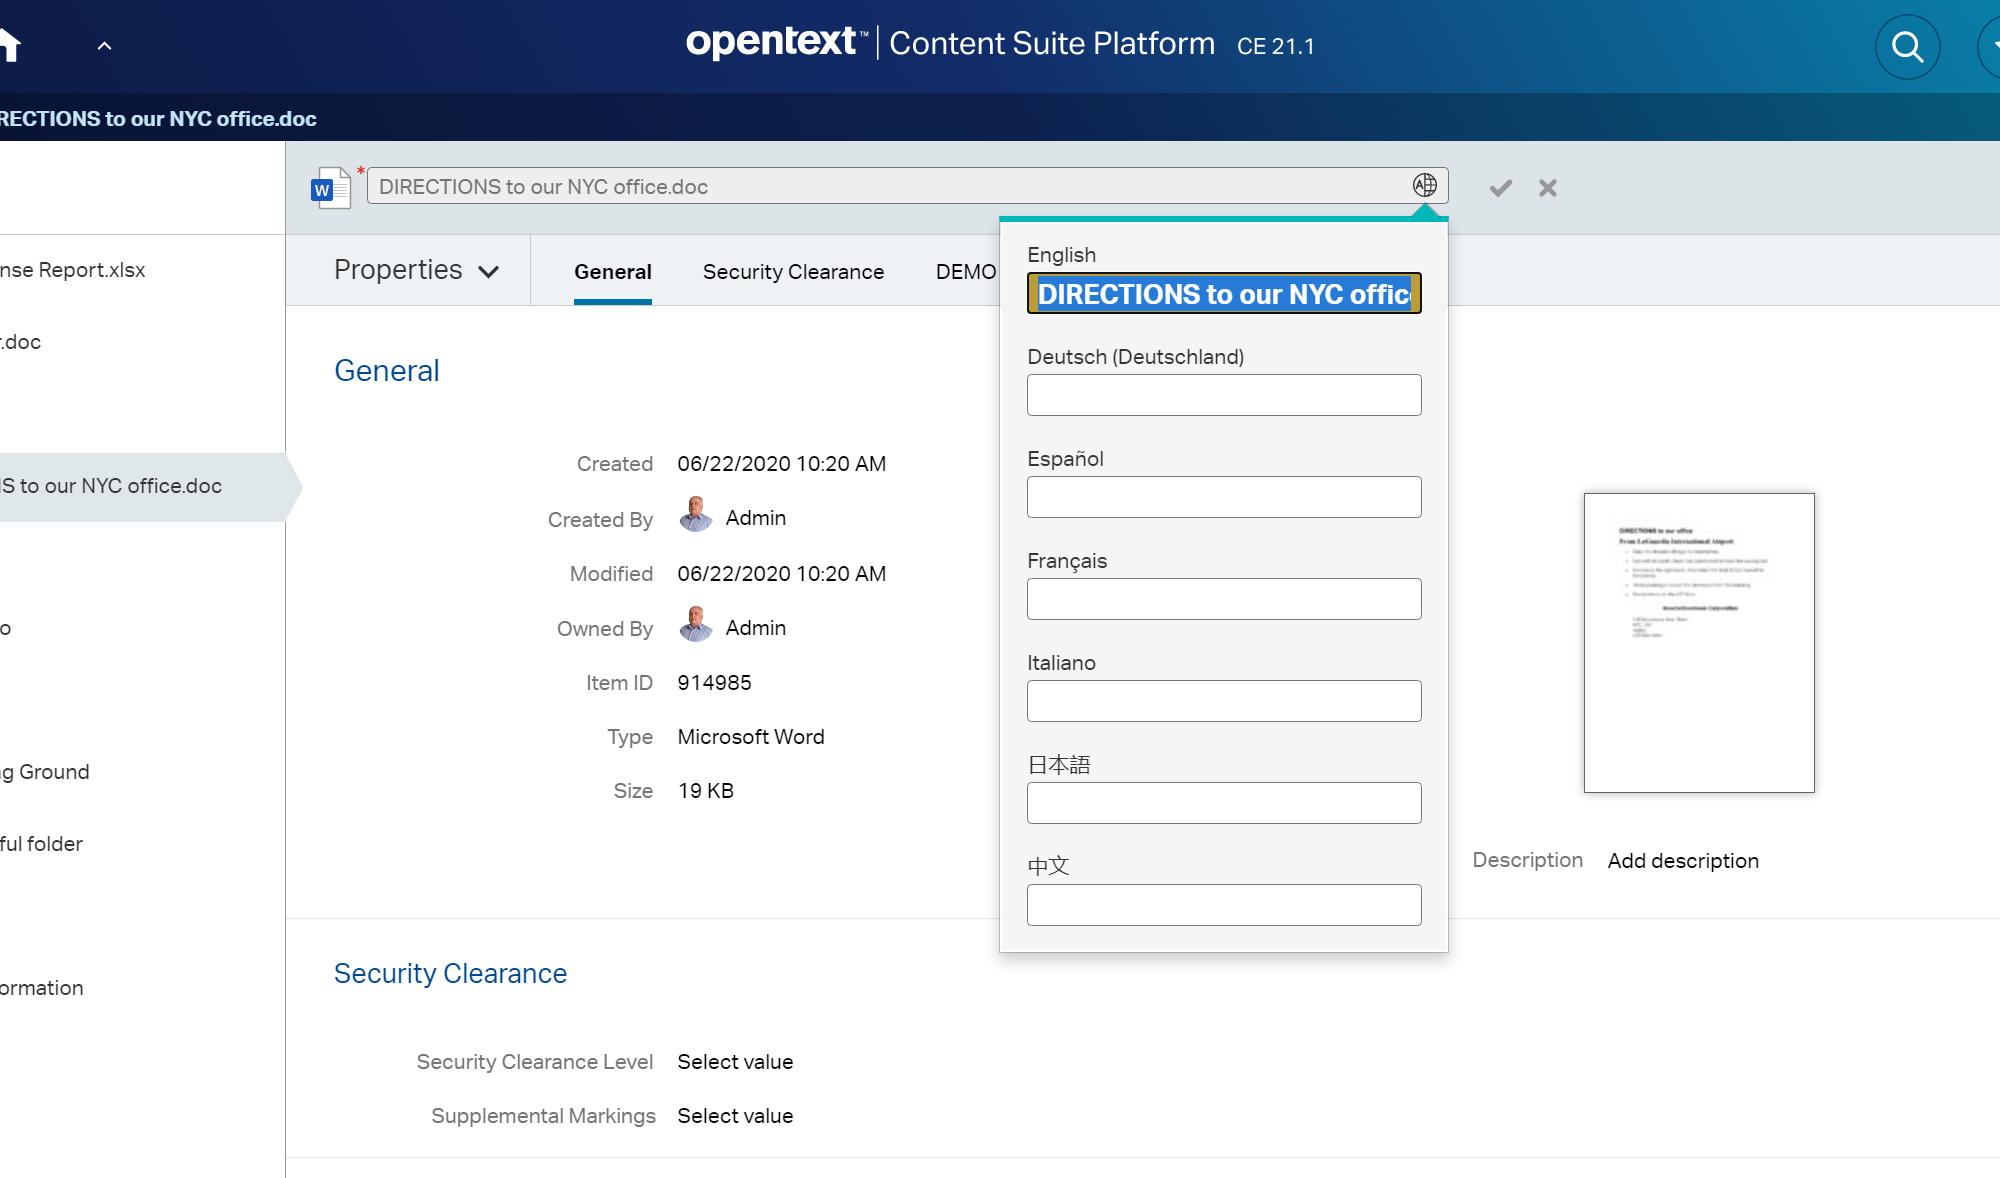
Finally, Multilingual Metadata Support is implemented in Content Server 21.1. Before that version there was only Support available here.
The Users Point of Vue
Multilingual Metadata can be added/edited at the Property Panel of a document. The first screenshot gives the entry of the name, the second gives the entry of the Description field.
Only Names and Descriptions are supported for Multilingual Metadata. For more fields or even Category Attributes in multiple languages, refer to an OpenText Partner like CASSIA.
The Programmers Point of Vue
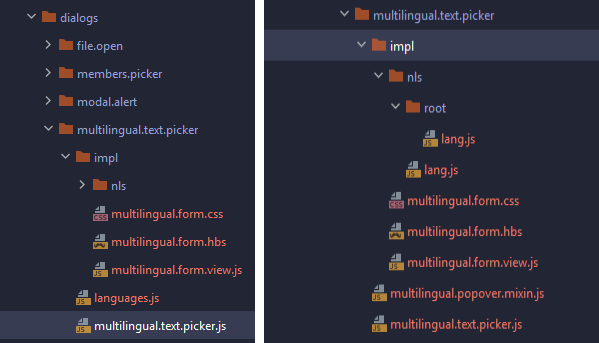
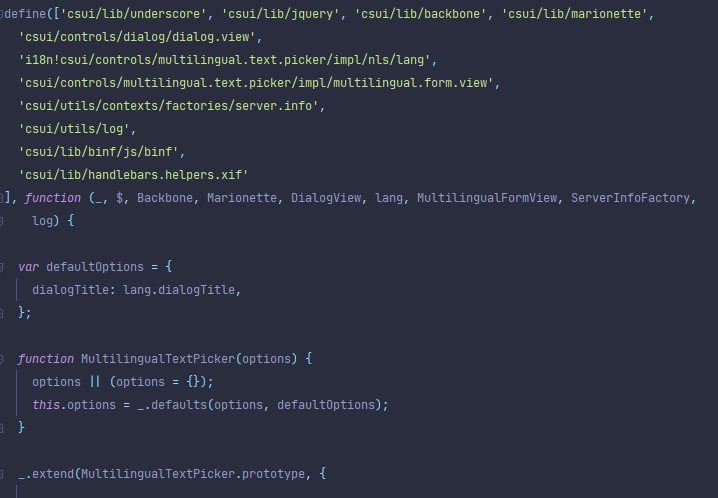
The Name and Description fields show at least two multilingual text pickers. These are found in the SDK in /lib/csui/controls/multilingual.text.picker and in /lib/csui/dialogs/multilingual.text.picker. Unfortunately there is no Documentation and no index.html. Lets take a look on that control:
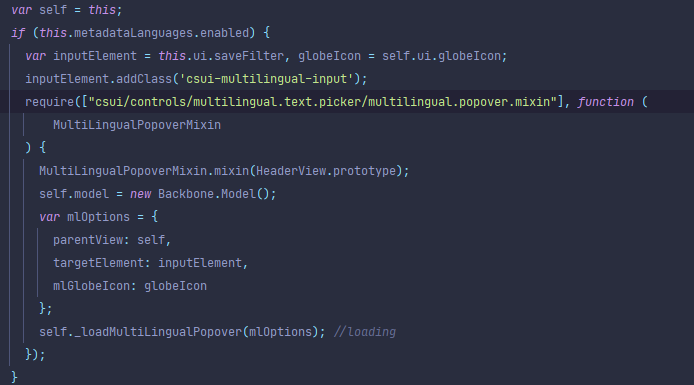
The left screenshot is from dialogs, the right is from controls.
This is embedded in the header.view.js from the dialogs/node.picker and will only be activated, if Metadata Languages are enabled. The mixin allows the form to be displayed as a Bootstrap Popover.
Changes in that area require the changed multilingu<al text picker and also the changed paths to be followed for that changes. Therefore require a spawn of the whole nodestable widget to reflect that changes. This is acually not recommended.
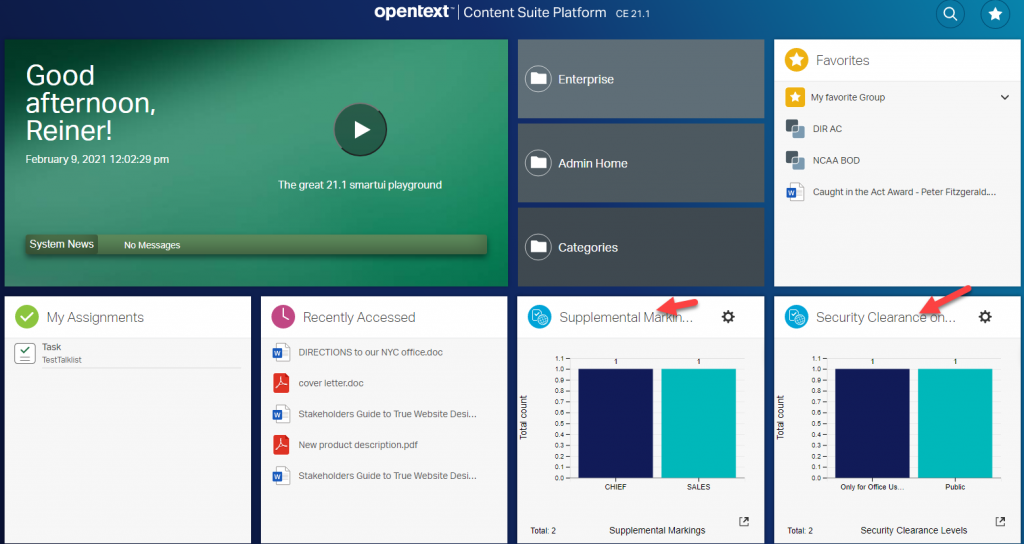
In the new Content Server Version 21.1 there are two new Report Widgets for Security Clearances and Supplemental Markings.
How does it look like?
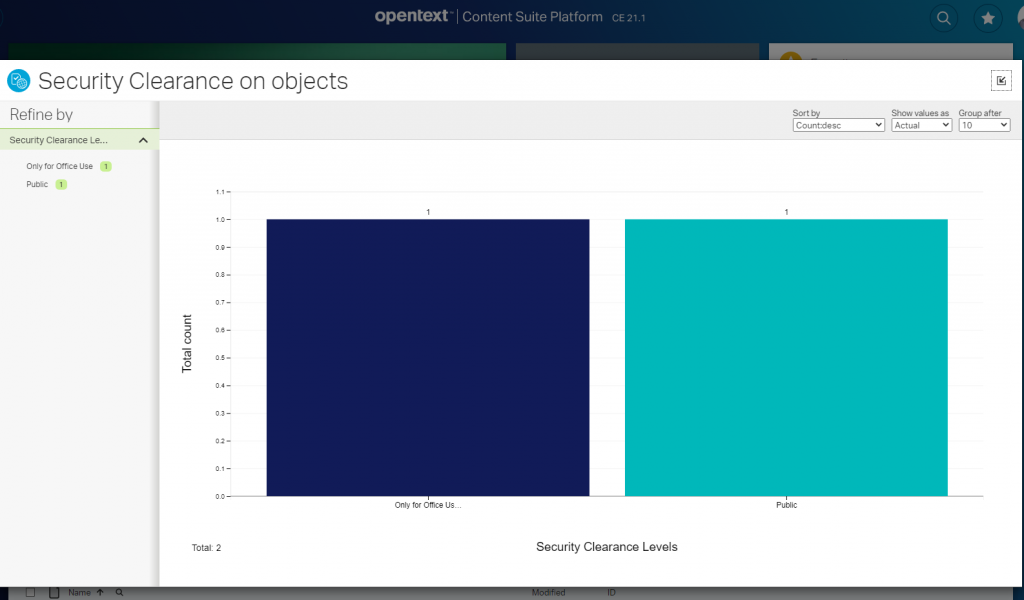
Here, both are shown on a landing page. This Widgets can be expanded by clicking on thy symbol on the lower right.
Then the full page widget view will be drawn. The report can be refined by selecting several columns.
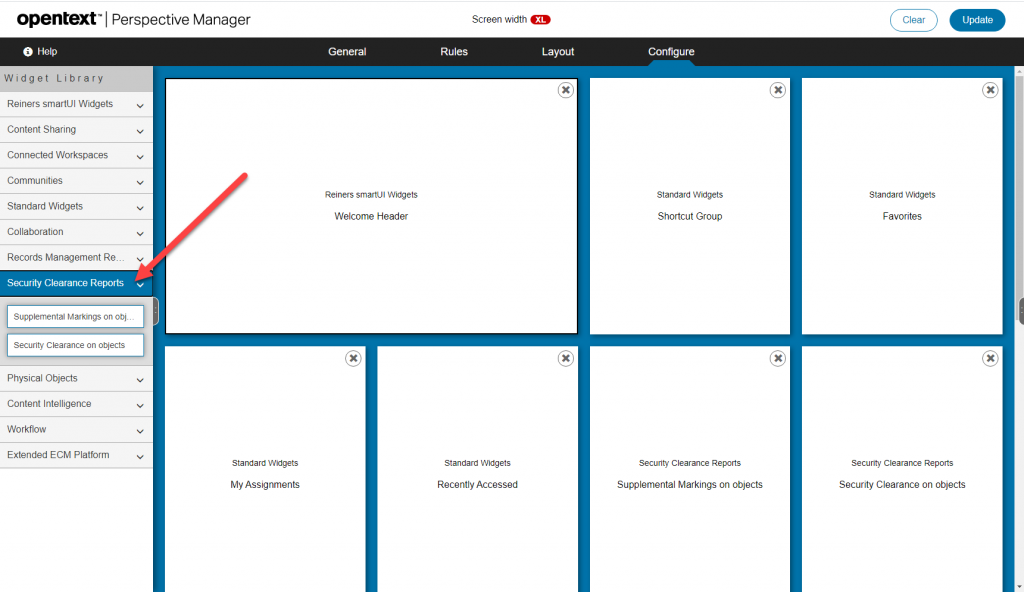
How to configure?
Simply add this widgets on the perspectives you want by dragging and dropping the widgets from the new group “Security Clearance Reports” to the widget area.
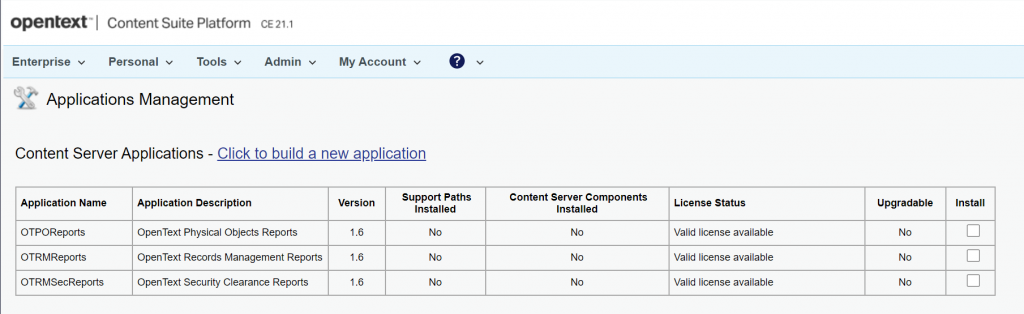
How to Install?
The widgets must be installed. They are based on several webreports and livereports. These reports are bundled in an Content Server App called OTRMSecReports. Open the “Applications Management” and install the application along with OTRMReports.
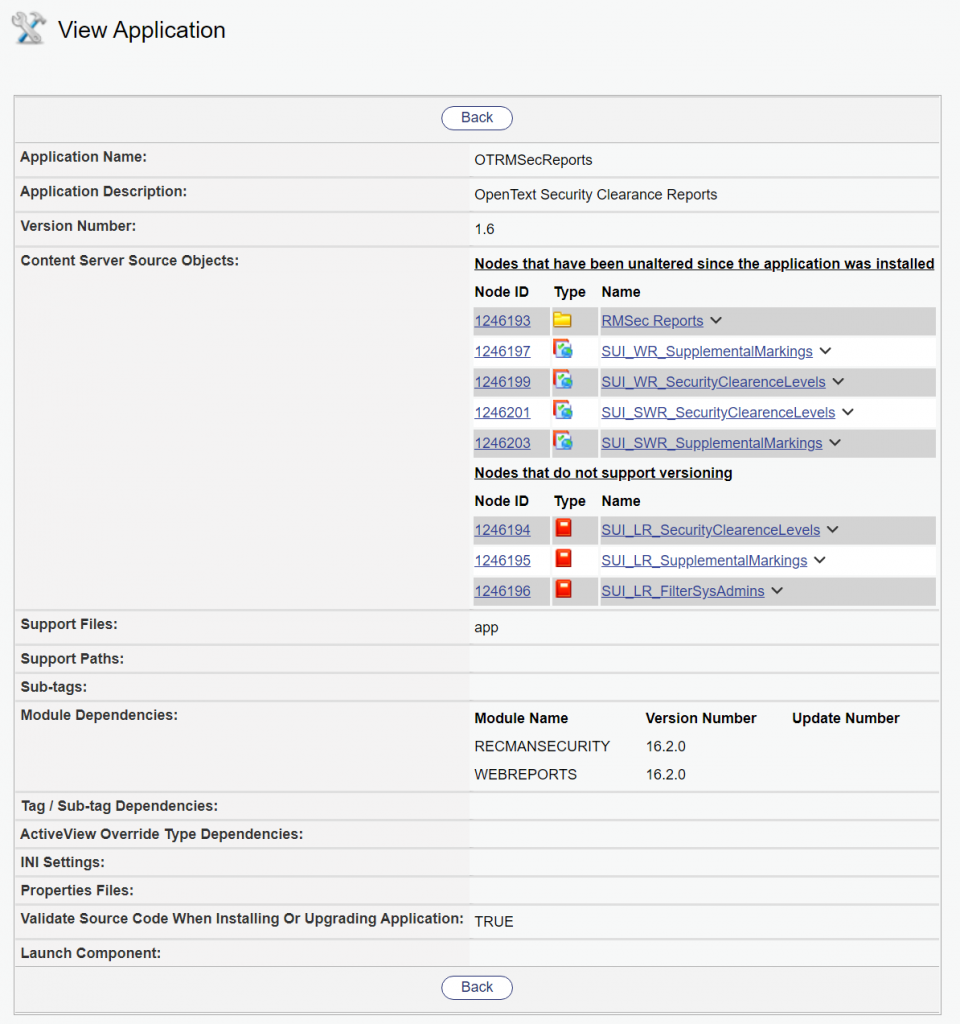
If its installed, you can check the components in “View Application”.
Ensure, that the version number is correct or correct the appropiate zip file.
Happy Security Clearance and Supplemental Markings Listing!
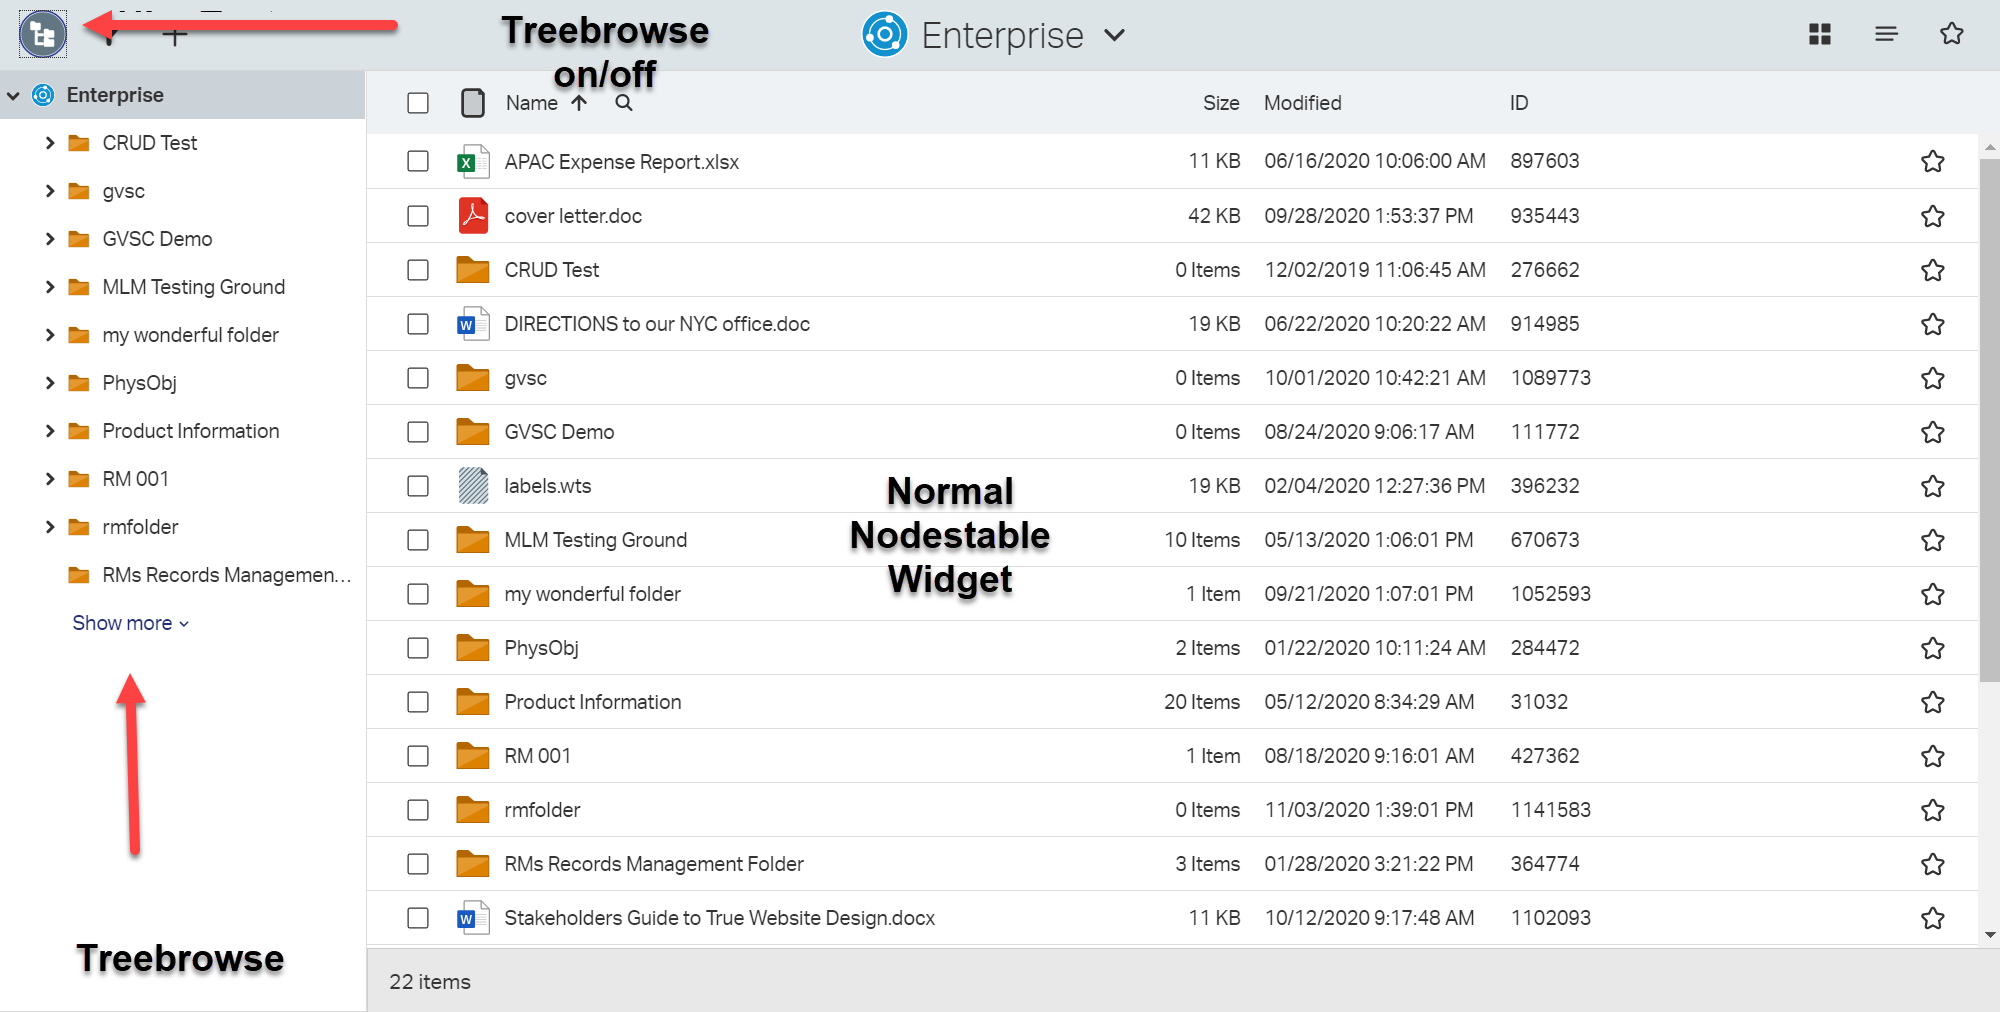
The Treebrowse Component is a new in Content Server 21.1. What’s a Treebrowse?
Let’s take a look at the index.html at csui/controls/treebrowse/test
This is an additional Window with the tree based display of all folders in a Content Server. It can be configured that a click on the top left icon will switch it on and off. This Treebrowse Control will then change the display of a Nodestable according to the folder pressed.
Additional Features
Lazy loading and prefetch options for performance. There are a couple of options to configure the loading of the nodes for performance. A “Show More” button can be configured
Tree Navigation is in sync with Table View in Nodestable view. The Nodestable is displays the children of the selected folder.
Multiple root nodes can be configured.
Enable
This Treebrowse is always there, but it must be enabled.
var NavigationTree = {
enabled: function (status, options) {
  if (!!enableSystemLevel) {
    return true;
  }
  var enabled                = false,
      moduleConfigCollection = new configCollection(moduleConfigs);
  moduleConfigCollection.some(function (mConfig) {
    enabled = mConfig.get('enabled')(status, options);
    if (enabled) {
      status.originatingView.treeData = mConfig.get('data')(status, options);
    }
    enabled = enabled ? true : enabled;
    return enabled;
  });
  return enabled;
}
};
return NavigationTree;
});
As you can see, the Enablement on a system level can be done in OScript. Refer to this post, if you want so figure out how.
If you want to configure this control only for certain folders, you should do:
Implement methods enable and data in a separate file and return them in an enclosed object.
Register this file which returns object containing enable and data methods as an extension to the “csui/controls/treebrowse/navigation.tree” in the respective module.
Enable method should return a condition that specifies when the Tree Navigation should be enabled.
The data method should return data that must be passed to tree navigation while instantiation. This data should include configurable settings. If there is no data to be passed default settings are applied.
Example
define([], function () {
  'use strict';
  var RMTreeView= {
    enabled: function (status, options) {
       var supportMaximizeWidget = $("body").hasClass("csui-support-maximize-widget");               return (supportMaximizeWidget && $("body").hasClass("csui-maximized-widget-mode") === false);
    },
    data: function () {
      return {
        "lazyTree": true;
      };
    },
    sequence: 50
  };
  return RMTreeView;
});
A more complex enabled function (like in the index.html) is
enabled: function (status, options) {
var parent_id = status && status.container && status.container.get('parent_id');
return !!parent_id;
}
Parameters
Parameters thats need to be included as part of module config:
sequence – number default: 100 Decides the priority of a module when multiple modules enabled treeview.
enable – function controls whether the treeview command should be visible or not. Need to return a logic whether tree view command is visible.
data – function Returns an object of data that are passed to treeview. The parameters that are returned by the data method are passed as options to the constructor of node.tree.view.
Parameters that can be returned by the data method are::
lazyTree – Boolean default: false Decides whether to prefetch items at one level ahead to display without any delay on clicking showmore button / to fetch the items after clicking show more button.
showItemsBlockSize – Number default: 10 Number of items that are shown on expansion of any node or clicking on showmore button.
rootNodes – Array of nodemodels default: top most ancestor node of the currently active node An array of nodes which are used as root nodes by the tree. If more than one root node is provided then multiples root nodes are displayed.
This is an brief overview on the highlights of Content Server 21.1. This is only a technical list without any screenshots.
In the following posts I will discuss some of the new features more in detail, of course with screenshots
What’s new? A brief overview.
This is an excerpt from the Content Server 21.1 Release Notes
Administration
Admin Server Processes have now names which follow the the schema AdminServer-NN.
Read-Only Partitions. They have been eliminated. During Upgrade, they will be converted to retired node.
New Indexing Control Rules. For new installations, they follow the best practices for configuration.
Transport Warehouse, The system was simplified.
Connected Workspaces
Folder Templates. Like creating documents and workspaces from predefined templates, Folders now can be created from predefined folder templates.
SmartView
Multilingual Metadata. The name and the description fields in the metadata now support the edit of these fields in the configured multilingual metadata
Search Forms. Search Forms, created in classic UI are now available from smartUI.
TreeBrowse. A new widget allows to browse the nodelist widget with tree like display (similar to the Windows Explorer) after enabling this widget.
OpenText Viewing
Is now available as Windows Installer in an non-containerized environment.
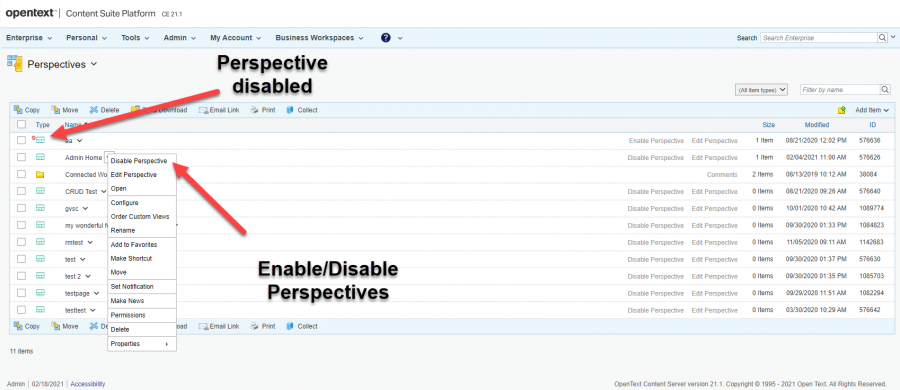
Perspectives
Perspectives now can be enabled or disabled
Content Intelligence
Three new full-page widgets.
Nodes Table Webreport -Full
Table Webreport – Full
Visual Count – Full
New full page Webreport destination supports the new full page widgets.
New Tags/Tag Options
Enable Row Filters: Automatically filter a Webreport data source if the report is used as a button within the Visual Count Widget.
Hidden Columns: INDLUDEHIDDENCOLUMS: <hiddencolumns to include> is a new option in Table Webreports to display hidden columns.
Records Management
REST
Add and remove users to a hold
Add and remove users to a user based hold
Execute a user based hold and apply or remove holds from content owned or modified by the user
Security Clearance
Dynamic Security Clearance. The Clearance can now be controlled based on organizational defined criteria, like network and device to provide a finer control of the Clearance. For example, a login from a coffee shop can receive a lower Clearance as one from the intranet.
User profile. Clearances and Supplemental Markings can now be displayed on the user profile.
Workflow
Initiation by Mime Type. Workflows can be initiated by mime type, such as a pdf in the proper format.
Have you ever thought of the magic of extension points in smartUI?
What is an extension point?
This are the dynamic configuration points of smartUI. Calling the config URL in smartUI, you will see all extension points with all configured extension modules in the current smarUI. Normally you’ll add your modules in the file <your-base-requirepath>-extensions.json in your projectstructure build by yo.
All of these modules indicated by these json files are loaded at initialization and form the dynamic smartUI system.
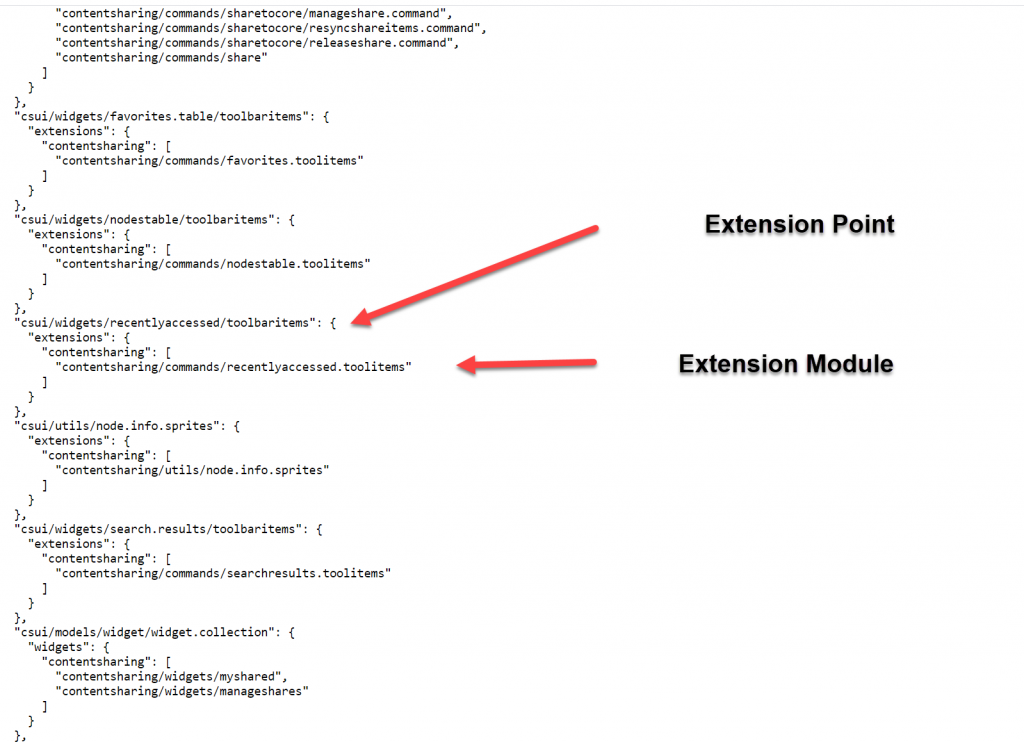
This is an example of an actual configuration in a Content Server System :
As you can see in the configuration, an extension point allows the extension of the extension point with several definable extension modules. Ok,this sounds like a typical lawyer sentence.
In plain english:
This technique allows you to extend the capabilities of a base module (the extension point) with the extension modules listed.
How to add your own extension point?
Use cs-ext as requirejs extensions. This is part of the SDK (/lib/src/csui/utils/load-extensions). There is the module and a very brief short documentation.
If you want more infos on custom requirejs modules, refer to the example of a conditional module,
This is a require.js module like the one which I introduced for conditional loading in Febr 2020. cs-ext is part of the smartUI core. If you want to modify the cs-ext, then use the easy way of loading an requirejs extension described in the conditional loading article.
Overview of cs-ext (in the sdk)
Lets take a look at cs-ext. But if you are more interested in the usage of cs-ext, skip the overview and go to the next chapter “Usage of cs-ext” below.
define(['module', 'csui/lib/underscore'], function (module, _) {
'use strict';
This is the standard entry to add sme vars into the configuration. Interesting is the list of modulePrefixesToRetry, includes all modules to retry a reload, if the extension point loading fails.
function handleSuccess(onLoad, parameters) {
onLoad(Array.prototype.slice.call(parameters));
}
The success handler, handles the callback
function handleError(error, onLoad) {
if (config.ignoreRequireErrors) {
console.error(error);
console.warn('Loading extensions of "' + name +
'" failed:', error.requireModules);
onLoad([]);
} else {
onLoad.error(error);
}
}
The error Handler
function retryLoading(require, name, modules, onLoad, firstError) {
var droppedModules = [],
selectedModules = .filter(modules, function (module) { var slash = module.indexOf('/'); if (slash < 0 || .contains(config.modulePrefixesToRetry,
module.substring(0, slash))) {
return true;
} else {
droppedModules.push(module);
}
});
if (selectedModules.length && droppedModules.length) {
console.error(firstError);
console.warn('Loading extensions of "' + name +
'" failed:', firstError.requireModules);
console.warn('Dropping extensions:', droppedModules);
console.warn('Retrying extensions:', selectedModules);
require(selectedModules,
function () {
handleSuccess(onLoad, arguments);
},
function (error) {
handleError(error, onLoad);
});
return true;
}
}
The retryLoading handler. Demonstrates how the reload a module, if there is an error condition. Only the modules with the prefixes listed in modulesPrefixesToRetry (see above) will be reloaded.
return {
load: function (name, require, onLoad, runtimeConfig) {
if (runtimeConfig.isBuild) {
onLoad();
} else {
var moduleConfig = runtimeConfig.config[name] || {},
modules = moduleConfig.extensions;
if (modules) {
if (!.isArray(modules)) { modules = Array.prototype.concat.apply([], .values(modules));
}
if (modules.length) {
require(modules,
function () {
handleSuccess(onLoad, arguments);
},
function (error) {
if (!retryLoading(require, name, modules, onLoad, error)) {
handleError(error, onLoad);
}
});
} else {
onLoad([]);
}
} else {
onLoad();
}
}
}
};
The main method is simply returned as js object.
All listed modules in the extension point list will be loaded and executed before the callback (the carrier module with the cs-ext entry) will be executed.
This may sound quite theoretical. Lets use cs-ext.
Usage of cs-ext
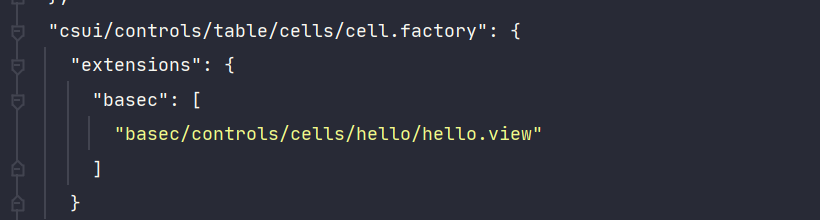
Select the module which you want to amend with an extension point. Lets use the csui/controls/table/cells/cell.factory (MUST exist) as an example.
Configure the proper extension in the project json like
Open the cell factory and examine the source code.
Notice the csui-ext! line at the end of the define-module list. This will search the require.config entries to get a list of the extension modules for this extension point. All listed modules (here hello.view) will be loaded and executed before the callback (stated in the line csui-ext) will be executed.
Back in the callback , the _.extend function extends the prototype of the cell factory by the methods “hasCellViewByOtherKey” and “getCellView”.
Summary
To make a custom extensible module (with extension point), add the csui-ext requirejs extension to your module and set the modules to be loaded in the appropriate json extension file.
Then point to your extensible module from your widget, and you are done. Then your module is configurable and extendable by using the csui-ext util module.
If you want to extend existing modules, you’ll have to spawn the widgets from the library to reflect your new module.