smartUI Goodies for Webreport Fans

One of the smartUI goodies for webreports

In the rich universe of Opentexts smartUI there are even some goodies for the webreport addicts. Besides the standard webreport widgets there are two controls witch are used happily and heavily by webreports designers, named Parameter.Prompt and Status.Screen. These are the true smartUI Goodies for Webreport fans.

smartUI support
Need smartUI support?

Especially two controls are of interest for the seasoned webreport developer.

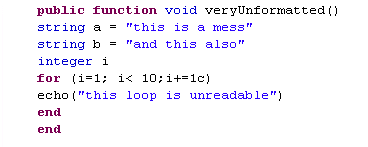
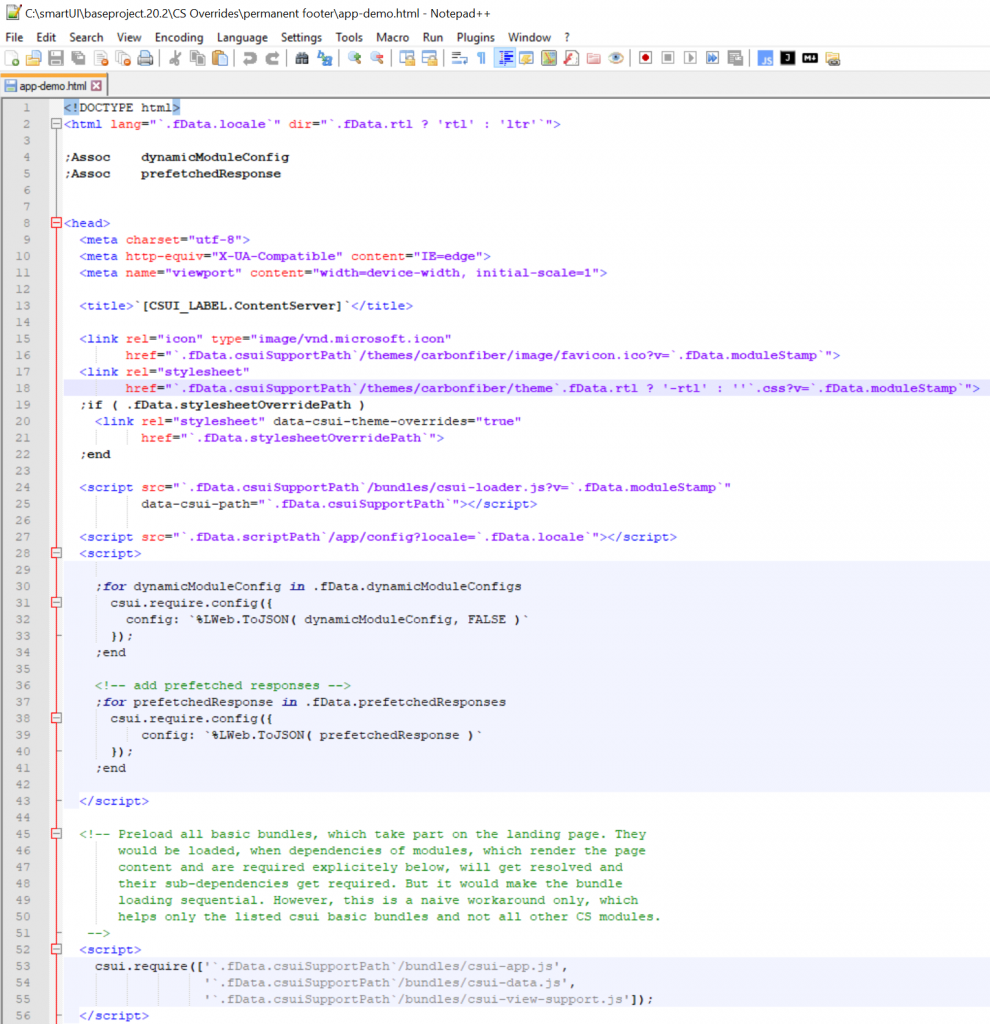
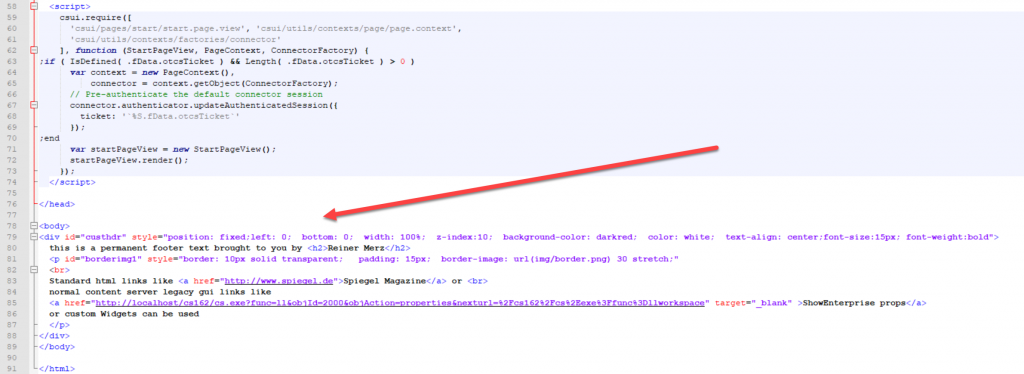
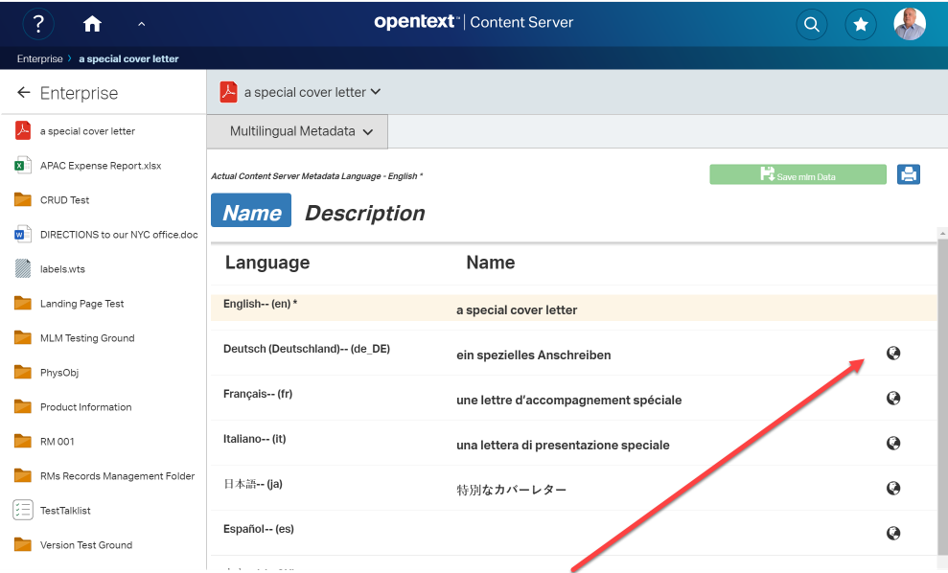
For tests, I’ve used a senseless webreport

A senseless webreport just for demonstration

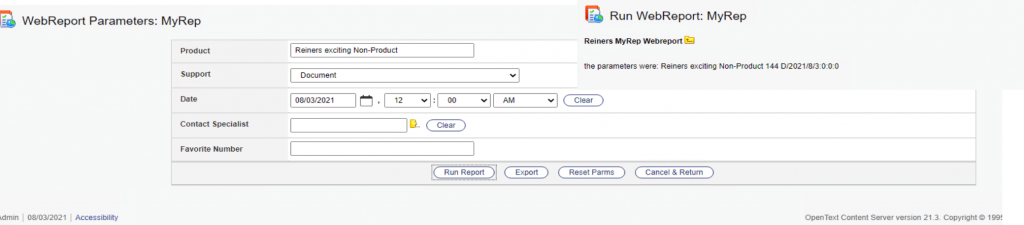
This is a dummy webreport with several parameters. At the top right corner you see the execution result. Just for demonstration purposes, this has been kept simple and stupid.

But what if…….. the webreport is supposed to be run under the new and amazing smartUI? In this case we have two controls to help.
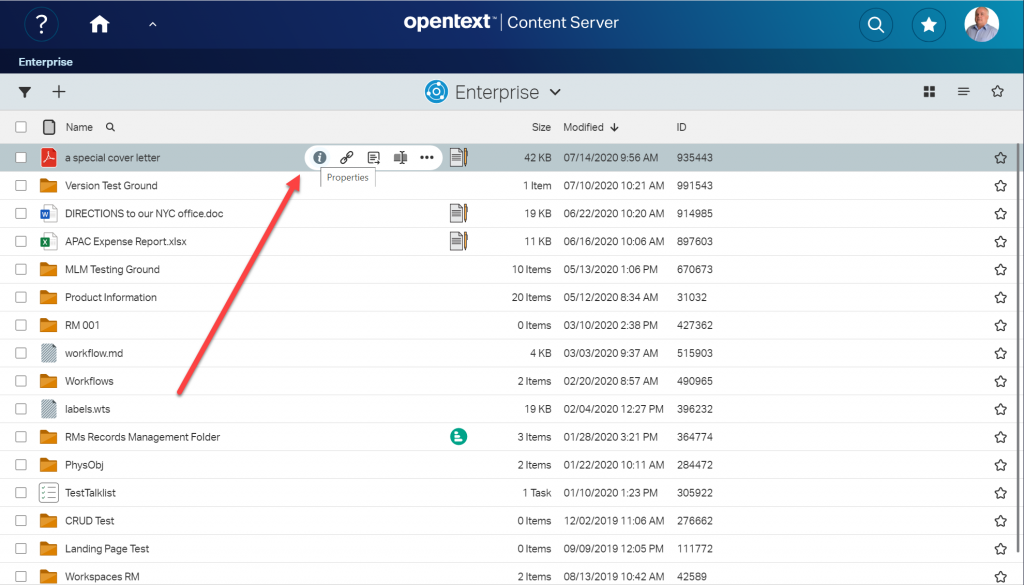
Parameter.Prompt

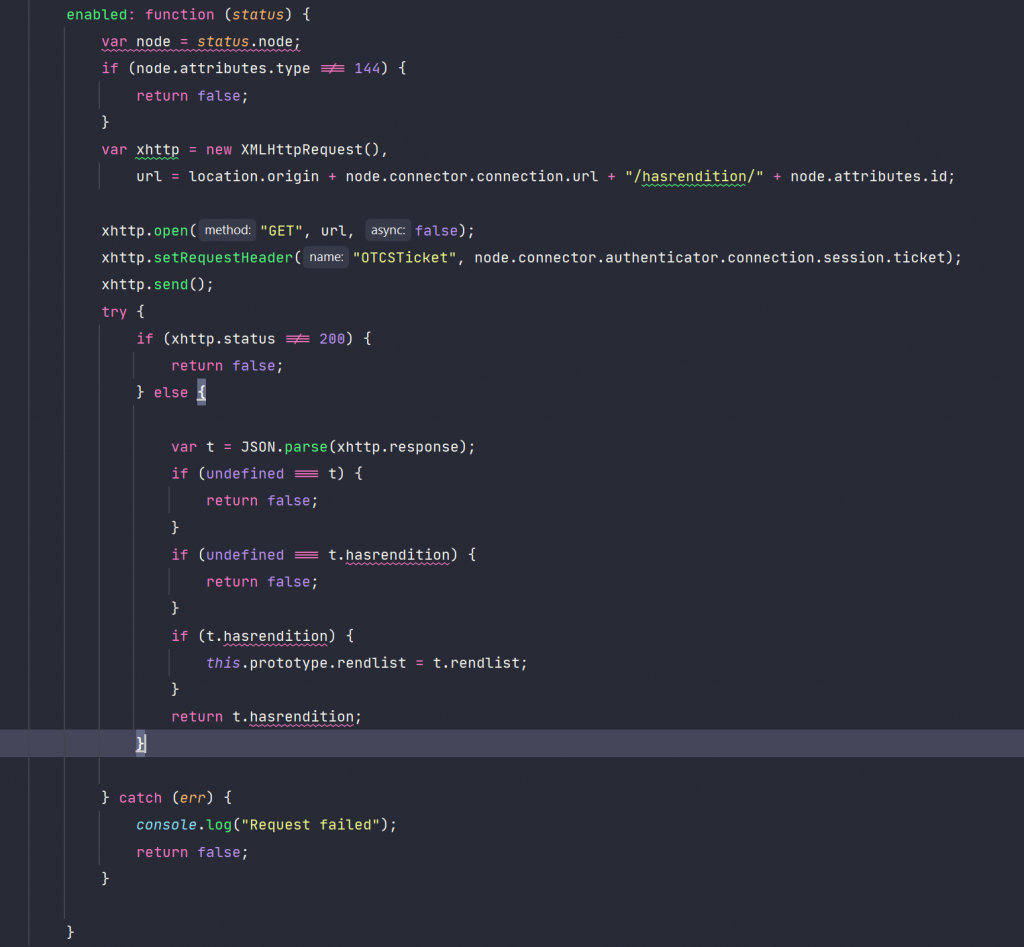
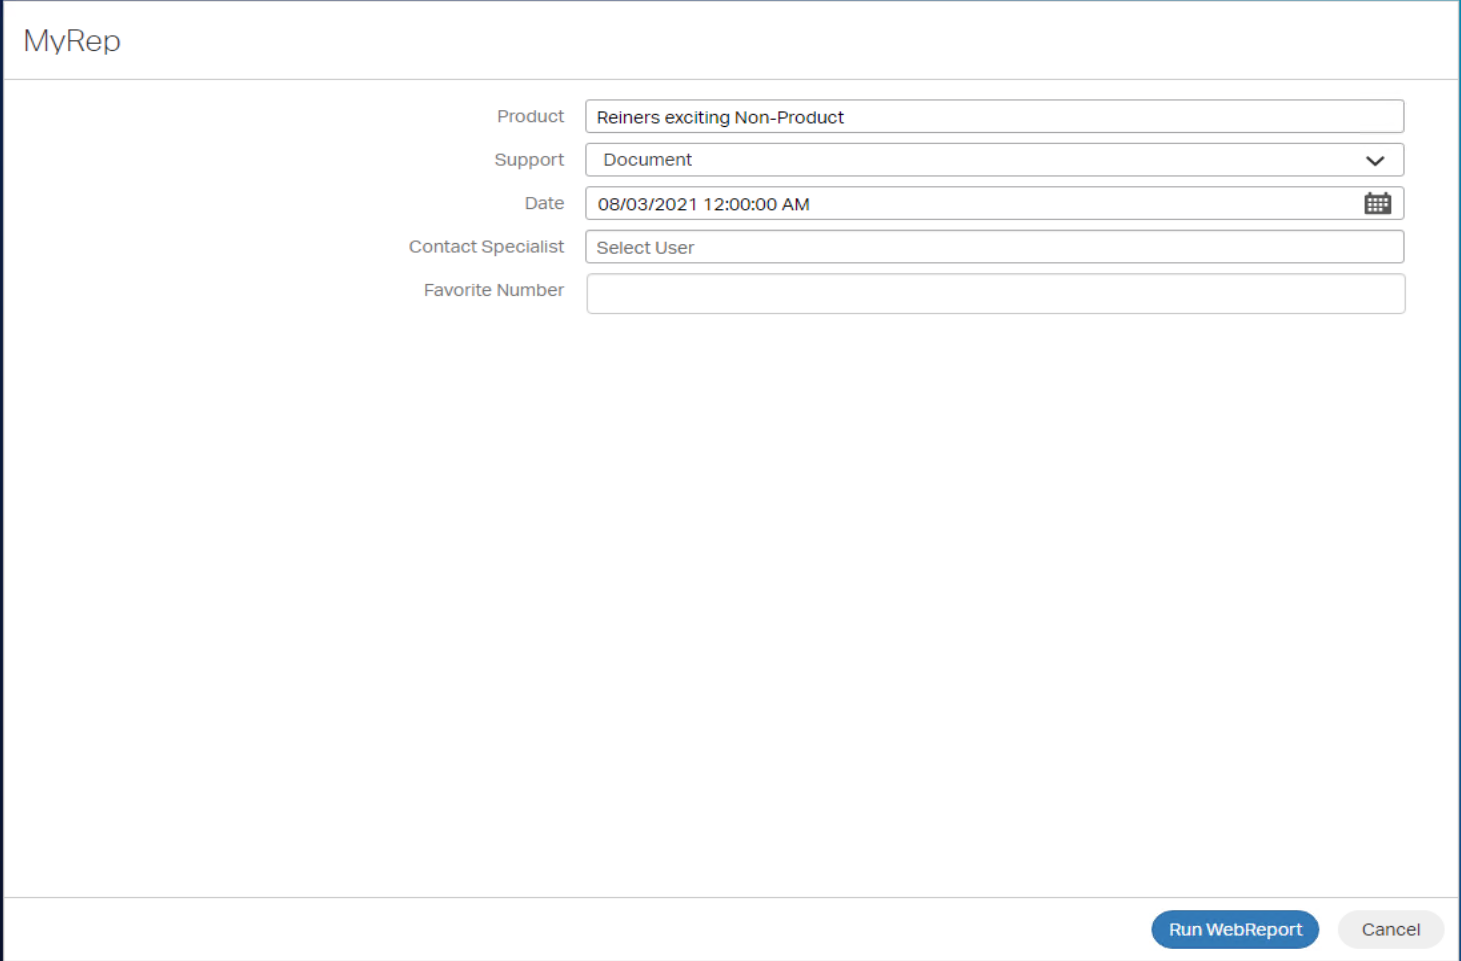
This control senses, if the webreport does have one or several parameters and allows to alter the parameters before the webreport is started.

PArameter.Prompt, a special service for all the webreport addicts

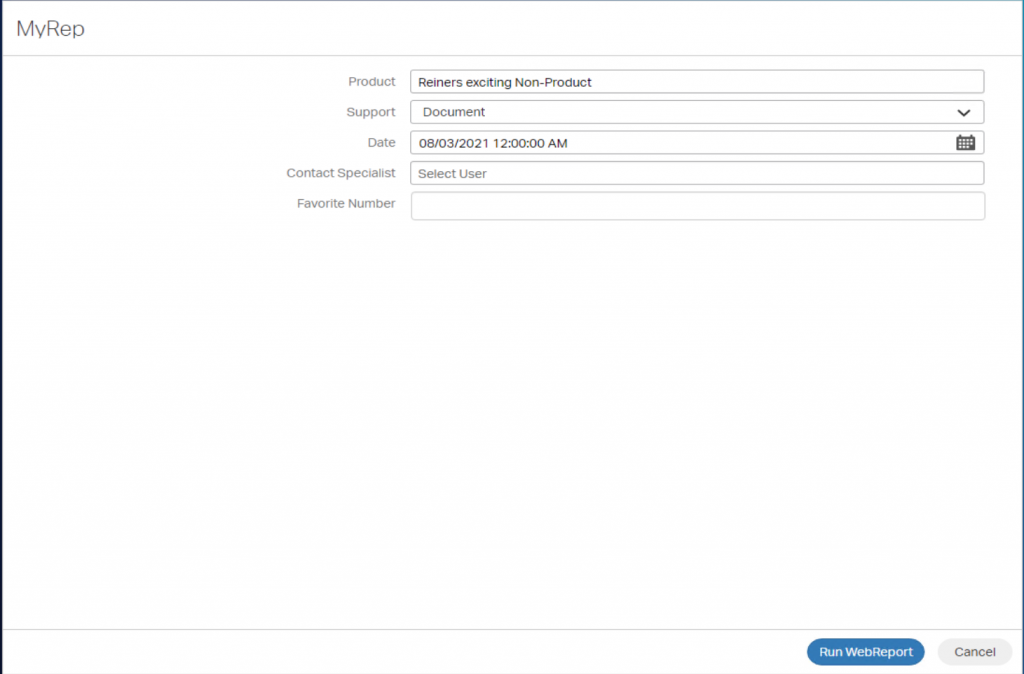
Here, all parameters can be changed. A click on “Run WebReport” will start the webreport if activated.
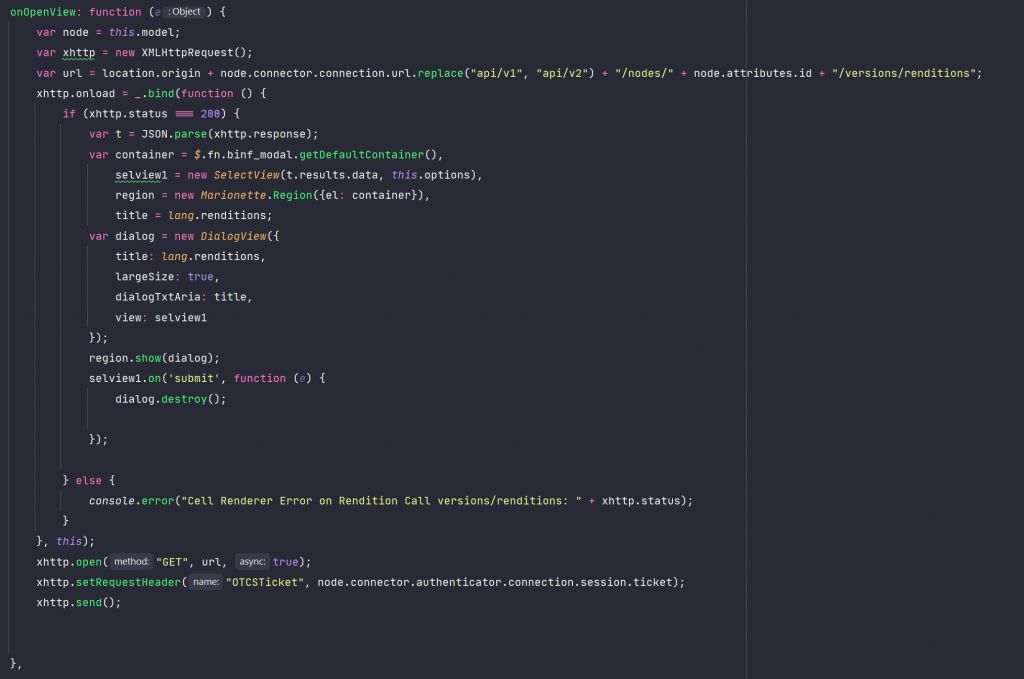
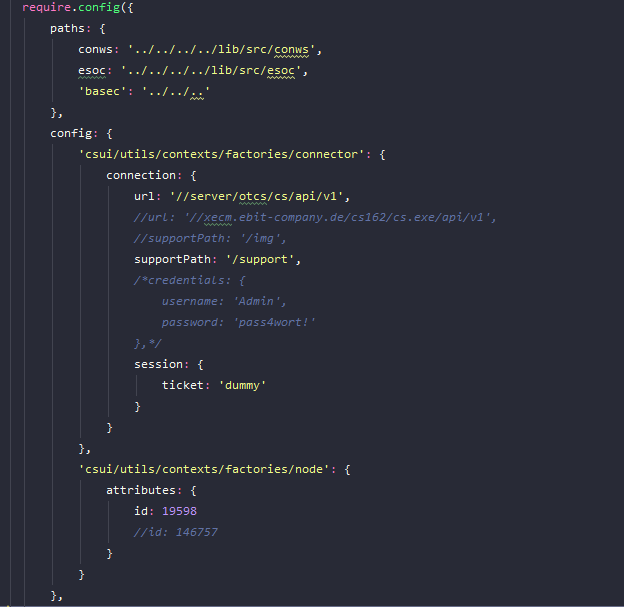
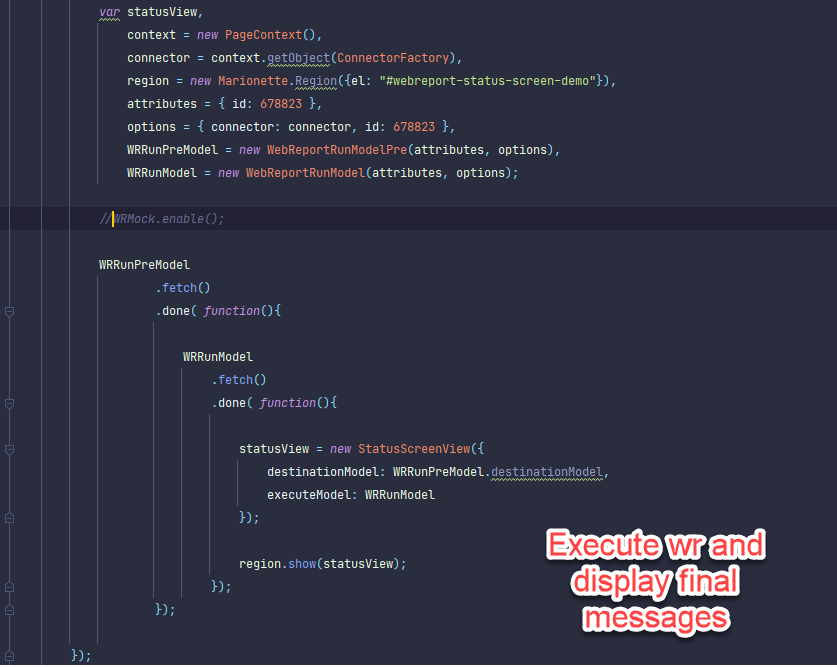
The js code is easy

JS code for the parameter prompt control

Status.Screen

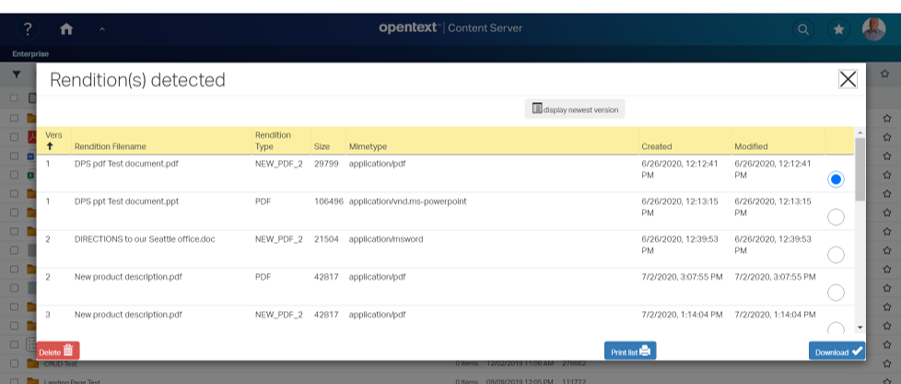
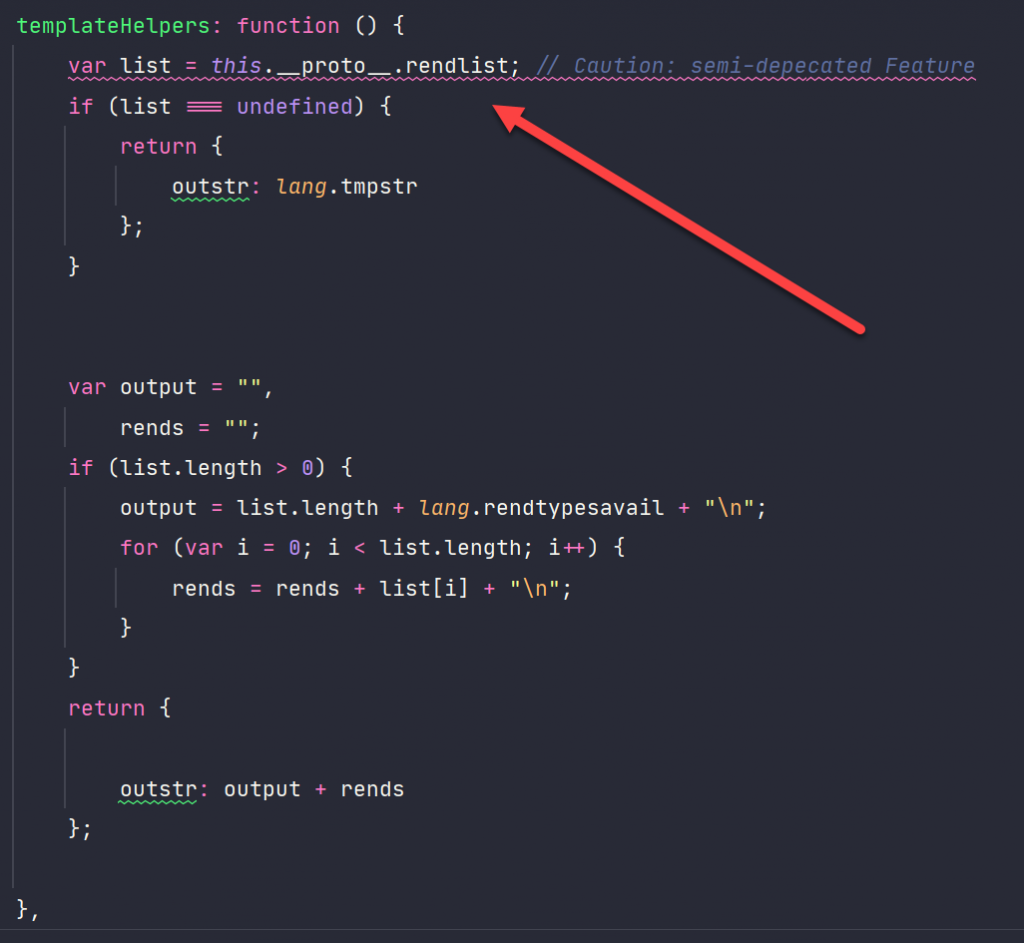
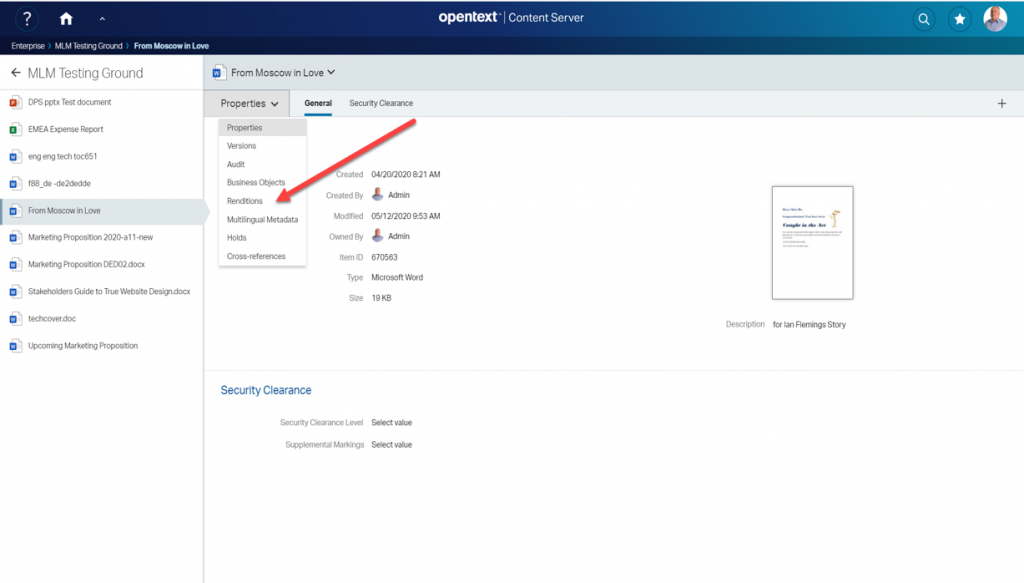
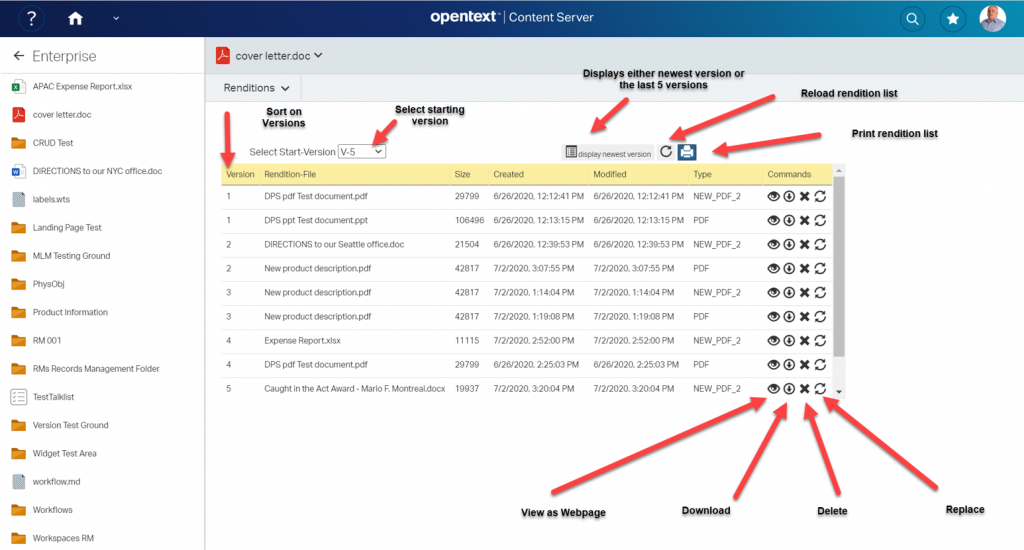
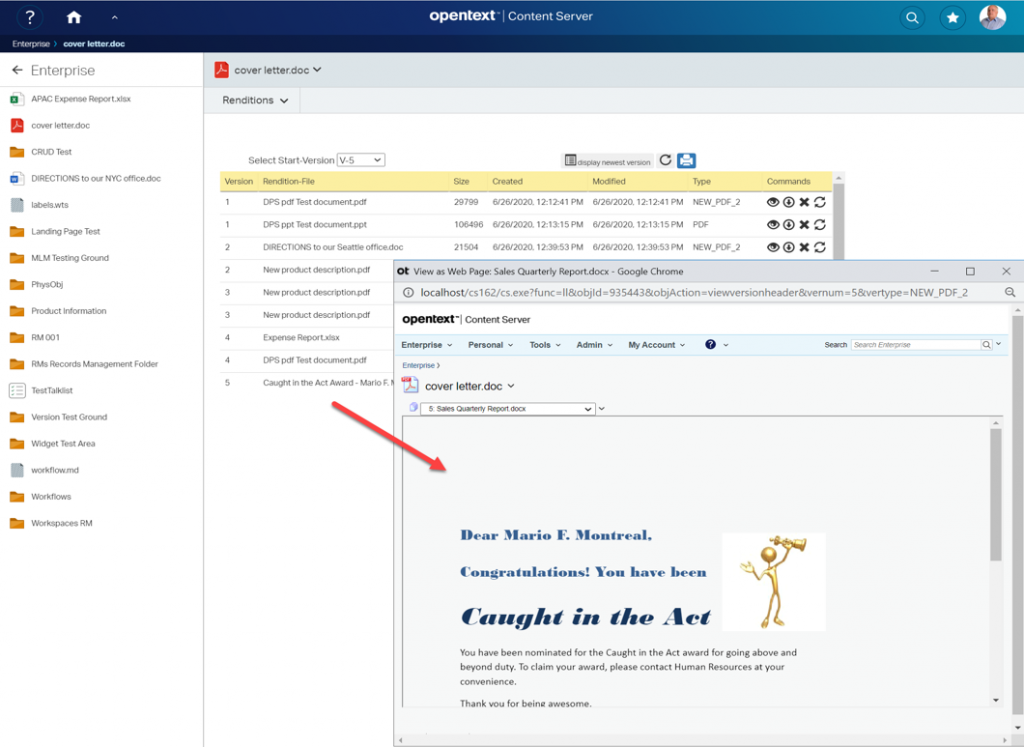
can be used to start the webreport and to display some End-Messages. A standard situation is displayed here

A webreport has finished and the End-Messages are displayed

For example, if a html file is defined as output under the folder “webreports”, then this infos can be displayed at the status screen.

The js code is easy

A smartUI goodie for webreport fans in JS: status.screen

Both controls can be combined to a widget to start and execute webreports.

If you need some more sophisticated, its easy to override those controls with custom controls.

That were the smartUI Goodies for Webreport Fans.

Happy playing with webreports, but dont forget: Webreports will make a machine not faster!

OS-Package in OScript

Oscript OS Package

The famous OS package in OScript is very important for the internal functionalities of the Content Server Modules, but its hardly documented. This post is an overview of the methods in this package.

A closer look

All of these methods van be used by adressing tzhe methods with the package name (OS) in any oscript program. For example OS.Features(Object) lists all features of the object in the argument.

Disclaimer: This list is not complete and may change any time and any Content Server Version, as long as there is no official documentation of this package. And there is (of course) no guarantee on this list by me.

Methods

CreateOSpace(sPath)ObjectCreates a new OSpace
New(oParent)ObjectCreates a new OSpace object
Delete(Object)Deletes an OSpace object
NewTemp(MasterObject)Creates a new instance of an OSpace object
IsTemp(Object)IntegerWas the object created using newTemp. Result 0,1.
Root(MasterObject)ObjectReturns the module root object
Roots()ArrayReturns all loaded root objects
Orphans(Object)ArrayReturns all orphans in the objects ospace
Children(Object)ArrayGets children objects from the object
Patent(Object)ObjectGets the parent object
Name(Object), FileName(Object)StringReturns the name of the object/ospace of the object
ReadOnly(Object)BooleanIndicates, if the current ospace is locked
Features(Object)ListLists all features in the current object
IsFeature(Object, sFeatureName)BooleanReturns, if the Feature sFeatureName exists in Object
AddFeature(Object, sFeatureName, [optional] CopyableBoolean)Add a new feature to the object
DeleteFeature(Object, sFeatureName)Removes the feature sFeatureName from the object
ClearValue(Object, sName)Clears the content of the feature nName
IsObject(objRef)BooleanChecks, if the object still exists

Happy OSpace Changing

New in 21.1: The new CAPI.ExecN Oscript command

New OScript for 21.1

There is a new CAPI.ExecN command special for Postgres operations.

Oscript, the final frontier. We write the year 2021 and the OScript universe is going to expand. The newest member is CAPI.ExecN.

CAPI.ExecN

Bulk Postgres operations are slow. There is a new implementation of CAPI.ExecN, which fixes this. But there is no free beer in the universe. This new implementation exposes Postgres SQL weaknesses (throws SQL errors).

As for 21.1, this is an experimental feature. IN 21.2, it will be activated by default.

For all the explorers in the world, this feature has to be actiated manually in 21.1.

Activate experimental feature

Java<->OScript Data Types

This is the thirth article on calling Java from OScript. If you want to refer the first two articles on how to call Java from Oscript, please take a look at the first article and the second article here.

The equivalent data types in java and oscript are:

a. Java to OScript

JavaOScript
booleanBoolean
byte
char, Character
short, Short
int, Integer
Integer
float, Float
double, Double
Real
long, LongLong
java.util.ListList
java.util.MapAssoc
com.opentext.util.RecArrayRecArray
com.opentext.util.RecordRecord
StringString
nullUndefined
Java -> Oscript

b. OScript to Java

OScriptJava
Assocjava.util.Map
Booleanboolean, Boolean
Integershort, Short
int, Integer
long, Long
JavaObjectPassed as wrapped value
Listjava.util.List
Longlong, Long
Object or Framecom.opentext.livelink.oml.OScriptObject
Realfloat, Float
double, Double
Recordcom.opentext.util.Record
RecArraycom.opentext.util.RecArray
StringString
Undefinednull
OScript->Java

Happy Java Programming in the Content Server!

Add a permanent Footer/Header etc to smartUI

Permanent Footer

Disclaimer: This requires a modification of app.html. Doing that will put you in the club of villains who intentionally change internal weblingo files.

OK, you’ve been warned.

Just kidding.

Permanent modifications

Lets take a look on the result. Maybe you need such a thing to comply with federal rules, to setup any “Impressum” or any links with GPDR of other infos. Then this example is for you:

A permant footer on the landing page
A permanent footer
A permanent footer on the nodelist widget
A permanent footer in the nodelist

This is not a thing you can do with perspectives. So the easiest way is to change the app.html which starts smartUI. This time, a serious disclaimer:

As always, the app.html can be changed by patches or with new versions of Content Server without a notice. You should test these things after applying patches/new versions to check, if the modifications are still inside this html file.

But this is normal. At least on 20.4 this is running.

So how to do this?

Lets take a look on app.html (hier its named app-demo.html, I can switch between footer version and normal version by simply copying the appropriate html files).

First half is quite standard. The page adds the theme stylesheet and, if the CSS-Override is switched on, loads the custom stylesheet at last.

Then the Oscript based configuration of dynamic JS module parameters is loaded and the csui modules on the client side are configurated with that parameters by sending JSON arrays to csui.config.

Then all bundles are required for csui.

As mentioned, straitforward and not very complex.

The first half of app.html

The second part is simply an empty body. csui is using JQuery to add the perspective contents in the main body.

So you can simply add permanent things in that main body.

Csui will append the content after your content.

The second half of the app.html

The content to make the red footer (see above) is

<body>
<div id="custhdr"
   style="position: fixed;
   left: 0;  bottom: 0;  width: 100%;  z-index:10;  
   background-color: darkred;  color: white;  
   text-align: center;font-size:15px; font-weight:bold">
       <p id="borderimg1" style="border: 10px solid transparent;   padding: 15px;  border-image:          url(img/border.png) 30 stretch;">
        Standard html links like <a href="www.spiegel.de">Spiegel Magazine</a>  or 
        normal content server legacy gui links like 
<a href="http://localhost/cs162/cs.exe?func=ll&objId=2000&objAction=properties&nexturl=%2Fcs162%2Fcs%2Eexe%3Ffunc%3Dllworkspace" target="_blank" >Enterprise Workspace</a> of custom widgets can be used
</p>

</div>
</body>

First, lets define a div with our custom extension. The positioning is done via an internal style and serves as an example. The position can be set to any direction, I put it down as footer.

Then inside a p element is the content. First, to make things more nicely, a border image is put around the p element. Then standard text, standard html links or links to the content server content can be used as content.

You can even add a widget here, but this follows no perspective conventions. It will be fixed on the screen.

The smartUI will follow later after the closing </div>.

Nice, isn’t it?

smartUI in practice: SMART TOOLS(4) –Direct Access of Renditions – Technical

smart tools
Cell Renderer

Overview

Last week, we discussed a possible implementation of the direct access to renditions. This icon is drawn an a document, which das renditions at the newest version. Clicking on that icon opens a panel which lets the user select one of the renditions to download or delete.

Direct Access Rendition

Selecting one of the renditions will download this rendition or (if permissions allow it)( delete the rendition.

Technical

The whole thing is based on a cell renderer. This relies on the extension point node.state.icons which is (as always) declared in the extensions.json file:

"csui/controls/table/cells/node.state/node.state.icons": {
"extensions": {
    "csuia": [
       "csuia/cells/node.state/node.rendition/node.state.icons"
             ]
      }
},

This declaration points direct to the appropriate node.state.icons

define(['csuia/cells/node.state/node.rendition/rendition.view'
],
function (RenditionView) {
'use strict';
return [ { sequence: 60, iconView: RenditionView } ]; });

This basically declares the required view named “rendition.view.js” as responsible to draw the icon at sequence position 60.

This is the template used for the view.

Cell renderer Template

The image is drawn cia the css seen above.

Encapsulating this inside a link allows to make the svg clickable.

Enable the direct access

The first point is the decision, if the cell renderer is to be drawn or not. This is a static method at the view, returning true or false. We dont have ony clue if the nodeid does have a rendition at the newest version, so we have to implement a new REST command at the server to get the information. The REST must be called synchronously.

the static enable function

This is done via a simple XMLHTTPRequest. If the result is true, we return true and store the number of each rendition types at the node in the prototype for further processing.

Then lets take a look on the events:

events

This means, a click on the class of our link in the template will call onOpenView. Before we look at that, look at this in the templateHelpers:

Open the Panel after the click

Remember, we got the number of each rendition types from the server? We want tzo display these numbers as a tooltip over the icon, so this is the way to formet the output string. A note to the knights of the holy JS-grail: Referencing this.__proto__ instead of finding the prototype via object maybe depreciated, but at least its also in ECMA 6! So nowadays its a valid method.

When we click on the icon, we want to open a DialogView from the sdk toolkit with an embedded view (SelectView) in the method onOpenView:

OpenDialog

Before we open this view, we call the server to get the renditionlist of this node via XMLHTTPRequest. If we get the list (status=200) we intiantiate the view (selview1) and display the DialogView containing the instantiated view at the bin_modal default EL anchor.

Then lets show this region and store a event handler (string “submit”), which is listening on the view selview1 for that string. If it receives that string, the DialogView is closed.

Next week, we’ll examine the SelectView.

Missed something in the Posts? Here are the parts already posted:

smartUI in practice: SMART TOOLS(3) – Renditions

smart UI in practice: SMART TOOLS(2) – Multilingual Metadata

smart UI in practice: SMART TOOLS(1) – the beginning

smartUI in practice: SMART TOOLS(3) – Renditions

smart tools

In SMART TOOLS renditions are also build in the properties manager of smartUI. Renditions can be displayed by selecting renditions on the pull down menu, just like Multilingual Metatata in my last post.

The main menu

Rendition Main Panel

Next, the main panel of renditions is displayed. The renditions of the newest version or the latest 5 versions will be displayed.. A Rendition can be downloaded, deleted, replaced or (if configured) with “View as Webpage” be seen.

Rendition Commands

If there are a lot of versions, a starting version can be selected. Then this version and the last 5 versions with all renditions will be displayed.

Ascending or descending sorts on versions can be done by clicking on Versions.

Interesting is the “View as Wewbpage” function. This is a build in function in the Content Server, so it can also be used to see the contents of any renditions in the classic UI and in a separate window.

view as webpage display

A rendition can also be downloadeed by clicking on the down.arrow icon. This will normally download the file as setup by the users browser. If the rendition is a PDF and print.js (a standard extension in browsers) is activated, the the pdf can also be displayed directly.

A list of renditions can also be printed. This is a nice addition to help you to get an overview.

Rendition list

Direct Access Renditions

For a direct access to renditions, I also added a cell renderer to be displayed, if the newest version of the document has a rendition.

This is a little svg icon displayed directly in the list of documents.

Cell Renderer

The little icon can be clicked and then a list of renditions belopnging to this document is displayed.

Direct Access Rendition

From this panel, a rendition can be selected and downloaded. If the user has proper permissions, he can also delete the rendition selected. Also a printed list (see above) can be made at this point.

Sorting in ascending/descending versions can be done by clicking on the Arrow in the “Vers” columnn.

Because this direct access requires a lot of calls to the server, this feature can be switched off at the Admin Pages of smartUI.

Add Rendition Command

Additionally, there is also one command required, the “Add Rendition” command. The “Make Rendition” command is not implemented, because this requires local admin rights, something which should be rare.

This command can be issued at any document directly from the list of documents

Addrendition command

Commands are usually displayed in two locations, the Headertoolbar (above) and the Toolbar (below)

Command in Toolbar

Adding a rendition means, selecting one of system defined rendition types and a file beeing intended as the rendition. If the selected rendition type does not exist on that document, then the file is uploaded and used as a rendition.

Add Renditions - Panel

Next week, we dive more in the direct access of renditions and the Pros and Cons of that technique.

Missed something in the Posts? Here are the parts already posted:

smart UI in practice: SMART TOOLS(2) – Multilingual Metadata

smart UI in practice: SMART TOOLS(1) – the beginning

smart UI in practice: SMART TOOLS(1) – the beginning

smart tools

Using OpenText Content Server as as developer, you have to face it sooner or later: Write an application in smartUI. This will give you a lot of experience for smartUI projects, especially on the Cost/Times/Materials base.

I did chose to build a product called SMART TOOLS with Renditions and Multilingual Metadata Support. Product means, it can be sold by other OT partners as well.

This is a multipart post. Today we talk about the basics of the application running in Content Server 20.2. Additional posts will explain the usage and some technical aspects

Features

SMART TOOLS includes these features:

  • Adds support for Multilingual Metadata to smartUI
    • Automatic Translations for the multilingual data using Microsoft Azure REST service (as nobody speaks all languages on this planet)
    • Add print lists (to get a list of the data entered for editing)
    • Add/edit mlm data directly
    • Integrated in the standard nodelist widget using the property manager
  • Adds support for Renditions
    • List all Versions and Renditions
    • Use “view as webpage” as a base viewer
    • Download renditions
    • Delete renditions
    • Replace renditions
    • Add Renditon as command
    • A cell icon marks all documents in the document list having renditions at the newest version. Clicking on the icon will open a window to show all renditions. Download or delete a rendition.
  • Adds configuration support for the javascript client software from the Admin pages. Critical things like MS Rest API key can be protected by sending this things at the page creation time to the client.

The SMART Tools are build for Content Server 20.2. A a considerable amount of new REST services also to be implemented in the Content Server.

The Integration

Integration is simply direct in the nodelist widget using the property manager.

Open the property manager

By clicking in the first icon in the list, the property manager opens.

Renditions and Multilingual Metadata

The panels adressed by this menu are the multilingual metadata panel (with the two fields Name and Description) and the rendition panel. Here you see the mlm panel with the autotranslate Icon (the globe at the right).

mlm main panel

This is the rendition panel which shows all renditions attached to all versions.

Renditions main panel

Language support

The SMART TOOLS support a couple of UI languages like

  • English
  • German
  • French
  • Spanish
  • Italian

This is one example on the multilingual metadata dialog using German, French and English.

The nls feature of smartUI is nice, isn’t it? I even tried it (experimental) for Arabic, and it worked!

Lets go more in detail in the next posts, as this here is intended to be a simple overview.

Next week I will describe the multilingual metadata support of smartUI

The Connection Object in smartUI

Setup of the Connection Object

smartUI does have a couple of interesting objects, but the actual documentation about them is not very clear. So lets take a look on the objects.

First, we’ll examine the connection object a little bit more in detail. The page context will follow in another post.

The connection object provides information about the content server to connect with. Normally, this object comes from the content server but has to be constructed manually when you use the index.html testing facility.

Lets take a look at a typical index.html with the connection object setup

Setup of the connection object

Remember, the widget will get everything beeing perfectly setup from the content server, but using the test faciliy, you have to mock up this.

Parameters:

  • url – the url which is the content server url in your mockup data
  • supportPath – where is your content server support directory
  • credentials – in case you want to log in, use this clause
  • session- when you want to ignore the ticketing etc, use ticket:”dummy”

Lets see what this object is doing:

(here the page is running and this is a screenshot from the debugger)

A debugging session with the connection object

We see, there is a connector object beeing the parent for the connection object. The connection object contains all parameter setups from the index.html, mainly the url and the session infos.

There is also an Authenticator in this connector object, which contains another copy of this connection object but also with the information, how the automatic re-login for a valid session ticked should be done. And of course, the type of Authenticator (here InteractiveCredentialsAuthenticator)

(Remember: The security token timeout will cancel your session (within typically 300 sec) if you do not a relogin).

This is the mechanism to avoid permanent logins. Take a look at the available authenticators to see the possibilities.

You can always refer the Connection Object to get the url of the server. This url os merged with the parameters in the Model URL function to build the final REST call.

A useful object. Normally we get it automatically from the server, only while testing with Mock-Up Data we need to setup this object manually.

Config Settings send to a smartUI Module

There are several possibilities to set the configs from the base OScript Module. The most interesting is the method of setting the configs via Oscript. The complete list of the possibilities is_

  • When you visit a mode or get a children
    • Implement “fields” and/or “expand” in the appropriate CSNode.
    • Use the date from data.(fields.name)
  • When the Widget is created
    • Implement an REST service which will give you the data
    • Load the data on the first widget creation and cache it with a permanent model factory in the context
  • When the page is loaded
    • The CSUI::Extension::GetDynamicConfiguration method in OScript has normally this entry
function Assoc GetDynamicConfiguration( Object prgCtx, Record request )      
return Undefined
  end

Overwrite it with your desired configuration (here only the enableAppleSupport is displayed for clarity):

 function Assoc GetDynamicConfiguration(

        Object      prgCtx,

        Record      request )      
Assoc       basicAppData
Assoc       config 
(snip)

        Boolean     enableAppleSupport

    (snip)

        // changes in admin page should be reflected immediately by every thread

        settings = $WebAdmin.AdminUtils.GetSmartUISettings( prgCtx )
     (snip)
    if ( IsFeature( settings, "enableAppleSupport" ) && IsDefined( settings.enableAppleSupport ) )

        enableAppleSupport = settings.enableAppleSupport

    end


    config = Assoc{ 
    (snip)
     "csui/utils/commands/email.link": Assoc{ "enableAppleSupport": enableAppleSupport },
                  

    return config

end 

The returned assoc consists of a requirejs module name containing an assoc with the config values.

In your js module (here csui/utils/commands/email.link) add this line

var config = _.extend({
rewriteApplicationURL: false,
enableAppleSupport: false,
appleNodeLinkBase: 'x-otm-as-cs16://?launchUrl=nodes/'
}, module.config());

Then the config is avaliable in your js module and can be used like

var iOSEnabled = config.enableAppleSupport

Nice, isn’t it?